background image

53

Operating from a Computer (EH-R4000 Only)

Ad

v

a

nced Funct

ions

Using the Mail Notification Function to Report Problems

By setting the Mail Notification function from the projector's Configuration Menu, notification
messages will be sent to the preset email addresses when a problem or warning occurs with a
projector. This will enable the operator to be notified of problems with projectors even at locations
away from the projectors. 

p.30

Up to a maximum of three notification destinations (Addresses) can be recorded, 
and notification messages can be sent to all three destinations at once.

If a projector develops a critical problem and suddenly stops working, it may not be 
able to send a message notifying an operator of the problem.

Monitoring is possible if "Communication On" is set from the "Settings" menu of the 
projector's Configuration Menu, even if the projector is in "Standby Mode".

TIP

Содержание dreamio EH-R2000

Страница 1: ......

Страница 2: ...ing the guide General information Meaning of unit and projector When unit or projector appears in the text of this User s Guide they may refer to items which are accessories or optional equipment in addition to the main projector unit itself This symbol indicates information that if ignored could possibly result in death or personal injury due to incorrect handling This symbol indicates informatio...

Страница 3: ...lease contact the place of purchase Projector with lens cover Remote control Power cable 3 0m Connect to the projector and to a wall outlet AA size alkali batteries 2 pcs Insert into the remote control HDMI cable clamps 2 pcs Secure the HDMI cable Document CD ROM Safety Instructions Support and Service Guide User s Guide Quick Start Guide Documentation ...

Страница 4: ...justment 16 Projection size adjustment Zoom adjustment 16 Projection image position adjustment Lens shift 16 Adjusting the tilt of the projector 17 Displaying a test pattern 17 Image Quality Adjustments Basic Image Quality Adjustments 18 Selecting the color mode 18 Selecting the aspect 19 Advanced Color Adjustments 21 Hue saturation and brightness adjustment 21 Gamma adjustment 22 RGB adjustment O...

Страница 5: ...g 54 Reading the indicators 54 When the warning indicator is lit or flashing 54 Indicator statuses in normal operation 55 When the indicators provide no help 56 Problems relating to images 57 Problems when projection starts 61 Problems with the remote control 62 Other problems 62 Network problems EH R4000 only 62 HDMI link problems 63 Reading Problem Mail Notification Function 64 Appendix l Mainte...

Страница 6: ...sired color mode from the following five preset modes p 18 Color Mode Cinema Dynamic Living Room Natural The lens shift function allows you to adjust the projection position in horizontal and vertical directions giving a much greater degree of freedom on installation The zoom focus and lens shift functions can be operated using the remote control and once completed the projection position can be l...

Страница 7: ...ation function compares each two successive images of a movie and generates intermediate images so that you can enjoy viewing smooth attractive moving images without the sense of image lag and blurriness of motion Frame interpolation Some of the other many functions are available as follows HDMI link allows you to use the remote control to turn on the power for the projector and connected HDMI CEC...

Страница 8: ... place anything that can become warped or damaged by heat near the exhaust vents Do not bring your hands or face close to the vents while projection is in progress Front adjustable feet p 17 Extend to adjust the projection angle so that the projector is horizontal when placed on a desk top Remote control light receiving area p 13 Receives signals from the remote control Projection lens Projects im...

Страница 9: ...remote control signals Illumination button Illuminates all of the buttons on the remote control for 15 seconds so that they can be seen in dark places Power buttons p 14 15 Turns the projector power on off Enter button p 18 26 30 While viewing a menu press this button to select the menu item and proceed to the next display Blank button Turns off and on the projected images temporarily When pressed...

Страница 10: ...turned on It is used to transmit the power status on off or the aspect ratio Anamorphic Wide Horiz Squeeze of this projector to external equipment such as a motorized screen PC input port p 12 Connects to the RGB out port of the computer Compatible with HDCP Video input port p 12 Connects to the Composite Video output port of the video equipment S Video input port p 12 Connects to the S Video out ...

Страница 11: ...9 Appearance Center of lens Distance from center of lens to suspension bracket fixing point Units mm Center of lens ...

Страница 12: ...d to position the image and the feature is especially useful under the following conditions p 16 A B 90 Screen size Center of lens Screen Set up so that the projector is parallel to the screen If the projector is set up at an angle to the screen distortion of the images will occur Screen Projection distance This is the distance from the center of the lens to the bottom of the projection images A W...

Страница 13: ... adhesives to the mount to prevent the screws from loosening or if you use lubricants or oils on the projector the projector housing may crack and the projector may fall from its ceiling mount This could cause serious injury to anyone under the mount and could damage the projector When installing or adjusting a ceiling mount do not use adhesives to prevent the screws from loosening and do not use ...

Страница 14: ...he video equipment which is being connected Some video equipment can output several different types of signal Refer to the documentation provided with the video equipment for details on what types of signal the video equipment can output HDMI Video equipment VHS VCR DVD player game console etc Use a HDMI cable that conforms to the HDMI specifications Port names may vary depending on the equipment ...

Страница 15: ...batteries ready You cannot use other batteries except for the AA size manganese or alkaline At the time of purchase the batteries are not inserted into the remote control Insert the supplied batteries before using the remote control Insert the batteries in the correct direction Close the cover Check the and indications inside the battery compartment and insert the batteries so that they face corre...

Страница 16: ...ic adjustment function that automatically optimizes it when a computer input signal is switched By setting Standby Mode to On you can turn the projector on and off from a web browser on a networked computer EH R4000 p 42 If a laptop computer or a computer with a LCD screen has been connected to the projector you may need to use keyboard or function settings to change the output destination While h...

Страница 17: ...itched when no operations are performed about three seconds with placing pointer at the target input source You can also press F to switch to the target source Turn the power off for the signal sources that are connected to the projector Press M on the remote control or A on the projector s control panel Attach the lens cover Once the cool down period approximately 16 seconds has ended and the ope...

Страница 18: ...r position for lens shift Range that the picture can be shifted from the standard projection position If the projector cannot be set up directly in front of the screen use the lens shift function to adjust the position of the projected images The position can be adjusted within the range shown in the figure at right If you want to return the lens to the center position hold down w y z x until the ...

Страница 19: ...from the projector that is placed on a flat surface is tilting horizontally use the front feet to correct the tilt You can use a test pattern to make the first setup such as zoom focus and image position using the lens shift without connecting to any electrical equipment When you press t on the remote control the test pattern menu will be displayed The display position and the R red G green and B ...

Страница 20: ...t you start in this mode when making color adjustments Dynamic Living Room Natural For viewing movies or films of concerts You can select from either of the signals being input to the HDMI1 and HDMI2 terminals Colors of images recorded in x v Color format can be produced accurately Cinema When you select any of the modes the Epson cinema filter is automatically applied to achieve high fidelity col...

Страница 21: ...ng on the author s right that is protected by copyright law Press s and select the aspect mode from the menu Depending on the input signal you may not be able to select the aspect ratio When projecting using Auto For 4 3 input signals Normal For input images recorded in squeeze mode Full For letterbox input signals Zoom This is not available for when image signals are being input from a computer a...

Страница 22: ...to adjust p 40 Images with standard aspect ratio 4 3 Input signals will be projected at the same height as the projector s panel resolution At this time the image enlargement ratio will be smaller near the middle of the images but become larger towards the left and right edges of the images This is useful for when 4 3 images are projected onto a wide screen Because there is almost no distortion du...

Страница 23: ... Hue saturation and brightness adjustment The hue saturation and brightness for each of the R red G green B blue C cyan M magenta and Y yellow color components can be adjusted Adjustment is not possible when Color Mode is set to x v Color Adjusts the tone of the entire image to bluish greenish and reddish Adjusts the overall vividness of the images Hue Saturation Adjusts the brightness of the over...

Страница 24: ...tween equipment may result in a slight variation in the coloring when images are projected and you may want to adjust this Projection will stop temporarily during such adjustment There are two methods of doing so One is to select one of the gamma correction values 2 0 2 1 2 2 2 3 2 4 The other is customized adjustment which is done with reference to the projected image or a gamma graph The gamma g...

Страница 25: ...e If you change it to the left side the whole image will become sharper but the contrast in dark areas will become poorer If you would like bright areas to appear more clearly change the setting to the left side If you change it to the right side you will feel that the image is becoming brighter and closer to white but the contrast in light areas will become poorer Offset Gain Selecting the color ...

Страница 26: ...the direction hair and the detailed areas of clothing will be emphasized If Thick Line Enhancement is set in the direction the areas emphasized by Thin Line Enhancement will be hardly emphasized Instead the rough areas of the entire subject such as contour and background will be emphasized resulting in a sharp image Setting Horiz Line Enhancement Vert Line Enhancement to the side will enhance the ...

Страница 27: ...rger the number the stronger the effect For some images interference at the edges may become visually enhanced This cannot be adjusted during input of computer image signals Lens Iris This adjusts the brightness by controlling the amount of light inside the projection lens Unlike the Auto Iris function that automatically adjusts light intensity according to the images you can manually change the a...

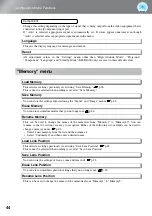
Страница 28: ... may not be possible to set some items p 30 All items Image Menu Progressive Frame Interpolation Super resolution All items in Advanced Signal Menu Adjust each of the settings to the values to be saved Press m and select Save Memory The Save Memory screen is displayed Select the memory name to register the adjustments to from Memory1 to 10 and press v or F When preceding the memory name is green t...

Страница 29: ...can be changed You can rename memories so that its settings are easy to recognize Press m and then select Rename Memory The Rename Memory screen is displayed Rename Memory Select the memory name to be changed and then press v or F The name selection screen is displayed To select a memory name from the displayed preset names select the desired name and then press v or F and go to step 5 If you woul...

Страница 30: ...Memory Save Lens Position The Save Lens Position screen will be displayed Select Memory1 Memory2 or Memory3 and then confirm the selection The current settings are stored in the selected memory If you select the memory in which you have already stored settings a confirmation message will be displayed If you select Yes the previous settings will be overwritten with the current settings Save Lens Po...

Страница 31: ...tings The names of stored settings can be changed Press k and select Memory Rename Lens Position The Rename Lens Position screen will be displayed Select the lens position to be renamed and then press v or F The keyboard screen will be displayed Use w y z x or K to select the desired key and then press v or F Once you have entered the name select Finish and then press v or F The selected or entere...

Страница 32: ...ntrol panel All items in the configuration menu can be checked while the settings are being made For details on the operation method refer to Using the configuration menus in the next section Using the configuration menus Displaying a menu Selecting a menu item Use w or y to select a menu item then press v The Configuration menu can be used to change the color pattern and display position of the m...

Страница 33: ... values Use w or y to select an item then press v For items such as Brightness which can be adjusted using an adjustment bar the adjustment values can be reset to the default if you press j while the adjustment bar is being displayed If u on the remote control is pressed while a menu is being displayed the menu screen disappears This is useful for checking your adjustment result on the images If y...

Страница 34: ...wer Consumption p 39 Lens Iris p 39 Standard Thin Line Enhancement Thick Line Enhancement Horiz Line Enhancement Vert Line Enhancement 2 0 2 1 2 2 2 3 2 4 Customized Adjust it from the image Adjust it from the graph R Hue Saturation Brightness G Hue Saturation Brightness B Hue Saturation Brightness C Hue Saturation Brightness M Hue Saturation Brightness Y Hue Saturation Brightness Reset Offset R G...

Страница 35: ...up Screen Color 1 Color 2 Black Blue Logo Standby Confirmation Auto NTSC NTSC4 43 PAL M PAL N PAL PAL60 SECAM Yes No Auto YCbCr YPbPr Load Memory p 44 Save Memory p 44 Erase Memory p 44 Memory1 to Memory10 Rename Memory p 44 Load Lens Position p 44 Save Lens Position p 44 Erase Lens Position p 44 Rename Lens Position p 44 On Off Off 5min 10min 30min Off Power Anamorphic Wide Front Front Ceiling Re...

Страница 36: ... Number The Info menu is only used to display the projector status Reset All p 47 Reset Memory p 47 Reset Lamp Hours p 47 Reset Lens Position p 47 Only displayed for composite video S Video input Only displayed for component video Computer image input This value is sometimes referred to when inquiries are made The message text will be displayed in yellow when it is time to replace the lamp Time fr...

Страница 37: ...38 Power Consumption p 39 Lens Iris p 39 Standard Thin Line Enhancement Thick Line Enhancement Horiz Line Enhancement Vert Line Enhancement 2 0 2 1 2 2 2 3 2 4 Customized Adjust it from the image Adjust it from the graph R Hue Saturation Brightness G Hue Saturation Brightness B Hue Saturation Brightness C Hue Saturation Brightness M Hue Saturation Brightness Y Hue Saturation Brightness Reset Offse...

Страница 38: ...y1 to Memory3 Memory1 to Memory3 Memory1 to Memory3 Memory1 to Memory3 Settings Memory Component Operation p 42 Input Signal p 43 Reset p 44 Video Signal Direct Power On Sleep Mode Trigger Out 1 High Altitude Mode Illumination Display p 43 Menu Position Top left Top center Top right Center left Center Center right Bottom left Bottom center Bottom right Menu Color Messages Display Background Startu...

Страница 39: ... is sometimes referred to when inquiries are made Lamp Hours Source Input Signal Resolution Refresh Rate Video Signal Deep Color Status Display the color depth of HDMI transmission Serial Number The Info menu is only used to display the projector status Reset All p 47 Reset Memory p 47 Reset Lamp Hours p 47 Reset Lens Position p 47 Only displayed for composite video S Video input Only displayed fo...

Страница 40: ...al x v Color This adjusts the overall tints of the images If you select a higher value images appear bluish and if you select a lower value images appear reddish The absolute color temperature can be set to one of 12 settings within the range of 5000K to 10000K Adjustment is not possible when Color Mode is set to the following EH R4000 Natural x v Color This adjusts the skin tones of people who ap...

Страница 41: ...response to changes in brightness of images can be set to either Normal or High Speed depending on your preference If set to Off no light intensity control is performed p 24 This adjusts the brightness by controlling the amount of light inside the projection lens p 25 This returns all settings in the Image menu to their default settings Selects the aspect mode p 18 This can be set only when Aspect...

Страница 42: ...he film images Auto Optimum conversion is performed for movie computer graphics and animation input signals The current and previous frames are compared and the frame in the middle of them is interpolated to reduce fuzziness and to produce clearer moving images The degree of interpolation can be set to Low Normal or High as desired Set to Off if noise occurs at the Low Normal or High setting This ...

Страница 43: ...ses try to adjust the display position Position p 40 Auto Displayed when the signals from HDMI1 HDMI2 input port are being input This is automatically set to Off or 8 depending on the input signal If the DVI port of the connected equipment is connected to the HDMI1 HDMI2 input port Auto will not be displayed Setting is possible only when EPSON Super White is Off Setting is not possible however whe...

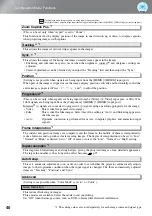
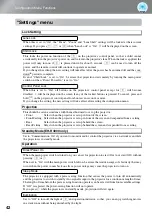
Страница 44: ...ect when the projector is set up in front of the screen Front Ceiling Select when the projector is set up in front of the screen and suspended from a ceiling Rear Select when the projector is set up behind the screen Rear Ceiling Select when the projector is set up behind the screen and suspended from a ceiling Set to Communication On if you want to monitor and or control the projector via a netwo...

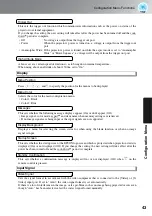
Страница 45: ...n t appear Off Image signal color mode aspect and item name when memory settings are retrieved If no image signals are being input or the input signals are not supported Displays a menu for selecting the screen status for when using the blank function or when no image signal is input This sets whether the startup screen the EPSON logo screen which is projected when projection starts is displayed O...

Страница 46: ...adjusted using the Signal and Image menus p 26 You can erase stored memories that you no longer use p 26 This can be used to change the names of the memories from Memory1 to Memory10 You can rename so that its settings are easy to recognize Either of the following two methods can be used to change a memory name p 26 Select a new memory from the list and then rename it Select Customized and then en...

Страница 47: ...trolling the projector using Web Control You can enter up to eight single byte alphanumeric characters Web Control is a computer function that allows you to set up and control the projector by using the Web browser on a computer connected on a Network Set whether or not On Off to use DHCP If this is set to On you cannot set any more addresses You can input the IP Address assigned to the projector ...

Страница 48: ...ut the Port Number for the SMTP Server The default value is 25 You can input numbers between 1 to 65535 Input the Email Address and the contents of the Mail to receive notification when an abnormality or warning occurs in the projector You can enter up to 32 single byte alphanumeric characters for the e mail addresses You can select multiple problems or warnings to be notified about by Mail You ca...

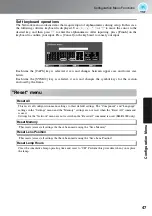
Страница 49: ...h time the SYM1 2 key is selected it sets and changes the symbol keys for the section enclosed by the frame Reset menu This resets all configuration menu settings to their default settings The Component and Language settings in the Settings menu and the Memory settings are not reset when the Reset All command is used Settings for the Network menu are not reset when the Reset All command is used EH...

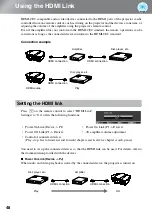
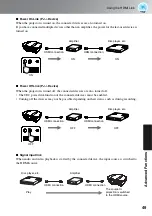
Страница 50: ...te control to select HDMI Link Setting it to On offers the following functions You need to set up the connected devices so that the HDMI link can be used For details refer to the documentation provided with the devices Power On Link Device PJ When audio and video playback is started by the connected device the projector is turned on Power On Link Device PJ Power On Link PJ Device Power Off Link PJ...

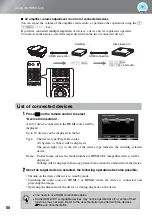
Страница 51: ...The CEC power link function of the connected devices must be enabled Turning off the devices may not be possible depending on their status such as during recording Signal input link When audio and video playback is started by the connected device the input source is switched to the HDMI source ON ON Amplifier HDMI connection HDMI connection Disc player etc ON OFF OFF Amplifier HDMI connection HDMI...

Страница 52: ...ight to the left of the device type indicates the currently selected device Name Product name such as the model number of HDMI CEC compatible devices will be displayed Nothing will be displayed when any product name cannot be obtained from the device Once the target device is selected the following operations become possible Turning on the device when it is in standby mode Switching the input sour...

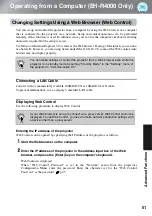
Страница 53: ...gory 5 shielded LAN cable Displaying Web Control Use the following procedure to display Web Control Entering the IP address of the projector Web Control can be opened by specifying the IP address of the projector as follows Start the Web browser on the computer Enter the IP address of the projector in the address input box of the Web browser and press the Enter key on the computer s keyboard Web C...

Страница 54: ... menu that cannot be set by the Web browser All items in the Configuration Menu can be set with the exception of the following items The items available on each menu are the same as the Configuration Menu of the projector p 30 Signal Zoom Size Signal Zoom Caption Pos Settings Operation High Altitude Mode Settings Display Menu Position Settings Display Menu Color Settings Display Standby Confirmati...

Страница 55: ...tor to be notified of problems with projectors even at locations away from the projectors p 30 Up to a maximum of three notification destinations Addresses can be recorded and notification messages can be sent to all three destinations at once If a projector develops a critical problem and suddenly stops working it may not be able to send a message notifying an operator of the problem Monitoring i...

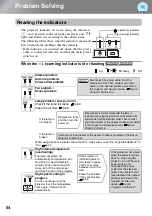
Страница 56: ...ector but if the temperature rises again it will switch off automatically operation indicator warning indicator warning problem Red Red Disconnect the power cable from the electrical outlet Then contact your local dealer or the nearest address provided in the Support and Service Guide Epson Projector Contact List Red Red Replace the lamp and then turn the power on If the problem is still not solve...

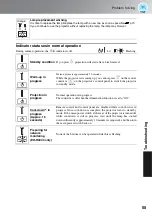
Страница 57: ... control or A on the projector s control panel to switch the projector to standby mode Projection in progress Normal operation is in progress The indicator is off when the illumination function is set to Off Cool down in progress Approx 16 seconds Remote control and control panel are disabled while cool down is in progress Once cool down is complete the projector turns to stand by mode If the main...

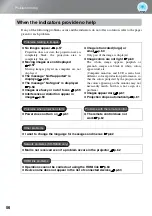
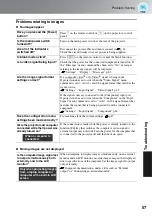
Страница 58: ...t right p 60 The whole image appears purplish or greenish images are black white colors appear dull etc Computer monitors and LCD screens have different color reproduction performance so that the colors projected by the projector and the colors appearing on the monitor may not necessarily match but this is not a sign of a problem Images appear dark p 61 Projection stops automatically p 61 Power do...

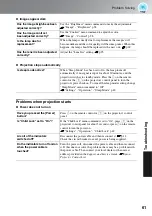
Страница 59: ...the signal source is connected to the Component input port If projection does not occur when the Component in the Input Signal menu command is set to Auto set the signal format that matches the signal that is being projected from the connected equipment Settings Input Signal Component p 44 Have the configuration menu settings been made correctly Try resetting all of the current settings p 47 Were ...

Страница 60: ...Supported Monitor Displays p 74 Are the cables connected correctly Check that all of the cables required for projection are securely connected p 12 Has the correct video input port been selected Press O P R Q S or T on the remote control or B on the projector s control panel to change the image source p 15 Is the power for the connected equipment turned on Turn the power on for the devices Are the...

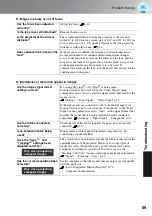
Страница 61: ... set to Auto select the signal format that matches the signal source Settings Input Signal Video Signal p 43 If the signal source is connected to the Component input port If projection does not occur when the Component in the Input Signal menu command is set to Auto set the signal format that matches the signal that is being projected from the connected equipment Settings Input Signal Component p ...

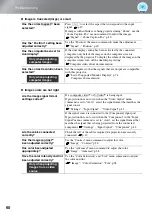
Страница 62: ...mage signal format settings correct If a composite video or S Video is being input If projection does not occur when the Video Signal menu command is set to Auto select the signal format that matches the signal source Settings Input Signal Video Signal p 43 If the signal source is connected to the Component input port If projection does not occur when the Component in the Input Signal menu command...

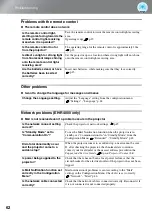
Страница 63: ...ndby mode Press the L on the remote control or the A on the projector s control panel to turn the projector s power back on To cancel the sleep mode setting change Sleep Mode menu command to Off Settings Operation Sleep Mode p 42 Have you pressed the Power button Press L on the remote control or A on the projector s control panel Is Child Lock set to On If the Child Lock menu command is set to On ...

Страница 64: ... the configuration menu Settings Language p 44 Is the network connect setting correct Check the projector s network settings p 45 Is Standby Mode set to Communication On To use the Mail Notification function when the projector is in standby set Communication On in Standby Mode from the Configuration Menu Extended Standby Mode p 42 Did a fatal abnormality occur and the projector come to a sudden st...

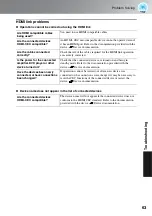
Страница 65: ...re securely corrected Is the power for the connected amplifier DVD player or other device turned on Check that the connected devices are turned on and being in standby mode Refer to the documentation provided with the devices Device documentation Have the devices been newly connected or have connections been changed If operations cannot be carried out after a new device was connected or the connec...

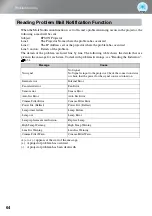
Страница 66: ...l with problems warnings see Reading the Indicators p 54 A or appears at the start of the message A projector problem has occurred A projector problem has been dealt with Message Cause No signal No Signal No Signal is input to the projector Check the connection status or check that the power for the signal source is turned on Internal error Internal Error Fan related error Fan Error Sensor error S...

Страница 67: ...m a ceiling Hold the tab of the air filter and remove the air filter Do not use sprays containing a flammable gas to remove dirt or dust which is adhering to parts such as the lens or filter of the projector Because the lamp inside the projector becomes very hot during use the gases may ignite and result in a fire If the air filter becomes clogged with dust it can result in overheating which may c...

Страница 68: ...d tap it again to shake off the dust Use a vacuum cleaner to remove any remaining dust from the surface of the air filter Install the air filter Install the air filter cover Do not hit the air filter hard otherwise it may become bent or broken and can no longer be used Be careful not to damage the tab of the air filter when shaking off the dust ...

Страница 69: ...ector case Then wipe the case again with a soft dry cloth Cleaning the lens To clean the lens it is preferable to use an air blower purchased for the purpose But alternatively you can wipe it gently clean with a spectacle cleaning cloth Do not use volatile substances such as wax alcohol or thinner to clean the projector case These can cause the case to warp and make the coating finish peel off Do ...

Страница 70: ...itial brightness and quality of the projected images The time taken for the message to appear will vary depending on usage conditions such as Color Mode settings If you continue to use the lamp after this period the possibility of the lamp breaking becomes greater When the lamp replacement message appears replace the lamp with a new one as soon as possible even if it is still working Depending on ...

Страница 71: ...hot Dispose of used air filters properly in accordance with your local regulations Frame material PP Filter materials PP PET TIP 1 2 Press the filter cover opening switch Press M or A to turn off the power and then turn the main power switch OFF 3 5 Insert the new air filter Remove the air filter cover 6 Install the air filter cover 4 Remove the old air filter ...

Страница 72: ...ot underneath it Wait until the lamp has cooled down sufficiently before removing the lamp cover If the lamp is very hot you may get burned Loosen the lamp fixing screws 1 2 Loosen the lamp cover fixing screw Press M or A to turn off the power and then turn the main power switch OFF Wait until the lamp cools down takes approximately 1 hour Securely tighten the lamp fixing screws 3 4 Remove the lam...

Страница 73: ...ning message to be displayed Never disassemble or modify the lamp Install the lamp and the lamp cover securely The projector will not turn on if the lamp or the lamp cover is not installed correctly This product includes a lamp component that contains mercury Hg Please consult your local regulations regarding disposal or recycling Do not dispose of it with normal waste Select Yes and then press v ...

Страница 74: ...n ELPSC07 80 Portable Screen ELPSC08 100 Portable Screen ELPSC10 A portable roll type screen Aspect 4 3 VGA HD15 PC Cable 1 8 m ELPKC02 VGA HD15 PC Cable 3 m ELPKC09 VGA HD15 PC Cable 20 m ELPKC10 For mini D Sub 15 pin mini D Sub 15 pin Use to connect the projector to a computer Ceiling Mount ELPMB20 ELPMB22 with ceiling plate Use when installing the projector to a ceiling Ceiling Pipe 600 600 mm ...

Страница 75: ...g commands defined by PJLink Class1 and agreement was confirmed by the PJLink standard adaptability verification URL http pjlink jbmia or jp english Non compatible commands Input names defined by PJLink and corresponding projector sources Manufacturer name displayed for Manufacture name information query EPSON Model name displayed for Product name information query Home Cinema EH R4000 PowerLite P...

Страница 76: ...resh rate Hz Resolution Dots SDTV 480i 60 720 480 SDTV 576i 50 720 576 SDTV 480p 60 720 480 SDTV 576p 50 720 576 HDTV 720p 50 60 1280 720 HDTV 1080i 50 60 1920 1080 HDTV 1080p 50 60 1920 1080 Signal Refresh rate Hz Resolution Dots TV NTSC 60 720 480 TV SECAM 50 720 576 TV PAL 50 60 720 576 ...

Страница 77: ...TV 480p 60 720 480 SDTV 576p 50 720 576 HDTV 720p 50 60 1280 720 HDTV 1080i 50 60 1920 1080 HDTV 1080p 24 50 60 1920 1080 Signal Refresh rate Hz Resolution Dots VGA 60 72 75 85 640 480 SVGA 56 60 72 75 85 800 600 XGA 60 70 75 85 1024 768 SXGA 70 75 85 1152 864 60 75 85 1280 960 60 75 85 1280 1024 WXGA 60 1280 768 60 1360 768 60 75 85 1280 800 MAC13 67 640 480 MAC16 75 832 624 MAC19 59 75 1024 768 ...

Страница 78: ...Electric Zoom adjustment Electric Approx 1 2 1 Lens shift Electric Maximums Approx 90 vertically 40 horizontally Lamp light source UHE lamp 200 W Model No ELPLP59 Power supply 100 to 240V AC 10 50 60Hz 2 9 to 1 3A Power Consumption 100 to 120V area Operating 291W Power Consumption Normal 243W Power Consumption ECO Standby 8 8W Communication On 0 17W Communication Off 0 17W 220 to 240V area Operati...

Страница 79: ...ld damage the projector and cause an accident Ports Component input 1 RCA pin jack 3 PC input 1 Mini D sub 15 pin female blue HDMI input 2 HDMI Compatible with HDCP CEC signals Video input 1 RCA pin jack S Video input 1 Mini DIN 4 pin LAN 1 RJ 45 RS 232C 1 D sub 9 pin male Trigger out 2 3 5 mm mini jack 1 3 5 mm mini jack Pixelworks DNXTM ICs are used in this Projector Product Information For user...

Страница 80: ...input connector RS 232C Default baud rate setting 9600 bps Data length 8 bit Parity None Stop bit 1 bit Flow control None At the projector PC serial cable At the computer Signal Function GND 5 5 GND GND Signal wire ground RD 2 3 TD TD Transmit data TD 3 2 RD RD Receive data At the projector At the computer ...

Страница 81: ...d used in accordance with the instructions may cause harmful interference to radio communications However there is no guarantee that interference will not occur in a particular installation If this equipment does cause harmful interference to radio or television reception which can be determined by turning the equipment off and on the user is encouraged to try to correct the interference by one or...

Страница 82: ... HDMI ports The HDMI input terminals of this projector are HDCP compatible so that digital images which are protected by HDCP technology can be projected However if changes are made to the HDCP standard it may no longer be possible to project digital images which have been protected by the new changed standard HDMITM An abbreviation for High Definition Multimedia Interface and refers to a standard...

Страница 83: ...ages will not be of a good quality The process of matching the phases of these signals the relative position of the crests and troughs in the signal is called synchronization If the signals are not synchronized problems such as flickering blurriness and horizontal interference can occur Tracking The signals output from computers have a specific frequency If the projector frequency does not match t...

Страница 84: ...3 36 Focus adjustment 6 16 Frame Interpolation 32 35 40 Front adjustable foot 6 17 Full 20 Full Menu 30 Gain 23 32 35 Gamma 21 32 35 HDMI input port 8 12 75 76 HDMI Video Range 32 35 HDMI CEC 48 HDTV 74 75 High Altitude Mode 33 36 43 Horiz Squeeze 20 Hue saturation and brightness adjustment 21 Illumination 33 36 42 Image menu 32 35 38 Image size 10 Indicators 6 54 64 Input Signal 34 37 Lamp cover ...

Страница 85: ...anced 24 32 35 38 Signal menu 32 35 39 Skin Tone 32 35 38 Sleep Mode 33 36 42 Source 34 37 Specifications 76 Standby Mode 36 42 Startup Screen 33 36 43 Sub menu 30 Super resolution 32 35 40 Supported Monitor Displays 74 S Video 12 74 S Video input port 8 12 74 76 Switch to a different source 6 7 16 Sync Info 34 37 Sync 32 35 40 Test Pattern 17 Tint 32 35 38 Top menu 30 Tracking 32 35 40 Trigger Ou...

Страница 86: ...y options or any consumable products other than those designated as Original Epson Products or Epson Approved Products by Seiko Epson Corporation The contents of this guide may be changed or updated without further notice Illustrations and screens used in this publication may differ from actual illustrations and screens General Notice x v Color and are trademarks of Sony Corporation Macintosh Mac ...

Отзывы: