15
epoke
®
SKE8-12-15-20
GB-0305.1
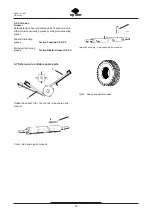
5.12 Instructions for repair and assembly
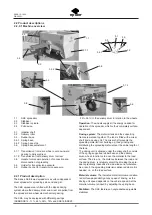
Replacement of delivery roller and impellor
The shafts are drawn sidewards out of the rear plates of the
hopper. The holes are big enough to let through the delivery
roller and the impellor mounted with cams and springs.
Remember to loosen both allan screws in the flange bea-
rings when the delivery roller and the impellor are dismoun-
ted. When mounting the delivery roller and the impellor the
tallow string tightenings are to be connected carefully and
the shaft ends to be wiped and greased. The chain wheels
must also flush.
6 Maintenance
6.2.1 Cleaning
All Epoke spreaders have been sandblasted, zinc dust
primed and primed before being painted with laquer, and
they are therefore extremely well-protected against rust.
However it is recommended - espescially after spreading
salt and if there are longer pauses between operations -
that the spreader is washed down with water after use.
Regular control extends the lifetime of the spreader and
guarantees a safer function.
6.2.2 Maintenance
Cleaning remote control.
Clean the remote control with a slightly moistened cloth
and wipe with a dry cloth.
Maintaining remote control.
Connectors and strain reliefs should be checked at regu-
lar intervals or at least every 100 operating hours. Defect
connectors must be replaced.
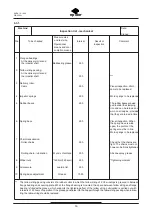
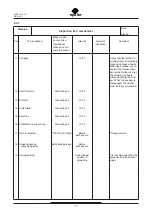
All moving transmission parts and bearings should be
lubricated with grease, see inspection list - mechanical
item 6.3.1.
The driving shafts
are suspended in spherical roller bea-
rings with tightenings and in flange bearings. They should
be greased only once a year. Over-greasing may spoil the
tightenings. Likewise too much grease may cause the
bearings to overheat.
Delivery roller and impellore
are suspended in flange
bearings by a laminated tightening. The bearings are gre-
ased at the factory and do not need much greasing, but
for the sake of the tallow tightenings mounted behind a
frquent greasing is recommended, at least after each 25
hours ‘ operating.
Spring base adjustment
is lubricated through the lubri-
cation nipple with grease, see inspection list - mechanical
item 6.3.1
Defect cams
are to be replaced. If the screws are rustbo-
und, the cams can be blasted with a hammer, and the
screws can be loosened with tongs. In order to avoid this,
it is recommended, before use to loosen a cam and fill in
approx. 1/4 litre waste oil in the delivery roller.
Impellors:
Defect springs are to be replaced, see mete-
ring system item 2.2.4.
Spring base:
Defect springs are to be replaced. When
the spring base is wide open, the points of the springs
must be in line.
Rubber base:
The rubber bases are wedged in under
clamping iron and can be turned and worn on all 4 edges,
provided that they are turned in time.
Roller chains:
Control that they are tightened. They shall
be tightened in such a way that they by means tightening
them totally.
Clutch:
Free function is checked. Otherwise clean and gre-
ase all parts. When the spreader is engaged is engaged the
pawl chamber, the pawl retainer and the pawl must turn free
without touching the stripper. When the spreader is disenga-
ged the pawl must be combletely in bottom.
6.2.3 Storing
After the winter season it is recommended that the sprea-
der is cleaned, protected against corrosion, lubricated and
has damages in the laquer repaired.
The spreader must be stored with an open (completely
open) spring base.
Storing remote control
When not in use, the remote control should be stored in a
dry place.
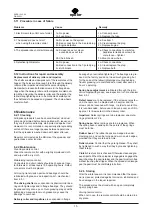
5.11 Procedure in case of failure
Problems
Cause
Remedy
1. Electric remote control out of order
1a. No power
1a. Connect power
1b. Fuse blown
1b. Replace the fuse
2. The spreader does not start
2a. No power on the system
2a. See item 1.
when using the remote control
2b. Bad connection in the 4-poled plug
2b. Clean/replace the plug
2c. Engine defective
2c. Replace engine
3. The spreader does not start manually
3a. Scraper does not move/
3a. Check connections to start/stop
eccentric does not turn
handle/axle (tailstock screw has
come loose – tighten)
3b. Chain broken
3b. Mount a new chain
4. Defective light/indicator
4a. No power
4a. Check connections
4b. Bad connection in the 7-poled plug
4b. Clean/replace the plug
4c. Bulb broken
4c. Replace bulb
Содержание SKE Series
Страница 2: ......
Страница 10: ......
Страница 12: ...9 epoke SKE8 12 15 20 GB 0305 1 2 2 4 6 7 8 9 10 1 2 3 4 5 C B A C D...
Страница 26: ...23 epoke SKE8 12 15 20 GB 0305 1 8 1...

