


P a g e
|
65
6.6.2
Analyze
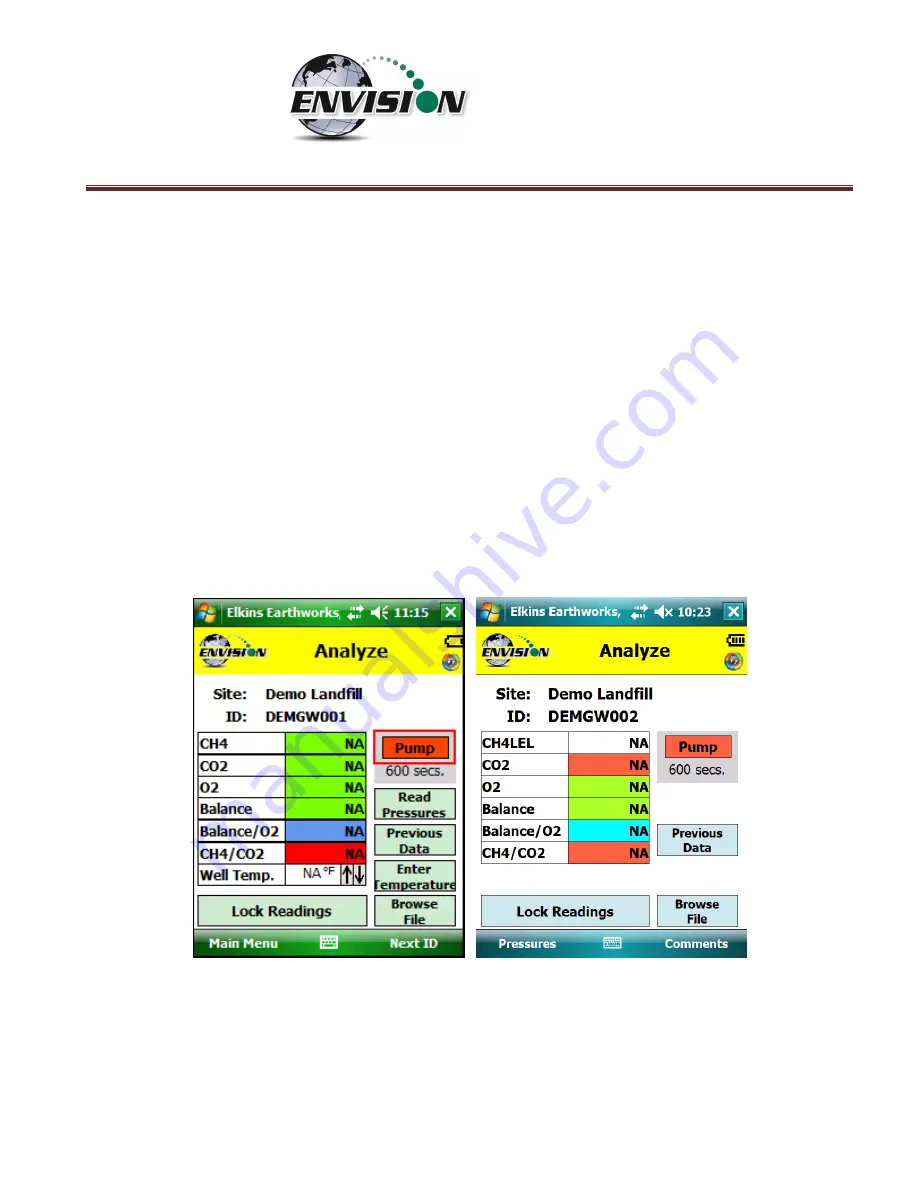
This feature allows the user to measure the gas qualities and pressures for a selected sample point. The
“Analyze” screen is accessed by pressing the “Analyze” button
in the lower right of
the “Select ID”
screen.
Note:
The typical screen progression is from gas concentration analysis to pressure analysis. However,
if the wellhea
d type is set to “Probe”, the screen progression is reversed.
6.6.2.1
Analyze Screen (ENV100/200)
6.6.2.1.1
Pump
This button activates the sample pump located within the Envision® gas analyzer.
The left screen is for a typical well. The right screen is for a probe.
The button is red when the pump is off and green when activated. The default on time for the pump is
600 seconds. To activate the pump,
tap the “Pump” button once.
The sensor will then go through a 20
second warm-up before actual gas values will appear. The pump may be turned off by tapping the
“Pump” button again.
If the pump is turned off,
then the gas values will return to the default “NA”. To
lock the gas values the user must tap the “
Lock
Readings” or “Read Pressures”.
The pump time can be
Содержание ENV100
Страница 1: ...865 West Liberty Suite 220 Medina Ohio April 2018 Envision Landfill Gas Analyzer...
Страница 15: ...P a g e 15 3 Tap Settings 4 Next tap System 5 Next tap Backlight...
Страница 17: ...P a g e 17 7 Tap on the Brightness tab at the bottom of the screen 8 Increase the brightness to 100...
Страница 18: ...P a g e 18 9 At the bottom of the Brightness screen select Power in the adjust power setting to conserve power...
Страница 20: ...P a g e 20 Next on the Wireless Manager Screen tap the Bluetooth button and Bluetooth will activate...
Страница 22: ...P a g e 22 2 Tap System and then External GPS 3 Verify GPS program port is set to COM 3...
Страница 23: ...P a g e 23 4 GPS Hardware Port is set to COM2 and BAUD rate 9600 5 Verify that this box is checked too...
Страница 36: ...P a g e 36 2 Tap the Disconnect button...
Страница 42: ...P a g e 42...
Страница 57: ...P a g e 57 1 Use the combo boxes labeled Site and ID to locate the monitoring point that is to be monitored...
Страница 84: ...P a g e 84 6 6 4 1 Wellhead Type The following images show screen progressions for non borehole wellhead types...
Страница 104: ...P a g e 104 1 Open the Well ID Maintenance Screen 2 Select the Site that is to be deleted from the dropdown menu...
Страница 105: ...P a g e 105 3 Tap the Clear Site button...
Страница 107: ...P a g e 107 2 Select the ID that is to be deleted from the dropdown menu 3 Tap the Clear ID button...
Страница 139: ...P a g e 139...
Страница 155: ...P a g e 155 5 Name the handheld PC 6 The handheld device will then Sync with the desktop PC...
Страница 166: ...P a g e 166 8 3 2 Copy Files from PC to Handheld Device 1 Right click on the file and click copy...


