23
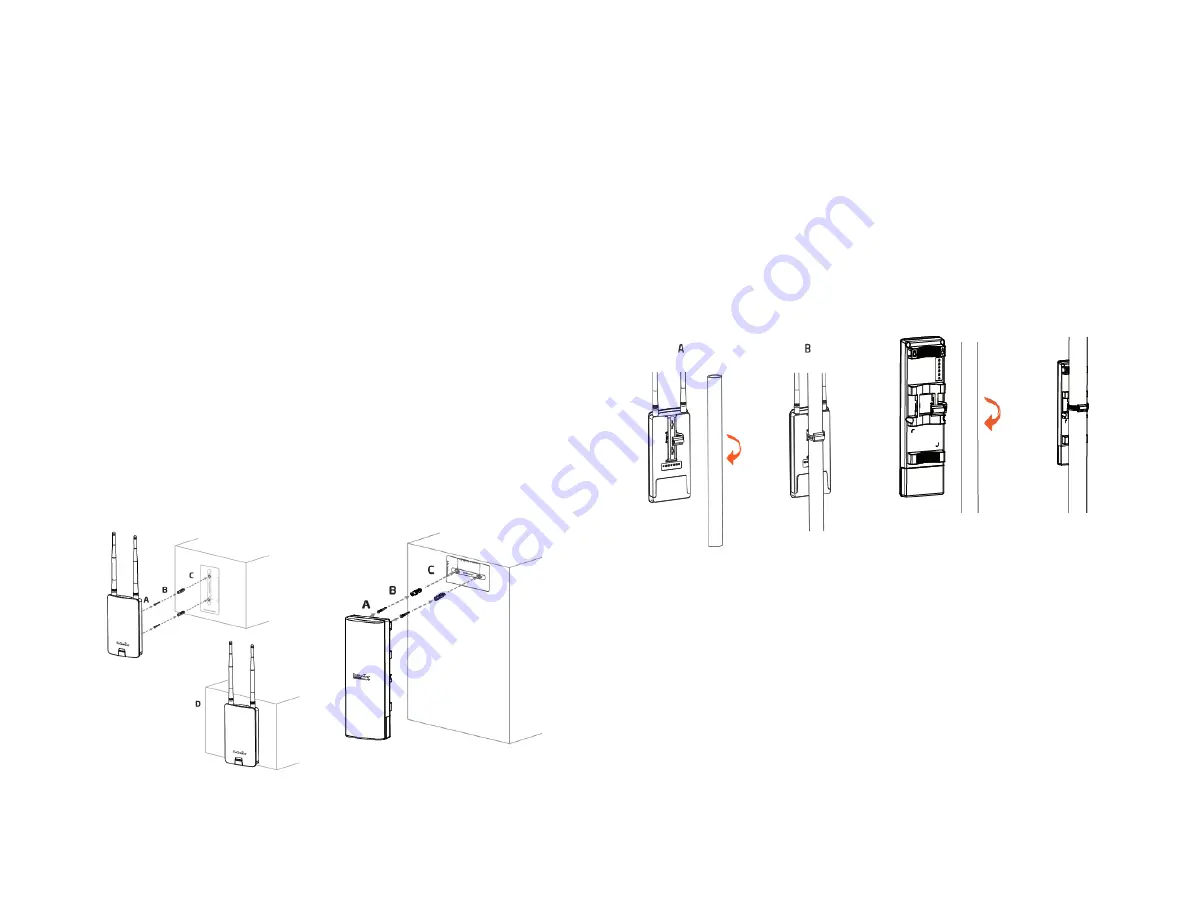
Wall mounting the ENH500v3/ENS500-ACv2/
ENS500EXT-ACv2
A
.
Determine where the Access Point to be placed and
stick the Adhesive label on the surface.
B
.
Use the appropriate drill bit to drill two 8.1mm
diagram and 26mm depth holes on the markings of the
label.
C
.
Remove the label and screw the anchors unto the holes
until they are flush with the wall.
D
.
Screw the included screws into the anchors. Place the
Access Point against wall with the mounting screw heads.
ENS500ACv2/ENS500EXT-ACv2 ENH500v3
Pole mounting the ENH500v3/ENS500-ACv2/
ENS500EXT-ACv2
A
.
Thread the open end of the Pole Strap through the two
tabs on the Pole Mount Bracket.
B.Lock and tighten Pole Strap to secure Pole Mount Bracket
to the pole.
ENS500ACv2/ENS500EXT-ACv2 ENH500v3
Содержание ENH500v3
Страница 4: ...4 Chapter 1 Product Overview ...
Страница 12: ...12 Chapter 2 Before You Begin ...
Страница 24: ...24 Chapter 3 Configuring Your Access Point ...
Страница 27: ...27 Chapter 4 Building a Wireless Network ...
Страница 29: ...29 AP Mode CB Mode 5GHz ...
Страница 31: ...31 WDS AP WDS Bridge 5GHz ...
Страница 33: ...33 Chapter 5 Status ...
Страница 38: ...38 Chapter 6 Network ...
Страница 41: ...41 Chapter 7 Wireless ...
Страница 52: ...52 Chapter 8 Management ...
Страница 66: ...66 Chapter 9 EnWiFi App ...
Страница 69: ...69 WDS Link Setting WDS links will assist users to setup peer to peer connection easily ...
Страница 72: ...72 Proceed configuration on IP Subnet time Setting and account password under a group ...
Страница 74: ...74 You also can set Operation mode to WDS AP mode and let WDS STA devices connect to this WDS AP mode device ...
Страница 75: ...75 Discover Device Discover and Access to other EnGenius devices to manage their status ...
Страница 77: ...77 Backup Backup current settings as a configuration file to apply to other devices quickly ...
Страница 78: ...78 Restore Choose backup file to restore other devices so that they can have the same configuration quickly ...
Страница 79: ...79 Appendix ...


