background image

13

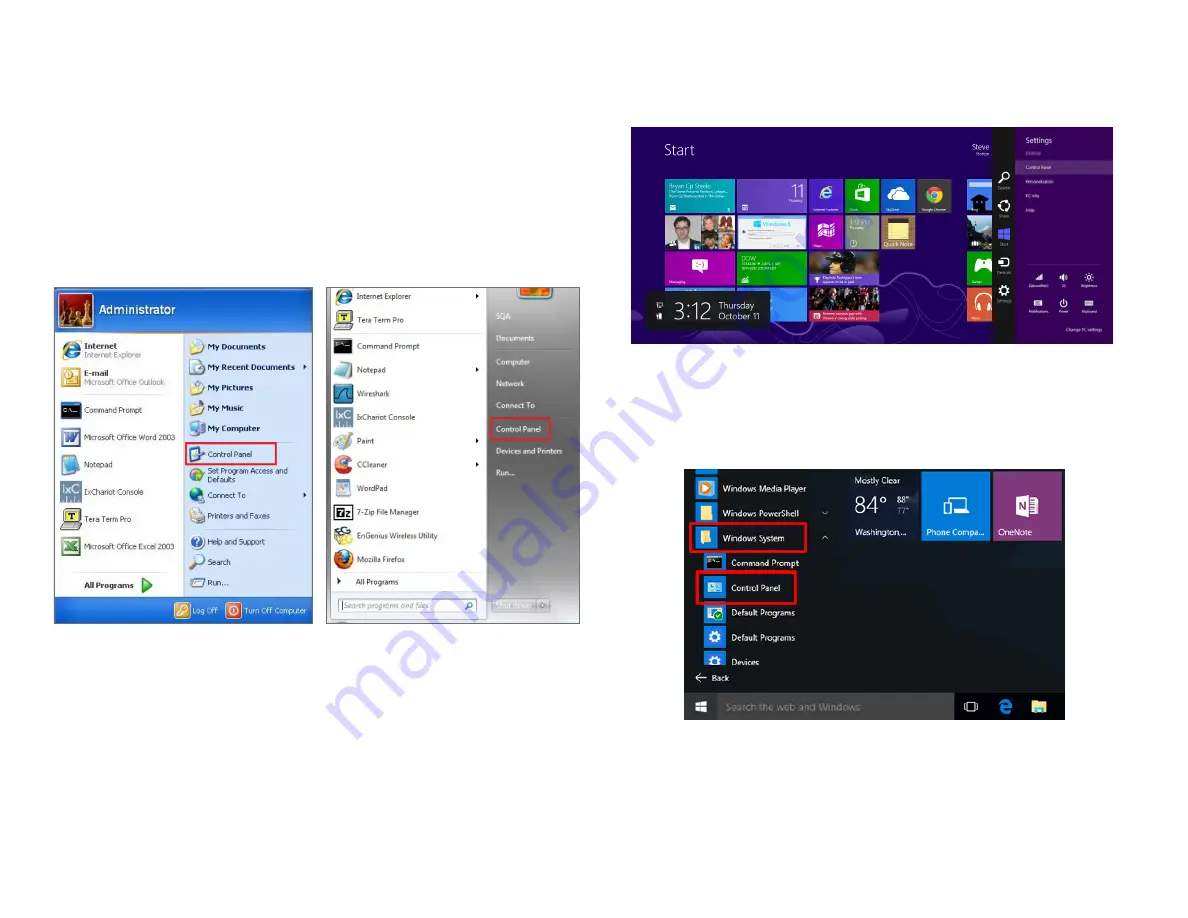
Windows XP/Windows 7/Windows 8/Windows 
10

In order to use the Access Point, you must first configure the 

TCP/IPv4 connection of your Windows OS computer system.

 1a. 

Click the 

Start

 button and open the 

Control Panel

1b

. Move your mouse to the lower right hot corner to  

display the Charms Bar and select the 

Control Panel

 in 

Windows 8 OS.

1c. 

In 

Windows 10,

 click 

Start 

to select 

All APPs 

to enter 

the folder of 

Windows system

 for selecting

 Control 

Panel.


Computer Settings

Windows XP

Windows 7

Windows 8

Windows 10

Содержание ENH500v3

Страница 1: ...User Manual Business Solutions AC867 5GHz Outdoor Long Range Wireless Access Point EnStationACv2 EnStation5 ACv2 ENS500 ACv2 ENS500EXT ACv2 ENH500v3 version 2 0 ...

Страница 2: ...2 IMPORTANT To install this Access Point please refer to the Quick Installation Guide included in the product packaging ...

Страница 3: ... Chapter 6 Network 37 Basic IP Settings 38 Spanning Tree Protocol Setting 38 Chapter 7 Wireless 41 Wireless Settings 42 Wireless Network 43 SSID Profile 44 Wireless Security 46 Fast Roaming 47 Wireless MAC Filtering 48 Wireless Traffic Shaping 45 Guest Network Settings 50 ManagementVLAVSetting 51 Chapter 8 Management 52 Advanced Settings 52 CLI Settings Email Alert 53 Time Zone 56 Auto Reboot Sett...

Страница 4: ...4 Chapter 1 Product Overview ...

Страница 5: ...nna Power Source ENH500v3 ENS500EXT ACv2 ENS500 ACv2 EnStation5 ACv2 Can be used with included 24V PoE adapter EnStationACv2 Can be used with included 54V PoE adapter Device can be reset from remote PoE adapter Advanced 256 QAM technology to achieve optimal performance throughout ultra long distance EnJet technology eliminates hidden node collisions to keep throughput more consistently when client...

Страница 6: ...upports wireless encryption including Wi Fi Protected Access WPA2 PSK Encryption and IEEE 802 1X with RADIUS EnGenius EnJet Technology EnGenius EnJet technology represents a new era in outdoor wireless solutions The built in EnGenius EnJet feature based on the Time Division Multiple Access method allows each client to send and receive data using pre designated time slots following the EnJet schedu...

Страница 7: ... Firefox Safari or another similar browser application Package Contents The EnStation5 ACv2 EnStationACv2 package contains the following items EnStation5 ACv2 EnStationACv2 Customer Premises Equipment EnStation5 ACv2 with PoE Adapter EPA2406GR EnStationACv2 with PoE Adapter EPA5006GR Power Cord Pole Mount Strap Wall Mount Bracket Base Screw Sets Kit Sealing Nut Dynamic Stick Quick Installation Gui...

Страница 8: ... Alert Standard IEEE802 11ac wave2 a n on 5 GHz Antenna Internal 15 5dBi high gain directional antenna EnStation5 ACv2 EnStationACv2 Internal 13 42dBi high gain directional antenna ENS500 ACv2 External 2 5 17dBi detachable antenna ENS500EXT ACv2 Physical Interface 2 x 10 100 1000 Gigabit Ethernet Port with PoE support EnStation5 ACv2 ENS500 ACv2 ENS500EXT ACv2 LAN PoE Port supports 24V PoE Input E...

Страница 9: ...ess STA Client connection list Https Support SSH Support QoS Quality of Service Complaint with IEEE 802 11e standard Physical Environment Conditions Operating Temperature 20 C to 60 C 4 F to 140 F Humidity non condensing 90 or less Storage Temperature 30 C to 80 C 22 F to 176 F Humidity non condensing 90 or less ...

Страница 10: ...1 16 lbs 1 WLAN Signal LED Applied on Client Bridge WDS 1 Red Weak Signal Connecting quality is bad 2 Yellow Connecting quality is Normal 3 Green Connection quality is Good 2 LAN PoE Signal LED 3 LAN Signal LED of the 2nd Port 4 Power Signal 5 LAN Port 1 Gigabit Ethernet port for RJ 45 cable 6 LAN Port 2 Gigabit Ethernet port for RJ 45 cable 5 4 1 6 2 3 ...

Страница 11: ...for Power LAN Port 1 LAN Port 2 2 4 GHz Connection and 5 GHz Connection 5 Mounting Holes Using the provided hardware the AP can be attached to a wall or pole The installation angle of antenna must be vertical to the ground 4 1 2 3 1 5 Physical Interface ENS500 ACv2 ENS500EXT ACv2 Dimensions Length 260mm 10 24 Width 84 3 31 Depth 55mm 2 17 1 LAN Port 1 Proprietary24V PoE Ethernet port for RJ 45 cab...

Страница 12: ...12 Chapter 2 Before You Begin ...

Страница 13: ...r system 1a Click the Start button and open the Control Panel 1b Move your mouse to the lower right hot corner to display the Charms Bar and select the Control Panel in Windows 8 OS 1c In Windows 10 click Start to select All APPs to enter the folder of Windows system for selecting Control Panel Computer Settings Windows XP Windows 7 Windows 8 Windows 10 ...

Страница 14: ...he Network and Internet section then select Change adapter settings 3 RightclickonLocalAreaConnectionandselectProperties 4 Select Internet Protocol Version 4 TCP IPv4 and then select Properties 5 Select Use the following IP address and enter an IP address that is different from the Access Point and Subnet mask then click OK ...

Страница 15: ...15 Note Ensure that the IP address and Subnet mask are on the same subnet as the device For example ENH220EXT IP address 192 168 1 1 PCIPaddress 192 168 1 2 192 168 1 255 PC Subnet mask 255 255 255 0 ...

Страница 16: ...tion 3 Highlight Ethernet 4 In Configure IPv4 select Manually 5 Enter an IP address that is different from the Access Point and Subnet mask then press OK Note Ensure that the IP address and Subnet mask are on the same subnet as the device For example ENH900EXT IP address 192 168 1 1 PCIPaddress 192 168 1 2 192 168 1 255 PC Subnet mask 255 255 255 0 Click Apply when done ...

Страница 17: ...the PoE Adapter and the other end to the Ethernet port on the computer 5 Place the panel back into device Note The EnStationACv2 should ONLY be powered via EthernetcableconnectedtoincludedsupportsbothIEEE 802 3at PoE Power over Ethernet or the included PoE Adapter You may use either one as the power source Do NOT use both at the same time Note The EnStationACv2 can supply the 802 3af power source ...

Страница 18: ...ation5 ACv2 EnStationACv2 Using the provided hardware the EnStation5 ACv2 can be attached to a wall or a pole 1 Device 3 Bracket 5 Screw Set Kit 6 Sealing Nut 4 Pole Mounting Strap 7 Dynamic Stick 2 PoE Adapter Power Cord ...

Страница 19: ...ut the nock washer on the dynamic stick 4 Assemble t he mounting parts to the EnStation 5 Determine the mounting location Mark and drill two pilot holes aligning to the screw holes of the bracket 6 Put wall anchors into the holes and insert screw into the wall anchor 7 Screw and secrue the bracket in the place 1 2 3 4 5 6 7 Dimension A Ø5 5 18 mm B Ø8 25 mm B A ...

Страница 20: ...racket 2 Screw the sealing nut and assembled parts as well as tighten it 3 Put the nock washer on the dynamic stick 4 Assemble t he mounting parts to the EnStation 5 Thread the open end of the pole strap through the two tabs on the bracket 6 Lock and tighten pole strap to secure bracket to the pole ...

Страница 21: ...ernet cable into the LAN port of the PoE adapter and the other end to the Ethernet port on the computer 4 Screwontheprovidedantennastothetopofthisdevice Note The AP Bridge should ONLY be powered via Ethernet cable connected to the included PoE Adapter This diagram depicts the hardware configuration Note The AP Bridge should ONLY be powered via Ethernet cable connected to the included PoE Adapter H...

Страница 22: ... ACv2 ENS500EXT ACv2 Using the provided hardware the device can be attached to a wall or a pole The height should not exceed 2 meter 1 Wall Mounting Kit Anchors Φ5 5 18mm Bolts Φ8 25mm 2 Pole Mounting Strap Φ66 12 6 mm Anchors Bolts ...

Страница 23: ... the label and screw the anchors unto the holes until they are flush with the wall D Screw the included screws into the anchors Place the AccessPointagainstwallwiththemountingscrewheads ENS500ACv2 ENS500EXT ACv2 ENH500v3 Pole mounting the ENH500v3 ENS500 ACv2 ENS500EXT ACv2 A Thread the open end of the Pole Strap through the two tabs on the Pole Mount Bracket B Lock and tighten Pole Strap to secur...

Страница 24: ...24 Chapter 3 Configuring Your Access Point ...

Страница 25: ... port or wireless network adapter to connect the Access Point IP Address 192 168 1 1 Username Password admin admin 1 Open a web browser Internet Explorer Firefox Safari Chrome and enter the IP Address http 192 168 1 1 Note If you have changed the default LAN IP Address of theAccessPoint ensureyouenterthecorrectIPAddress 2 The default username and password are admin Once you have entered the correc...

Страница 26: ...pp from Google Play or iOS App Market Android iOS 2 Before access to device you need to find Management SSID and connect to it first Then you can see your device in the Device List 3 For more details of how to configure and management device via EnWiFi App please see Chpater 9 EnWiFi App ...

Страница 27: ...27 Chapter 4 Building a Wireless Network ...

Страница 28: ...ebehaveslikesacentralconnectionforstationsorclientsthatsupportIEEE802 11ac a nnetworks The stations and clients must be configured to use the same SSID Service Set Identifier and security password to associate with the EnStationAC The EnStationAC supports up to one 1 eight 8 SSIDs per band when EnJet enabled disabled at the same time for secure access Client Bridge Mode The device essentially acts...

Страница 29: ...29 AP Mode CB Mode 5GHz ...

Страница 30: ...ssly connect different LANs by configuring the MAC address and security settings of each device Use this mode when two wired LANs located a small distance apart want to communicate with each other The best solution is to use the device to wirelessly connect two wired LANs as shown in the following diagram WDS Bridge Mode can establish up to four WDS links creating a star like network Note WDS Brid...

Страница 31: ...31 WDS AP WDS Bridge 5GHz ...

Страница 32: ...32 WDS Station Mode Station mode expands the WDS by receiving a wireless signal service and sharing it through the Ethernet port WDS AP WDS Station WDS Station ...

Страница 33: ...33 Chapter 5 Status ...

Страница 34: ...link under the Overview menu shows the status information about the current operating mode The Device Information section shows general system information such as Device Name MAC Address Current Time Firmware Version and Management VLAN ID Note VLAN ID information is only applicable in Access Point or WDS AP mode The model name will be varied by different models The Memory Information section show...

Страница 35: ...n 5 GHz section shows wirelessinformationsuchasOperatingMode Frequency and Channel Since the AP CPE supports multiple SSIDs information about each SSID the ESSID and security settings are displayed Note Profile Settings are only applicable in Access Point and WDS AP modes The Statistics section shows Mac information such as SSID MAC address RX and TX ...

Страница 36: ...he Overview menu This page displays the current status of the WDS link including WDS Link ID MAC Address Link Status and RSSI Note Only applicable in WDS AP and WDS Bridge modes The Realtime section contains the following options CPU Loading 3 minutes CPU loading percentage information it displays current loading average loading and peak loading status Left bar is loading percentage button is time...

Страница 37: ...nt active network connections It displays UDP and TCP packets information and other connection status UDP connections curve is in blue TCP connection curve is in green others curve is in red Below of chart shows connections source and destination ...

Страница 38: ...38 Chapter 6 Network ...

Страница 39: ...ress for this device Save Click Save to confirm the changes Spanning Tree Protocol STP Settings This page allows you to modify the Spanning Tree settings Enabling the Spanning Tree protocol will prevent network loops in your LAN network Spanning Tree Status Enables or disables the Spanning Tree function Hello Time Specifies Bridge Hello Time in seconds This value determines how often the device se...

Страница 40: ...Learning states before the Forwarding state is entered This delay is provided so that when a new bridge comes onto a busy network it analyzes data traffic before participating in the network Priority Specifies the Priority Number A smaller number has a greater priority than a larger number Save Click Save to confirm the changes ...

Страница 41: ...41 Chapter 7 Wireless ...

Страница 42: ...s name is not the SSID and is not broadcast to other devices Save Click Save to confirm the changes EnJet The AP CPE is default EnJet enable When enabling the EnGenius EnJet system the AP CPE can then transmit data more efficiently avoid collisions and reduce latency and packet losses If you do not enable EnJet data will be sent via traditional CSMA Wireless ...

Страница 43: ...nnel HT Mode The default channel bandwidth is 20 MHz 40 80 MHz The larger the channel the greater the transmission quality and speed Channel Click Configuration button to open a new windows to configure channels for performing wireless service Transmit Power Sets the power output of the wireless signal Bit Rate 5GHz is default 6 Mbps the range can control by BAR via scroll from 6Mbps to 54Mbps Cli...

Страница 44: ... will get 10 16 of AP s time resource Wireless Setting 5GHz Current Profile You can configure up to eight 8 different SSIDs when EnJet disable or 1 SSID when EnJet enable If multiple client devices will be accessing the network you can arrange the devices into SSID groups Click Edit to configure the profile and check whether you want to enable extra SSID SSID Profile when EnJet disable SSID Profil...

Страница 45: ...enable this function for allowing or preventing communication between client devices VLAN Isolation Restrict clients communicating with different VIDs by selecting the radio button L2 Isolation Enable this function prevenet client devices to communicate on the both WLAN and LAN VLAN ID Specifies the VLAN tag for each profile If your netowrk includes VLANs you can specify a VLAN ID for packets pass...

Страница 46: ...se Pre Shared Key Encryption Default is AES Please ensure that your wireless clients use the same settings Group Key Update Interval Specifies how often in seconds the Group Key changes The default value is 3600 Radius Server Enter the IP address of the Radius server Radius Port Enter the port number used for connections to the Radius server Radius Secret Enter the secret required to connect to th...

Страница 47: ...g server Interim Accounting Interval Specifies how often in seconds the accounting data sends Note 802 11n does not allow WPA2 PSK TKIP security mode Fast Roaming Enable the function to serve mobile client devices that roam from Access Point to Access Point Some applications running on Client devices require fast re association when they roam to a different Access Point Pleaseenterthesettingsofthe...

Страница 48: ... Disable Wireless MAC Filter Note Only applicable in Access Point and WDS AP modes ACL Mode Determines whether network access is granted or denied to clients whose MAC addresses appear in the MAC address table on this page Your choices are Disabled Deny MAC in the list or Allow MAC in the list MAC Address Enter the MAC address of the wireless client Add Click Add to add the MAC address to the MAC ...

Страница 49: ...ll allow administrators to restrict the wireless bandwidth per SSID or per user Enable Traffic Shaping Check this option to enable Wireless Traffic Shaping Download Limit Specifies the wireless transmission bandwidth used for downloading Upload Limit Specifies the wireless transmission bandwidth used for uploading Save Click Save to confirm the changes ...

Страница 50: ...dress The first IP Address in the range of the addresses by the DHCP server Ending IP Address The last IP Address in the range of addresses assigned by the DHCP server RSSI Threshold RSSI Threshold Enable the Fast Handover feature when EnJet disable by ensuring that each client is served by at least one Access Point at any time Access Points continuously monitor the connectivity quality of any cli...

Страница 51: ...e another on the LAN Note Only applicable in Access Point and WDS AP modes Management VLAN If your network includes VLANs you can enable Management VLAN ID for packets passing through the Access Point with a tag Save Click Save to confirm the changes or Cancel to cancel and return to previous settings Note If you reconfigure the Management VLAN ID you may lose your connection to the EnStationAC Ve...

Страница 52: ...52 Chapter 8 Management ...

Страница 53: ...tion of the device Community Name Read Only Specifies the password for the SNMP community for read only access Community Name Read Write Specifies the password for the SNMP community with read write access Trap Destination Address Specifies the IP address of the computer that will receive the SNMP traps Trap Destination Community Name Specifies the password for the SNMP trap community SNMPv3 Enabl...

Страница 54: ...fer Protocol over SSL Secure Socket Layer is a TCP IP protocol used by web servers to transfer and display web content securely Email Alert You can use the Email Alert feature to send messages to the configured email address when particular system events occur Note Do NOT use your personal email address as it can unnecessarily expose your personal email login credentials Use a separate email accou...

Страница 55: ...he password for the email account that will be used to send emails SMTP Server Enter the IP address or hostname of the outgoing SMTP server Port Enter the SMTP port number to use for outbound emails Security Mode Selects the security mode SSL TLS or STARTTLS or None Apply To save setting and take effect ...

Страница 56: ...ish to enter the IP address of an NTP server or use the default NTP server to have the internal clock set automatically Time Zone You can click Auto Detect or select Time Zone from the menu Enable Daylight Saving Check whether daylight savings applies to your area Start Select the day month and time when daylight savings time starts End Select the day month and time when daylight sav ings times en...

Страница 57: ... Auto Reboot Setting Enables or disables the Auto Reboot function Frequency of Auto Reboot Specifies how often you wish to reboot the EnStationAC by Min Hour Day or Week Timer Select the day and enter the time you would like to reboot automatically Save Click Save to apply the changes ...

Страница 58: ... Fi scheduler function Wireless Radio Select 2 4 GHz or 5 GHz from the drop down list for the preferred band type SSID Selection Select a SSID from the drop down list Schedule Templates Select a schedule template from the drop down list Day s Place a checkmark in the boxes for the desired days or select the All Week radio button to select all seven days of the week Duration The Start Time is enter...

Страница 59: ...ter the IP address you would like to trace Nslookup Test Parameter Target IP Domain Name Enter the IP address or domain name you wish to do Nslookup test Speed Test Parameters Target IP Domain Name Enter an IP address or domain name you wish to impelement a speed test for realizing the variance on wireless speed Time Period Enter the time in seconds that you would like the test to implement for an...

Страница 60: ...60 Device Discovery This page allows you to discover devices from network for Operation Mode IP Address System MAC Address and Firmware version ...

Страница 61: ...n to the New Password entry box Verify Password Re enter the new password in the Confirm Password entry box for confirmation Apply Click Apply to apply the changes Firmware Upgrade This page allows you to upgrade the firmware of the device To Perform the Firmware Upgrade 1 Click the Choose File button and navigate the OS file system to the location of the upgrade file 2 Select the upgrade file The...

Страница 62: ...ou have set the AP incorrectly you can use the Reset button in the Revert to Factory Default Settings section to restore all the configurations of the AP to the original default settings Backup Setting Click Export to save the current configured settings Restore New Setting To restore settings that have been previously backed up click Browse select the file and click Restore Restore to Default Cli...

Страница 63: ...to backup the user settings you would like to the device s memory for the default settings Restore to User Default Click Restore to restore user settings to the factory standard settings Note1 After setting the current settings as the default you should click the Restore to Default on the web interface for reverting the settings into the factory default instead of pushing the reset button Note2 Pl...

Страница 64: ...r rebooted the log will be cleared Status Enable Disable this function Trafic Log Enable Disable this function Log type You may choose one of log types to display logs in the following window The default log types is All Remote Log This page allows you to setup the Remote Log functions for the AP CPE Syslog Enables or disables the syslog function Log Server IP Address Enter the IP address of the l...

Страница 65: ...Reset to reboot or to reset the AP CPE The model name will be varied by different models Once you click reset button you will see the options for reboot or restore this AP Reboot the device Click it to reboot this device Restore to Factory Default Click it to reset this device to factory default setting Restore to User Default Click it to reset this device to user default settings For realizing th...

Страница 66: ...66 Chapter 9 EnWiFi App ...

Страница 67: ...ration Users can create a group configuration for multiple wireless access points and change between Client Bridge WDS AP WDS Bridge WDS Station modes and EnGenius ERP easily Device Management Realize status of an Access Point on RF information and real time throughput on Tx and Rx ways to make maximum PtP connecting performance or remove device with weak signal Discover Device Discover EnGenius D...

Страница 68: ...you need to find Management SSID and connect to it first Then you can see your device in the Device List Single Configuration Proceed Wireless Settings Network and System Configuration to setup value on RF parameters DHCP Spanning Tree and time zone for a device ...

Страница 69: ...69 WDS Link Setting WDS links will assist users to setup peer to peer connection easily ...

Страница 70: ...70 Group Configuration Proceed Wireless Settings including EnJet Operation mode distance and time slot channel used channel HT Tx power and Security ...

Страница 71: ...71 Group Configuration Proceed Wireless Settings including EnJet Operation mode distance and time slot channel used channel HT Tx power and Security ...

Страница 72: ...72 Proceed configuration on IP Subnet time Setting and account password under a group ...

Страница 73: ...73 You also can use EnWiFi App to proceed connection from Client Bridge mode devices to an Access Point mode device ...

Страница 74: ...74 You also can set Operation mode to WDS AP mode and let WDS STA devices connect to this WDS AP mode device ...

Страница 75: ...75 Discover Device Discover and Access to other EnGenius devices to manage their status ...

Страница 76: ...76 Monitor Management Monitor clients connected status Base on this information to adjust configuration or press kick out to remove device if the signal is weak ...

Страница 77: ...77 Backup Backup current settings as a configuration file to apply to other devices quickly ...

Страница 78: ...78 Restore Choose backup file to restore other devices so that they can have the same configuration quickly ...

Страница 79: ...79 Appendix ...

Страница 80: ...energy and if not installed and used in accordance with the instructions may cause harmful interference to radio communications However there is no guarantee that interference will not occur in a particular installation If this equipment does cause harmful interference to radio or television reception which can be determined by turning the equipment off and on the user is encouraged to try to corr...

Страница 81: ... kept 20 cm from nearby person in normal operation condition to meet regulatory RF exposure requirement External Antenna Useonlytheantennaswhichhavebeenapprovedbytheapplicant Thenon approvedantenna s mayproduceunwantedspuriousorexcessive RF transmitting power which may lead to the violation of FCC limit and is prohibited Installation Procedure Please refer to user s manual for the detail Warning P...

Страница 82: ...orisée aux deux conditions suivantes 1 le dispositif ne doit pas produire de brouillage préjudiciable et 2 ce dispositif doit accepter tout brouillage reçu y compris un brouillage susceptible de provoquer un fonctionnement indésirable Caution where applicable antenna type s antenna models s and worst case tilt angle s necessary to remain compliant with the e i r p elevation mask requirement set fo...

Страница 83: ...IC 10103A ENH500V3 has been approved by ISED to operate with the antenna type listed below with maximum permissible gain indicated Antenna types not included in this list having a gain greater than the maximum gain indicated for that type are strictly prohibited for use with this device Le présent émetteur radio IC 10103A ENS500ACV2 Model EnStation5 ACv2 ENS500EXT ACv2 ENS500 ACv2 IC 10103A ENH500...

Страница 84: ...erson in normal operation condition to meet regulatory RF exposure requirement 3 External antenna Use only the antennas which have been approved by the applicant The non approved antenna s may produce un wanted spurious or excessive RF transmitting power which may lead to the violation of FCC ISED limit and is prohib ited 4 Installation procedure Please refer to user s manual for the detail 5 Warn...

Страница 85: ...cter une distance de 20cm entre l antenne emettrice et les personnes 3 Antenn externe Utiliser uniiquement les antennes approuvees par le fabricant L utilisation d autres antennes peut conduire a un niveau de rayonnement essentiel ou non essentiel depassant les niveaux limites definis par FCC ISED ce qui est interdit 4 Procedure d installation Consulter le manuel d utilisation 5 Avertissement Choi...

Отзывы: