5.
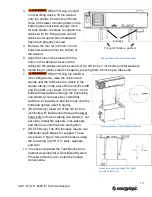
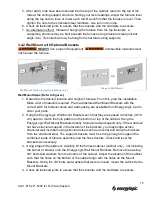
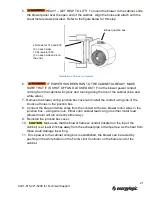
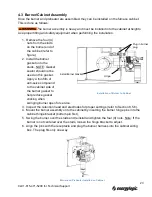
HEAVY – GET HELP TO LIFT! To mount the blower to the cabinet, slide
the blower panel over the open end of the cabinet. Align the holes and attach with the
sheet metal screws provided. Refer to the figure below for this step.
6.
IF POWER HAS BEEN RUN TO THE CABINET ALREADY, MAKE
SURE THAT IT IS SHUT OFF AND LOCKED OUT! Find the blower power conduit
coming from the cabinet wiring box and running along the top of the cabinet (blue and
white wires).
7. Remove the blower wiring junction box cover and install the conduit using one of the
knock out holes in the junction box.
8. Connect the blue and white wires from the conduit to the two blower motor wires in the
junction box – using wire nuts. Either color cabinet lead can go to either motor lead
(blower motor will run correctly either way).
9. Reinstall the junction box cover.
10.
Make sure that the blower harness conduit (located on the top of the
cabinet) is at least 2 inches away from the exhaust pipe or damper tee, as the heat from
these could damage the wiring.
11. Once power to the cabinet wiring box is established, the blower can be tested by
pushing in the white button on the Fan & Limit Controller on the burner end of the
cabinet.
4 Screws for 140 and 200
(2 on each side)
10 Screws for 350
(3 on each side and 4 on
the end)
Blower junction box
Installation of Blower to Cabinet
21
Call 1-615-471-5290 for Technical Support
Содержание EL-140H
Страница 2: ......
Страница 51: ...45 Call 1 615 471 5290 for Technical Support ...
Страница 90: ...10 2 Carlin 50200E Primary Control 84 Call 1 615 471 5290 for Technical Support ...
Страница 91: ...85 Call 1 615 471 5290 for Technical Support ...
Страница 93: ...87 Call 1 615 471 5290 for Technical Support ...
Страница 94: ...88 Call 1 615 471 5290 for Technical Support ...
Страница 95: ...89 Call 1 615 471 5290 for Technical Support ...

