background image

Ness

-M1XEP  Installation Manual 

Page 7

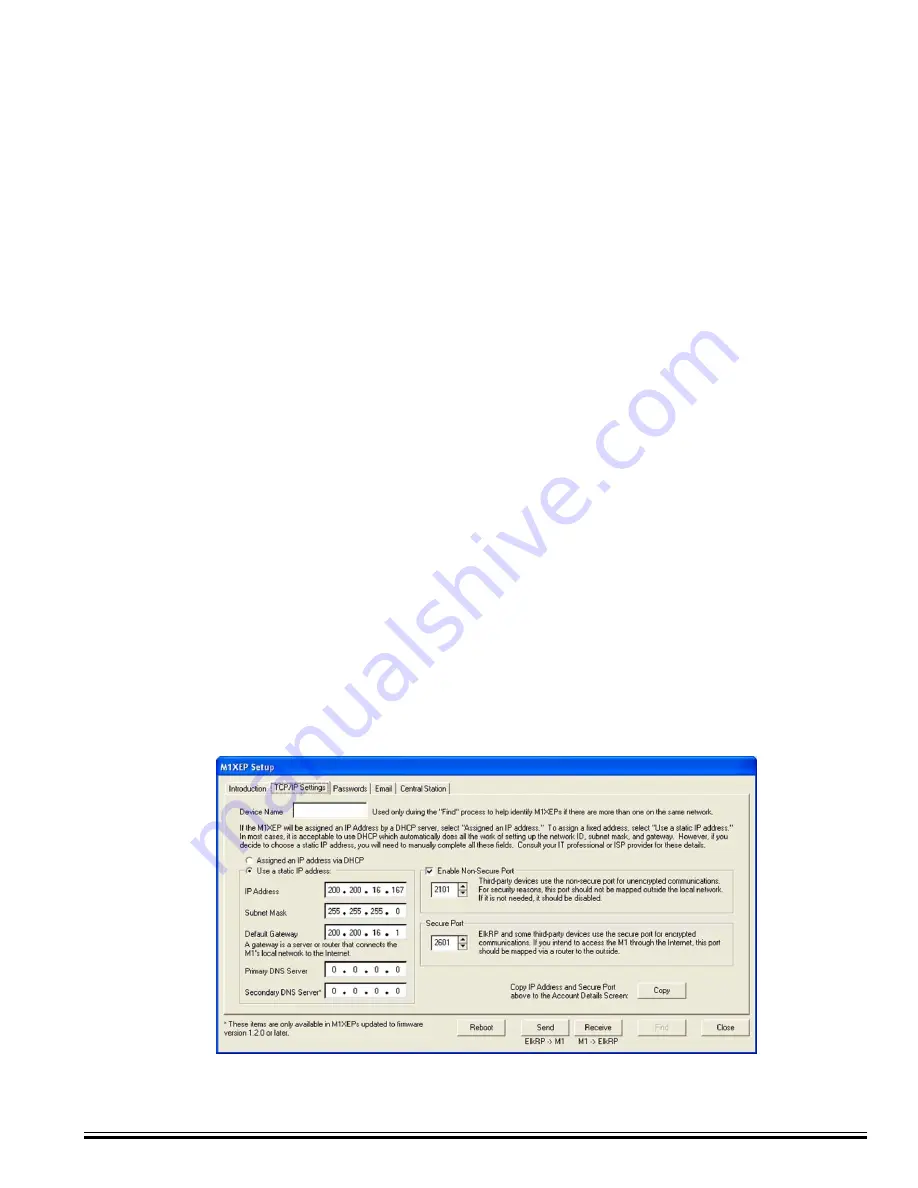
1.6. As previously discussed, the M1XEP is factory defaulted to DHCP, which means that it expects to be assigned a

“dynamic” IP address. Be aware that a “dynamic” IP address can periodically change for many reasons, including a
power down/up cycle. You may optionally assign the M1XEP a permanent “static” address, if permitted by the
network. This will also involve setting values for subnet mask, default gateway, and primary and secondary DNS
servers. These settings can be obtained from your network administrator or Internet service provider. 

The secondary

DNS field is only supported by M1XEPs with firmware version 1.2.0 or later.

If the M1XEP is programmed with a static IP address, and later changed to obtain a dynamic IP
address from a DHCP server, it will revert back to the last programmed static IP address if it fails
to obtain a dynamic IP address from the DHCP server after 1 minute.  If a static IP address has not
been programmed and the M1XEP cannot obtain a dynamic IP address from a DHCP server it will
default to an IP address of 192.168.0.251.

1.7. Some third party devices use a TCP or non-secure port for standard (unencrypted) communications on the local

network.  If this port is needed, select “Enable Non-Secure Port" and enter the appropriate port number.  Values
between 1024 and 49151 are valid.  The recommended (default) port is 2101.  This port should not be mapped
outside the local network for security reasons.  If the port is not needed, it should be disabled.  To disable the
non-secure port, remove the check from the box beside of "Enable Non-Secure Port".

1.8.

Ness

RP and some third party devices use a SSL or secure port for encrypted communications.  Enter the

appropriate value for the secure port.  Values between 1024 and 49151 are valid.  The recommended (default) port
is 2601.  If you intend to access the Control through the Internet, this port should be mapped (port forwarded) to
outside the local network via a router.

1.5. Once connected, click the 'M1XEP Setup' button once again to continue the configuration.  Click the 'TCP/IP

Settings' tab.  At the top, a device name of up to 16 characters may be entered.  This name is used only during
subsequent “Find” processes to quickly identify an M1XEP when there are more than one on the same network.

1.3. Highlight the M1XEP to be configured and click the 'Use Selected' button.  This automatically copies the IP

address and Port settings to the 

Ness

RP "Account Details" location and returns back to the setup screen.  Click

'Close' to exit this screen.

1.4. Before continuing with the setup and configuration, you must connect to the Control over the network.

a.

Verify that the URL/IP and Port setting are correct on the "Account Details" screen.

b.

Make sure the serial number is correct and the "RP Access Code" is set to the correct value programmed
into the control. (default=246801)

c.

From the RP Connection Menu, choose the "Network" method.

If everything is setup correctly, 

Ness

RP should now connect to the control through the M1XEP.

!

Содержание Ness M1XEP

Страница 1: ...Ness M1XEP Ethernet Interface INSTALLATION MANUAL...

Страница 2: ...EP Firmware 14 Using the Virtual Keypad Application 15 Glossary of Terms 21 Troubleshooting Guide 22 IMPORTANT NOTICE The M1XEP has been shipped with the non secure port enabled Itisstronglyrecommende...

Страница 3: ...ptible Power Supply in order for the equipment to continue operating during brief power outages Features and Specifications APPLICATION The Ness M1XEP is an Ethernet Device Server with a RS 232 Serial...

Страница 4: ...uterwithBuilt In Dynamic DNS Support M1XEP PC Technical support from Ness Security Products is limited to the setup and connection of the M1XEP inside the local network Connection to outside the local...

Страница 5: ...s the Installation Programming menu Menu 9 Choose Bus Module Enrollment Menu 1 and press the right arrow key to start the enrollment When the enroll ment is complete press the ELK or Asterisk key to e...

Страница 6: ...CP should not need any configuration to allow the M1XEP to connect inside the local network For communications outside the local network you will need to establish several open ports on the router Ple...

Страница 7: ...t be mapped outside the local network for security reasons If the port is not needed it should be disabled To disable the non secure port remove the check from the box beside of Enable Non Secure Port...

Страница 8: ...ges to the M1XEP and Save Usernames and Passwords are entered on this tabbed screen for use as a means of authentication while logging on to the M1XEPs secure connection port THESE ARE OPTIONAL If eve...

Страница 9: ...e supported only by M1XEPs with firmware version 1 2 0 or later d The lower portion of this screen is where the email addresses and messages for email notification are entered Up to 16 addresses and m...

Страница 10: ...one account 2 corresponds with CS2 etc 1 Create a new telephone account in NessRP To do this right click on the Telephones icon on the left side of the screen Choose New Telephone Enter the number of...

Страница 11: ...hat is set up as Format 6 Ethernet M1XEP For example if telephone ID s 1 2 are setup as telephone dialer formats and Telephone ID 3 is setup for Ethernet format you MUST program CS3 on the M1XEP Centr...

Страница 12: ...To connect to the Control over a network you will need the URL or IP address assigned to the M1XEP If the customer does not have a registered URL the IP address must be used If the M1XEP has been prog...

Страница 13: ...anually a If the M1XEP is connected through a network router you will need to enter the IP address or URL for the entire local network The router must be programmed to allow outside traffic through a...

Страница 14: ...t firmware version 6 Check the Update box under the action column and then click the Update button The update may take several minutes Wait for the process to complete DO NOT INTERRUPT OR POWER DOWN T...

Страница 15: ...ion with the M1 Virtual Keypad is already established and NessRP connects to the control the M1 Virtual Keypad will display Please Wait Panel has entered programming mode The M1 Virtual Keypad screen...

Страница 16: ...to run the application Clicking Run will proceed to run the Java applet Clicking Cancel will abort the connection This screen will appear every time you connect unless you choose the Always trust cont...

Страница 17: ...splayed even if the keypad does not physically exist Hovering the cursor over the F keys causes their programmed identity name to be displayed Clicking an F key performs the function s programmed in t...

Страница 18: ...rom 0 Off to 100 full on The On Off indicator will be Green when the device is On If there are too many lights to fit on one screen the word Next will illuminate along the bottom of the screen Click o...

Страница 19: ...x permits additional thermostats to be selected Use the mouse to change any of the settings The Up arrows raise the setpoint values and the Down arrows lower the setpoint values 10 The Climate screen...

Страница 20: ...w long the output will stay on The Send button must be clicked to perform the desired command Outputs printed in Red type are currently On 11 Click the Tasks button to display the following screen Thi...

Страница 21: ...y client and server station must have a unique IP address Example 192 168 0 1 Static IP Address a permanent or non changing IP address that is assigned to a node in a TCP IP network Static IP addresse...

Страница 22: ...g NessRP click on M1XEP setup then click Find to verify IP address viaLocalNetwork Highlight the M1XEP and click Use Selected If the M1XEP does not appear on the find screen refer to the troubleshooti...

Страница 23: ...M1XEP to continue booting up This may take another minute Browsergiveserrormessage Update Java VM The M1 Virtual Keypad requires Java version java lang UnsupportedClassVersionError J2SE 1 5 0 or later...

Страница 24: ...www ness com au m1 email m1support ness com au...

Отзывы: