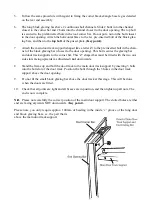
EXTERIOR DOOR TRACK
This top door track has no holes in, but 1 continuous bolt slot. You must have the door track cen-
trally positioned. Insert 3 bolts into the bolt slot and line them up with the 3 holes in the door track
support, put the nuts on and tighten up. To move the door track into the correct height, fit the glaz-
ing bar above the doors to the unoccupied hole in the ridge gusset plate and the slot in the middle of
the main door track support. Tighten all nuts.
FITTING THE DOORS TO THE STRUCTURE
The doors slide onto the frame from the left and right hand side.
For the left hand door, put the door bottom rail into the bottom door track and slide to the right, feed
the first wheel into the upper door track and move further to the right until the black draught exclud-
er butts up to the end block glazing bars. Carefully ease the door past the block glazing bar and feed
in the second wheel. Push further to the right until the draught excluder butts up to the end block
glazing bar. The door will now run quite freely. Fit the right hand door from the right hand side in
the same way. To square up the doors with the spacing, undo the upper bolts holding the door track.
There is a little play to facilitate “fine tuning” of the door.
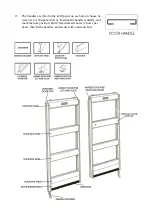
FITTING THE DOOR HANDLES
The handles are fitted to the infill panel on each door (choose between 1st or
2nd panel down). Position the handle centrally, and mark the hole position.
Drill 7mm diameter holes (2 holes per door), then fit the handles, and secure
with a nut and bolt.
FITTING THE DOOR LOCK
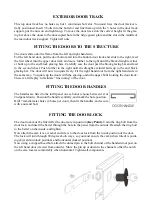
The door lock must be fitted after the doors are in position
(Key Point).
Undo the ring bolt from the
door lock, and insert the barrel through the hole in the panel from the outside. Reattach the ring bolt
to the barrel on the inside, and tighten.
Now attach the cam lever, washer and screw to the door lock from the inside position of the door.
The lock will turn through 90 degrees both ways, so you must ensure the cam (when fitted) is point-
ing skywards (unlock position) and horizontal (locked position)
Now using a cropped head bolt, attach the domed pin to the bolt channel of the handed door post on
the left hand door (viewed from outside). Move the pin up or down in the channel so that the notch
on the cam locates comfortably when horizontal. Tighten all components.
Содержание 7'5" WIDE TITAN
Страница 1: ......
Страница 2: ......
Страница 3: ......
Страница 9: ...WELL DONE YOU HAVE SUCCESSFULLY COMPLETED THE 2 SIDE FRAMES ...
Страница 11: ...REAR END ASSEMBLY ...
Страница 16: ...DOOR END ASSEMBLY ...
Страница 32: ...ELITE 1806 ...


