ROOF VENT ASSEMBLY
The roof vent pack has 5 pieces of aluminium: and from the main box of fittings you require
6’ of glazing beading
4 nuts and bolts
2 casement stay pins
1 casement stay
6 M4 stainless steel nuts and bolts
PROCEDURE:
1.
Identify the slam bar and attach the 2 stay pins to the outer side of the angle using the M4
stainless steel nuts and bolts.
2.
Lay the 4 edge pieces of the vent on a level surface as though you were on the inside of the
vent (with the bolt slots of the side bars uppermost and the ‘v’ slots of the bottom rail upper
most. The top rail is arranged in such a way that the squared off end is to the bottom and the
hooked hinge uppermost).
3.
Slide the glazing beading into the slots in the side and top rails and trim to suit.
4.
Insert a bolt into each end of the side rail bolt slots, put these bolts through the holes in the top
and bottom rails, add nuts and lightly tighten. Check that all joints are secure and that the
vent is square, and then tighten up the nuts.
5.
Fit the casement stay using the M4 stainless steel nuts and bolts, putting the bolts through the
holes in the saddle of the stay and through the 2 elongated holes in the bottom rail. Hold the
nuts in place and tighten the bolts with a screwdriver.
Do the same with the other vents.
The vents can be positioned onto the ridge after general assembly
by sliding them along the ridge from the end and locating them to
the desired position.
Do not fit the vent at this stage.
Содержание 7'5" WIDE TITAN
Страница 1: ......
Страница 2: ......
Страница 3: ......
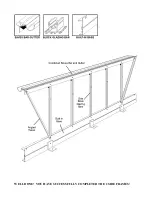
Страница 9: ...WELL DONE YOU HAVE SUCCESSFULLY COMPLETED THE 2 SIDE FRAMES ...
Страница 11: ...REAR END ASSEMBLY ...
Страница 16: ...DOOR END ASSEMBLY ...
Страница 32: ...ELITE 1806 ...


