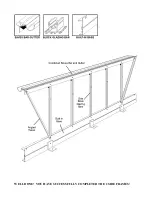
Every glazing bar is fitted with a cantilever. Small cantilevers across the gutter on both sides
(side bar to roof bar). Large cantilevers across the ridge (roof bar to roof bar).
You must remember to insert one extra bolt per cantilever T-bar brace and one per vent per
bar.
If you have purchased a partition with your greenhouse you will be 2 roof block glazing bars
short of a full pack. Omit one each side of the ridge at the point where the partition is to be
situated i.e. at the same place where you omitted the side glazing bars (see later text for par-
tition details).
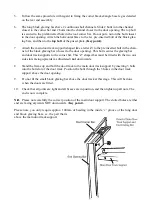
Before tightening the nuts that hold the roof block glazing bar to the eave you must ensure
that the roof block glazing bar is tight up against the small flange immediately above the
gutter.
(Key point).
Failure to observe this point and the previous one of keeping the roof
bar tight up to the ridge could result in a slight outward bow of the gutters and a slight
downwards dip of the ridge.
9.
At this point you will need to lift the structure onto a firm footing if you haven’t already
done so.
10.
On the 6’, 8’, 10’ and 12’ models there are 2 roof diagonal braces. On the 14’, 16’, 18’ and
20’ models there are 4. You attach these to the point where the ridge bolts to the corner bars
at the rear end. The angle travels diagonally down to the bottom of the first block glazing
bar at the eave/gutter. You fit one each side at the rear of the greenhouse. If you have the
longer house you put another 2 at the front end.
11.
You can now attach the T-bar cantilevers which bolt to the side block bars and roof block
glazing bars as indicated in point 8.
Before tightening these cantilevers up make sure there is no sag in the ridge or outward bow
in the eave. (Key point). If you do have this problem you must straighten it out before tighten-
ing the cantilevers up. A bow or sag can easily be removed with 2 people pushing the gutters
towards each other until straight, hold it in position whilst a third person tightens up the can-
tilevers.
Содержание 7'5" WIDE TITAN
Страница 1: ......
Страница 2: ......
Страница 3: ......
Страница 9: ...WELL DONE YOU HAVE SUCCESSFULLY COMPLETED THE 2 SIDE FRAMES ...
Страница 11: ...REAR END ASSEMBLY ...
Страница 16: ...DOOR END ASSEMBLY ...
Страница 32: ...ELITE 1806 ...


