background image

FITTING THE ROOF CANOPY 


This must be done AFTER the roof vent(s) is/are fitted. 


The canopy is fitted on top of the ridge bar, and is slight-
ly longer than the ridge. If your greenhouse is over 6’ 
long, then the canopy will be made up using several piec-
es. 
First sit the canopy on top of the ridge and position the 
canopies so that the overhang at each end of the ridge is 
the same and that the end of the canopy is level with the 
outer edge of the roof corner bars.  
Drill through the ridge (7mm diameter hole) and canopy at each end . Insert a bolt, and secure on 
the other side with a nut. 


Now insert the canopy seal to each side of the canopy into the seal channel, and feed along so that it 
is level with the ridge at each end.


FITTING THE CANOPY PLATE 


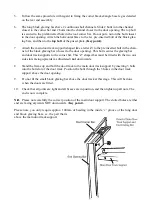
The canopy plate has 3 holes. Slide a LONG 
bolt (provided) into the external bolt slot of the 
glazing bar above the door and the central 
glazing bar at the rear. Fit the canopy plate to 
this bolt, and put a nut on. Do not tighten yet. 
Now the top 2 holes in the plate are fitted to 
the self tapping screw grooves in the ends of 
the roof canopy using 1/2” colour coded 
screws provided.  
Tighten all screws and nuts.


FITTING THE RAMP 


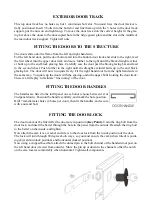
The final aluminium piece of the greenhouse is the door end ramp cill. The ramp is attached to the 
door end cill by engaging the nub of the door end cill to the ‘C’ groove of the ramp. The ramp is 
now rotated to horizontal. Drill a hole at each end approx. 20mm in from the end of the ramp and 
into the floor. Plug and screw. 
If you are fitting onto soft ground, you must ensure that a solid material is underneath the ramp to 
avoid damage when you step on the ramp to enter the greenhouse. 
You can lay a row of bricks sunk to ground level, a concrete flag, a 
piece of aluminium base pressed into the ground to ground level or 
something similar. You can then screw the ramp into the support 
material for a secure fixing.  

Содержание 7'5" WIDE TITAN

Страница 1: ......

Страница 2: ......

Страница 3: ......

Страница 4: ...ng bar 1 1 1 1 1 1 1 1 16 Door end diagonal angle 2 2 2 2 2 2 2 2 14 15 16 taped together and marked rear end 17 Corner bars in 2 packs of 4 8 8 8 8 8 8 8 8 18 Roof block glazing bars 4 6 8 10 12 14 16 18 19 Side block glazing bars 4 6 8 10 12 14 16 18 20 Roof diagonal angle 2 2 2 2 4 4 4 4 21 Roof vent pack 1 2 2 2 4 4 6 6 22 Door panel pack 2 2 2 2 2 2 2 2 23 Door posts 2 unhanded 1 left post 1 ...

Страница 5: ... strong outer clothing and eye glasses should be worn Be careful when using agricultural chemicals such as fertilisers fungicides and insecticides etc in the greenhouse Do not use chemicals that are for outside use only Always read the labels very carefully Do not push or lean on the glass panels Use extra care when moving heavy or awkward objects such as tables poles internal frames etc within or...

Страница 6: ...e completed unit It is recommended that each frame assembly is fully completed before moving on to the next The frames to be constructed are as follows 1 SIDE FRAME Two off 2 REAR GABLE One off 3 DOOR GABLE One off 4 ROOF VENT One for 6 x 8 two for 8 x 8 10 x 8 12 x 8 four for 14 x 8 and 16 x 8 six for 18 x 8 and 20 x 8 5 DOOR S Two off 18 wide 6 LOUVRE 7 Additional parts such as the ridge roof ba...

Страница 7: ... inside bolt channel skywards and the beading channels of the block glazing bar facing downwards Key point Slide the glazing beading into the V grooves of the block glazing bars 2 Slide a bolt into each end of each block glazing bar using the inside bolt slot i e the one facing upwards and one in the middle to enable the cantilever brace to be fitted If you have bought a shelf and or louvre to go ...

Страница 8: ...olt channel of both ends of the built in base These will be used to secure the corner bracket base leg If your greenhouse is over 12 5 in length you will need to attach the side base sections together to form the length of your greenhouse You will notice that you have 4 side base pieces 2 of which will be un fabricated at 1 end These 2 sections are handed sections and must be fitted to the correct...

Страница 9: ...WELL DONE YOU HAVE SUCCESSFULLY COMPLETED THE 2 SIDE FRAMES ...

Страница 10: ...d with a letter R They can be identi fied from the side bars as pictured above Key point 1 The bars are also handed so you must identify the left and the right hand Standing up hold one side bar vertically in your left hand and the other in your right Rotate the bars so that the 2 bolt slots are facing towards you with the mitres at the top inside view Viewed this way the two mi tres should run do...

Страница 11: ...REAR END ASSEMBLY ...

Страница 12: ...t nuts on both bolts i e flange and plate finger tip tighten only Key point 7 Do exactly the same with the other roof corner bar ensuring that the two bars are pressed tight up together behind the ridge gusset plate 8 Now moving to the eave gusset assembly slide one bolt into the facing bolt slot the one that is facing upwards and is at 90º to 4 above Place the eave gusset plate smaller of the 2 t...

Страница 13: ...orner bar place the nuts on and finger tip tighten 16 Now attach the horizontal brace to the 3 upright blockglazing bars utilising the 1st bolt you inserted in 13 above Put the nuts on finger tip tight Key point 17 The built in base has a continuous bolt channel along its length Slide 5 bolts into this channel if you are installing the greenhouse onto hard standing or 2 bolts 1 at each end if inst...

Страница 14: ...agram At this stage the cill will move freely left and right but will remain located to the built in base cill See diagram below The bottom cill is not as wide as the greenhouse it is approx 300mm shorter i e 150 mm at each side 3 The long block glazing bars have 2 bolt channels on the inside face When in position slide 2 bolts into the bottom of the channel closest to the corner bar and 1 bolt in...

Страница 15: ...he glazing bar and door track supports to the corner bar This Z shaped bar must be fitted with the two out side slots facing upwards as illustrated not downwards 8 Stand the frame up and bolt the door track to the main door track support by inserting 3 bolts into the bolt slot of the door track Position the bolts through the 3 holes in the door track support above the door opening 9 Do not fit the...

Страница 16: ...DOOR END ASSEMBLY ...

Страница 17: ...ttom and the hooked hinge uppermost 3 Slide the glazing beading into the slots in the side and top rails and trim to suit 4 Insert a bolt into each end of the side rail bolt slots put these bolts through the holes in the top and bottom rails add nuts and lightly tighten Check that all joints are secure and that the vent is square and then tighten up the nuts 5 Fit the casement stay using the M4 st...

Страница 18: ... Unhanded door post on the left handed door post on the right The top of each side post has two screw holes in it the bottom has three Key point Slide the glazing beading into the groove of each bar i e only one length of glazing beading per bar 2 Place the top bottom and 3 infill panels in position as shown by the po sition of the screw holes in the side pieces and the panels The top panel has th...

Страница 19: ...ntre this collar goes against the inside face of the top door panel See picture 8 Slip the nylon door skids on each of the bottom panels This may already have been done prior to delivery After fitting the doors see later in the booklet you may need to lower the door skid so that it engages with the bottom door cill to allow smooth movement of the door Lower the skid on each door and insert a self ...

Страница 20: ...ed to the infill panel on each door choose be tween 1st or 2nd panel down Position the handle centrally and mark the hole position Drill 7mm diameter holes 2 holes per door then fit the handles and secure with a nut and bolt ...

Страница 21: ...t 2 Loosen the nuts holding the bolts you inserted into the alternative bolt slot of the corner bar during door end and rear end assembly and slide them into the slotted holes in the flanges of the gutter see diagram Put a nut on the top bolt put the side diagonal brace on the bottom bolt and then the nut and tighten up Repeat the procedure at the bottom where the built in base and corner bar meet...

Страница 22: ...of the cor ner bars The vertical part of the ridge is outside and pointing skywards Undo the nuts and bolts previously inserted during the gable end assembly and push them upwards into the slot ted holes of the ridge Tighten the nuts 7 The roof block glazing bars can now be attached to the structure but first you must slide the glazing beading into the bars and trim to suit Key point Attach the ba...

Страница 23: ...outward bow of the gutters and a slight downwards dip of the ridge 9 At this point you will need to lift the structure onto a firm footing if you haven t already done so 10 On the 6 8 10 and 12 models there are 2 roof diagonal braces On the 14 16 18 and 20 models there are 4 You attach these to the point where the ridge bolts to the corner bars at the rear end The angle travels diagonally down to ...

Страница 24: ... Determine the square of the greenhouse as described above dig holes approx 1 spade depth in the corners make a mix of concrete and place a couple of shovelfuls around the base of each stake When the concrete has gone off backfill with the soil excavated earlier on NOW YOU FIT THE VENT TO THE RIDGE Slide the vent into position in the C groove as shown Insert a small black PVC tube into the same ch...

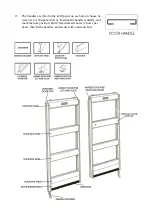
Страница 25: ...d door from the right hand side in the same way To square up the doors with the spacing undo the upper bolts holding the door track There is a little play to facilitate fine tuning of the door FITTING THE DOOR HANDLES The handles are fitted to the infill panel on each door choose between 1st or 2nd panel down Position the handle centrally and mark the hole position Drill 7mm diameter holes 2 holes...

Страница 26: ...s the door from moving too far along the top door track Repeat at the bottom of the door Repeat for the 2nd door To facilitate smooth running of the door fit 1 flat bar at each end of the top door track The flat bar has 2 holes of different size Loosely fix the larger hole to the bolt channel at the back of the top door track using a short bolt and allow the flat bar to hand vertically down Move t...

Страница 27: ...lazing bar above the door and the central glazing bar at the rear Fit the canopy plate to this bolt and put a nut on Do not tighten yet Now the top 2 holes in the plate are fitted to the self tapping screw grooves in the ends of the roof canopy using 1 2 colour coded screws provided Tighten all screws and nuts FITTING THE RAMP The final aluminium piece of the greenhouse is the door end ramp cill T...

Страница 28: ...bottom cill The louvre is fitted from inside the greenhouse and you must ensure that the handles are on the right viewed from inside 1 Decide which bay you intend to fit to and fit 1 piece of glass on the bottom cill either ref T6 or T5 depending upon the required louvre height 2 Offer the louvre to the bay you intend to fit to and sit on top of the previously installed pane of glass 3 Using the p...

Страница 29: ...z ing bar 2 on either side of the pane approx 100mm from the bottom and the top The upper 2 clips approx 13mm from the top edge of the glass Now insert the intermediate clips so as to have 8 clips per large pane Bar Capping should be fitted as you go along You need access to the top of each roof cap to screw into position so you will need to poke your head up in the next bay along to enable safe f...

Страница 30: ...5 T6 T10 T14 T15 T16 T17 T21 T41 T46 T47 T48 TOTAL T42 T44 T43 T45 6 X 7 4 1 1 3 2 1 4 2 10 2 1 2 2 2 46 2 4 2 1 8 X 7 4 3 1 3 2 2 4 2 10 2 2 2 2 2 51 2 4 2 2 10 X 7 4 5 1 3 2 2 4 2 10 2 2 2 2 2 55 2 4 2 4 12 X 7 4 7 1 3 2 2 4 2 10 2 2 2 2 2 59 2 4 2 6 14 X 7 4 9 1 3 2 4 4 2 10 2 4 2 2 2 65 2 4 2 6 16 X 7 4 11 1 3 2 4 4 2 10 2 4 2 2 2 69 2 4 2 8 18 X 7 4 13 1 3 2 6 4 2 10 2 6 2 2 2 75 2 4 2 8 20 X...

Страница 31: ...EET TOUGHENED GLASS YOUR GREENHOUSE IS NOW COMPLETE If you have purchased any accessories such as staging louvre auto vents rain water kits etc they will have their own detailed instructions in their packaging ...

Страница 32: ...ELITE 1806 ...

Отзывы: