120
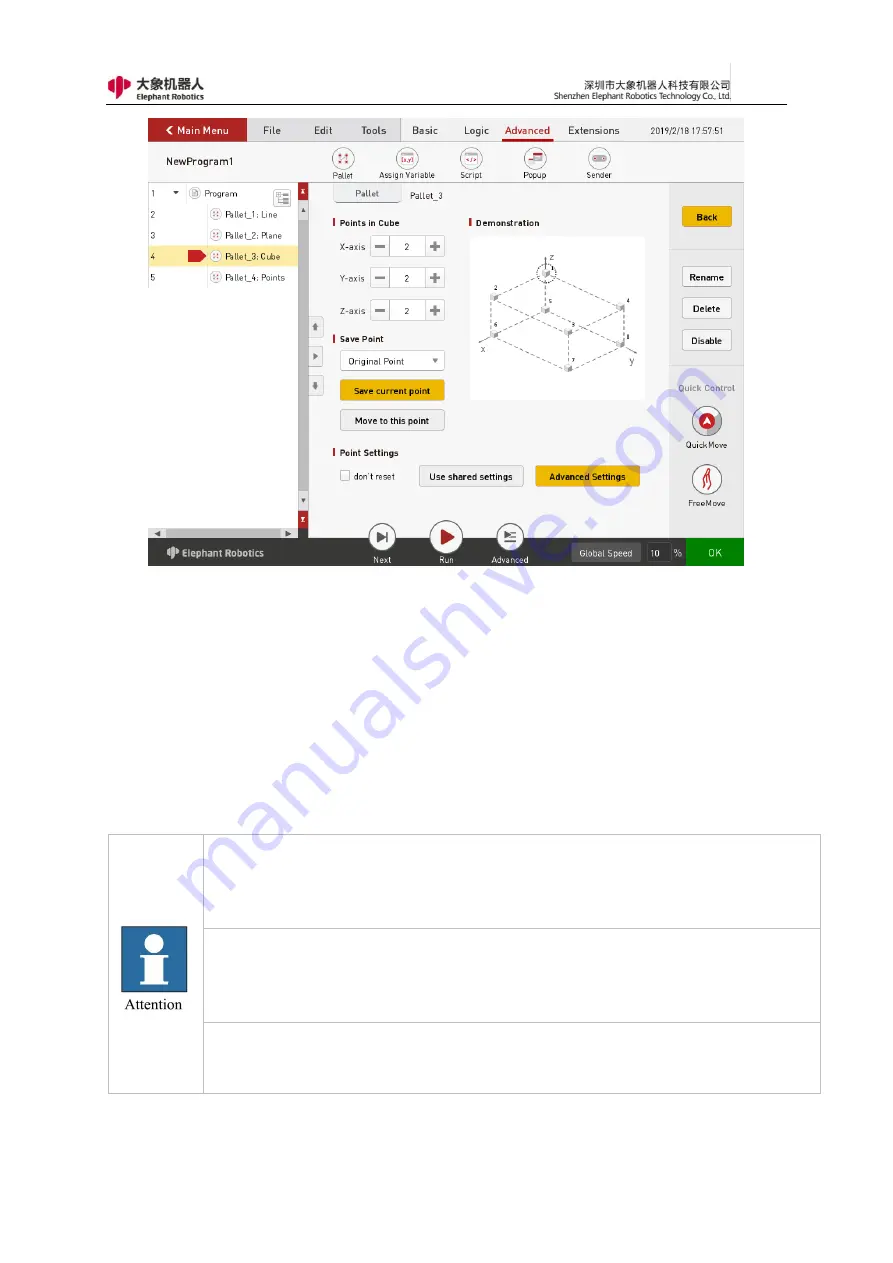
Figure 4- 25 Cube
As shown in Figure 4-26, when “Discrete Point” is selected, the number of
points is selected to teach different points. That is, a discrete point is a collection
of multiple points.
Whichever type is chosen, the robot will move to the first point when this instruction
is executed for the first time.
The second time, the robot moves to the second point.
The nth time the instruction is run, it moves to the nth point.
Until all the points have
arrived, the robot will start again from the first point.
Note that if you need to control the position of the robot to reach each point
separately, this command needs to be used in conjunction with the loop instruction.
This instruction is only executed once and only controls the robot to reach the first
point.
If you select "Do not reset", then stop running the program before all points have
been executed. When you run it again, it will start from the point of the last
interruption, not from the first position.
Содержание myCobot Pro 600
Страница 1: ...1 Elephant Robotics User Manual myCobot Pro 600 Language English Compiled in 2022 3 28...
Страница 14: ...14 2 QuickStart 2 1 Installation Instructions for the Robot Arm 1 Full unpacked items of robot arm...
Страница 19: ...19 8 Install the set screws of housing for the pedestal of robot arm 9 Baseplate dimension figure...
Страница 27: ...27 Fig 2 9 State of Being Not Powered On...
Страница 28: ...28 Fig 2 10 In the Process of Being Powered On Fig 2 11 Completion of Being Powered On...
Страница 35: ...35...
Страница 37: ...37 3 2 Product Appearance and Composition Fig 3 1 Product Composition...
Страница 38: ...38 3 3 Working Principles and Specifications 3 3 1 Working Space...
Страница 39: ...39 3 3 2 Coordinate System DH parameters and coordinate system Fig 3 2 DH Coordinate System...
Страница 40: ...40 Fig 3 2 DH Coordinate Parameter...
Страница 45: ...45 Fig 3 10 Size Parameters of End Mounting Hole...
Страница 71: ...71 Figure 2 21 Initialization 2 Default program Figure 2 22 shows the default program settings page...
Страница 75: ...75 Figure 2 25 Language and unit 6 Time Figure 2 26 shows the time setting page...
Страница 88: ...88 Figure 3 13 Network settings...
Страница 95: ...95 Figure 3 21 Basic Settings...
Страница 113: ...113 Figure 4 17 Subprogram Figure 4 18 Display subroutine...
Страница 135: ...135 Fig 5 88 Connect to RoboFlow Fig 5 89 Connected Successfully...


