10
repair. The operator is not allowed to change the operating procedures and trials at will,
and other personnel are not allowed to enter the collaborative operation space and
danger zone.
6
When repairing work, operators must hang the warning sign to enter the collaborative
operation space.
7
When the operator enters the safety zone of the equipment protected by the safety guard
door, it shall be absolutely guaranteed that the safety guard door will always open when
working in the area, and the door must be in an unlocked position.
8
When the operator is in production, it should be ensured that each starting device is
normal and cannot be started at will.
9
When the maintenance and operation personnel perform maintenance on the
equipment, the main power switch must be turned off to perform maintenance work.
10
No items should be stacked in the robot working area, and no debris should be placed
in the control box.
11
After the operation is completed, the safety protection door should be closed
immediately, and the various switches of gas and electricity should be closed according
to the procedure, and the work site should be cleaned up.
12 Do not shake the robot and hang heavy objects on the robot.
13 No dangerous behaviors or games around the robot.
14
After installing the robot, make sure the robot is fixed on a stable surface for subsequent
operations.
15 Make sure that the robot does not collide with itself or other objects during running.
16 If the robot is damaged, do not continue to use it.
17
Please use the robot within the robot's parameter range and service life, otherwise it
will cause serious safety problems.
18
After the emergency stop state is canceled, and before the servo power is turned on, it
is necessary to remove the obstacles and faults that cause the emergency stop, and then
turn on the servo power.
19
Please pay attention to the rotating shaft of the robot to prevent the cable and the air
tube from being entangled. Keep a distance from the shaft to prevent hair or clothing
from getting entangled.
Содержание myCobot Pro 600
Страница 1: ...1 Elephant Robotics User Manual myCobot Pro 600 Language English Compiled in 2022 3 28...
Страница 14: ...14 2 QuickStart 2 1 Installation Instructions for the Robot Arm 1 Full unpacked items of robot arm...
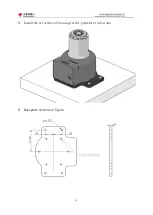
Страница 19: ...19 8 Install the set screws of housing for the pedestal of robot arm 9 Baseplate dimension figure...
Страница 27: ...27 Fig 2 9 State of Being Not Powered On...
Страница 28: ...28 Fig 2 10 In the Process of Being Powered On Fig 2 11 Completion of Being Powered On...
Страница 35: ...35...
Страница 37: ...37 3 2 Product Appearance and Composition Fig 3 1 Product Composition...
Страница 38: ...38 3 3 Working Principles and Specifications 3 3 1 Working Space...
Страница 39: ...39 3 3 2 Coordinate System DH parameters and coordinate system Fig 3 2 DH Coordinate System...
Страница 40: ...40 Fig 3 2 DH Coordinate Parameter...
Страница 45: ...45 Fig 3 10 Size Parameters of End Mounting Hole...
Страница 71: ...71 Figure 2 21 Initialization 2 Default program Figure 2 22 shows the default program settings page...
Страница 75: ...75 Figure 2 25 Language and unit 6 Time Figure 2 26 shows the time setting page...
Страница 88: ...88 Figure 3 13 Network settings...
Страница 95: ...95 Figure 3 21 Basic Settings...
Страница 113: ...113 Figure 4 17 Subprogram Figure 4 18 Display subroutine...
Страница 135: ...135 Fig 5 88 Connect to RoboFlow Fig 5 89 Connected Successfully...


