101
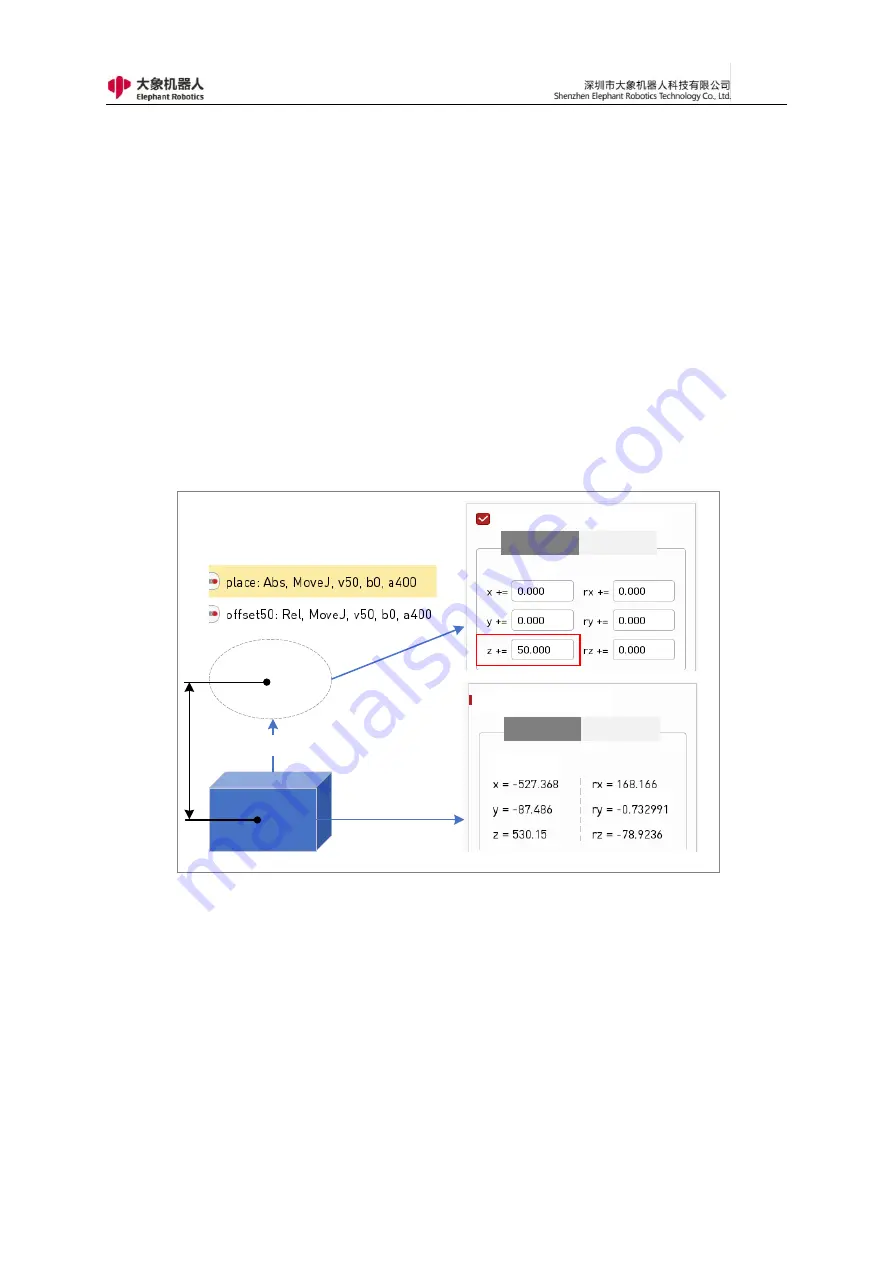
robot (at this time the robot should be holding the state of the workpiece) to move
to the placement point, click to save the current point, which generates the
command line 2 shown in Figure 4-6. Then click on the basic function - waypoint:
select the relative point, set the z-direction of the icon to increase the relative
point of 50mm, then the robot will move to the position of the transition point
after running the last sentence. In the actual pickup and placement process, other
instructions, such as setting instructions, may be added between the two
instructions to open the gripper.
Transition
point
Target
placement
Up
Up
Down
(Unit:mm)
Coordinate
Angle
Coordinate
Angle
Waypoint coordinates
Direct input (relative motion)
(Unit:mm)
50
mm
Figure 4- 6 Application examples of direct input coordinate values
In addition to offset based on the position of the last motion instruction,
relative point instruction can also be offset based on a Waypoint or Variable point.
The "Move to this" button verifies the offset motion, and "Clear Saved
Points" clears the currently entered content.
Содержание myCobot Pro 600
Страница 1: ...1 Elephant Robotics User Manual myCobot Pro 600 Language English Compiled in 2022 3 28...
Страница 14: ...14 2 QuickStart 2 1 Installation Instructions for the Robot Arm 1 Full unpacked items of robot arm...
Страница 19: ...19 8 Install the set screws of housing for the pedestal of robot arm 9 Baseplate dimension figure...
Страница 27: ...27 Fig 2 9 State of Being Not Powered On...
Страница 28: ...28 Fig 2 10 In the Process of Being Powered On Fig 2 11 Completion of Being Powered On...
Страница 35: ...35...
Страница 37: ...37 3 2 Product Appearance and Composition Fig 3 1 Product Composition...
Страница 38: ...38 3 3 Working Principles and Specifications 3 3 1 Working Space...
Страница 39: ...39 3 3 2 Coordinate System DH parameters and coordinate system Fig 3 2 DH Coordinate System...
Страница 40: ...40 Fig 3 2 DH Coordinate Parameter...
Страница 45: ...45 Fig 3 10 Size Parameters of End Mounting Hole...
Страница 71: ...71 Figure 2 21 Initialization 2 Default program Figure 2 22 shows the default program settings page...
Страница 75: ...75 Figure 2 25 Language and unit 6 Time Figure 2 26 shows the time setting page...
Страница 88: ...88 Figure 3 13 Network settings...
Страница 95: ...95 Figure 3 21 Basic Settings...
Страница 113: ...113 Figure 4 17 Subprogram Figure 4 18 Display subroutine...
Страница 135: ...135 Fig 5 88 Connect to RoboFlow Fig 5 89 Connected Successfully...


