25
cz
pl
dk
ru
no
fi
it
se
gb
fr
A
B
C
How to use the robot / Comment utiliser le robot aspirateur
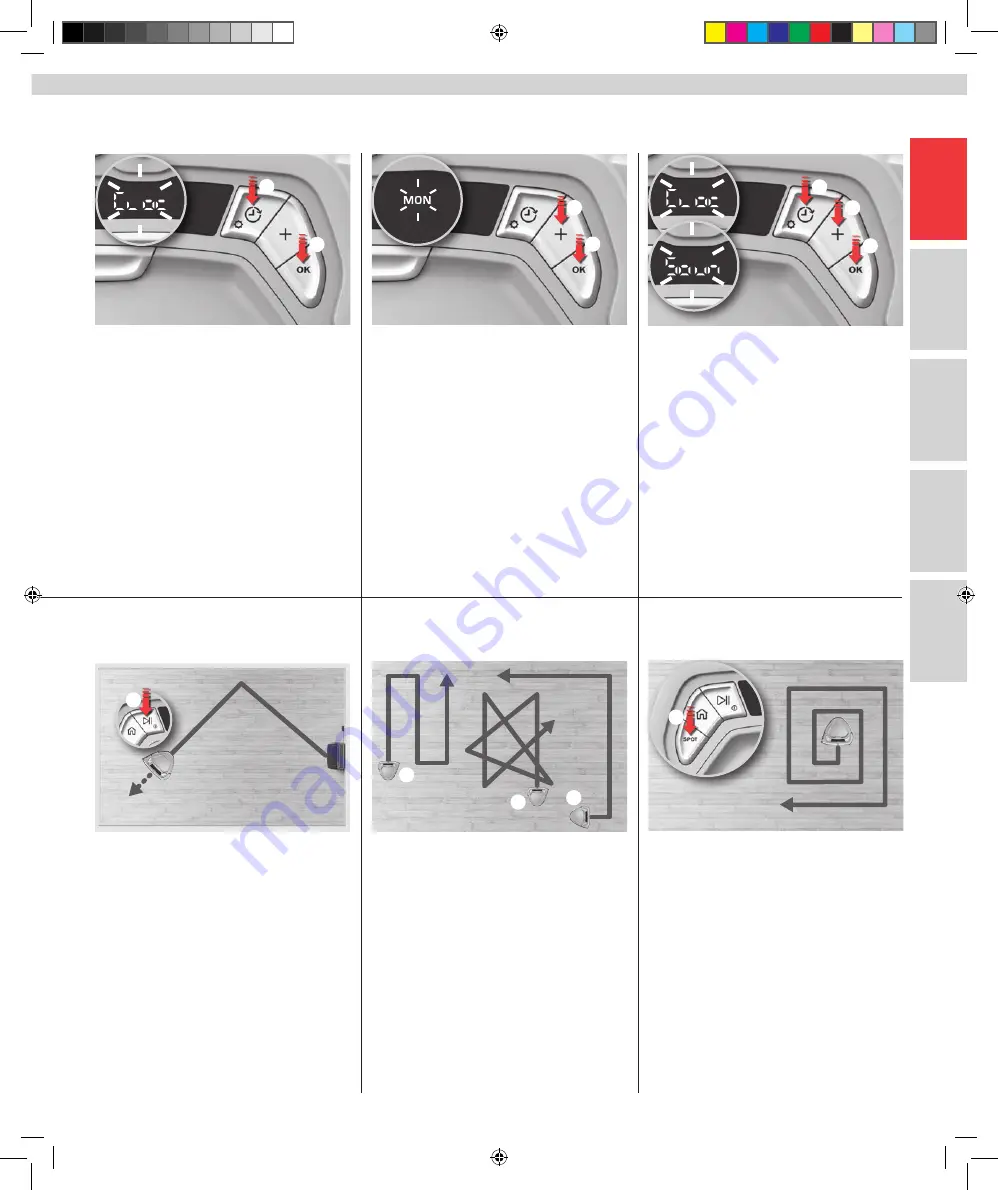
1. Set the clock:
Press and hold the Schedule/Setting
button (A) until “CLOC“ starts flashing. Press “OK“ (B),
weekdays starts flashing.
Note:
The Schedule/Setting button (A) can be used at
any time to exit. The settings can also be managed more
conveniently through the remote control.
2. Set the current weekday and time:
“Weekday”
: Press + button (A) until the correct day
flashes. Confirm by pressing “OK”(B).
“Hour”
: Press + button (A) until the correct hour flashes.
Confirm by pressing “OK”(B).
“Minute”
:
Press + button (A) until the correct minute
flashes. Confirm by pressing “OK”(B) and exit.
3. Enable/disable the sound:
Press and hold the Schedule/Setting button (A) until
“CLOC“ starts flashing. Press + button (B), “SOUN” appears.
Press “OK“ (C), “ON“ appears. Press + button (B) to enable
(On) or disable (Off) the sound.
Press “OK” (C) to confirm and exit.
1. Press Play/Pause button (A) to start cleaning.
The display indicates “Auto“.
Note:
Press “Play/Pause” (A) briefly to pause cleaning, or
press and hold to terminate cleaning.
2. The robot intelligence detects obstacles and
calculate accordingly the optimal cleaning path
for an efficient cleaning.
It will automatically switch
between different cleaning modes:
- Snake (A)
- Bounce (B)
- Wall following (C)
1. Régler l’horloge :
Maintenez la touche Programmer/
Réglage (A) enfoncée jusqu’à ce que « HOR » clignote.
Appuyez sur « OK » (B), les jours de la semaine
commencent à clignoter.
Remarque :
la touche Programmer/Réglage (A) peut être utilisée
à tout moment pour quitter. Les réglages peuvent également être
gérés plus commodément grâce à la télécommande.
2. Régler le jour de la semaine et l’heure :
« Jour de la semaine » :
Appuyez sur la (A) jusqu’à ce
que le jour correct clignote. Confirmez en appuyant sur « OK » (B).
« Heure » :
Appuyez sur la (A) jusqu’à ce que l’heure
correcte clignote. Confirmez en appuyant sur « OK » (B).
« Minute » :
Appuyez sur la (A) jusqu’à ce que la
minute correcte clignote. Confirmez en appuyant sur « OK » (B) et
quittez.
2. De façon intelligente, le robot détecte les obstacles
et calcule en fonction de ces obstacles le trajet
optimal pour un nettoyage efficace.
Il passera
automatiquement d’un mode de nettoyage à un autre :
- Serpent (A)
- Rebond (B)
- Tracé des murs (C)
3. Activer/Désactiver le son :
Maintenez la touche Programmer/Réglage (A) enfoncée
jusqu’à ce que « HOR » clignote. Appuyez sur la touche
+ (B), « SON » apparaît. Appuyez sur « OK », « ON »
apparaît. Appuyez sur la (B) pour activer (On) ou
désactiver (Off) le son.
Appuyez sur « OK » (C) pour confirmer et quitter.
1. Appuyez sur la touche Marche/Pause (A) pour lancer
le nettoyage.
L’écran indique « Auto ».
Remarque :
appuyez brièvement sur la touche Marche/
Pause (A) pour mettre le nettoyage en pause ou maintenez-
la enfoncée pour terminer le nettoyage.
Cleaning modes
Réglage de l’horloge et des paramètres de présentation
Setting the clock and presentation settings
Modes de nettoyage
3. Spot cleaning (small area, ~ 1 m2):
Place the robot
on the spot you want to clean and press the SPOT button
(A).
Spot cleaning
can be started while the robot is
vacuuming or is in schedule mode. When finished, the
robot will enter idle mode. Press Play/Pause button to
continue vacuuming in normal mode.
3. Nettoyage de tache (petite surface, ~ 1 m2) :
Placez
le robot sur la tache que vous voulez nettoyer et appuyez
sur la touche TACHE (A). Le nettoyage de tache peut être
lancé pendant que le robot aspire ou se trouve en mode
Programmer. Quand il a terminé, le robot se met en
mode Ralenti. Appuyez sur la touche Marche/Pause pour
continuer l’aspiration en mode normal.
A
A
C
B
A
B
A
B
A
Anubis_Electrolux_EMEA.indd 25
2016-08-03 11:19:38
Содержание MOTION SENSE ERV5210TG
Страница 35: ...35 cz pl dk ru no fi it se gb fr Anubis_Electrolux_EMEA indd 35 2016 08 03 11 19 54 ...
Страница 49: ...49 cz pl dk ru no fi it se gb fr Anubis_Electrolux_EMEA indd 49 2016 08 03 11 20 24 ...
Страница 63: ...63 cz pl dk ru no fi it se gb fr Anubis_Electrolux_EMEA indd 63 2016 08 03 11 20 54 ...
Страница 77: ...77 cz pl dk ru no fi it se gb fr Anubis_Electrolux_EMEA indd 77 2016 08 03 11 21 26 ...
Страница 91: ...91 cz pl dk ru no fi it se gb fr Anubis_Electrolux_EMEA indd 91 2016 08 03 11 22 11 ...


