


XD10P Cinema Audio Processor, Installation and Operation
Version 1.0
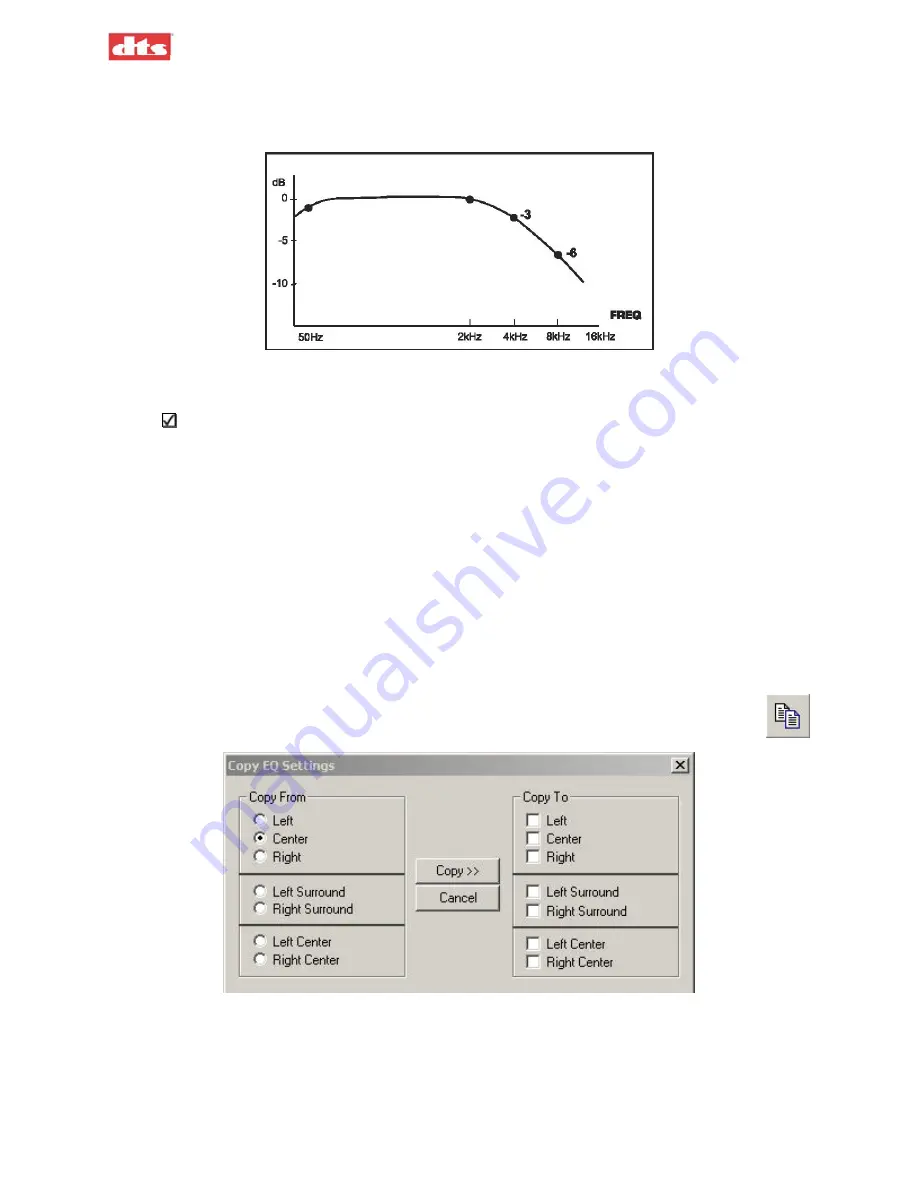
The goal is to achieve a 3 dB roll off at 2 kHz, on every channel except Subwoofer, as shown in
this example. (Subwoofer equalization is detailed in
Figure 3-12. RTA example. Try to obtain this pattern for ALL channels except Subwoofer.
9. Use the individual sliders for fine-tuning.
Note
: Once a slider is selected with a mouse click, the keyboard UP/DOWN keys will adjust
the slider. The left/right keys will switch to the adjacent 1/3 octave slider. Use the Bass and
Treble sliders to achieve the overall shape of the auditorium response. After making the EQ
adjustments, it may be necessary to fine-tune the level setting (in the
Outputs
tab).
10. Repeat the tuning procedure (steps 4 through 9) for the left, right, left center, right center and
surround channels. You may use the Copy feature to simplify this procedure (see next topic).
3.5.1. Use the Copy Feature
The XD10P includes a
Copy
feature that minimizes the time required for re-equalizing similar
channels (see Figure 3-13, below).
After equalizing the center channel, copy these settings to the left, left center, right center, and
right channels. Since all three front speakers are usually similar, if not identical, the EQ settings
will be a close starting point. Similarly, after equalizing the left surround, copy these settings to
the right surround channel.
To access Copy, select
Copy
from the
File
menu, click the
Copy EQ
icon in the toolbar,
or press key combination
Ctrl+Shift+C
.
Figure 3-13. Copy EQ settings
•
Select the
Copy From
channel, then select the
Copy To
channel, then click the
Copy>>
button.
3. Using XD10P Setup
Document #: 9301E855001.0
3-9
Содержание XD10P
Страница 13: ...XD10P Cinema Audio Processor Installation and Operation Version 1 0 Document 9301E855001 0 xii ...
Страница 80: ......


