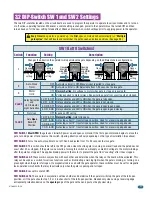
9150-065-Y-12-20
24
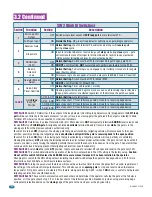
3.4 Clutch Adjustment
Test the operator clutch adjustment:
CAUTION: Keep pedestrians and vehicles clear of the gate while
testing clutch!
Place an immobile object along the gate path, allowing the gate to strike
it while in the
open
and
close
cycles. The clutch
must
slip and the gate
must
reverse direction after striking the object. If it does not, readjust
the clutch. Repeat this test until the correct clutch adjustment has been
achieved. The operator will assume a soft shutdown after striking and
reversing the gate which will require a key switch command to cycle
operator again.
1
2
3
4
In addition to the inherent reverse sensor, this operator is equipped with a mechanical slip clutch to further reduce the possibility of injury
should an entrapment occur.
DO NOT
over tighten the clutch to compensate for a gate that is damaged, poorly constructed or too heavy.
Over
tightening the clutch would create a hazard
which could result in serious injury or death to persons who may become entrapped.
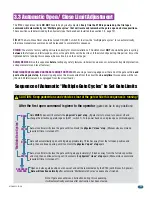
Hex Bolt
Magnetic
Spring Assembly
To adjust clutch:
Hex nut is connected to black plastic magnet holder.
Important Note:
2
magnetic sensors
located on the bottom of
the circuit board sense when the magnetic spring assembly is
slipping during operation. Keep all high voltage wires away from
the 2 sensors to avoid any electrical interference between the
sensors and magnets.
Note:
After power has been turned back on, the first open command will
automatically run the “multiple gate cycles” to locate and remember the open
and close gate positions (See section 3.3 on previous page).
Make sure power to operator is OFF when adjusting clutch.
Hold large pulley to loosen the hex bolt counter clockwise.
Magnetic spring assembly can now be loosened (counter clockwise) or tightened
(clockwise) to adjust the clutch.
Tighten the hex bolt to lock assembly after adjustment.
3.5 Inherent Reverse Sensor Adjustment
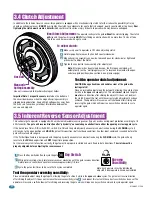
Test the operator reversing sensitivity:
Press the Key Switch button to cycle the gate.
While gate is cycling, slowly rotate reverse sensor clockwise until the gate reverses direction.
Rotate reverse sensor back counter-clockwise approximately 1/8 turn.
Cycle the gate a few times to be sure that it cycles completely.
Place an immobile object along the gate path, allowing the gate to strike it while in the
open
and
close
cycles. The gate must reverse direction
after striking the object. If it does not, increase the reverse sensitivity (step ) and repeat this test until the correct sensitivity has been set. The
operator will assume a soft shutdown after striking and reversing the gate which will require a key switch command to cycle operator again.
1
2
2
3
Min
Max
Sensitivity
Key Switch
Reverse
Sensitivity
Note: Each operator must be individually
adjusted if dual operators have been installed.
Ideal Clutch Adjustment:
The operator will cycle the gate
without
the clutch slipping. The clutch
will
slip and the gate will reverse
ONLY
after striking an obstruction with no more than 75 Lbs of force.
This force can be measured with a gate scale.
This vehicular gate operator is equipped with an inherent adjustable reversing sensor (Type A) used as entrapment protection according to UL
325 standards.
The gate will reverse direction after “physically” encountering an obstruction in either the opening or closing gate cycle
.
If the Auto-Close Timer (DIP-switch SW 1, switch 2) is ON and the gate physically encounters an obstruction during the
CLOSING
cycle, it
will reverse to the open position and
HOLD
the gate at this position (Soft shutdown condition). Another input command is needed before the
gate will reset and close again.
If the Partial Open Feature is being used and the gate physically encounters an obstruction during the
CLOSING
cycle, the gate will only
reverse to the
FULL
open position and
NOT
the partial open position.
For the reverse system to function correctly, the gate must be properly installed and work freely in both directions.
The clutch must be
properly adjusted before adjusting the reverse sensor.

