E-59
6. Using On-Screen Menu
(3) Adjust the settings in (1) and (2) so that images on the screen are
superimposed.
(4) Select “Adjust (Source)”
→
“Image Options”
→
“Blanking” of the
Advanced Menu and hide the left and right unrequired portions of the
screen as required.
- Checking the “Black Label Only” check box
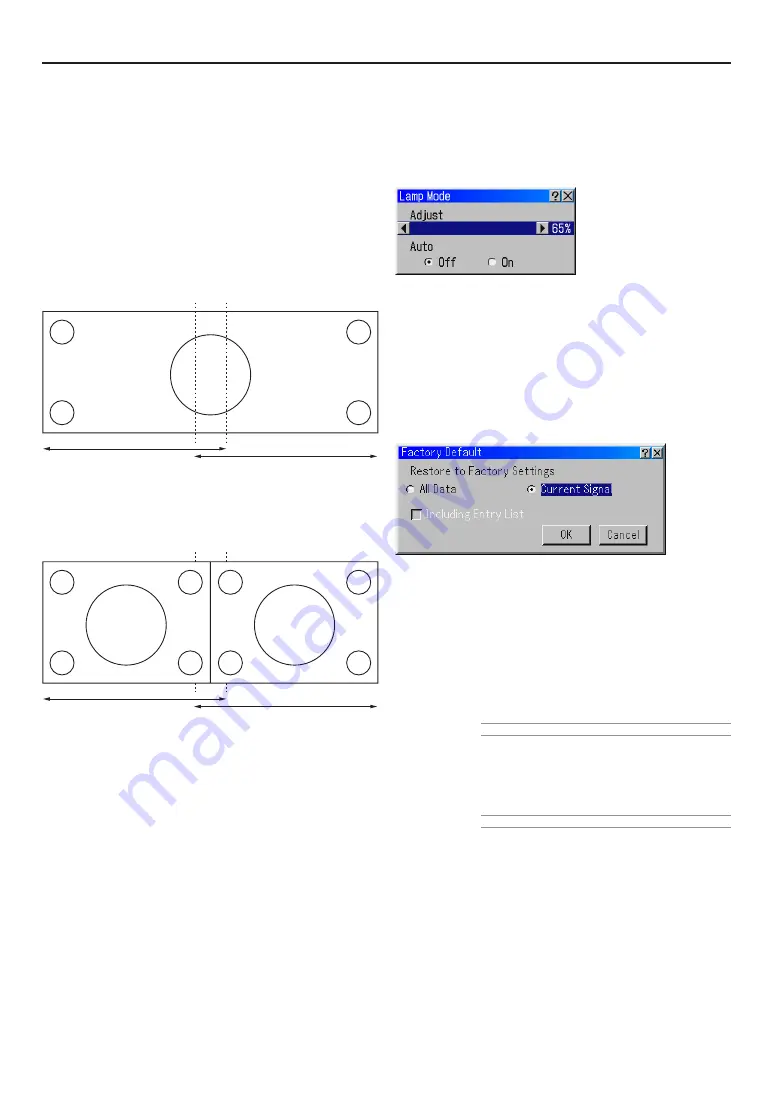
If images are displayed by two or more projectors together, blending
correction is necessary. On the other hand, if images are separately
displayed by each projector, blending correction must be set to “OFF”.
Checking the [Black Level Only] check box in the [Edge Blending] -
[Page 2] screen is assumed that blending correction is off and only
the black level correction is allowed. This adjustment is possible per
signal.
Note:
In edge blending, when the projector displays images in full size on the
screen, the four edge lines of the screen are the standard (correction
range value is 0) position to fix the blending correction range.
Blending correction can’t provide the optimal images when projected
image is smaller than full size screen according to setting of the Screen
Setup (Page 83) and Aspect setup (Page 76).
If blending correction is “ON”, “Gamma” of images is fixed to the gamma
value displayed on the [Edge Blending] screen.
HL12000HD and HL10000HD projectors enable the edge blending
functions only when selecting an advanced menu, [Ref. Adjust]
→
[Screen], and “1.90:1” as the screen type.
Set “16:9” as the screen type in [Screen] when MM-WARP option is
used.
Lamp Mode
Lamp brightness can be adjusted to 8 levels or automatically
adjusted.
Adjust .......... Choices of levels: 65%, 70%, 80%, 85%, 90%,
95%, 100%
Auto ............. Automatic adjustment is made when “ON” is se-
lected.
Auto maintains same power after a power cycle.
Factory Default
All Data /Current Signal
The Factory Default feature allows you to change adjustments
and setting to the factory preset for source.
All Data ........ Reset all the adjustments and settings for all the
signals to the factory preset except Language,
Background, Communication Speed, Projector
ID, LAN Mode, Password and Security.
Including Entry List:
Also deletes all the signals in the Entry List and
returns to the factory preset.
NOTE: Locked signals in Entry List cannot be deleted.
Current Signal
.................... Resets the adjustments for the current signal to
the factory preset levels.
All the items in "Adjust (Source)" can be reset.
NOTE: Locked signals in Entry List cannot be reset.
Blending area
Blending correction is necessary
Black level correction is necessary
Blending area
Blending correction is unnecessary
Black level correction is necessary
Adjust the image size and position by setting
[Resolution], [Input Position] and [Output position] in Image Options.
When images from two projectors
are displayed in combination:
When images from two projectors
are displayed separately:
Left image
Right image
Left image
Right image
Содержание HIGHlite 10000Dsx+
Страница 34: ...E 34...
Страница 74: ...E 74 6 Using On Screen Menu...
Страница 75: ...E 75 7 Maintenance 1 Cleaning the Cabinet and the Lens E 74...
Страница 85: ...E 85 Unit mm 3 Cabinet Dimensions 8 Appendix HIGHlite 16000Dsx...
Страница 86: ...E 86 Unit mm inch 8 Appendix HIGHlite 10000Dsx...
Страница 94: ...E 94...
Страница 95: ...E 95...
Страница 96: ...E 96...


