8-4
Parts Replacement
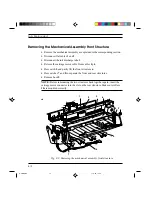
Removing / Remounting the Printer's Casing and Base
•
Disconnect the interface cable.
•
Remove the paper input and output trays.
•
Remove the memory card, if inserted.
•
Open the top cover and remove the paper insertion guide 1 by lifting it from
the front and then turning it to free the studs from their respective slots.
•
Free the casing from catches 2, 3, 4 and 5 (do so by inserting the blade of a
screwdriver in the points just indicated).
•
Turn the casing backwards and disconnect the console's flat cable from
connector 6.
•
Separate the base of the printer from the frame by pressing catch 7 and
lifting the part that has been released.
1
2
3
4
5
6
7
Fig. 8-3: Removing the printer's case and base
S-8.PM5
11/7/94, 17:31
4
Содержание DECcolorwriter 120ic
Страница 58: ...3 21 Installation Fig 3 21 Fonts selector switches settings S 3 PM5 11 7 94 17 16 21 ...
Страница 59: ...3 22 Installation Fig 3 22 Character sets selector switches settings S 3 PM5 11 7 94 17 16 22 ...
Страница 60: ...3 23 Installation Fig 3 23 Character sets selector switches settings S 3 PM5 11 7 94 17 16 23 ...
Страница 69: ...5 3 Diagnostics and Tests Fig 5 1 Example of monochrome print test page 1 S 5 PM5 11 7 94 17 18 3 ...
Страница 78: ...7 3 Electrical Interconnections Fig 7 1 Main board S 7 PM5 3 14 97 3 38 PM 3 ...


