background image

Page 22 

ƒ


To activate the vario simulator go to  (MAIN SETUP \ n. 8 SIMV) and select “ON”. Once in 

vario simulator mode is possible to change the vario value using the keys  

 , 

 . 

ƒ


To deactivate the vario simulator go to  (MAIN SETUP \ n. 8 SIMV) and select “OFF”. For 

safety reason the vario simulator is always turned off when you switch off the instrument.


3.2 

GRAPHIC ALTIMETER AND THERMAL CENTERING DISPLAY 

ƒ


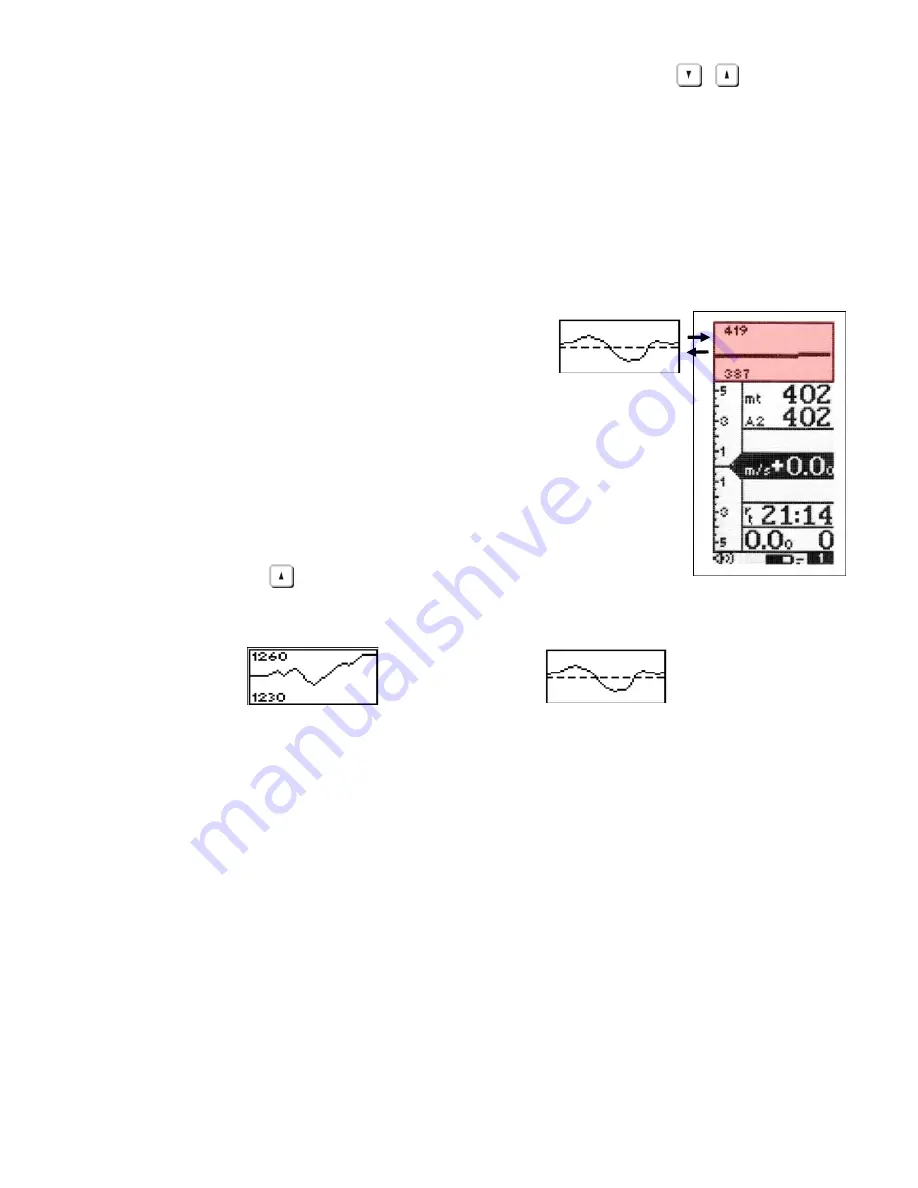
This is a live plot of your altitude against time 

(highlighted here in red), it scrolls whilst you are 

flying. It will help you to see how effectively you are climbing or 

turning in a thermal. It is especially useful in weak conditions. 

ƒ


The scales on the graphic altimeter can be changed go to (MAIN 

SETUP \ n. 13 BARY and \n. 14 BARY).  

ƒ


To switch between the graphic altimeter and the thermal centering 

display, press the 

 key (long pressure). 


GRAPHIC ALTIMETER DISPLAY 

THERMAL CENTERING DISPLAY 


3.3 

ALTIMETER DISPLAYS 

ƒ


The Digifly Leonardo has 7 different altimeters: A1, A2, AG, A3, H1, H2 and HA.  

-


A1: Barometric altimeter. 

-


A2: Altimeter A2. 

-


AG: GPS altimeter. 

-


A3: Last thermal height gain. 

-


H1: Estimated height over current WP. 

Содержание cartesio 2

Страница 1: ...Page 1 User Manual Software Version 61 1 05 05 2008 ...

Страница 2: ...from the date of purchase The Digifly guarantee applies provided the product is handled properly for its intended use in accordance with its operating instructions and upon presentation of the original invoice or cash receipt indicating the date of purchase the dealer s name the model and the serial number of the instrument The customer is however responsible for any transportation costs The unit ...

Страница 3: ...TERY TYPES 11 2 1 2 INSERTING BATTERIES 11 2 1 3 BATTERY LIFE 11 2 1 4 RECHARGING YOUR DIGIFLY VARIO 12 2 1 5 BATTERY LIFE INDICATOR Leonardo model 12 2 2 NORMAL OR LONG KEY PRESS 13 2 3 TURNING ON OFF 13 2 4 MENU NAVIGATION 14 2 5 SETTING UP YOUR VARIO 14 2 6 MULTI LANGUAGE HELP 15 2 7 DISPLAY CONTRAST ADJUSTMENT 15 2 8 RESTORE FACTORY SETTINGS 15 2 9 MAIN DISPLAY SCREENS 15 2 10 AUTOMATIC SCREEN...

Страница 4: ...ISPLAYS 22 3 3 1 BAROMETRIC ALTIMETER A1 23 3 3 2 ADDITIONAL ALTIMETERS 23 3 3 3 ADJUSTING ALTIMETERS A1 AND A2 24 3 4 TIME CHRONOGRAPH DISPLAY 25 3 5 TEMPERATURE DISPLAY 25 3 6 PRESSURE DISPLAY 26 3 7 AIR SPEED DISPLAY WITH OPTIONAL AIR SPEED PROBE 26 3 7 1 AIR SPEED RECALIBRATION 27 3 7 2 STALL ALARM 27 3 8 PILOT NAME GLIDER DATA 27 3 9 PRESET SCREENS 28 4 DISPLAYING ADDITIONAL INFORMATION RELAT...

Страница 5: ... 6 GPS FUNCIONS 38 6 1 INTEGRATED 20 CHANNEL GPS RECEIVER 38 6 2 GPS STATUS INFORMATION 38 6 3 POWER SAVING MODES 38 6 4 GPS SIGNAL AND BATTERY LIFE 39 6 5 GPS INFORMATION DISPLAY 39 6 6 LATITUDE LONGITUDE COORDINATES 39 6 7 GPS ALTITUDE 39 6 8 GROUND SPEED GPS 40 6 9 GPS DIRECTION TRK 40 6 10 WIND SPEED AND DIRECTION INDICATION USING GPS 40 6 10 1 TURNING 40 6 10 2 RECTILINEAR FLIGHT 40 6 11 HSI ...

Страница 6: ...NT 45 6 18 1 INSERT WAYPOINTS IN AN EMPTY ROUTE 46 6 18 2 INSERT A WAYPOINT AT THE LAST POSITION OF THE ROUTE 46 6 18 3 INSERT A WAYPOINT IN A ROUTE WITH WAYPOINTS 46 6 18 4 CHANGE WAYPOINTS IN A ROUTE 46 6 18 5 DELETE WAYPOINTS IN A ROUTE 47 6 18 6 ACTIVATE DEACTIVATE REVERSE CLEAR A ROUTE 47 6 19 COMPETITION ROUTE 48 6 19 1 SETUP THE COMPETITION ROUTE Rt 1 Comp 48 6 19 2 START PYLON NAVIGATION 5...

Страница 7: ...PATIBILITY 61 10 2 CONNECTING WITH COMPEGPS MAXPUNKTE GPSDUMP CHECKIN PWC SOFTWARE61 10 2 1 UPLOADING COMPETITION WAYPOINTS 61 10 2 2 DOWNLOAD A SINGLE FLIGHT 62 10 2 3 DOWNLOAD ALL FLIGHTS 62 10 3 CONNECTING WITH THE DIGIFLY VLTOOLS SOFTWARE 62 10 4 FIRMWARE UPGRADE 62 10 4 1 UPGRADE PROCESS 63 10 5 PROBLEMS CONNECTING TO YOUR PC 64 10 6 ACOUSTIC HEADPHONE OUTPUT 65 10 7 EXTERNAL GPS CONNECTION T...

Страница 8: ...AL FEATURES 68 12 2 STANDARD FUNCTIONS 68 12 3 ADVANCED FUNCTIONS 68 12 4 GPS FUNCTIONS 69 12 5 GENERAL SPECIFICATIONS 69 12 6 MAIN SETUP PARAMETERS 70 12 7 ADV SETUP ADVANCED SETUP PARAMETERS 71 12 8 RESTORE FACTORY SETTINGS 71 ...

Страница 9: ...le data field Customisable data field Equivalent McCready McCready Analogue vario Customisable data field Customisable data field Customisable data field Customisable data field Customisable data field Altitude to Distance to Required efficiency to Wind speed Equivalent McCready McCready Analogue vario Information bar North direction Current waypoint direction Next waypoint direction Wind directio...

Страница 10: ...mal direction Equivalent McCready McCready Analogue vario Information bar North direction Current waypoint direction Next waypoint direction Wind direction Plotter scale 10 pixels km ON OFF GPS antenna Go to waypoint Select from instrument list zoom map scale Scroll subpage Menu Scroll up down trough displays for edit info Scroll page Graphic Altimeter Thermal centering GPS info Mark WP Zero altim...

Страница 11: ...inserting a battery always insert the positive pole first and then the negative pole This in order to avoid excessive force from being applied to the negative contact Damage could reduce its flexibility and prevent electrical contact resulting in an instrument fault Make sure that the metal tab at the positive end of the battery makes good contact with the silver metal on board of the vario 2 1 3 ...

Страница 12: ...ours as the vario automatically switches to a maintain mode to prevent any damage from occurring due to overcharging the battery With Ni Mh batteries there is no memory effect so you may also partially charge the Ni Mh battery The self discharge function of all rechargeable Ni Mh batteries mean that the batteries will become fully discharged in about 3 weeks To achieve the best performance make su...

Страница 13: ...han a second For a long key press you must keep the button pressed down for at least 2 seconds When not specified the key press is to be considered as a normal key press less than a second 2 3 TURNING ON OFF To turn on your Digifly Leonardo press the key at least for 4 seconds To turn off your Digifly Leonardo press the key at least for 4 seconds After switching off your Digifly Leonardo you must ...

Страница 14: ...ARIO To setup your Digifly Leonardo and adjust the parameters mentioned in the following sections go to the MENU page by pressing the key function men There are two setup menus on the Digifly Leonardo The MAIN SETUP menu and the ADVANCED SETUP menu Using the arrow keys scroll to select the MAIN SETUP or the ADVANCED SETUP menu and to select confirm press the key function ENT You will now see a lis...

Страница 15: ...ltools software on your PC 2 7 DISPLAY CONTRAST ADJUSTMENT The contrast of the Digifly Leonardo LCD display can be adjusted to suit ambient light conditions To change the contrast of the display go to MAIN SETUP n 1 CTRS press the key function EDIT to go to the edit mode and then press the arrow keys to increase or decrease the display contrast 2 8 RESTORE FACTORY SETTINGS To restore the factory s...

Страница 16: ...Plotter Display screens To enable this function go to ADVANCED SETUP n 1 IFLY and set it to ON The Digifly Leonardo will switch automatically to the Thermal Display screen when the conditions of a thermal are met To set the thermal detection parameters go to ADVANCED SETUP n 2 THEV and ADVANCED SETUP n 3 THET to adjust the time over which a change in height is required for detection of a thermal T...

Страница 17: ...y recognized by the icon 22 on the display status bar Sub page 3 is preset with all information related to the arrival Waypoint GOAL and is easily recognized by the icon GOL on the display status bar 2 12 CUSTOMISABLE DATA FIELDS It is possible to customise the pre set screens On the Thermal Display Screen there are 5 data fields highlighted here in red that can be customized to change the type of...

Страница 18: ...up or down the fields that you can customize are highlighted inverted and for approximately 3 seconds a description of the data currently being displayed is shown To change the data you wish to display press the keys Each time a new parameter is selected the field shows the a description of the data currently selected ...

Страница 19: ...E TO DESTINATION dstT DIST TO LST TH dst1 DIST TO WPT dst2 DIST TO NEXT dstA DIST TO GOAL EFFICIENCY REQUIRED TO DEST efrT EF REQ TO TER efr1 EF REQ TO WPT efr2 EF REQ TO NXT efrA EF REQ TO GOL SPECIAL INSTRUMENTS effA IST AIR EFF brt BRG TO LST TH br1 BEARING TO WP br2 BEARITO NEXT trk TRACKING TIME TO DESTINATION ero REL TIME STAR eS TIME TO START e1 TIME TO WPT e2 TIME TO NEXT eA TIME TO GOAL C...

Страница 20: ...IN SETUP n 5 RVAR The default setting is 0 4 sec To increase the sensitivity of the vario reduce the value of this parameter For a more damped response increase this value 3 1 3 ANALOGUE VARIO The long data field highlighted here in red on the left of the Thermal Display page shows the analogue vario value The analogue vario is an instantaneous vario reading This information is shown on the analog...

Страница 21: ...vario reading over a number of seconds is higher than the actual reading it means that you are doing worse than before 3 1 5 ACOUSTIC VARIO The acoustic vario represents the instantaneous values of the vario with a modulated tone The volume of the tone is adjustable over three levels HIGH OFF LOW by pressing the key long pressure The volume level selected is shown by a change in the speaker graphi...

Страница 22: ...lighted here in red it scrolls whilst you are flying It will help you to see how effectively you are climbing or turning in a thermal It is especially useful in weak conditions The scales on the graphic altimeter can be changed go to MAIN SETUP n 13 BARY and n 14 BARY To switch between the graphic altimeter and the thermal centering display press the key long pressure GRAPHIC ALTIMETER DISPLAY THE...

Страница 23: ...urrent GPS information is also shown You can then check if the GPS altitude is available and stable for at least one minute then press the key long press to confirm the display will then show ALTIM SYNC WARNING if the recorder is activated is not possible to synchronize the barometric altimeter If no GPS information is shown here a GPS FIX has not been made as there may be no or poor GPS reception...

Страница 24: ... in height and the time over which the change in height occurs To set the thermal detection parameters go to ADVANCED SETUP n 2 THEV and ADVANCED SETUP n 3 THET to adjust the time over which a change in height is required for detection of a thermal The AG altimeter shows the GPS altitude If a GPS FIX has not been made of the GPS has been switched off a value of 0 is shown in the display The H1 H2 ...

Страница 25: ...he data field you wish to adjust As you scroll up or down the fields that you can customize are highlighted inverted and a description of the data currently being shown is that field is shown for approx 3 seconds To change the data you wish to display press the key Each time the data field is changed the field briefly shows a description of the data type currently selected To zero the chronograph ...

Страница 26: ...riefly shows a description of the data type currently selected It is possible to adjust the temperature units go to MAIN SETUP n 31 KTMP 3 6 PRESSURE DISPLAY The pressure can be shown by the Digifly Leonardo The pressure data can be shown in any of the 5 customizable display fields on the Thermal Display screen highlighted here in red To show the pressure data in any of these customizable fields p...

Страница 27: ...select the data field AIR SPEED 3 7 1 AIR SPEED RECALIBRATION If the air speed probe is showing inaccurate readings it is possible to recalibrate the air speed probe go to MAIN SETUP n 11 KIAS An adjustment in of the air speed reading can be made 100 no adjustment 110 increase 90 decrease Incorrect recalibration will makes the air speed readings on the Digifly Leonardo less accurate 3 7 2 STALL AL...

Страница 28: ...t Waypoint Goal To scroll between the each sub page press the key Sub page 1 is preset with all information related to the WP1 the current Waypoint and is easily recognized by the icon 1 on the display status bar Sub page 2 is preset with all information related to the WP2 the next Waypoint and is easily recognized by the icon 2 2 on the display status bar Sub page 3 is preset with all information...

Страница 29: ...data field you wish to adjust As you scroll up or down the fields that you can customize are highlighted inverted and a description of the data currently being shown is that field is shown for approx 3 seconds To change the data you wish to display press the key Each time the data field is changed the field briefly shows a description of the data type currently selected 4 1 TIME INFORMATION The Di...

Страница 30: ...ce to current Waypoint dst2 Distance to next Waypoint dstA Distance to Goal 4 3 EFFICIENCY INFORMATION efrT Efficiency required to last thermal efr1 Required efficiency to current Waypoint efr2 Required efficiency to next Waypoint efrA Required efficiency Goal effA Instant efficiency related to the Air 4 4 TRACKING INFORMATION The Digifly Leonardo can display tracking information related to Waypoi...

Страница 31: ...identify the correct total energy compensation value an air speed probe must be connected to your vario The optional air speed probe should be plugged in to the right hand socket on the bottom of the vario To determine the correct total energy compensation value with an air speed probe connected you should fly in calm air conditions and slow down as if you are entering a thermal If the vario shows...

Страница 32: ...D SETUP n 9 17 PX A B C and choose which polar to use go to ADVANCED SETUP n 8 POLA If this parameter ADVANCED SETUP n 8 POLA is set to OFF all information relating to McCready McCready Equivalent Thermal Sniffer is not displayed on the instrument creating a cleaner display for users not needing this functionality There are three polars preloaded 2 for hang gliders and 1 for a paraglider To see th...

Страница 33: ...ptimum speed to fly value in sink you simply add the sink of the air to the polar of your glider drawing a new polar and a new tangent line from the initial point of axes The new tangent point D meets the polar at the point giving a higher optimum flying speed VD To obtain the correct Speed to fly you have to adjust your speed so both McCready arrows are in the same position 5 4 AIR EFFICIENCY GLI...

Страница 34: ...t side of this data field is displayed the ground efficiency If your ground speed drops to lower than 2km h or the GPS fix is not valid the left indicator displayed as 0 0 0 If the vario is showing lift the efficiency indicator shows the average efficiency calculated in the last glide reverse display go to ADVANCED SETUP n 5 EFFA to set the time over which the average efficiency is calculated The ...

Страница 35: ...at flying at the current air speed you are assuming that the average thermal value of the flight is the value indicated from the Equivalent McCready To set the average of the Equivalent McCready go to ADVANCED SETUP n 18 MCRE 5 8 NETTO VARIO To utilize the netto vario function you must have an air speed probe connected The optional air speed probe should be plugged in to the right hand socket on t...

Страница 36: ...but your vario is still indicating sink because your sink rate is higher than the speed of the rising air This function uses two parameters the thermal strength and the time over which the themal must occur To set the thermal detection parameters go to ADVANCED SETUP n 2 THEV and ADVANCED SETUP n 3 THET to adjust the time over which a change in height is required for detection of a thermal To use ...

Страница 37: ...and set it to ON The Digifly Leonardo will switch automatically to the Thermal Display screen when the conditions of a THERMAL are met To set the thermal detection parameters go to ADVANCED SETUP n 2 THEV and ADVANCED SETUP n 3 THET to adjust the time over which a change in height is required for detection of a thermal The instrument will then switch back to the Glide Compass or Glide Plotter Disp...

Страница 38: ...PS signal either 2 or 3 bars 2 bars poor GPS reception 3 bars good GPS reception The GPS status icon shown at the bottom of all display pages has different meanings 1 GPS icon on GPS signal is valid current GPS position is provided 2 GPS icon blinking GPS signal not obtained the current GPS position is not provided 3 GPS icon off GPS receiver is turned off or very low signal 6 3 POWER SAVING MODES...

Страница 39: ...de and consumes up to two times more current As a result of poor satellite reception the expected battery life can be reduced to 10 hours or even less With the GPS power saving mode set to ECO ADVANCED SETUP n 7 POWE During outdoor usage with full sky visibility 3 bars you can achieve 30 hours of battery life With the GPS power saving mode set to EC2 ADVANCED SETUP n 7 POWE During outdoor usage wi...

Страница 40: ...eonardo recognizes if you are flying rectilinear or turning using the GPS Direction TRK and the GPS ground speed Gs values 6 10 1 TURNING For the Digifly Leonardo to determine the wind speed and direction you should make a normal turn that is neither too tight nor too wide It is also important to maintain constant airspeed during the turn For an accurate calculation a 360º turn must be completed 6...

Страница 41: ... direction brt distance dstT required efficiency ertT and gain altitude A3 to the last thermal To set the thermal detection parameters go to ADVANCED SETUP n 2 THEV and ADVANCED SETUP n 3 THET to adjust the time over which a change in height is required for detection of a thermal 6 13 DIRECTION DISTANCE AND HEIGHT TO WAYPOINTS This is a powerful feature that displays the direction distance and the...

Страница 42: ...efficiency glide ratio or L D required to arrive to the Waypoint and is calculated only if navigation to a Waypoint or Route has been activated This information is shown by the efr1 efr2 efrA data values on the 3 main display screens Thermal Display Glider Compass and Glide Plotter 6 15 DIRECTION TO CURRENT AND NEXT WAYPOINT There are two different direction indications from your current position ...

Страница 43: ...ly Competition Waypoints can be used only in the Competition Route Rt 1 Comp and User Waypoints can be used only in User Routes Rt 2 User Rt 12 User Waypoints can be managed manually through the Digifly Leonardo or with an external Windows program running on a PC 6 17 1 MANUALLY CREATE A NEW WAYPOINT To create a new Waypoint move the cursor to the first line of the Waypoint list the empty line usi...

Страница 44: ...t an existing Waypoint scroll though the list using the arrow keys until the cursor is on the desired Waypoint Press the key function EDIT the Waypoint Data screen then appears with these fields to be completed Name max 6 characters Sym there are 6 graphic symbols icons available to choose from Lat Lon Longitude and Latitude Each Waypoint can be individually edited with its own coordinate System D...

Страница 45: ...ming message is shown ACTIVE MOB then NEAR WPT is shown 6 18 ROUTE MANAGEMENT The Digifly Leonardo can store up to 12 Routes with 20 Waypoints on each Route A Route allows you to automatically navigate to all Waypoints stored in it The first Route shown is the Rt 1 Comp Competition Route To scroll through view the other routes Rt 2 User to Rt 12 User use the keys At the bottom of the Route screen ...

Страница 46: ...function EDIT The first Waypoint on the Waypoint list appears Scroll trough the Waypoint list using the arrow keys and then press the key function SAVE 6 18 3 INSERT A WAYPOINT IN A ROUTE WITH WAYPOINTS Scroll to the desired position using the arrow keys and then press the key function EDIT From the drop down menu select the INSERT option with the keys and confirm with YES The first Waypoint in th...

Страница 47: ...ion using the arrow keys then press the key function EDIT From the drop down menu select the CLEAR function with the keys and confirm with YES To delete all Waypoints in a Route press the key long press and confirm with YES 6 18 6 ACTIVATE DEACTIVATE REVERSE CLEAR A ROUTE To activate a Route press the key and confirm with YES To deactivate a Route press the key and confirm with YES To reverse a Ro...

Страница 48: ... COMPEGPS Air 6 19 1 SETUP THE COMPETITION ROUTE Rt 1 Comp Insert in the Competition Route Rt 1 Comp the Waypoints required for the current task Each Waypoint with its own name icon and radius adjustable from 0 to 60 000 mt Each Waypoint in the Competition Route has more icon choices than the Waypoints available to the User Routes Waypoints may also include numbers and letters so it will possible ...

Страница 49: ...Waypoint is selected as the Start Pylon it will be shown on the Glide Plotter screen plotter with the S symbol To edit Start Pylon Time Gate go to Route Display Rt Comp 1 and using the arrow keys select fields start next gate num of gate then press the key function EDIT n 1 SGhh Hour to start n 2 SGmm minutes to start n 3 SGst Next Start Pylon Time Gate Interval in minutes if necessary n 4 SGnm Nu...

Страница 50: ...Plotter Display automatically switches first three instrument displays to dst1 er0 and es and also disables the HSI cross hair When the Remaining count down Timer to start pylon time gate Timer Start es reach 0 it starts to flash and a popup message Gate Opened with long beep alerts to inform the pilot that the time gate has opened At this point if the parameter SGnm is bigger than 0 is possible t...

Страница 51: ...t per second To change Near value go to Route Display Rt Comp 1 and using the arrow keys select fields start next gate num of gate then press the key function EDIT Here using the arrow keys select NEAR parameter n 5 and press the key to edit value FAI Cylinder Validation When you arrive in the FAI Cylinder the distance to the Waypoint is less than the radius the Digifly Leonardo warns you with a s...

Страница 52: ...edit with the arrow keys Press the key function EDIT to edit and press the key to select the icon column To change the icon press the key function EDIT and select a new icon using the arrow keys To save your changes with the press the key 6 19 5 MANUALLY JUMP TO PREVIOUS NEXT WAYPOINT To manually jump to previous or next Waypoint on the current active Route press the arrow keys long press ...

Страница 53: ...usted from 1 to 60 seconds go to MAIN SETUP n 24 RECR At 1 data point per second you can record 10 hours of flight data At 1 data point per minute you can record up to 1000 hours of flight data Up to 45 000 flight and GPS data points can be recorded from 250 flights When you are near the Waypoint go to the recorder rate is automatically increased to 1 data point per second When the recorder memory...

Страница 54: ...automatic start record mode it is possible to change the parameters that initiates the recording You can adjust the change of height in meters MAIN SETUP R DS n 23 and required for the instrument to automatically start recording a flight In order to respect the FAI rules access to the setup menu on the Digifly Leonardo is blocked when the flight recorder has been activated Once the recorder is act...

Страница 55: ...K menu press the key long press A confirmation of YES or NO is required For each flight the flight data screen includes the following information Take off date and time the duration of the flight and the total gain of altitude attained the minimum and maximum values of altimeter A1 the variometer values and air speed 7 4 FLIGHT PLAYBACK This is a special function that allows you to review playback...

Страница 56: ...Page 56 Press the arrow keys to move the graphic cursor to the left or to the right Press the key function Tim to change the time display to chronograph display ...

Страница 57: ...y handles the switching between the Glide Compass Display screen and the Thermal Display screen To enable this function go to ADVANCED SETUP n 1 IFLY and set it to ON The Digifly Leonardo will switch automatically to the Thermal Display screen when the conditions of a thermal are met To set the thermal detection parameters go to ADVANCED SETUP n 2 THEV and ADVANCED SETUP n 3 THET to adjust the tim...

Страница 58: ...cket on the bottom of the vario The air speed reading can be shown in metric km h or imperial mph units To change the units of display go to MAIN SETUP n 29 U SP and change to KMH or MPH If the air speed indicator is selected on the data field indicator the icon ieff Kmh As or ieff mph As will appear for one second On the left of the air speed indicator the instant ground efficiency ieff is also d...

Страница 59: ...reen To enable this function go to MAIN SETUP n 29 IFLY and set it to ON The Digifly Leonardo will switch automatically to the Thermal Display screen when the conditions of a thermal are met To set the thermal detection parameters go to ADVANCED SETUP n 2 THEV and ADVANCED SETUP n 3 THET to adjust the time over which a change in height is required for detection of a thermal The instrument will the...

Страница 60: ... the arrow keys The plot scale is shown on the left of the screen according to the following values ZOOM VALUE Km screen m pixel 0 01 0 3 1 0 02 0 6 2 0 04 0 25 4 0 08 0 5 8 0 16 1 16 0 32 2 32 0 64 4 65 1 28 8 130 2 56 16 250 5 12 32 500 10 2 65 1000 20 4 130 2000 40 9 250 4100 ...

Страница 61: ...unkte GpsDump CheckIn PWC software have two different and completely independent ways to connect to the instrument To communicate with a PC connect the optional PC serial cable or USB cable in to the left socket on the bottom of the vario marked GPS 10 2 CONNECTING WITH COMPEGPS MAXPUNKTE GPSDUMP CHECKIN PWC SOFTWARE 10 2 1 UPLOADING COMPETITION WAYPOINTS To upload competition Waypoints from your ...

Страница 62: ... the PC go to the LOGBOOK menu without entering in it From the PC software CompeGPS MaxPunkte GpsDump CheckIn PWC select download flight track using the protocol MLR 38400 baud The download can be stopped pressing the ESC key on the Digifly Leonardo Cartesio2 10 3 CONNECTING WITH THE DIGIFLY VLTOOLS SOFTWARE Enter in the VLTOOLS menu of Digifly Leonardo Cartesio2 and from your PC run the latest co...

Страница 63: ...rdo is fully charged Turn off your Digifly Leonardo and plug the Digifly PC serial or USB cable in to the middle socket on the base of the Digifly Leonardo Keeping the key pressed press the key and wait a long beep acoustic confirmation Note that the screen will not come on Now release the key and then the key From your PC run the Upgrade_xx_x_Leonardo exe program Press Start Button Make sure you ...

Страница 64: ...n 1 Go to the Device Manager Start Control Panel System Hardware Device Manager 2 Click on the plus sign next to Ports 3 If the device is installed properly you will see Prolific USB to Serial Com Port COMx Note that x is the number of the COM port assigned to the cable B Look for a conflict with a another program or device and turn off firewall antivirus programs C It is also possible that the CO...

Страница 65: ...e COM port number If you are still experiencing problems try with the following Temporarily disable your antivirus and firewall software Manually setup on your PC the communication protocol MLR 38400 baud If this still fails try adjusting the communication protocol to MLR 19200 baud Again From Windows right click on the Vltools2007 icon and tick the check box run this program in Windows98 WindowsM...

Страница 66: ... the GPS socket on the base of the Digifly Cartesio2 To enable the external GPS receiver to send data output to the Digifly Cartesio2 setup the external GPS receiver data output to Data Output Protocol NMEA 183 2 0 or higher Data Output Baud Rate 4800 Connect the Digifly Cartesio2 to the external GPS receiver using the Digifly GPS cable GPS cables for different GPS models are available from Digifl...

Страница 67: ...chargeable battery with tabs Wall adaptor 11 3 OPTIONAL ACCESSORIES The following optional accessories are available from Digifly Digifly PC serial cable to download flight data and upload new firmware directly from the Internet Digifly PC USB cable to download flight data and upload new firmware directly from the Internet Air speed probe for hang glider Air speed probe for paraglider Hang gliding...

Страница 68: ...ration Adjustable stall alarm visual and acoustic with optional air speed probe Barometer range 300 to 1200 mB with user calibration Thermometer range 30 C to 70 C range 22 F to 158 F Constant battery monitoring Date and time with GPS synchro chronometer flight timer Adjustable units of measure 12 3 ADVANCED FUNCTIONS 3 adjustable polar curves McCready and Equivalent McReady function with optional...

Страница 69: ...patible with most competition software programs Automatic FAI cylinder turnpoint and Start Pylon validation visual and acoustic 200 Competition Waypoints 200 User Waypoints 12 Routes with 20 Waypoints on each Route 12 5 GENERAL SPECIFICATIONS High resolution graphic LCD display 128 x 64 pixels Upgradeable Flash memory software available from the Internet using the optional PC cable via your PC PC ...

Страница 70: ...pensation 0 100 0 11 KIAS air speed calibration 50 200 100 12 KBAR barometer calibration 20 0 0 mB 13 BARX graphic altimeter x 0 4 4 1 0 min 14 BARY graphic altimeter y 3 3000 30 mt 15 UTCO time zone difference 12 12 2 hour 16 HOUR time setting hours 0 23 hour 17 MIN time setting minutes 0 59 minute 18 DAY time setting day 1 31 day 19 MONT time setting month 1 12 month 20 YEAR time setting year 0 ...

Страница 71: ... 1 30 10 sec 5 EFFA instant efficiency for HW 1 100 3 sec 6 PHON headphone output ON OFF OFF 7 POWE gps mode Leonardo only STD ECO EC2 ECO 8 POLA active polar OFF P1 P2 P3 OFF 9 11 P1 A P1 B P1 C polar 1 coeff xxx 12 14 P2 A P2 B P2 C polar 2 coeff xxx 15 17 P3 A P3 B P3 C polar 3 coeff xxx 18 MCRA McCready value 0 2 30 10 min 19 MCRE McCready equiv average time 0 1 3 0 sec 12 8 RESTORE FACTORY SE...

Отзывы: