To connect the combustion air pipe, use the venting
flange with the gasket and screw it to the chosen location.
Secure the combustion air pipe to the flange using glue.
At the combustion air termination, use a 90° elbow or two
medium-radius sweep elbows to keep the inlet downward
and prevent the entry of rain. The inlet opening of the
combustion air termination must be a minimum of 12”
above the anticipated level of snow accumulation.
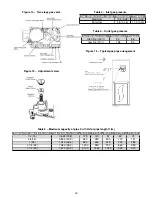
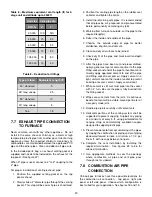
The furnace may have a drain tee assembly and trap
installed in the combustion air pipe as close to the
furnace as possible (see figure 17). This is to drain any
water that may enter the combustion air pipe, preventing
entry in the furnace vestibule area.
Note that with horizontal combustion air pipe there is a
risk of excessive moisture entering the combustion air
pipe and consequently, furnace cabinet. A moiture trap
should be added to the combustion air pipe as shown in
figure 17.
Figure 17 – Combustion air moisture trap
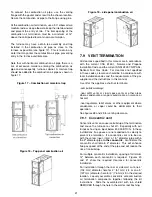
Figure 18 – Top panel combustion air
Figure 19 – side panel combustion air
7.9
VENT TERMINATION
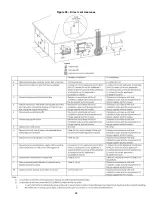
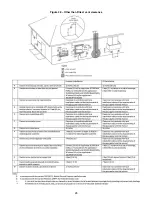
All clearance specified in this manual are in accordance
with the current CSA B149.1, Natural and Propane
Installation Code and the current ANSI Z223.1/NFPA 54,
National Fuel Gas Code. For clearance not specified
in these codes, clearance should be in accordance with
local installation codes and the requirements of the gas
supplier and the instructions in this manual.
A vent for this appliance shall not terminate:
-over public walkways;
-near soffit vents or crawl space vents or other areas
where condensate or vapor could create a nuisance or
hazard;
-near regulators, relief valves, or other equipment where
condensate or vapor could be detrimental to their
operation;
See figures 28 and 29 for venting clearance.
7.9.1
Concentric vent
Concentric vent can cause ice build up at the termination
and cause the furnace to shut off. Especially with our
furnaces having an input below 30,000 BTU/hr. In these
installations, flue gases are not expelled at a velocity to
prevent ice formation. If a concentric vent is to be use
with these low input, intall a 1.5" diameter pipe within
the 2" diameter pipe
in the concentric
. Vent before the
concentric shall remain 2" diameter. This will enhance
flue gas speed at the end of the pipe and will reduce the
risk of ice build up.
For multiple concentric installation, spacing of minimum
12" between each concentric is required.
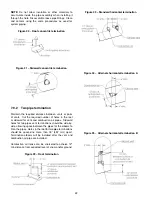
Figures 20
and 21 show the required clearance for concentric
installation.
For installation through the roof or side wall, cut one 4”
(102 mm) diameter hole for 2” (51 mm) kit, or one 5”
(127 mm) diameter hole for 3” (76 mm) kit in the desired
location. Loosely assemble concentric vent/combustion
air termination components together following the kit
instructions.
Slide the assembled kit with rain shield
REMOVED through the hole in the wall or roof flashing.
21
Содержание C105-1-D
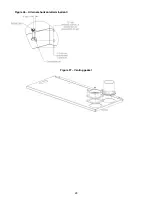
Страница 24: ...Figure 26 Alternate horizontal termination C Figure 27 Venting gasket 23...
Страница 25: ...Figure 28 Direct vent clearance 24...
Страница 26: ...Figure 29 Other than Direct vent clearance 25...
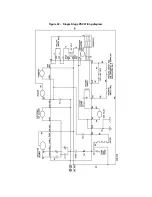
Страница 34: ...Figure 32 Single Stage PSC Wiring diagram...
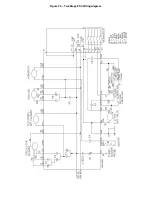
Страница 35: ...Figure 33 Two Stage PSC Wiring diagram...
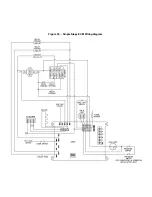
Страница 36: ...Figure 34 Single Stage ECM Wiring diagram...
Страница 39: ...Figure 35 Dimensions 38...
Страница 40: ...Figure 36 Exploded view CXX 1 X part 1...
Страница 41: ...Figure 37 Exploded view CXX 1 X part 2...
Страница 43: ...Figure 38 Exploded view Cxx 1 D part 1...
Страница 44: ...Figure 39 Exploded view Cxx 1 D part 2...
Страница 46: ...Figure 40 Exploded view Cxx 2 D part 1...
Страница 47: ...Figure 41 Exploded view Cxx 2 D part 2...

