104
Installing System Components
5
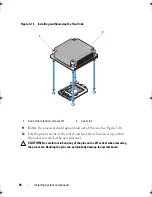
Remove the processor heat sink. See "Removing a Processor" on page 92.
6
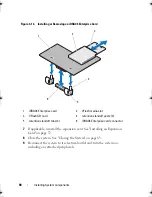
If installed, remove the iDRAC6 Enterprise card. See "Removing an
iDRAC6 Enterprise Card" on page 91.
7
If installed, remove the iDRAC6 Express card. See "Removing an iDRAC6
Express Card" on page 88.
8
Disconnect all cables from the system board.
9
Remove all the memory modules and memory blanks. See "Removing
Memory Modules" on page 83.
NOTE:
To ensure proper reinstallation of memory modules, record the
memory module socket locations.
10
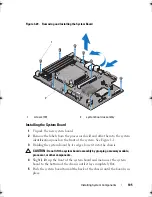
Remove the ten screws securing the system board to the chassis and then
slide the system board assembly toward the front end of the chassis.
CAUTION:
Do not lift the system board assembly by grasping a memory module,
processor, or other components.
11
Grasp the system board assembly by its edges and lift the assembly away
from the chassis. See Figure 3-20.
book.book Page 104 Wednesday, August 12, 2009 4:51 PM
Содержание External OEMR R210
Страница 1: ...Dell PowerEdge R210 Systems Hardware Owner s Manual ...
Страница 9: ...Contents 11 7 Getting Help 133 Contacting Dell 133 Glossary 135 Index 145 ...
Страница 10: ...12 Contents ...
Страница 34: ...36 About Your System ...
Страница 56: ...58 Using the System Setup Program and UEFI Boot Manager ...
Страница 128: ...134 Getting Help ...
Страница 138: ...144 Glossary ...
Страница 143: ...Index 149 V VFlash media 93 video troubleshooting 110 W warning messages 34 wet system troubleshooting 112 ...
Страница 144: ...Index 150 ...

