background image

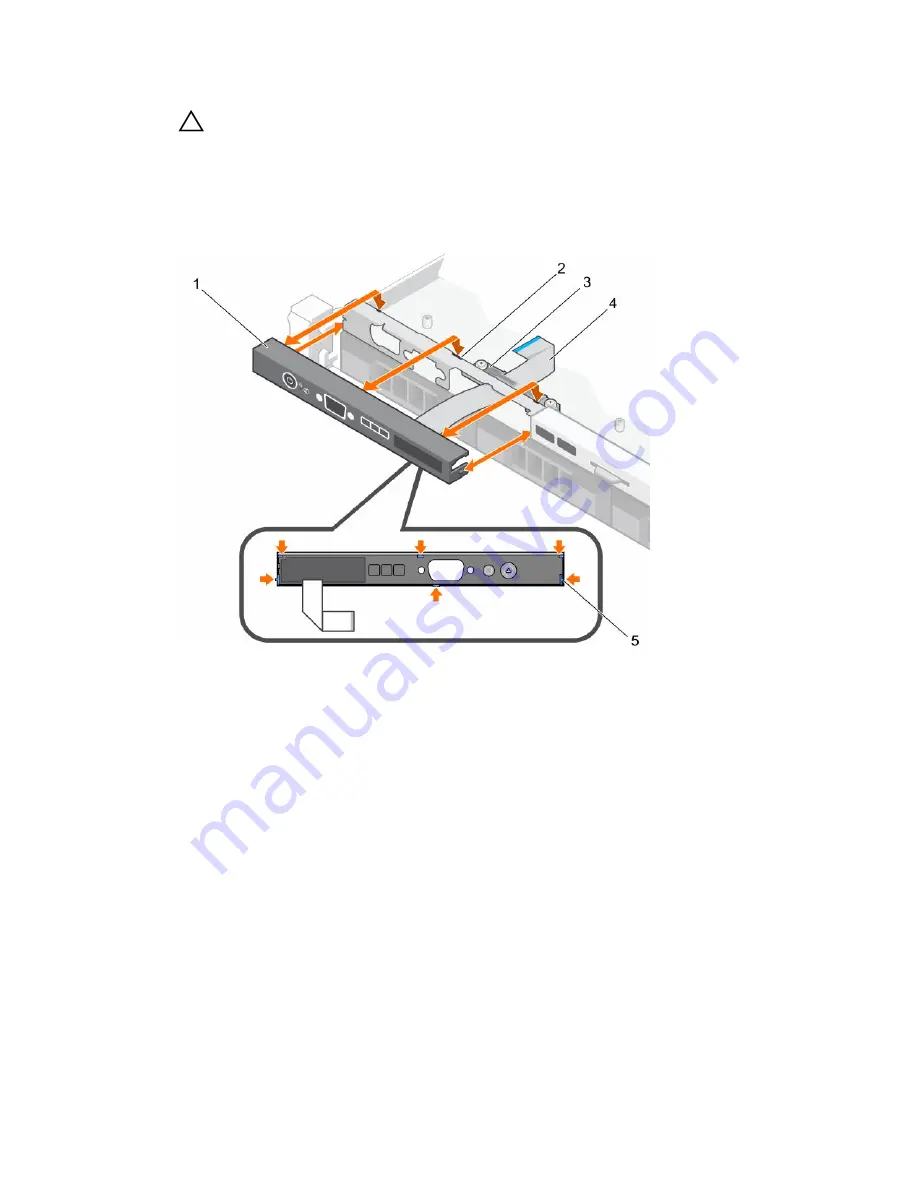
CAUTION: Do not use excessive force when removing the control panel as it can damage the 
connectors.

2.

Hold the top edge of the LCD control panel at the corners and pull upward until the LCD control 
panel tabs are released.

3.

Pull the control panel away from the chassis.

4.

Remove the screws securing the LCD control panel board.

5.

Lift the LCD control panel board away from the chassis.

Figure 35. Removing and installing the LCD control panel—four 3.5-inch hot swappable hard drive 

chassis

1.

LCD control panel

2. notches (6)

3. display module cable retention clip

4. display module cable

5. tabs on the LCD control panel (6)

95

Содержание DL1300

Страница 1: ...Dell DL1300 Appliance Owner s Manual Regulatory Model E33S Series Regulatory Type E33S001 ...

Страница 2: ... the problem WARNING A WARNING indicates a potential for property damage personal injury or death 2016 Dell Inc All rights reserved This product is protected by U S and international copyright and intellectual property laws Dell and the Dell logo are trademarks of Dell Inc in the United States and or other jurisdictions All other marks and names mentioned herein may be trademarks of their respecti...

Страница 3: ...9 Power specifications 19 Storage controller specifications 20 Drive specifications 20 Connectors specifications 20 Video specifications 20 Environmental specifications 21 Particulate and gaseous contamination specifications 22 4 Initial system setup and configuration 24 Setting up your system 24 iDRAC configuration 24 Setting up and configuring the iDRAC IP address 24 Log in to iDRAC 25 Downloadi...

Страница 4: ...ide the system 53 Chassis intrusion switch 54 Removing the intrusion switch 54 Installing the intrusion switch 55 Cooling shroud 56 Removing the cooling shroud 56 Installing the cooling shroud 57 System memory 58 General memory module installation guidelines 59 Sample memory configurations 59 Removing memory modules 60 Installing memory modules 61 Hard drives 63 Supported hard drive configuration ...

Страница 5: ...or 85 Removing the processor 86 Power supply unit 88 Removing a cabled power supply unit 88 Installing a cabled power supply unit 90 System battery 90 Replacing the system battery 90 Hard drive backplane 92 Removing the hard drive backplane 92 Installing the hard drive backplane 94 Control panel 94 Removing the LCD control panel assembly 94 Installing the LCD control panel assembly 96 Removing the...

Страница 6: ...Troubleshooting a USB device 113 Troubleshooting a serial I O device 113 Troubleshooting a NIC 114 Troubleshooting a wet system 114 Troubleshooting a damaged system 115 Troubleshooting the system battery 116 Troubleshooting power supply units 116 Troubleshooting power source problems 117 Power supply unit problems 117 Troubleshooting cooling problems 117 Troubleshooting cooling fans 118 Troublesho...

Страница 7: ... 4 TB hot swappable Nearline SAS HDDs Memory Four 4 GB UDIMMs default or four 8 GB UDIMMs or four 16 GB UDIMMs Table 2 Specifications for DL1300 3 TB 2VM Component Specification Processor Intel Xeon E3 1280 v5 3 7GHz 4C 8T Hard drives Four 4 TB hot swappable Nearline SAS HDDs Memory Four 8 GB UDIMMs default or four 4 GB UDIMMs or four 16GB UDIMMs Table 3 Specifications for DL1300 4 TB 2VM Applianc...

Страница 8: ...tem The power on indicator glows when the system power is on The power button controls the power supply output to the system NOTE On ACPI compliant operating systems turning off the system using the power button causes the system to perform a graceful shutdown before power to the system is turned off 2 NMI button Enables you to troubleshoot software and device driver errors when running certain op...

Страница 9: ...ant 9 Information tag Contains system information such as service tag NIC MAC address for your reference The information tag is a slide out label panel 10 Hard drives Enables you to install up to four 3 5 inch hot swappable hard drives in 3 5 inch hot swappable adapters LCD panel The LCD panel of your system provides system information status and error messages to indicate if the system is functio...

Страница 10: ... system is in standby mode the LCD backlight turns off after a few minutes of inactivity if there are no error messages 1 To view the Home screen press one of the three navigation buttons Select Left or Right 2 To navigate to the Home screen from another menu complete the following steps a Press and hold the navigation button till the up arrow is displayed b Navigate to the using the up arrow c Se...

Страница 11: ...ks View menu View menu NOTE When you select an option in the View menu you must confirm the option before proceeding to the next action Option Description iDRAC IP Displays the IPv4 or IPv6 addresses for iDRAC8 Addresses include DNS Primary and Secondary Gateway IP and Subnet IPv6 does not have Subnet MAC Displays the MAC addresses for iDRAC iSCSI or Network devices Name Displays the name of the H...

Страница 12: ...r system within a rack The identification buttons are on the front and back panels When one of these buttons is pressed the LCD panel on the front and the system status indicator on the back flash until one of the buttons is pressed again Press the button to turn the system ID on or off If the system stops responding during POST press and hold the system ID button for more than five seconds to ent...

Страница 13: ...eo connector Enables you to connect a VGA display to the system Hot swappable hard drive indicator codes Figure 4 Hot swappable hard drive indicators 1 hard drive activity indicator 2 hard drive status indicator 3 hard drive NOTE If the hard drive is in Advanced Host Controller Interface AHCI mode the status indicator on the right side does not function and remains OFF Table 7 Hot swappable hard d...

Страница 14: ...online Flashes green three seconds amber three seconds and turns off six seconds Rebuild stopped NIC indicator codes Figure 5 NIC indicators 1 link indicator 2 activity indicator Table 8 NIC indicators Convention Status Condition A Link and activity indicators are off The NIC is not connected to the network B Link indicator is green The NIC is connected to a valid network at its maximum port speed...

Страница 15: ...U of the system Figure 6 Cabled AC PSU status indicator and self diagnostic button 1 self diagnostic button 2 AC PSU status indicator Table 9 Non redundant AC PSU status indicator Power Indicator Pattern Condition Not lit Power is not connected or PSU is faulty Green A valid power source is connected to the PSU and the PSU is operational 15 ...

Страница 16: ...l com support home For information about iDRAC features configuring and logging in to iDRAC and managing your system remotely see the Integrated Dell Remote Access Controller User s Guide Dell com idracmanuals For information about understanding Remote Access Controller Admin RACADM subcommands and supported RACADM interfaces see the RACADM Command Line Reference Guide for iDRAC Dell com idracmanu...

Страница 17: ...ll com openmanagemanuals For understanding the features of Dell Lifecycle Controller LCC see the Dell Lifecycle Controller User s Guide Dell com idracmanuals Working with Dell PowerEdge RAID controllers For information about understanding the features of the Dell PowerEdge RAID controllers PERC and deploying the PERC cards see the Storage controller documentation Dell com storagecontrollermanuals ...

Страница 18: ...weight for four 3 5 inch hot swappable hard drive chassis 9 51 kg 20 96 lb Empty weight for four 3 5 inch hot swappable hard drive chassis 5 25 kg 11 57 lb Processor specifications Processor Specification Type One Intel Xeon E3 series processor Expansion bus specifications PCI Express Generation 3 expansion slots using expansion card riser Specification PCIE_G3_X16 Slot 1 one half height half leng...

Страница 19: ...n sockets Memory module capacities UDIMM 4 GB single rank 8 GB dual rank 16 GB dual rank Minimum RAM 16 GB Maximum RAM 64 GB NOTE For system specific memory details see Supported configurations section Related Links Supported configurations Power specifications Power supply unit Specification Power rating per power supply unit PSU 250 W Bronze AC 100 240 V 50 60 Hz 4 0 A 2 0 A Heat dissipation NOT...

Страница 20: ...arline SAS hard drives Connectors specifications Back connectors Specification NIC Two 10 100 1000 Mbps Serial 9 pin DTE 16550 compatible USB Two 9 pin USB 3 0 compliant Video 15 pin VGA iDRAC8 One optional 1 GbE Ethernet Front connectors Specification USB Two 4 pin USB 2 0 compliant Video 15 pin VGA Internal connectors Specification USB One 9 pin USB 3 0 compliant Video specifications Video Speci...

Страница 21: ...cifications Relative humidity Specifications Storage 5 to 95 RH with 33 C 91 F maximum dew point Atmosphere must be non condensing at all times Operating 10 to 80 relative humidity with 29 C 84 2 F maximum dew point Table 13 Maximum vibration specifications Maximum vibration Specifications Operating 0 26 Grms at 5 Hz to 350 Hz all operation orientations Storage 1 88 Grms at 10 Hz to 500 Hz for 15 ...

Страница 22: ...ons is the responsibility of the customer Table 17 Particulate contamination specifications Particulate contamination Specifications Air filtration Data center air filtration as defined by ISO Class 8 per ISO 14644 1 with a 95 upper confidence limit NOTE This condition applies only to data center environments Air filtration requirements do not apply to IT equipment designed to be used outside a da...

Страница 23: ...tamination Specifications Copper coupon corrosion rate 300 Å month per Class G1 as defined by ANSI ISA71 04 1985 Silver coupon corrosion rate 200 Å month as defined by AHSRAE TC9 9 NOTE Maximum corrosive contaminant levels measured at 50 relative humidity 23 ...

Страница 24: ...them perform remote system management and reduces the need for physical access to the system Setting up and configuring the iDRAC IP address You can set up the Integrated Dell Remote Access Controller iDRAC IP address by using one of the following interfaces iDRAC Settings utility Dell Lifecycle Controller Dell OpenManage Deployment Toolkit Server LCD panel You can use the default iDRAC IP address...

Страница 25: ... you download and install the latest BIOS drivers and systems management firmware on your system Prerequisites Ensure that you clear the web browser cache before downloading the drivers and firmware Steps 1 Go to Dell com support drivers 2 Under the Drivers Downloads section type the Service Tag of your system in the Service Tag or Express Service Code box NOTE If you do not have the Service Tag s...

Страница 26: ...more information see Dell com openmanagemanuals OpenManage Server Administrator or Dell com openmanagemanuals OpenManage Essentials 26 ...

Страница 27: ...t applications Table 19 Navigation keys Key Description Page Up Moves to the previous screen Page Down Moves to the next screen Up arrow Moves to the previous field Down arrow Moves to the next field Enter Enables you to type a value in the selected field if applicable or follow the link in the field Spacebar Expands or collapses a drop down list if applicable Tab Moves to the next focus area NOTE...

Страница 28: ... and then restart your system and try again System Setup details The System Setup Main Menu screen details are explained as follows Option Description System BIOS Enables you to configure BIOS settings iDRAC Settings Enables you to configure iDRAC settings The iDRAC settings utility is an interface to set up and configure the iDRAC parameters by using UEFI Unified Extensible Firmware Interface You...

Страница 29: ...ions related to the processor such as speed and cache size SATA Settings Specifies options to enable or disable the integrated SATA controller and ports Boot Settings Specifies options to specify the boot mode BIOS or UEFI Enables you to modify UEFI and BIOS boot settings Network Settings Specifies options to change the network settings Integrated Devices Specifies options to manage integrated dev...

Страница 30: ... BIOS Boot Settings menu Setting this field to BIOS disables the UEFI Boot Settings menu Boot Sequence Retry Enables or disables the Boot Sequence Retry feature If this option is set to Enabled and the system fails to boot the system reattempts the boot sequence after 30 seconds This option is set to Enabled by default Hard Disk Failover Specifies the hard drive that is booted in the event of a ha...

Страница 31: ...ng the boot order You may have to change the boot order if you want to boot from a USB key The following instructions may vary if you have selected BIOS for Boot Mode 1 On the System Setup Main Menu screen click System BIOS Boot Settings 2 Click Boot Option Settings Boot Sequence 3 Use the arrow keys to select a boot device and use the plus and minus sign keys to move the device down or up in the ...

Страница 32: ...r operating system begins to load before you press F2 wait for the system to finish booting and then restart your system and try again 3 On the System Setup Main Menu screen click System BIOS 4 On the System BIOS screen click Network Settings 5 On the Network Settings screen click UEFI iSCSI Settings UEFI iSCSI Settings screen details You can use the iSCSI Settings screen to modify iSCSI device se...

Страница 33: ...em Setup Password Sets the setup password This option is read only if the password jumper is not installed in the system Password Status Locks the system password This option is set to Unlocked by default TPM Security NOTE The TPM menu is available only when the TPM module is installed Enables you to control the reporting mode of the TPM The TPM Security option is set to Off by default You can onl...

Страница 34: ... When Secure Boot policy is set to Custom the BIOS uses the user defined key and certificates Secure Boot policy is set to Standard by default Secure Boot Policy Summary Specifies the list of certificates and hashes that secure boot uses to authenticate images Secure Boot Custom Policy Settings Secure Boot Custom Policy Settings is displayed only when Secure Boot Policy is set to Custom Viewing Se...

Страница 35: ...ss F2 immediately after turning on or rebooting your system 2 On the System Setup Main Menu screen click System BIOS System Security 3 On the System Security screen verify that Password Status is set to Unlocked 4 In the System Password field type your system password and press Enter or Tab Use the following guidelines to assign the system password A password can have up to 32 characters The passw...

Страница 36: ...the System Security screen ensure that Password Status is set to Unlocked 4 In the System Password field alter or delete the existing system password and then press Enter or Tab 5 In the Setup Password field alter or delete the existing setup password and then press Enter or Tab If you change the system and setup password a message prompts you to reenter the new password If you delete the system a...

Страница 37: ...em Setup Main Menu screen click System BIOS 4 On the System BIOS screen click System Information System Information details The System Information screen details are explained as follows Option Description System Model Name Specifies the system model name System BIOS Version Specifies the BIOS version installed on the system System Management Engine Version Specifies the current version of the Man...

Страница 38: ... the system System Memory Speed Specifies the system memory speed System Memory Voltage Specifies the system memory voltage Video Memory Specifies the amount of video memory System Memory Testing Specifies whether the system memory tests are run during system boot Options are Enabled and Disabled This option is set to Disabled by default Memory Operating Mode Specifies the memory operating mode Th...

Страница 39: ... Data Cache Unit DCU streamer prefetcher This option is set to Enabled by default DCU IP Prefetcher Enables or disables the Data Cache Unit DCU IP prefetcher This option is set to Enabled by default Configurable TDP Enables you to reconfigure the processor Thermal Design Power TDP levels during POST based on the power and thermal delivery capabilities of the system TDP verifies the maximum heat th...

Страница 40: ...u screen click System BIOS 4 On the System BIOS screen click SATA Settings SATA Settings details The SATA Settings screen details are explained as follows Option Description Embedded SATA Enables the embedded SATA option to be set to Off AHCI or RAID modes This option is set to AHCI by default Security Freeze Lock Sends Security Freeze Lock command to the Embedded SATA drives during POST This opti...

Страница 41: ...on Model Specifies the drive model of the selected device Drive Type Specifies the type of drive attached to the SATA port Capacity Specifies the total capacity of the hard drive Port E For AHCI or RAID mode BIOS support is always enabled Option Description Model Specifies the drive model of the selected device Drive Type Specifies the type of drive attached to the SATA port Capacity Specifies the...

Страница 42: ...and also restricts access to iDRAC features Internal USB Port Enables or disables the internal USB port This option is set to Enabled by default Integrated Network Card 1 Enables or disables the integrated network card Embedded NIC1 and NIC2 NOTE The Embedded NIC1 and NIC2 options are only available on systems that do not have Integrated Network Card 1 Enables or disables the Embedded NIC1 and NIC...

Страница 43: ...2 Press F2 immediately after you see the following message F2 System Setup NOTE If your operating system begins to load before you press F2 wait for the system to finish booting and then restart your system and try again 3 On the System Setup Main Menu screen click System BIOS 4 On the System BIOS screen click Serial Communication Serial Communication details The Serial Communication screen detail...

Страница 44: ...or disables the BIOS console redirection when the operating system is loaded This option is set to Enabled by default System Profile Settings You can use the System Profile Settings screen to enable specific system performance settings such as power management Viewing System Profile Settings To view the System Profile Settings screen perform the following steps 1 Turn on or restart your system 2 P...

Страница 45: ...is influenced by the setting of the Energy Efficiency Policy option Energy Efficient Policy Enables you to select the Energy Efficient Policy option The CPU uses the setting to manipulate the internal behavior of the processor and determines whether to target higher performance or better power savings Number of Turbo Boot Enabled Cores for Processor 1 Controls the number of turbo boost enabled cor...

Страница 46: ...boot mode You cannot set the option to Enabled if UEFI Secure Boot mode is enabled In System Characterization Enables or disables In System Characterization This option is set to Disabled by default The two other options are Enabled and Enabled No Reboot NOTE The default setting for In System Characterization is subject to change in future BIOS releases When enabled In System Characterization ISC ...

Страница 47: ... Lifecycle Controller Dell Lifecycle Controller LC provides advanced embedded systems management capabilities including system deployment configuration update maintenance and diagnosis LC is delivered as part of the iDRAC out of band solution and Dell system embedded Unified Extensible Firmware Interface UEFI applications Embedded system management The Dell Lifecycle Controller provides advanced e...

Страница 48: ...e boot attempt fails the system continues with the next item in the boot order until the boot is successful or no more boot options are found One shot Boot Menu Enables you to access boot menu where you can select a one time boot device to boot from Launch System Setup Enables you to access System Setup Launch Lifecycle Controller Exits the Boot Manager and invokes the Dell Lifecycle Controller pr...

Страница 49: ...ing that is not authorized by Dell is not covered by your warranty Read and follow the safety instructions that are shipped with your product CAUTION Operating the system without the system cover can result in component damage NOTE Dell recommends that you always use a static mat and static strap while working on components inside the system NOTE To ensure proper operation and cooling all bays in ...

Страница 50: ... 3 If removed install the optional front bezel 4 Reconnect the peripherals and connect the system to the electrical outlet 5 Turn on the system including any attached peripherals Related Links Installing the optional front bezel Installing the system cover Front bezel optional The front bezel is attached to the front side of the server and prevents accidents while removing the hard drive or when p...

Страница 51: ...em cover protects the components inside the system and helps in maintaining air flow inside the system Removing the system cover actuates the intrusion switch which aids in maintaining system security Removing the system cover Prerequisites 1 Follow the safety guidelines listed in the Safety instructions section 2 Turn off the system including any attached peripherals 3 Disconnect the system from ...

Страница 52: ... the cover on both sides and lift the cover away from the system Figure 8 Removing the system cover 1 system cover 2 latch 3 latch release lock Next steps 1 Install the system cover Related Links Removing the optional front bezel Installing the system cover Safety instructions Installing the system cover Prerequisites 1 Follow the safety guidelines listed in the Safety instructions section 2 Ensur...

Страница 53: ...the chassis 3 Rotate the latch release lock clockwise to the locked position Next steps 1 If removed install the front bezel 2 Reconnect the peripherals and connect the system to the electrical outlet 3 Turn on the system including any attached peripherals Related Links Installing the optional front bezel Safety instructions Inside the system Figure 9 Inside the system four 3 5 inch hot swappable ...

Страница 54: ...d and access is made to the interior of your system Removing the intrusion switch Prerequisites CAUTION Many repairs may only be done by a certified service technician You should only perform troubleshooting and simple repairs as authorized in your product documentation or as directed by the online or telephone service and support team Damage due to servicing that is not authorized by Dell is not ...

Страница 55: ...ed service technician You should only perform troubleshooting and simple repairs as authorized in your product documentation or as directed by the online or telephone service and support team Damage due to servicing that is not authorized by Dell is not covered by your warranty Read and follow the safety instructions that are shipped with your product 1 Follow the safety guidelines listed in the S...

Страница 56: ...y only be done by a certified service technician You should only perform troubleshooting and simple repairs as authorized in your product documentation or as directed by the online or telephone service and support team Damage due to servicing that is not authorized by Dell is not covered by your warranty Read and follow the safety instructions that are shipped with your product CAUTION Never opera...

Страница 57: ...ervice technician You should only perform troubleshooting and simple repairs as authorized in your product documentation or as directed by the online or telephone service and support team Damage due to servicing that is not authorized by Dell is not covered by your warranty Read and follow the safety instructions that are shipped with your product 1 Follow the safety guidelines listed in the Safet...

Страница 58: ...system supports DDR3 ECC unbuffered DIMMs UDIMMs NOTE MT s indicates memory module speed in Mega Transfers per second Memory bus operating frequency is 2133 MT s depending on the following factors System profile selected for example Performance Optimized Custom or Dense Configuration Optimized Maximum supported memory module frequency of the processors The system contains four memory sockets two s...

Страница 59: ...talling memory modules x4 and x8 DRAM based memory modules can be mixed For more information see the Mode specific guidelines section Up to two dual or single rank UDIMMs can be populated per channel Populate DIMM sockets only if a processor is installed For single processor systems sockets A1 to A4 are available If memory modules with different speeds are installed they operate at the speed of th...

Страница 60: ...sted in the Safety instructions section 2 Follow the procedure listed in the Before working inside your system section 3 Remove the cooling shroud WARNING The memory modules are hot to touch for some time after the system has been powered down Allow the memory modules to cool before handling them Handle the memory modules by the card edges and avoid touching the components or metallic contacts on ...

Страница 61: ...me time after the system has been powered down Allow the memory modules to cool before handling them Handle the memory modules by the card edges and avoid touching the components or metallic contacts on the memory module CAUTION Many repairs may only be done by a certified service technician You should only perform troubleshooting and simple repairs as authorized in your product documentation or a...

Страница 62: ...ectors on the memory module socket outward to allow the memory module to be inserted into the socket 4 Align the edge connector of the memory module with the alignment key of the memory module socket and insert the memory module in the socket CAUTION Do not apply pressure at the center of the memory module apply pressure at both ends of the memory module evenly NOTE The memory module socket has an...

Страница 63: ...ble hard drive read the storage controller card documentation to ensure that the host adapter is configured to support hot swappable hard drive removal and installation CAUTION Do not turn off or restart your system while the hard drive is being formatted Doing so can cause a hard drive failure Use only hard drives that have been tested and approved for use with the hard drive backplane When you f...

Страница 64: ...el Related Links Installing the optional front bezel Removing the optional front bezel Safety instructions Installing a 3 5 inch hot swappable hard drive carrier blank Prerequisites CAUTION Many repairs may only be done by a certified service technician You should only perform troubleshooting and simple repairs as authorized in your product documentation or as directed by the online or telephone s...

Страница 65: ... 1 Follow the safety guidelines listed in the Safety instructions section 2 If installed remove the front bezel 3 Using the management software prepare the hard drive for removal For more information see the documentation for the storage controller If the hard drive is online the green activity or fault indicator flashes when the hard drive is turned off You can remove the hard drive when the hard...

Страница 66: ...N Many repairs may only be done by a certified service technician You should only perform troubleshooting and simple repairs as authorized in your product documentation or as directed by the online or telephone service and support team Damage due to servicing that is not authorized by Dell is not covered by your warranty Read and follow the safety instructions that are shipped with your product NO...

Страница 67: ...cted by the online or telephone service and support team Damage due to servicing that is not authorized by Dell is not covered by your warranty Read and follow the safety instructions that are shipped with your product NOTE Hot swappable hard drives are supplied in hot swappable hard drive carriers that fit in the hard drive slots 1 Keep the Phillips 2 screwdriver ready 2 Remove the hot swappable ...

Страница 68: ...e is not supported CAUTION When installing a hard drive ensure that the adjacent drives are fully installed Inserting a hard drive carrier and attempting to lock its handle next to a partially installed carrier can damage the partially installed carrier s shield spring and make it unusable CAUTION To prevent data loss ensure that your operating system supports hot swap drive installation See the d...

Страница 69: ...stall the front bezel Related Links Installing a hot swappable hard drive into a hot swappable hard drive carrier Installing the optional front bezel Cooling fans Depending on your system configuration your system can support up to four cooling fans NOTE Hot swappable removal or installation of the fans is not supported NOTE Each fan is listed in the management software of the system referenced by...

Страница 70: ...elephone service and support team Damage due to servicing that is not authorized by Dell is not covered by your warranty Read and follow the safety instructions that are shipped with your product NOTE The procedure for removing each cooling fan blank is identical 1 Follow the safety guidelines listed in Safety instructions section 2 Follow the procedure listed in the Before working inside your sys...

Страница 71: ...ction Steps 1 Lower the cooling fan blank into the cooling fan bracket 2 Insert the tabs on the cooling fan blanks into the slots on the cooling fan bracket 3 Press the cooling fan blank until it clicks into place Next steps Follow the procedure listed in the After working inside your system section Related Links Before working inside your system Safety instructions Removing a cooling fan Prerequi...

Страница 72: ...nd installing a cooling fan 1 cooling fan 2 power cable connector 3 cooling fan bracket Next steps 1 Install the cooling fan 2 Follow the procedure listed in the After working inside your system section Related Links Before working inside your system After working inside your system Removing the cooling shroud Installing a cooling fan Installing the cooling shroud Safety instructions 72 ...

Страница 73: ...nto the cooling fan bracket 2 Connect the power cable to the power cable connector on the system board Next steps 1 Install the cooling shroud 2 Follow the procedure listed in the After working inside your system section Related Links Before working inside your system After working inside your system Removing the cooling shroud Installing the cooling shroud Safety instructions Expansion cards and ...

Страница 74: ...ull height 2 1 4 PERC H830 low profile 1 1 Removing the expansion card riser Prerequisites CAUTION Many repairs may only be done by a certified service technician You should only perform troubleshooting and simple repairs as authorized in your product documentation or as directed by the online or telephone service and support team Damage due to servicing that is not authorized by Dell is not cover...

Страница 75: ...g an expansion card Installing an expansion card Installing the expansion card riser Safety instructions Installing the expansion card riser Prerequisites CAUTION Many repairs may only be done by a certified service technician You should only perform troubleshooting and simple repairs as authorized in your product documentation or as directed by the online or telephone service and support team Dam...

Страница 76: ...m board 3 Lower the expansion card riser until the expansion card riser is firmly seated in the connector on the system board 4 Close the expansion card riser latch Figure 23 Installing the expansion card riser 1 expansion card riser 2 guide on the expansion card riser 3 guide pin on the system board 4 riser connector on the system board 5 slot on the chassis 6 expansion card latch Next steps 1 If...

Страница 77: ...3 Disconnect any cables connected to the expansion card or expansion card riser 4 If installed remove the expansion card riser Steps 1 Hold the expansion card by its edges and remove it from the expansion card riser connector 2 If you are removing the card permanently install a filler bracket in the empty expansion card slot and close the expansion card latch NOTE You must install a filler bracket...

Страница 78: ... Links Before working inside your system After working inside your system Safety instructions Installing an expansion card Prerequisites CAUTION Many repairs may only be done by a certified service technician You should only perform troubleshooting and simple repairs as authorized in your product documentation or as directed by the online or telephone service and support team Damage due to servici...

Страница 79: ...ws automation of server configuration scripts and imaging It emulates USB device s For more information see the Integrated Dell Remote Access Controller User s Guide at Dell com esmmanuals The iDRAC port card consists of the SD vFlash card slot and an iDRAC port The iDRAC port card features a dedicated NIC port and is used for remote advanced management of the system through the network An SD vFla...

Страница 80: ...t card connector on the system board and remove the card from the chassis Figure 26 Removing and installing the iDRAC port card 1 screw 2 iDRAC port 3 iDRAC port card board 4 tabs on the iDRAC port 5 slots on the chassis 6 iDRAC port card connector 7 iDRAC port card holder Next steps 1 Install the iDRAC port card 2 If disconnected reconnect the network cable 3 Follow the procedure listed in the Af...

Страница 81: ...t card into the slots on the chassis 2 Insert the iDRAC port card into the connector on the system board 3 Tighten the screw that secures the iDRAC port card holder to the system board Next steps 1 Install the cooling shroud 2 If disconnected reconnect the network cable 3 Follow the procedure listed in the After working inside your system section Processors and heat sinks Use the following procedu...

Страница 82: ... has been powered down Allow the heat sink and processor to cool down before handling them Steps 1 Loosen one of the screws that secure the heat sink to the system board Allow some time around 30 seconds for the heat sink to loosen from the processor 2 Loosen the screw that is diagonally opposite the screw you first removed 3 Repeat the procedure for the remaining two screws 4 Lift the heat sink a...

Страница 83: ...d service technicians 1 Follow the safety guidelines listed in the Safety instructions section 2 Follow the procedure listed in the Before working inside your system section 3 Keep the Phillips 2 screwdriver ready 4 Remove the cooling shroud 5 Install the processor Steps 1 If you are using an existing heat sink remove the thermal grease from the heat sink by using a clean lint free cloth 2 Use the...

Страница 84: ...er tightening tighten the retention screw until resistance is felt and stop after the screw is seated The screw tension should not be more than 6 in lb 6 9 kg cm 6 Repeat the procedure for the remaining two screws Next steps 1 Follow the procedure listed in the After working inside your system section 2 While booting press F2 to enter System Setup and verify that the processor information matches ...

Страница 85: ...or are too hot to touch for some time after the system has been powered down Allow the heat sink and processor to cool down before handling them CAUTION Never remove the heat sink from a processor unless you intend to remove the processor The heat sink is necessary to maintain proper thermal conditions NOTE If you are installing a single processor it must be installed in socket CPU1 Steps 1 Unpack...

Страница 86: ...duct NOTE This is a Field Replaceable Unit FRU Removal and installation procedures should be performed only by Dell certified service technicians 1 Follow the safety guidelines listed in the Safety instructions section 2 Keep the Phillips 2 screwdriver ready 3 If you are upgrading your system download the latest system BIOS version from Dell com support and follow the instructions included in the ...

Страница 87: ...euse return or temporary storage Do not touch the bottom of the processor to avoid damage to the processor contacts Touch only the side edges of the processor Figure 29 Opening and closing the processor shield 1 processor shield 2 tab on the processor shield 3 socket lever 87 ...

Страница 88: ...ower supply unit Your system supports a 250 W AC non redundant power supply unit PSU Removing a cabled power supply unit Prerequisites CAUTION Many repairs may only be done by a certified service technician You should only perform troubleshooting and simple repairs as authorized in your product documentation or as directed by the online or telephone service and support team Damage due to servicing...

Страница 89: ...the chassis slide the PSU toward the front of the chassis and lift it out of the chassis Figure 31 Removing and installing a cabled power supply unit 1 screw 2 PSU 3 P2 cable connector 4 P1 cable connector 5 standoff 6 P3 cable connector Next steps 1 Install the cabled PSU 2 Follow the procedure listed in the After working inside your system section Related Links Before working inside your system ...

Страница 90: ... instructions System battery The system battery is used for low level system functions like powering the real time clock and storing the computer s BIOS settings Replacing the system battery Prerequisites 1 Follow the safety guidelines listed in safety instructions section 2 Follow the procedure listed in the Before working in your system section 3 Remove the expansion card riser 4 Keep the plasti...

Страница 91: ...3 securing tabs 3 Install a new system battery by holding the battery with the sign facing up and slide it under the securing tabs 4 Press the battery into the connector until it snaps into place Figure 33 Installing the system battery 1 positive side of the battery connector 2 battery connector Next steps 1 Install the expansion card riser 2 Follow the procedure listed in the After working in you...

Страница 92: ... that is not authorized by Dell is not covered by your warranty Read and follow the safety instructions that are shipped with your product CAUTION To prevent damage to the drives and backplane you must remove the hard drives from the system before removing the backplane CAUTION You must note the number of each hard drive and temporarily label them before removal so that you can replace them in the...

Страница 93: ...ower cable 5 backplane signal cable 6 SAS_A connector on the backplane 7 hard drive connector 4 Next steps 1 Install the hard drive backplane 2 Follow the procedure listed in After working inside your system section Related Links Before working inside your system After working inside your system Installing the hard drive backplane Safety instructions 93 ...

Страница 94: ...onnect the SAS SATA data signal and power cable s to the backplane Next steps 1 Install the hard drives in their original locations 2 Follow the procedure listed in the After working inside your system section Related Links Before working inside your system After working inside your system Safety instructions Control panel The control panel contains the power button the diagnostic indicators and t...

Страница 95: ...s are released 3 Pull the control panel away from the chassis 4 Remove the screws securing the LCD control panel board 5 Lift the LCD control panel board away from the chassis Figure 35 Removing and installing the LCD control panel four 3 5 inch hot swappable hard drive chassis 1 LCD control panel 2 notches 6 3 display module cable retention clip 4 display module cable 5 tabs on the LCD control pa...

Страница 96: ...ystem Safety instructions Installing the LCD control panel assembly Prerequisites CAUTION Many repairs may only be done by a certified service technician You should only perform troubleshooting and simple repairs as authorized in your product documentation or as directed by the online or telephone service and support team Damage due to servicing that is not authorized by Dell is not covered by you...

Страница 97: ...bleshooting and simple repairs as authorized in your product documentation or as directed by the online or telephone service and support team Damage due to servicing that is not authorized by Dell is not covered by your warranty Read and follow the safety instructions that are shipped with your product 1 Follow the safety guidelines listed in Safety instructions section 2 Follow the procedure list...

Страница 98: ...ing the LED module four cabled hard drive chassis 1 LED module 2 screw 2 3 slot on the chassis Figure 38 Removing and installing the LED control panel board four cabled hard drive chassis 1 screw 2 2 control panel connector cable 98 ...

Страница 99: ...ines listed in safety instructions section 2 Follow the procedure listed in the Before working inside your system section Steps 1 Insert the control panel board into the slot in the chassis and align the two screw holes on the control panel board with the corresponding holes on the chassis 2 Secure the control panel board with the screws 3 Connect all the cables to the control panel board Next ste...

Страница 100: ... the TPM plug in module from the system board After the TPM plug in module is installed it is cryptographically bound to that specific system board Any attempt to remove an installed TPM plug in module breaks the cryptographic binding and it cannot be re installed or installed on another system board 1 Follow the safety guidelines listed in Safety instructions section 2 Keep the Phillips 2 screwdr...

Страница 101: ...Figure 39 Removing and installing the screws on the system board 1 screw 8 101 ...

Страница 102: ...tem board Prerequisites CAUTION Many repairs may only be done by a certified service technician You should only perform troubleshooting and simple repairs as authorized in your product documentation or as directed by the online or telephone service and support team Damage due to servicing that is not authorized by Dell is not covered by your warranty Read and follow the safety instructions that ar...

Страница 103: ...ard riser b memory modules c heat sink and processor d cooling shroud e iDRAC port card if removed 3 Reconnect all cables to the system board NOTE Ensure that the cables inside the system are routed through the cable routing latch 4 Follow the procedure listed in the After working inside your system section 5 Import your new or existing iDRAC Enterprise license For more information see the Integra...

Страница 104: ...rm one of the following steps After the restore process is complete BIOS prompts to restore the system configuration data 3 Perform one of the following steps Press Y to restore the system configuration data Press N to use the default configuration settings After the restore process is complete the system restarts Entering the system Service Tag by using System Setup If Easy Restore fails to resto...

Страница 105: ...n or as directed by the online or telephone service and support team Damage due to servicing that is not authorized by Dell is not covered by your warranty Read and follow the safety instructions that are shipped with your product NOTE This is a Field Replaceable Unit FRU Removal and installation procedures should be performed only by Dell certified service technicians 1 Follow the safety guidelin...

Страница 106: ...alizing the TPM see http technet microsoft com en us library cc753140 aspx The TPM Status changes to Enabled Activated Initializing the TPM for TXT users 1 While booting your system press F2 to enter System Setup 2 On the System Setup Main Menu screen click System BIOS System Security Settings 3 From the TPM Security option select On with Pre boot Measurements 4 From the TPM Command option select ...

Страница 107: ...thorough tests to introduce additional test options to provide extra information about the failed device s View status messages that inform you if tests are completed successfully View error messages that inform you of problems encountered during testing When to use the Embedded System Diagnostics Run the Embedded System Diagnostics ePSA if your system does not boot Running the Embedded System Dia...

Страница 108: ...tus information of all detected devices Results Displays the results of all tests that are run System health Provides the current overview of the system performance Event log Displays a time stamped log of the results of all tests run on the system This is displayed if at least one event description is recorded For information about embedded system diagnostics see the ePSA Diagnostics Guide Notebo...

Страница 109: ...in the system Jumpers on the system board help to disable system and setup passwords You must know the connectors on the system board to install components and cables correctly System board jumpers and connectors Figure 42 System board jumpers and connectors Table 25 System board jumpers and connectors Item Connector Description 1 PCIE_G3_X8 PCIe card connector 2 2 INT_USB_3 0 Internal USB connect...

Страница 110: ...ED PERC LED connector 19 HDD_PWR Hard drive power connector 20 FP_USB Front panel USB connector 21 FAN1 Cooling fan connector 22 CTRL_PNL Control panel interface connector 23 BATTERY Battery connector System board jumper settings CAUTION Many repairs may only be done by a certified service technician You should only perform troubleshooting and simple repairs as authorized in your product documenta...

Страница 111: ...afety instructions that are shipped with your product Steps 1 Turn off the system including any attached peripherals and disconnect the system from the electrical outlet 2 Remove the system cover 3 Move the jumper on the system board jumper from pins 2 and 3 to pins 1 and 2 4 Install the system cover The existing passwords are not disabled erased until the system boots with the jumper on pins 1 an...

Страница 112: ...o avoid this issue you must boot to the same boot mode in which you installed the operating system For all other startup issues note the system messages that appear on the screen Troubleshooting external connections Before troubleshooting any external devices ensure that all external cables are securely attached to the external connectors on your system before troubleshooting any external devices ...

Страница 113: ...B ports are enabled on the Integrated Devices screen If your keyboard is not functioning use remote access to enable or disable the USB options 9 If the system is not accessible reset the NVRAM_CLR jumper inside your system and restore the BIOS to the default settings See the System board jumper setting section 10 In the IDRAC Settings Utility ensure that USB Management Port Mode is configured as ...

Страница 114: ...the Integrated Devices screen 6 Ensure that all the NICs hubs and switches on the network are set to the same data transmission speed and duplex For more information see the documentation for each network device 7 Ensure that all network cables are of the proper type and do not exceed the maximum length Next steps If the problem persists see the Getting help section Related Links Getting help Usin...

Страница 115: ...l see the Getting help section Related Links Getting help Using system diagnostics Troubleshooting a damaged system Prerequisites CAUTION Many repairs may only be done by a certified service technician You should only perform troubleshooting and simple repairs as authorized in your product documentation or as directed by the online or telephone service and support team Damage due to servicing that...

Страница 116: ...ation is caused by a defective battery NOTE Some software may cause the system time to speed up or slow down If the system seems to operate normally except for the time set in System Setup the problem may be caused by a software rather than by a defective battery Steps 1 Re enter the time and date in System Setup 2 Turn off the system and disconnect it from the electrical outlet for at least an ho...

Страница 117: ... configuration ensure that both the PSUs are of the same type and wattage You may have to upgrade to a higher wattage PSU 5 Ensure that you use only PSUs with the Extended Power Performance EPP label on the back 6 Reseat the PSU NOTE After installing a PSU allow several seconds for the system to recognize the PSU and determine if it is working properly If the problem persists see the Getting help ...

Страница 118: ...oubleshooting and simple repairs as authorized in your product documentation or as directed by the online or telephone service and support team Damage due to servicing that is not authorized by Dell is not covered by your warranty Read and follow the safety instructions that are shipped with your product NOTE The fan number is referenced by the systems management software In the event of a problem...

Страница 119: ...h the installed memory but the problem still persists go to step 12 5 Turn off the system and attached peripherals and disconnect the system from the electrical outlet 6 Remove the system cover 7 Check the memory channels and ensure that they are populated correctly NOTE See the system event log or system messages for the location of the failed memory module Reinstall the memory device 8 Reseat th...

Страница 120: ...ion See the Dell Lifecycle Controller documentation or online help for information about RAID configuration b Ensure that the hard drives are configured correctly for the RAID array c Take the hard drive offline and reseat the drive d Exit the configuration utility and allow the system to boot to the operating system 3 Ensure that the needed device drivers for your controller card are installed an...

Страница 121: ...the system and attached peripherals and disconnect the system from the electrical outlet b Remove the system cover c Reinstall one of the expansion cards d Install the system cover e Run the appropriate diagnostic test See the Using system diagnostics section If the problem persists see the Getting help section Related Links Using system diagnostics Getting help Troubleshooting expansion cards Pre...

Страница 122: ...ing help section Related Links Using system diagnostics Getting help Troubleshooting processors Prerequisites CAUTION Many repairs may only be done by a certified service technician You should only perform troubleshooting and simple repairs as authorized in your product documentation or as directed by the online or telephone service and support team Damage due to servicing that is not authorized b...

Страница 123: ...ges are generated by either the application or the operating system For more information see the documentation that accompanied the operating system or application Diagnostic messages The system diagnostic utility will generate messages if there are errors detected when you run diagnostic tests on your system For more information about system diagnostics see the Using system diagnostics section Re...

Страница 124: ... general support a Select your product category b Select your product segment c Select your product The support page that lists the various support categories is displayed 5 For contact details of Dell Global Technical Support a Click Global Technical Support b The Contact Technical Support page is displayed with details to call chat or e mail the Dell Global Technical Support team Locating Servic...

Отзывы: