background image


5.

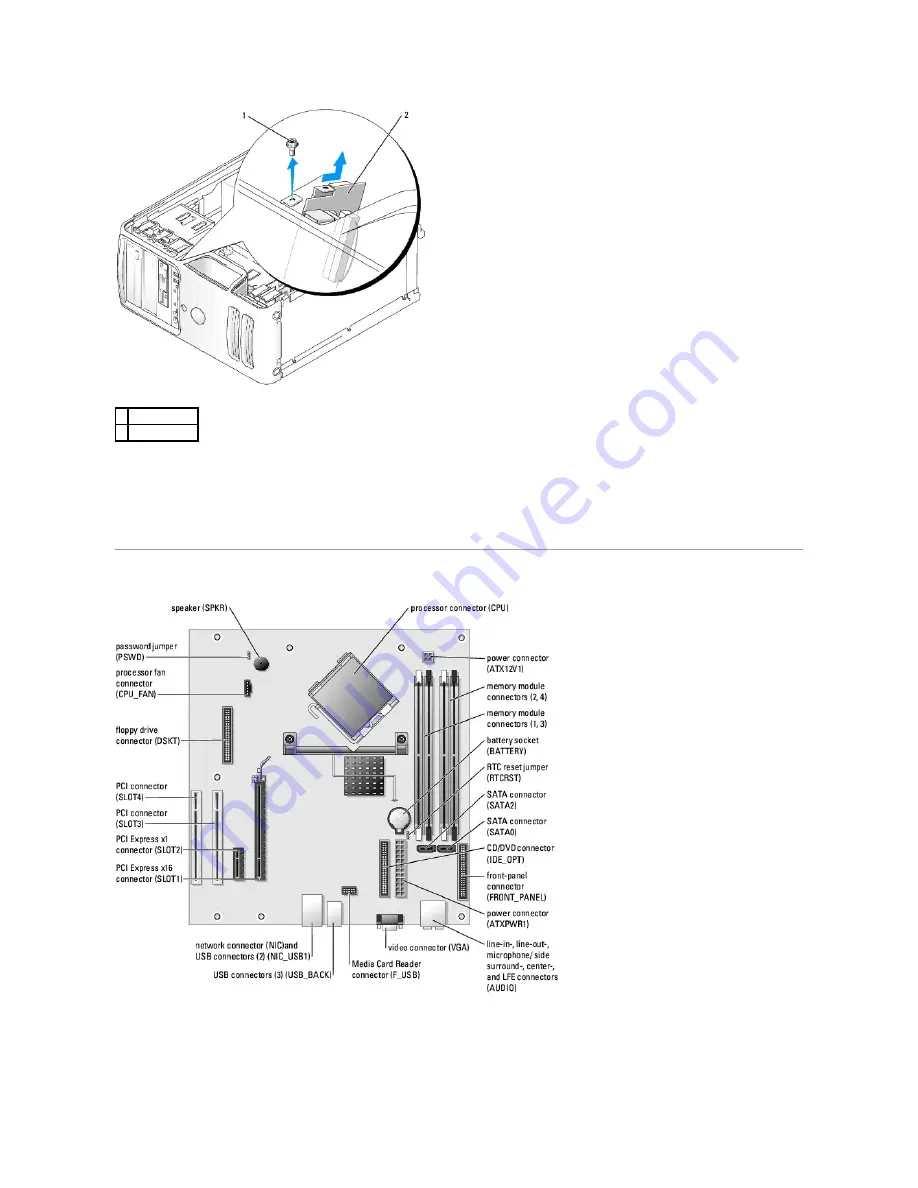
Remove the screw that secures the front I/O panel to the front of the computer.  


6.

Pull the I/O panel toward the back of the computer and lift the panel to remove from the computer.  


7.

Disconnect any cables from the I/O panel.  


System Board  


Jumper Settings 

The jumper locations are shown below. 

1  screw 

2  front I/O panel 

Содержание Dimension 5100

Страница 1: ...tly forbidden Trademarks used in this text Dell the DELL logo and Dimension are trademarks of Dell Inc Intel and Pentium are registered trademarks of Intel Corporation Microsoft and Windows are registered trademarks of Microsoft Corporation Other trademarks and trade names may be used in this document to refer to either the entities claiming the marks and names or their products Dell Inc disclaims...

Страница 2: ...adphones 8 diagnostic lights 4 Use the lights to help you troubleshoot a computer problem based on the diagnostic code For more information see Diagnostic Lights 9 hard drive activity light The hard drive activity light is on when the computer reads data from or writes data to the hard drive The light might also be on when a device such as a CD player is operating 10 power button power light Press...

Страница 3: ...ween a 100 Mbps network and the computer l Off The computer is not detecting a physical connection to the network 2 network adapter connector To attach your computer to a network or broadband device connect one end of a network cable to either a network jack or your network or broadband device Connect the other end of the network cable to the network adapter connector on the back panel of your com...

Страница 4: ... or musical input into a sound or telephony program On computers with a sound card the microphone connector is on the card The side surround output provides enhanced surround audio for computers with 7 1 speakers 8 center subwoofer connector Use the yellow connector to attach a speaker to a Low Frequency Effects LFE audio channel 9 VGA video connector If your monitor has a VGA connector plug it in...

Страница 5: ...ts to help you troubleshoot a computer problem based on the diagnostic code For more information see Diagnostic Lights 9 hard drive activity light The hard drive activity light is on when the computer reads data from or writes data to the hard drive The light might also be on when a device such as a CD player is operating 10 power button power light Press the power button to turn on the computer T...

Страница 6: ...es that the network cable has been securely attached NOTE Do not plug a telephone cable into the network connector On computers with a network connector card use the connector on the card It is recommended that you use Category 5 wiring and connectors for your network If you must use Category 3 wiring force the network speed to 10 Mbps to ensure reliable operation 3 network activity light Flashes ...

Страница 7: ...A connector plug it into the VGA connector on the computer 10 USB 2 0 connectors 5 Use the back USB connectors for devices that typically remain connected such as printers keyboards and mice or for bootable USB devices which may not function properly if attached to the front connectors see System Setup for more information on booting to a USB device It is recommended that you use the front USB con...

Страница 8: ...nds Before Working Inside Your Computer Use the following safety guidelines to help protect your computer from potential damage and to help ensure your own personal safety 1 Turn off your computer NOTICE To avoid losing data save and close any open files and exit any open programs before you turn off your computer CAUTION Before you begin any of the procedures in this section follow the safety ins...

Страница 9: ...cover Back to Contents Page CAUTION To guard against electrical shock always unplug your computer from the electrical outlet before opening the cover NOTICE Before touching anything inside your computer ground yourself by touching an unpainted metal surface such as the metal at the back of the computer While you work periodically touch an unpainted metal surface to dissipate any static electricity...

Страница 10: ...nds Before Working Inside Your Computer Use the following safety guidelines to help protect your computer from potential damage and to help ensure your own personal safety 1 Turn off your computer NOTICE To avoid losing data save and close any open files and exit any open programs before you turn off your computer CAUTION Before you begin any of the procedures in this section follow the safety ins...

Страница 11: ...cover Back to Contents Page CAUTION To guard against electrical shock always unplug your computer from the electrical outlet before opening the cover NOTICE Before touching anything inside your computer ground yourself by touching an unpainted metal surface such as the metal at the back of the computer While you work periodically touch an unpainted metal surface to dissipate any static electricity...

Страница 12: ...r 4 Using the tabs as leverage rotate the cover downward and press down to close it 5 Ensure that the cover is seated correctly before moving it to the upright position 6 Connect your computer and devices to electrical outlets and turn them on Back to Contents Page CAUTION Before you begin any of the procedures in this section follow the safety instructions in the Product Information Guide NOTICE ...

Страница 13: ...r 4 Using the tabs as leverage rotate the cover downward and press down to close it 5 Ensure that the cover is seated correctly before moving it to the upright position 6 Connect your computer and devices to electrical outlets and turn them on Back to Contents Page CAUTION Before you begin any of the procedures in this section follow the safety instructions in the Product Information Guide NOTICE ...

Страница 14: ...ore you begin any of the procedures in this section follow the safety instructions in the Product Information Guide CAUTION To guard against electrical shock always unplug your computer from the electrical outlet before removing the cover NOTICE Ensure that sufficient space exists to support the removed cover at least 30 cm 1 ft of desk top space NOTICE Ensure that you are working on a level prote...

Страница 15: ...ore you begin any of the procedures in this section follow the safety instructions in the Product Information Guide CAUTION To guard against electrical shock always unplug your computer from the electrical outlet before removing the cover NOTICE Ensure that sufficient space exists to support the removed cover at least 30 cm 1 ft of desk top space NOTICE Ensure that you are working on a level prote...

Страница 16: ... 2 or A pair of matched memory modules installed in DIMM connectors 1 and 2 and another matched pair installed in DIMM connectors 3 and 4 l If you install mixed pairs of DDR2 400 MHz PC2 3200 and DDR2 533 MHz PC2 4300 memory the modules function at the slowest speed installed l Be sure to install a single memory module in DIMM connector 1 the connector closest to the processor before you install m...

Страница 17: ...iginal memory modules from the computer during a memory upgrade keep them separate from any new modules that you may have even if you purchased the new modules from Dell If possible do not pair an original memory module with a new memory module Otherwise your computer may not start properly You should install your original memory modules in pairs either in DIMM connectors 1 and 2 or DIMM connector...

Страница 18: ...or PCI and PCI Express cards l Two PCI card slots l One PCI Express x16 card slot l One PCI Express x1 card slot PCI Cards Your computer supports two PCI cards 1 notch 2 memory module 3 cutouts 2 4 crossbar NOTICE To avoid damage to the memory module press the module straight down into the connector while you apply equal force to each end of the module NOTICE To connect a network cable first plug ...

Страница 19: ...filler bracket to create a card slot opening Then continue with step 6 5 If you are replacing a card that is already installed in the computer remove the card If necessary disconnect any cables connected to the card Grasp the card by its top corners and ease it out of its connector 6 Prepare the card for installation See the documentation that came with the card for information on configuring the ...

Страница 20: ...Controller and then change the setting to Off b Connect external audio devices to the sound card s connectors Do not connect external audio devices to the microphone speaker headphone or line in connectors on the back panel 13 If you installed an add in network adapter and want to disable the integrated network adapter 1 bracket within slot 4 alignment guide 2 bracket caught outside of slot 5 full...

Страница 21: ...a sound card a Enter system setup select Audio Controller and then change the setting to On b Connect external audio devices to the audio connectors on the back panel of the computer 9 If you removed an add in network connector a Enter system setup select Integrated NIC and then change the setting to On b Connect the network cable to the integrated connector on the back panel of the computer PCI E...

Страница 22: ...ab grasp the card by its top corners and then ease it out of its connector 7 Prepare the card for installation See the documentation that came with the card for information on configuring the card making internal connections or otherwise customizing it for your computer 8 If you are installing the card into the x16 card connector position the card so the securing slot is aligned with the securing ...

Страница 23: ... the microphone speaker headphone or line in connectors on the back panel 15 If you installed an add in network adapter and want to disable the integrated network adapter a Enter system setup select Integrated NIC and then change the setting to Off b Connect the network cable to the add in network adapter s connectors Do not connect the network cable to the integrated connector on the back panel 1...

Страница 24: ... the operating system 10 If you removed a sound card a Enter system setup select Audio Controller and then change the setting to On b Connect external audio devices to the audio connectors on the back panel of the computer 11 If you removed an add in network connector a Enter system setup select Integrated NIC and then change the setting to On b Connect the network cable to the integrated connecto...

Страница 25: ...in 2 Remove the computer cover 3 Remove the drive panel 1 Turn the drive panel sideways and find the tip of the drive panel insert tab that latches over a tab on the right side of the drive panel 2 Pull the inner tip of the drive panel insert tab away from the drive panel 1 sliding plate lever 3 drive panel 2 sliding plate 4 front panel NOTE The sliding plate secures and releases the drive panel a...

Страница 26: ...rresponding tab on the drive panel Replacing the Drive Panel 1 Follow the procedures in Before You Begin 2 Remove the computer cover if you have not already done so 3 If you are installing a replacement drive panel remove the old drive panel 4 Align the drive panel tabs with the side door hinges 5 Rotate the drive panel toward the computer until it snaps into place on the front panel 1 drive panel...

Страница 27: ... panel Drives Your computer supports a combination of these devices l Up to two serial ATA hard drives l One FlexBay drive may contain an optional floppy drive or an optional Media Card Reader l Up to two CD or DVD drives CAUTION Before you begin any of the procedures in this section follow the safety instructions in the Product Information Guide CAUTION To guard against electrical shock always un...

Страница 28: ...ata cable grasp the colored pull tab and pull until the connector detaches Most interface connectors are keyed for correct insertion that is a notch or a missing pin on one connector matches a tab or a filled in hole on the other connector Keyed connectors ensure that the pin 1 wire in the cable indicated by the colored stripe along one edge of the IDE cable serial ATA cables do not use a colored ...

Страница 29: ...Guide CAUTION To guard against electrical shock always unplug your computer from the electrical outlet before removing the cover NOTICE To prevent static damage to components inside your computer discharge static electricity from your body before you touch any of your computer s electronic components You can do so by touching an unpainted metal surface on the computer NOTICE To avoid damage to the...

Страница 30: ...he drive to verify that it is configured for your computer 6 Gently slide the drive into place until you feel a click or feel the drive securely installed 7 Connect the power and hard drive cables to the drive 1 hard drive 2 tabs 2 NOTE If your replacement hard drive does not have the hard drive bracket attached remove the bracket from the old drive by unsnapping it from the drive Snap the bracket...

Страница 31: ...r CAUTION Before you begin any of the procedures in this section follow the safety instructions in the Product Information Guide CAUTION To guard against electrical shock always unplug your computer from the electrical outlet before removing the cover NOTICE To prevent static damage to components inside your computer discharge static electricity from your body before you touch any of your computer...

Страница 32: ...he bottom of the computer and without releasing the sliding plate lever slide the floppy drive out through the front of the computer NOTE If you are adding a floppy drive see Installing a Floppy Drive 1 power cable 2 data cable NOTE If you are installing a PCI Express x16 card the card may cover the floppy drive connectors Remove the card before connecting the floppy drive cables 1 sliding plate l...

Страница 33: ...the way to avoid blocking the fan and cooling vents 8 Replace the drive panel 9 Replace the computer cover 10 Connect your computer and devices to their electrical outlets and turn them on See the documentation that came with the drive for instructions on installing any software required for drive operation NOTE If the new floppy drive does not include shoulder screws use the screws within the dri...

Страница 34: ...connect the FlexBay USB cable on the back of the Media Card Reader from the Media Card Reader connector on the system board and route the cable through the cable routing clip CAUTION Before you begin any of the procedures in this section follow the safety instructions in the Product Information Guide NOTICE To prevent static damage to components inside your computer discharge static electricity fr...

Страница 35: ... Media Card Reader and bracket from its packaging and ensure that all of the screws are included 1 sliding plate lever 2 sliding plate 3 Media Card Reader CAUTION Before you begin any of the procedures in this section follow the safety instructions in the Product Information Guide NOTICE To prevent static damage to components inside your computer discharge static electricity from your body before ...

Страница 36: ...nnect the power and data cables from the back of the drive NOTE Ensure that the Media Card Reader is installed before the FlexBay cable is connected 1 Media Card Reader 2 FlexBay USB cable CAUTION Before you begin any of the procedures in this section follow the safety instructions in the Product Information Guide CAUTION To guard against electrical shock always unplug your computer from the elect...

Страница 37: ...ve out through the front of the computer Installing a CD DVD Drive 1 Follow the procedures in Before You Begin 2 Remove the computer cover 3 Remove the drive panel 4 Slide the drive into place until you feel a click or feel the drive securely installed NOTE If you are installing a new drive you need to remove the drive panel insert ...

Страница 38: ...ectly by running the Dell Diagnostics Heat Sink Assembly Removing the Heat Sink Assembly NOTICE To connect a network cable first plug the cable in to the network port or device and then plug it in to the computer CAUTION Before you begin any of the procedures in this section follow the safety instructions in the Product Information Guide CAUTION To guard against electrical shock always unplug your...

Страница 39: ...k assembly lay the assembly on its side Do not set the heat sink assembly upright or touch the thermal interface as this may result in damage to the thermal interface material 1 heat sink assembly 2 captive screws 2 NOTICE When you install the heat sink assembly do not touch the thermal interface on its underside as this may result in damage to the thermal interface material CAUTION Before you beg...

Страница 40: ...t notches on the processor with the front and rear alignment notches on the socket 4 Align the pin 1 corners of the processor and socket 3 processor socket NOTICE When removing or replacing the processor do not touch any of the pins inside the processor socket or allow any objects to fall onto the pins in the socket NOTICE Ground yourself by touching an unpainted metal surface on the back of the c...

Страница 41: ...front alignment notch 3 processor 8 socket and processor pin 1 indicators 4 processor socket 9 rear alignment notch 5 cover latch NOTICE To avoid damage ensure that the processor aligns properly with the socket and do not use excessive force when you install the processor NOTICE If you are not installing a processor upgrade kit from Dell reuse the original heat sink assembly when you replace the p...

Страница 42: ...ove the fan assembly 1 fan release tabs 2 2 fan assembly 3 fan cable connector 4 release tab on fan cable connector CAUTION Before you begin any of the procedures in this section follow the safety instructions in the Product Information Guide CAUTION To guard against electrical shock always unplug your computer from the electrical outlet before removing the cover NOTICE To prevent static damage to...

Страница 43: ...e front of the computer 6 Pull the I O panel toward the back of the computer and lift the panel to remove from the computer 7 Disconnect any cables from the I O panel System Board Jumper Settings The jumper locations are shown below 1 screw 2 front I O panel ...

Страница 44: ...two mounting bracket screws 10 Slide the system board assembly toward the front of the computer and then lift the board away Jumper Setting Description PSWD default Password features are enabled Password features are disabled RTCRST default Real time clock reset in normal operation Clear CMOS settings CAUTION To guard against electrical shock always unplug your computer from the electrical outlet ...

Страница 45: ...ts and turn them on Power Supply Removing the Power Supply 1 Follow the procedures in Before You Begin 2 Remove the computer cover 3 Disconnect the DC power cables from the system board and the drives 1 mounting bracket screws 2 2 system board screws 8 NOTICE To connect a network cable first plug the cable into the network port or device and then plug the cable into the computer CAUTION Before you...

Страница 46: ...puter and devices to electrical outlets and turn them on Back to Contents Page 1 release button 2 power supply 3 screws 4 4 AC power connector NOTICE Note the routing of the DC power cables underneath the routing clips in the computer frame as you remove them from the system board and drives You must route these cables properly when you replace them to prevent them from being pinched or crimped CA...

Страница 47: ......

Страница 48: ...s installed in DIMM connectors 1 and 2 or A pair of matched memory modules installed in DIMM connectors 1 and 2 and another matched pair installed in DIMM connectors 3 and 4 l If you install mixed pairs of DDR2 400 MHz PC2 3200 and DDR2 533 MHz PC2 4300 memory the modules function at the slowest speed installed l Be sure to install a single memory module in DIMM connector 1 the connector closest t...

Страница 49: ...arranty NOTICE If you remove your original memory modules from the computer during a memory upgrade keep them separate from any new modules that you may have even if you purchased the new modules from Dell If possible do not pair an original memory module with a new memory module Otherwise your computer may not start properly You should install your original memory modules in pairs either in DIMM ...

Страница 50: ...or PCI and PCI Express cards l Two PCI card slots l One PCI Express x16 card slot l One PCI Express x1 card slot PCI Cards Your computer supports two PCI cards 1 notch 2 memory module 3 cutouts 2 4 crossbar NOTICE To avoid damage to the memory module press the module straight down into the connector while you apply equal force to each end of the module NOTICE To connect a network cable first plug ...

Страница 51: ...filler bracket to create a card slot opening Then continue with step 6 5 If you are replacing a card that is already installed in the computer remove the card If necessary disconnect any cables connected to the card Grasp the card by its top corners and ease it out of its connector 6 Prepare the card for installation See the documentation that came with the card for information on configuring the ...

Страница 52: ...Controller and then change the setting to Off b Connect external audio devices to the sound card s connectors Do not connect external audio devices to the microphone speaker headphone or line in connectors on the back panel 13 If you installed an add in network adapter and want to disable the integrated network adapter 1 bracket within slot 4 alignment guide 2 bracket caught outside of slot 5 full...

Страница 53: ...a sound card a Enter system setup select Audio Controller and then change the setting to On b Connect external audio devices to the audio connectors on the back panel of the computer 9 If you removed an add in network connector a Enter system setup select Integrated NIC and then change the setting to On b Connect the network cable to the integrated connector on the back panel of the computer PCI E...

Страница 54: ...ab grasp the card by its top corners and then ease it out of its connector 7 Prepare the card for installation See the documentation that came with the card for information on configuring the card making internal connections or otherwise customizing it for your computer 8 If you are installing the card into the x16 card connector position the card so the securing slot is aligned with the securing ...

Страница 55: ... the microphone speaker headphone or line in connectors on the back panel 15 If you installed an add in network adapter and want to disable the integrated network adapter a Enter system setup select Integrated NIC and then change the setting to Off b Connect the network cable to the add in network adapter s connectors Do not connect the network cable to the integrated connector on the back panel 1...

Страница 56: ... the operating system 10 If you removed a sound card a Enter system setup select Audio Controller and then change the setting to On b Connect external audio devices to the audio connectors on the back panel of the computer 11 If you removed an add in network connector a Enter system setup select Integrated NIC and then change the setting to On b Connect the network cable to the integrated connecto...

Страница 57: ...in 2 Remove the computer cover 3 Remove the drive panel 1 Turn the drive panel sideways and find the tip of the drive panel insert tab that latches over a tab on the right side of the drive panel 2 Pull the inner tip of the drive panel insert tab away from the drive panel 1 sliding plate lever 3 drive panel 2 sliding plate 4 front panel NOTE The sliding plate secures and releases the drive panel a...

Страница 58: ...rresponding tab on the drive panel Replacing the Drive Panel 1 Follow the procedures in Before You Begin 2 Remove the computer cover if you have not already done so 3 If you are installing a replacement drive panel remove the old drive panel 4 Align the drive panel tabs with the side door hinges 5 Rotate the drive panel toward the computer until it snaps into place on the front panel 1 drive panel...

Страница 59: ... panel Drives Your computer supports a combination of these devices l Up to two serial ATA hard drives l One FlexBay drive may contain an optional floppy drive or an optional Media Card Reader l Up to two CD or DVD drives CAUTION Before you begin any of the procedures in this section follow the safety instructions in the Product Information Guide CAUTION To guard against electrical shock always un...

Страница 60: ...ata cable grasp the colored pull tab and pull until the connector detaches Most interface connectors are keyed for correct insertion that is a notch or a missing pin on one connector matches a tab or a filled in hole on the other connector Keyed connectors ensure that the pin 1 wire in the cable indicated by the colored stripe along one edge of the IDE cable serial ATA cables do not use a colored ...

Страница 61: ...Guide CAUTION To guard against electrical shock always unplug your computer from the electrical outlet before removing the cover NOTICE To prevent static damage to components inside your computer discharge static electricity from your body before you touch any of your computer s electronic components You can do so by touching an unpainted metal surface on the computer NOTICE To avoid damage to the...

Страница 62: ...he drive to verify that it is configured for your computer 6 Gently slide the drive into place until you feel a click or feel the drive securely installed 7 Connect the power and hard drive cables to the drive 1 hard drive 2 tabs 2 NOTE If your replacement hard drive does not have the hard drive bracket attached remove the bracket from the old drive by unsnapping it from the drive Snap the bracket...

Страница 63: ... NOTICE To connect a network cable first plug the cable into the network port or device and then plug it into the computer CAUTION Before you begin any of the procedures in this section follow the safety instructions in the Product Information Guide CAUTION To guard against electrical shock always unplug your computer from the electrical outlet before removing the cover NOTICE To prevent static da...

Страница 64: ...he computer NOTICE To prevent static damage to components inside your computer discharge static electricity from your body before you touch any of your computer s electronic components You can do so by touching an unpainted metal surface on the computer NOTE If you are adding a floppy drive see Installing a Floppy Drive 1 power cable 2 data cable NOTE If you are installing a PCI Express x16 card t...

Страница 65: ...shroud 7 Check all cable connections and fold cables out of the way to avoid blocking the fan and cooling vents 8 Replace the drive panel 9 Replace the computer cover 10 Connect your computer and devices to their electrical outlets and turn them on NOTE If the new floppy drive does not include shoulder screws use the screws within the drive panel insert 1 drive 2 screws 4 NOTE If you are installin...

Страница 66: ...n 2 Remove the computer cover 3 Remove the drive panel 4 Disconnect the FlexBay USB cable on the back of the Media Card Reader from the Media Card Reader connector on the system board and route the cable through the cable routing clip CAUTION Before you begin any of the procedures in this section follow the safety instructions in the Product Information Guide NOTICE To prevent static damage to com...

Страница 67: ... Media Card Reader and bracket from its packaging and ensure that all of the screws are included 1 sliding plate lever 2 sliding plate 3 Media Card Reader CAUTION Before you begin any of the procedures in this section follow the safety instructions in the Product Information Guide NOTICE To prevent static damage to components inside your computer discharge static electricity from your body before ...

Страница 68: ...nnect the power and data cables from the back of the drive NOTE Ensure that the Media Card Reader is installed before the FlexBay cable is connected 1 Media Card Reader 2 FlexBay USB cable CAUTION Before you begin any of the procedures in this section follow the safety instructions in the Product Information Guide CAUTION To guard against electrical shock always unplug your computer from the elect...

Страница 69: ...ve out through the front of the computer Installing a CD DVD Drive 1 Follow the procedures in Before You Begin 2 Remove the computer cover 3 Remove the drive panel 4 Slide the drive into place until you feel a click or feel the drive securely installed NOTE If you are installing a new drive you need to remove the drive panel insert ...

Страница 70: ...ectly by running the Dell Diagnostics Heat Sink Assembly Removing the Heat Sink Assembly NOTICE To connect a network cable first plug the cable in to the network port or device and then plug it in to the computer CAUTION Before you begin any of the procedures in this section follow the safety instructions in the Product Information Guide CAUTION To guard against electrical shock always unplug your...

Страница 71: ...e heat sink assembly upright or touch the thermal interface as this may result in damage to the thermal interface material 1 heat sink assembly 2 captive screws 2 NOTICE When you install the heat sink assembly do not touch the thermal interface on its underside as this may result in damage to the thermal interface material CAUTION Before you begin any of the procedures in this section follow the s...

Страница 72: ...ar alignment notches on the processor with the front and rear alignment notches on the socket 4 Align the pin 1 corners of the processor and socket 1 processor cover 4 release lever 2 processor 5 side latch 3 processor socket NOTICE When removing or replacing the processor do not touch any of the pins inside the processor socket or allow any objects to fall onto the pins in the socket NOTICE Groun...

Страница 73: ...se lever 2 tab 7 front alignment notch 3 processor 8 socket and processor pin 1 indicators 4 processor socket 9 rear alignment notch 5 cover latch NOTICE To avoid damage ensure that the processor aligns properly with the socket and do not use excessive force when you install the processor NOTICE If you are not installing a processor upgrade kit from Dell reuse the original heat sink assembly when ...

Страница 74: ...ove the fan assembly 1 fan release tabs 2 2 fan assembly 3 fan cable connector 4 release tab on fan cable connector CAUTION Before you begin any of the procedures in this section follow the safety instructions in the Product Information Guide CAUTION To guard against electrical shock always unplug your computer from the electrical outlet before removing the cover NOTICE To prevent static damage to...

Страница 75: ...e front of the computer 6 Pull the I O panel toward the back of the computer and lift the panel to remove from the computer 7 Disconnect any cables from the I O panel System Board Jumper Settings The jumper locations are shown below 1 screw 2 front I O panel ...

Страница 76: ...two mounting bracket screws 10 Slide the system board assembly toward the front of the computer and then lift the board away Jumper Setting Description PSWD default Password features are enabled Password features are disabled RTCRST default Real time clock reset in normal operation Clear CMOS settings CAUTION To guard against electrical shock always unplug your computer from the electrical outlet ...

Страница 77: ...ts and turn them on Power Supply Removing the Power Supply 1 Follow the procedures in Before You Begin 2 Remove the computer cover 3 Disconnect the DC power cables from the system board and the drives 1 mounting bracket screws 2 2 system board screws 8 NOTICE To connect a network cable first plug the cable into the network port or device and then plug the cable into the computer CAUTION Before you...

Страница 78: ...ct your computer and devices to electrical outlets and turn them on 1 release button 2 power supply 3 screws 4 4 AC power connector NOTICE Note the routing of the DC power cables underneath the routing clips in the computer frame as you remove them from the system board and drives You must route these cables properly when you replace them to prevent them from being pinched or crimped CAUTION Befor...

Страница 79: ...Back to Contents Page ...

Страница 80: ...is divided into three areas the options list active options field and key functions NOTICE Unless you are an expert computer user do not change the settings for this program Certain changes can make your computer work incorrectly NOTE The F2 prompt indicates that the keyboard has initialized This prompt can appear very quickly so you must watch for it to display and then press F2 If you press F2 b...

Страница 81: ... Operating systems with USB support will recognize USB floppy drives regardless of this setting Drives 0 through 3 On default Enables or disables an ATA or SATA device such as hard drive CD drive or DVD drive On enables the interface so that the device can be used Displays the Controller type ATA or SATA Port number the drive is using Drive ID number Capacity and whether the drive is controlled by...

Страница 82: ...rd Unlocked allows a user with a valid Admin password to modify the system password Execute Disable On default Enables or disables Execute Disable memory protection technology Power Management AC Recovery Off default Determines how the system responds when AC power is re applied after a power loss Off commands the system to stay off when the power is re applied You must press the front panel power...

Страница 83: ... enter the number of the device that is to be used for the current boot only For example if you are booting to a USB memory key highlight USB Flash Device and press Enter Changing Boot Sequence for Future Boots 1 Enter system setup Entries Read puts an R to the left of all the entries Clear Log clears the Event Log POST Behavior Fastboot On default When enabled this feature reduces computer startu...

Страница 84: ...mputer shut down your computer Turn off the monitor and disconnect it from the electrical outlet 6 Disconnect the computer power cable from the electrical outlet and press the power button to ground the system board 7 Open the computer cover 8 Locate the 3 pin password jumper PSWD on the system board and attach the jumper to pins 1 and 2 to re enable the password feature 9 Close the computer cover...

Страница 85: ...on pins 1 and 2 and wait for approximately 5 seconds d Replace the jumper plug on pins 2 and 3 3 Close the computer cover 4 Connect your computer and devices Back to Contents Page CAUTION Before you begin any of the procedures in this section follow the safety instructions in the Product Information Guide NOTICE To connect a network cable first plug the cable into the network port or device and th...

Страница 86: ...nformation on the screen is divided into three areas the options list active options field and key functions NOTICE Unless you are an expert computer user do not change the settings for this program Certain changes can make your computer work incorrectly NOTE The F2 prompt indicates that the keyboard has initialized This prompt can appear very quickly so you must watch for it to display and then p...

Страница 87: ...drive controller and allows the internal floppy drive read only permission NOTE Operating systems with USB support will recognize USB floppy drives regardless of this setting Drives 0 through 3 On default Enables or disables an ATA or SATA device such as hard drive CD drive or DVD drive On enables the interface so that the device can be used Displays the Controller type ATA or SATA Port number the...

Страница 88: ...sword Locked prevents a user without a valid Admin password from being able to modify the System password Unlocked allows a user with a valid Admin password to modify the system password Execute Disable On default Enables or disables Execute Disable memory protection technology Power Management AC Recovery Off default Determines how the system responds when AC power is re applied after a power los...

Страница 89: ... to be used for the current boot only For example if you are booting to a USB memory key highlight USB Flash Device and press Enter Changing Boot Sequence for Future Boots Event Log Allows you to view the Event Log Entries are marked R for Read and U for Unread Mark All Entries Read puts an R to the left of all the entries Clear Log clears the Event Log POST Behavior Fastboot On default When enabl...

Страница 90: ... the Microsoft Windows desktop appears on your computer shut down your computer Turn off the monitor and disconnect it from the electrical outlet 6 Disconnect the computer power cable from the electrical outlet and press the power button to ground the system board 7 Open the computer cover 8 Locate the 3 pin password jumper PSWD on the system board and attach the jumper to pins 1 and 2 to re enabl...

Страница 91: ... pins 2 and 3 c Place the jumper plug on pins 1 and 2 and wait for approximately 5 seconds d Replace the jumper plug on pins 2 and 3 3 Close the computer cover 4 Connect your computer and devices Back to Contents Page CAUTION Before you begin any of the procedures in this section follow the safety instructions in the Product Information Guide NOTICE To connect a network cable first plug the cable ...

Страница 92: ...SRAM Memory Type 400 MHz and 533 MHz DDR2 unbuffered SDRAM Memory connectors four Memory capacities 256 MB 512 MB or 1 GB non ECC Maximum memory 4 GB NOTE See Addressing Memory With 4 GB Configurations to verify the amount of memory available to the operating system BIOS address F0000h Computer Information Chipset Intel 945G Express DMA channels eight Interrupt levels 24 BIOS chip NVRAM 4 Mb NIC I...

Страница 93: ...ive one 40 pin connector Serial ATA two 7 pin connectors FlexBay Drive one USB 10 pin header for optional Media Card Reader 3 5 inch bay device Floppy drive one 33 pin connector Fan one 5 pin connectors PCI 2 3 two 120 pin connectors PCI Express x1 one 36 pin connector PCI Express x16 one 164 pin connector Controls and Lights Power button push button Power light green light Blinking green in sleep...

Страница 94: ...ches Weight 12 7 kg 28 lb Environmental Temperature Operating 10 to 35 C 50 to 95 F Storage 40 to 65 C 40 to 149 F Relative humidity 20 to 80 noncondensing Maximum vibration Operating 0 25 G at 3 to 200 Hz at 0 5 octave min Storage 0 5 G at 3 to 200 Hz at 1 octave min Maximum shock Operating bottom half sine pulse with a change in velocity of 20 inches sec 50 8 cm sec Storage 27 G faired square wa...

Страница 95: ...e back SRAM Memory Type 400 MHz and 533 MHz DDR2 unbuffered SDRAM Memory connectors four Memory capacities 256 MB 512 MB or 1 GB non ECC Maximum memory 4 GB NOTE See Addressing Memory With 4 GB Configurations to verify the amount of memory available to the operating system BIOS address F0000h Computer Information Chipset Intel 945G Express DMA channels eight Interrupt levels 24 BIOS chip NVRAM 4 M...

Страница 96: ...tors Primary IDE drive one 40 pin connector Serial ATA two 7 pin connectors FlexBay Drive one USB 10 pin header for optional Media Card Reader 3 5 inch bay device Floppy drive one 33 pin connector Fan one 5 pin connector PCI 2 3 two 120 pin connectors PCI Express x1 one 36 pin connector PCI Express x16 one 164 pin connector Controls and Lights Power button push button Power light green light Blink...

Страница 97: ... cm 18 0 inches Weight 14 2 kg 32 lb Environmental Temperature Operating 10 to 35 C 50 to 95 F Storage 40 to 65 C 40 to 149 F Relative humidity 20 to 80 noncondensing Maximum vibration Operating 0 25 G at 3 to 200 Hz at 0 5 octave min Storage 0 5 G at 3 to 200 Hz at 1 octave min Maximum shock Operating bottom half sine pulse with a change in velocity of 20 inches sec 50 8 cm sec Storage 27 G faire...

Страница 98: ... Computer System Board Components Power Supply DC Connector Pin Assignments Inside View of Your Computer Follow the procedures in Before You Begin System Board Components CAUTION Before you begin any of the procedures in this section follow the safety instructions in the Product Information Guide ...

Страница 99: ...Power Supply DC Connector Pin Assignments DC Main Power Connector P1 ...

Страница 100: ...Black 18 COM Black 19 COM Black 20 NA NA 21 5 VDC Red 22 5 VDC Red 23 5 VDC Red 24 COM Black The orange 3 3 VDC output wires must be 16 AWG The 3 3 VDC terminals are high current type 9 A current rating Molex HCS type The 3 3VDC SE is a brown sense wire for 3 3VDC and is optional Pin Number Signal Name 18 AWG Wire 1 COM Black 2 COM Black 3 12 VADC Yellow 4 12 VADC Yellow Pin Number Signal Name 18 ...

Страница 101: ...DC Peripheral Connectors P8 and P9 Back to Contents Page Pin Number Signal Name 18 AWG Wire 1 12 VBDC White 2 COM Black 3 COM Black 4 5 VDC Red ...

Страница 102: ...l Inside View of Your Computer System Board Components Power Supply DC Connector Pin Assignments Inside View of Your Computer System Board Components CAUTION Before you begin any of the procedures in this section follow the safety instructions in the Product Information Guide ...

Страница 103: ...Power Supply DC Connector Pin Assignments DC Main Power Connector P1 ...

Страница 104: ...Black 18 COM Black 19 COM Black 20 NA NA 21 5 VDC Red 22 5 VDC Red 23 5 VDC Red 24 COM Black The orange 3 3 VDC output wires must be 16 AWG The 3 3 VDC terminals are high current type 9 A current rating Molex HCS type The 3 3VDC SE is a brown sense wire for 3 3VDC and is optional Pin Number Signal Name 18 AWG Wire 1 COM Black 2 COM Black 3 12 VADC Yellow 4 12 VADC Yellow Pin Number Signal Name 18 ...

Страница 105: ...DC Peripheral Connectors P8 and P9 Back to Contents Page Pin Number Signal Name 18 AWG Wire 1 12 VBDC White 2 COM Black 3 COM Black 4 5 VDC Red ...

Страница 106: ...e registered trademarks of Intel Corporation Microsoft and Windows are registered trademarks of Microsoft Corporation Other trademarks and trade names may be used in this document to refer to either the entities claiming the marks and names or their products Dell Inc disclaims any proprietary interest in trademarks and trade names other than its own Model DCSM September 2005 Rev A01 Back to Conten...

Страница 107: ...ty Partition and press Enter 4 When the Dell Diagnostics Main Menu appears select the test you want to run Starting the Dell Diagnostics From the Optional Drivers and Utilities CD 1 Insert the Drivers and Utilities CD 2 Shut down and restart the computer When the DELL logo appears press F12 immediately If you wait too long and the Windows logo appears continue to wait until you see the Windows des...

Страница 108: ... customize the tests you want to run Symptom Tree Lists the most common symptoms encountered and allows you to select a test based on the symptom of the problem you are having NOTE The Service Tag for your computer is located at the top of each test screen If you contact Dell technical support will ask for your Service Tag Your computer s Service Tag is listed in the system information option in s...

Страница 109: ...scription Suggested Resolution The computer is in a normal off condition has successfully booted to the operating system or a possible pre BIOS failure has occurred Plug the computer into a working electrical outlet and press the power button Also see Power Problems in your computer Owner s Manual A possible processor failure has occurred Contact Dell see your computer Owner s Manual for informati...

Страница 110: ...Board Components l If there is an error message on your screen identifying a problem with a device such as the floppy drive or hard drive check the device to ensure that it is functioning properly l The operating system is attempting to boot from a device such as the floppy drive or hard drive check system setup to ensure that the boot sequence is correct for the devices installed on your computer...

Страница 111: ...e 4 3 1 Memory failure above address 0FFFFh 4 3 3 Timer chip counter 2 failure 4 3 4 Time of day clock stopped 4 4 1 Serial or parallel port test failure 4 4 2 Failure to decompress code to shadowed memory 4 4 3 Math coprocessor test failure 4 4 4 Cache test failure ...

Страница 112: ...ostics From the Optional Drivers and Utilities CD 1 Insert the Drivers and Utilities CD 2 Shut down and restart the computer When the DELL logo appears press F12 immediately If you wait too long and the Windows logo appears continue to wait until you see the Windows desktop Then shut down your computer and try again 3 When the boot device list appears highlight IDE CD ROM Device and press Enter 4 ...

Страница 113: ...ed and allows you to select a test based on the symptom of the problem you are having NOTE The Service Tag for your computer is located at the top of each test screen If you contact Dell technical support will ask for your Service Tag Your computer s Service Tag is listed in the system information option in system setup Tab Function Results Displays the results of the test and any error conditions...

Страница 114: ...etected but a memory failure has occurred l If you have two or more memory modules installed remove the modules reinstall one module and then restart the computer If the computer starts normally reinstall an additional module Continue until you have identified a faulty module or reinstalled all modules without error l If available install properly working memory of the same type into your computer...

Страница 115: ...the floppy drive or hard drive check system setup to ensure that the boot sequence is correct for the devices installed on your computer l If the problem persists contact Dell see your computer Owner s Manual for information about how to contact Dell The computer is in a normal operating condition after POST NOTE The diagnostic lights are not lit after the system successfully boots to the operatin...

Страница 116: ...Back to Contents Page 4 4 1 Serial or parallel port test failure 4 4 2 Failure to decompress code to shadowed memory 4 4 3 Math coprocessor test failure 4 4 4 Cache test failure ...

Отзывы: