Dell 948 Скачать руководство пользователя страница 79

Troubleshooting

file:///T|/htdocs/systems/prn948/en/en/d0e10686.html[10/10/2012 11:05:40 AM]

2.  Firmly grasp the paper, and gently pull it from the printer.

3.  Reinstall the duplex unit cover.

4.  Press the 

Select

 button 

 to continue printing.

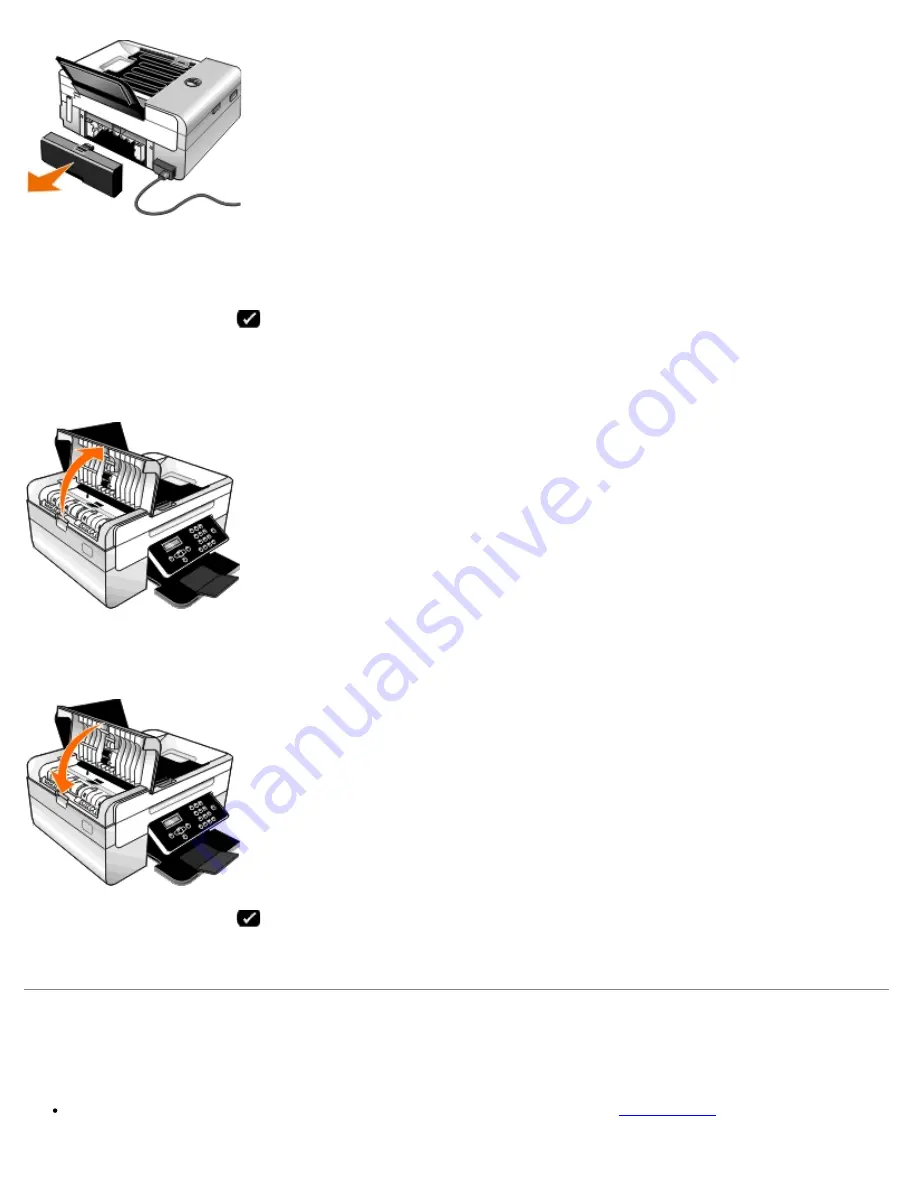
Paper jam near the ADF

1.  Lift the ADF cover located to the left of the ADF input tray.

2.  Firmly grasp the paper, and then gently pull it from the printer.

3.  Close the ADF cover.

4.  Press the 

Select

 button 

.

5.  Resend your print job to print any missing pages.

Avoiding Jams and Misfeeds

You can avoid most jams and misfeeds by following these guidelines:

Use media that follows the printer's media guidelines. For more information, see 

Loading Paper

.

Содержание 948

Страница 1: ...poration in the United States and or other countries Windows Server and Windows NT are registered trademarks of Microsoft Corporation Windows Vista is either a trademark or a registered trademark of Microsoft Corporation in the United States and or other countries Bluetooth is a registered trademark owned by Bluetooth SIG Inc and is used by Dell Inc under license EMC is a registered trademark of E...

Страница 2: ...Dell All In One Printer 948 User s Guide file T htdocs systems prn948 en en index html 10 10 2012 11 05 17 AM Model 948 July 2007 SRV UY127 Rev A00 ...

Страница 3: ...dy installed on your computer You can use the CD to uninstall reinstall drivers or access your documentation Readme files may be included on your CD to provide last minute updates about technical changes to your printer or advanced technical reference material for experienced users or technicians How to set up my printer Setting Up Your Printer poster Safety information How to set up and use my pr...

Страница 4: ...rmation order status warranty and repair information Downloads Drivers Reference Printer documentation and product specifications How to use Windows Vista Documentation for my printer Windows Vista Help and Support Center 1 Click Help and Support 2 Type a word or phrase that best describes your problem and then click the arrow icon 3 Click the topic that describes your problem 4 Follow the instruc...

Страница 5: ...rations with newly scanned and previously saved documents and images Dell Fax Solutions Software Allows you to fax electronic or scanned documents Printing Preferences Allows you to adjust printer settings Memory Card Manager Allows you to display manage edit print and scan photos from your memory card or USB memory key to your computer Dell Ink Management System Warns you when your printer is run...

Страница 6: ...being scanned Select a quality setting for your scan Select Scan Now to scan your document or photo Select Fax Now to scan and then fax a copy of your document or photo NOTE Click See More Scan Settings to view all settings Copy Select the quality and color of your copies Select a quality setting for your copies Specify the blank paper size Specify the size of the original document being copied Li...

Страница 7: ...roup information You can also add a contact or group to your speed dial list View and customize cover page Click View cover pages to open the Cover Pages dialog You can customize add logos to or choose from a variety of different ready made cover pages for your fax View fax history Click View full activity log to see or print a detailed list of all fax activity Create a fax report Click Print acti...

Страница 8: ...ns or Setup depending on the program or operating system The Printing Preferences dialog box opens To access Printing Preferences when a document is not open 1 In Windows Vista a Click Control Panel b Click Hardware and Sound c Click Printers In Windows XP click Start Settings Control Panel Printers and Other Hardware Printers and Faxes In Windows 2000 click Start Settings Printers 2 Right click t...

Страница 9: ...vailable for printing Copies Customize how the printer prints several copies of a single print job Collated Normal or Print Last Page First Advanced 2 sided printing Select this to print on both sides of the paper Select from Automatic Manual or Print Duplex Extend dry time Select this option if you notice ink is smeared on the bottom of the pages of your duplex print jobs This allows the ink on t...

Страница 10: ... first 50 pages of cartridge use until printing habits are learned and a more accurate count can be given The number of pages remaining changes as a result of the type of print jobs the printer completes When your ink cartridge levels are low a Low Ink Warning appears on your screen when you try to print This warning is displayed every time you print until you install a new ink cartridge For more ...

Страница 11: ...cleared from More Options located on the Advanced tab of the Printing Preferences The Reserve Tank dialog does not display again until after the low ink cartridge has been replaced The Complete A Print check box is automatically reset when a new or different cartridge is installed Removing and Reinstalling Software If your printer does not function properly or communication error messages appear w...

Страница 12: ...tml 10 10 2012 11 05 21 AM b Double click the CD ROM drive icon and then double click setup exe c When the printer software installation screen appears click Using a USB cable or Using a wireless network d Follow the instructions on your screen to complete the installation ...

Страница 13: ...OTE The printer whether it is connected to a computer or not must be connected to a telephone line before you can send a fax NOTE If you use a Digital Subscriber Line DSL modem for your computer you must install a DSL filter on the telephone line attached to your computer For information about DSL filters contact your DSL Service Provider Number Part Description 1 Automatic Document Feeder ADF Par...

Страница 14: ...reign objects from falling into the paper path 10 Paper support Part that supports loaded paper 11 Paper guides Guides that help the paper feed into the printer properly Number Part Description 12 Supplies Reorder Label To order ink cartridges or paper visit www dell com supplies 13 Ink cartridge carrier Part that holds two ink cartridges one color ink and the other black or photo 14 Express Servi...

Страница 15: ...tor lower connector Slot into which you plug an active telephone line to send and receive faxes NOTE Do not connect additional devices to the FAX connector lower connector and do not connect a DSL digital subscriber line or ISDN integrated services digital network to the printer without using a digital line filter 19 Back cover Cover that you have to remove to install the Dell Internal Wireless Ad...

Страница 16: ...nu option Initiate a paper feed or paper eject by holding the button for three seconds 6 Right arrow button Increase a numeric value option Scroll through a list on the display 7 Start button Initiate a copy scan or fax 8 Pause button Insert a three second pause in the number to be dialed to wait for an outside line or get through an automated answering system NOTE Enter a pause only when you have...

Страница 17: ...About Your Printer file T htdocs systems prn948 en en d0e186 html 10 10 2012 11 05 23 AM ...

Страница 18: ...A computer running one of the following operating systems Windows Vista Microsoft Windows XP Microsoft Windows 2000 Wireless Network Settings Some wireless network settings may be needed to configure the adapter that has been installed in the printer Here are some of the settings that you may need Network Name also known as SSID Service Set ID BSS Basic Service Set Type the type of wireless networ...

Страница 19: ...8 characters long The wireless network may use anywhere from one to four WEP keys A WEP key is like a password and must meet the following criteria If you are using Hex characters valid keys are either 10 or 26 characters long If you are using ASCII valid keys are either 5 or 13 characters long Installing and Setting Up the Dell Wireless Adapter 1000 Installing the Wireless Adapter 1 Turn off your...

Страница 20: ... Wireless Adapter 1 Plug the printer power cable into the wall outlet 2 Press the Power button The Wireless Adapter detected message appears on the operator panel for three seconds 3 If you are using your printer with a new Dell computer Go to step 8 If you are using your printer with an existing computer Go to the next step 4 Make sure your computer is on and then insert the Drivers and Utilities...

Страница 21: ... Printer to Another Computer NOTE To perform the following steps the printer must already be connected to a computer or router through the wireless network 1 Make sure your computer is on and then insert the Drivers and Utilities CD 2 Select Using a wireless network and then click Next 3 Select I Agree with the terms of this license agreement and then click Next 4 Read the Firewall Exceptions info...

Страница 22: ...twork Configuration 1 From the Wireless Networks Found In Your Area screen select the appropriate Network Name SSID from the list and then click Next 2 On the Apply and Verify Wireless Settings screen check each network attribute to make sure the settings are correct and then click Next to apply the settings NOTE Clicking Next prompts the setup utility to verify wireless communication with the pri...

Страница 23: ...ee Verifying Network Communication Manually Configuring the Adapter in Infrastructure Mode To set up the adapter in Infrastructure Mode the setup steps vary based on the security settings you select If you don t want any security 1 From the Wireless Security Settings screen select No Security and then click Next 2 On the Apply and Verify Wireless Settings screen check each network attribute to mak...

Страница 24: ...ormation see Verifying Network Communication Manually Configuring the Adapter in Ad Hoc Mode To set up the adapter in Ad Hoc Mode the setup steps vary based on the security settings you select The security options are more limited in Ad Hoc Mode than they are in Infrastructure Mode If you don t want any security 1 From the Wireless Security Settings screen select No Security and then click Next 2 ...

Страница 25: ...lable on the network remove the USB cable and click Next to continue with printer software installation If the adapter was not able to join the wireless network try one of the following suggestions Click View Settings to verify the settings are correct Select I want to change the settings I entered and then click Next Follow the instructions on your screen to update the wireless settings Select I ...

Страница 26: ...w buttons to scroll to COPY 2 Press the Select button 3 Use the left and right Arrow buttons until the heading you want appears on the display and then press the Select button 4 Use the left and right Arrow buttons to scroll through the available menu items 5 When the setting you want appears on the display press the Select button to save the setting Main Menu Mode Main Menu Copy Color Copy Copies...

Страница 27: ...8 5 x 14 inches A4 B5 A5 A6 L 2L Hagaki 3 x 5 inches 3 5x 5 inches 4 x 6 inches 4 x 8 inches 5 x 7 inches 10x15 cm 10x20 cm 13x18 cm Paper Type Auto Detect Plain Heavyweight matte Photo Transparency 2 Sided Copies Select the type of copy you want 1 Sided Original 1 Sided Copy 1 Sided Original 2 Sided Copy 2 Sided Original 1 Sided Copy 2 Sided Original 2 Sided Copy Zoom Specify how much you want th...

Страница 28: ...rs on the display and then press the Select button 4 Use the left and right Arrow buttons to scroll through the available menu items 5 When the setting you want appears on the display press the Select button to save the setting Factory default setting Current setting selected by user 4 x 6 inches 4 x 8 inches 5 x 7 inches 8 x 10 inches L 2L Hagaki A6 A5 B5 A4 60x80 mm 9x13 cm 10x15 cm 10x20 cm 13x...

Страница 29: ...ailable on that computer NOTE If the computer you are sending scanned images or documents to requires a PIN you are prompted to enter the PIN before the scan is initiated For more information about scanning across a network see Scanning a Document or Photo Across a Network Scan To Memory Device Automatically save the documents or images on the scanner glass or ADF to the inserted memory card or US...

Страница 30: ...il View Pending Quality Standard Fine Superfine Ultrafine Dark Fax Setup Reports Activity Report Confirmation Print Reports Ringing and Answering Auto Answer Ringing Volume Answer Fax When Ring Pattern Fax Forward Caller ID Pattern Fax Printing Paper Setup Fit Fax to Page Fax Footer 2 Sided Fax Print Dialing and Sending Your Fax Number Your Fax Name Dial Method Redial Time Redial Attempts Dial Pre...

Страница 31: ... be connected to an active telephone line See Setting Up the Printer With External Devices for setup details NOTE You cannot fax with a DSL digital subscriber line or ISDN integrated signature digital network unless you purchase a digital line filter Contact your Internet Service Provider for more details If you are sending a fax from within an application the printer must be connected to a comput...

Страница 32: ... Answering Fax Printing Dialing and Sending Fax Blocking Fax Setup Menu From this menu item You can Reports Specify the type of report you would like to set print settings for Activity Report Confirmation Print Reports For more information on any of the options listed under the Reports heading see Additional Fax Options Ringing and Answering Set various ringing and answering features for your prin...

Страница 33: ...nformation on any of the options listed under the Dialing and Sending heading see Additional Fax Options Fax Blocking Add or remove numbers from which you want to block faxes Turn On Off Add Remove Modify Print Block No ID For more information on any of the options listed under the Fax Blocking heading see Additional Fax Options Additional Fax Options From this menu item You can Activity Report Sp...

Страница 34: ...s all incoming calls Single Double Triple Any Fax Forward Specify if you want your incoming faxes to be forwarded to another fax number Off Forward Print Forward Caller ID Pattern Specify the Caller ID pattern you want to use Pattern 1 Pattern 2 Pattern n NOTE The number of patterns shown is based on the country selection Paper Setup Select the size and type of the paper in the paper input tray Pa...

Страница 35: ...end a non successful fax again 1 Minute 2 Minutes 3 Minutes 4 Minutes 5 Minutes 6 Minutes 7 Minutes 8 Minutes Redial Attempts Specify the number of times the printer should attempt to re send a non successful fax 0 Time 1 Time 2 Times 3 Times 4 Times 5 Times Dial Prefix Specify a number up to eight digits that will be added to the beginning of each number dialed NOTE A pause is automatically inser...

Страница 36: ...9600 12000 14400 16800 19200 21600 24000 26400 28800 31200 33600 Auto Fax Convert Turn Auto Fax Convert on or off If you are faxing a high resolution document to a fax machine that prints at a lower resolution the printer automatically converts the resolution to match that of the receiving fax machine On Off Error Correction Specify if you want error correction enabled or not On Off Turn On Off Tu...

Страница 37: ...ing writing or printing from these devices Data corruption can occur From this menu item You can Select Computer Choose a computer to send photos to Available only when the printer is attached to a network and has received a list of computers that support network media connection Proof Sheet Use the proof sheet to control the printing of your photos From the Print Proof Sheet submenu use the Arrow...

Страница 38: ...pecify the size of the photo 4 x 6 inches 5 x 7 inches 8 x 10 inches L 2L 6x8 cm 10x15 cm 13x18 cm 8 5 x 11 inches A4 A5 B5 A6 Hagaki Wallet 3 5 x 5 inches Paper Setup Specify the size and type of the paper in the paper input tray Paper Size 8 5 x 11 inches 8 5 x 14 inches 4 x 6 inches A4 B5 A5 A6 L 2L Hagaki 3 x 5 inches 3 5 x 5 inches 4 x 6 inches 4 x 8 inches 5 x 7 inches 10x15 cm 10x20 cm 13x1...

Страница 39: ...y changes to OFFICE FILE Use the left and right Arrow buttons to scroll through the files and then press the Select button to print If the memory card or USB key contains both documents and photos the display asks which files to print Use the left and right Arrow buttons to scroll to Documents and then press the Select button 4 Use the left and right Arrow buttons until the heading you want appear...

Страница 40: ...ess the Select button 2 Use the left and right Arrow buttons to scroll through the available menu items 3 When the setting you want appears on the display press the Select button to save the setting Main Menu Mode Main Menu PictBridge Paper Size Photo Size Layout Quality Paper Type From this menu item You can Paper Size Select the size of the paper in the paper input tray 8 5 x 11 inches 8 5 x 14 ...

Страница 41: ...l through the available menu items Factory default setting Current setting selected by user A4 60 x 80 mm 9 x 13 cm 10 x 15 cm 13 x 18 cm 20 x 25 cm Layout Specify the layout of photos on the printed page Automatic Borderless 1 Per Page 2 Per Page 3 Per Page 4 Per Page 6 Per Page 8 Per Page 16 Per Page 1 Centered Quality Specify the print quality resolution of the photos Automatic Draft Normal Pho...

Страница 42: ...g the Bluetooth wireless specification Security Level Set the security settings of your Bluetooth connection High Low Pass Key Specify a pass key Any external Bluetooth enabled device needs to enter this pass key before it sends a print job NOTE You only need to specify a pass key if the Security Level is set to High Clear Device List Remove the names of devices listed Press the Select button to c...

Страница 43: ...ults Photo Print Size Set Defaults Network Setup Print Setup Page Wireless Setup Network Name Wireless Signal Quality Reset Network Adapter to Factory Defaults TCP IP Menu Enable DHCP Set IP Address View IP Address Set IP Netmask View IP Netmask Set IP Gateway View IP Gateway Network Time Setup Mode Menu From this menu You can Paper Setup Select the size and type of the paper in the paper input tr...

Страница 44: ...Wireless Setup TCP IP Menu Network Time For more information see Network Setup Options Device Setup Menu From this menu You can Factory default setting Current setting selected by user Language Specify your language options Country Specify your country options Date Time Enter your current date and time Host Fax Settings Specify if you want to allow the printer fax settings to be reconfigured from ...

Страница 45: ...twork settings Wireless Setup View your wireless setup options Network Name Wireless Signal Quality TCP IP Menu Configure TCP IP setup options Enable DHCP If DHCP is disabled these items appear on the display Set IP Address Set IP Netmask Set IP Gateway If DHCP is enabled these items appear on the display View IP Address View IP Netmask View IP Gateway Network Time Allow your printer to update its...

Страница 46: ...d Set IP Netmask Use the keypad to enter an IP address Press the Select button to save the settings NOTE The IP netmask cannot be changed if DHCP is enabled View IP Netmask appears on the display instead Set IP Gateway Use the keypad to enter an IP address Press the Select button to save the settings NOTE The IP gateway cannot be changed if DHCP is enabled View IP Gateway appears on the display in...

Страница 47: ...k computers that you want to connect and use the shared printer For more information see Adding the Shared Printer on Other Network Computers Sharing the Printer on the Network On the host computer or network computer where the printer is directly connected by USB cable share the printer In Windows Vista 1 Click Control Panel 2 Click Hardware and Sound 3 Click Printers 4 Right click your printer i...

Страница 48: ... Click Next 9 Follow instructions on the computer screen to complete the installation In Windows XP and Windows 2000 1 In Windows XP click Start Settings Control Panel Printers and Other Hardware Printers and Faxes In Windows 2000 click Start Settings Printers 2 Click Add a printer 3 From the Add Printer Wizard dialog box click Next 4 From the Local or Network Printer dialog box click A network pr...

Страница 49: ...e edges of the paper NOTE Do not pull on both paper guides simultaneously When one paper guide is moved the other adjusts accordingly NOTE Do not force paper into the printer The paper should be flat against the paper support surface and the edges should be flushed against both paper guides Print Media Guidelines Load up to Make sure that 100 sheets of plain paper The paper guides rest against the...

Страница 50: ... of the envelopes You print the envelopes with Landscape orientation NOTE If you are mailing within Japan the envelope can be printed in Portrait orientation with the stamp in the lower right corner or in Landscape orientation with the stamp in the lower left corner If you are mailing internationally print in Landscape orientation with the stamp in the upper left corner You select the correct enve...

Страница 51: ...g system 25 sheets of photo glossy paper The print side of the paper faces up The paper guides rest against the edges of the paper You select Automatic Normal or Photo print quality 10 iron on transfers You follow the loading instructions on the iron on transfer packaging The print side of the transfer faces up The paper guides rest against the edges of the transfer You select Automatic Normal or ...

Страница 52: ...he Print Setup tab select the paper type 4 Click OK To turn off the automatic paper type sensor for all print jobs 1 In Windows Vista a Click Control Panel b Click Hardware and Sound c Click Printers In Windows XP click Start Control Panel Printers and Other Hardware Printers and Faxes In Windows 2000 click Start Settings Printers 2 Right click the printer icon 3 Click Printing Preferences 4 On th...

Страница 53: ...5 9 mm Length 11 0 14 0 inches 279 4 355 6 mm The document is loaded text side up The paper guide rests against the edge of the paper 25 sheets of edge reinforced three hole copier media The paper fits within these dimensions Width 8 27 8 5 inches 210 0 215 9 mm Length 11 0 14 0 inches 279 4 355 6 mm The document is loaded text side up The paper guide rests against the edge of the paper 25 sheets ...

Страница 54: ...tems prn948 en en d0e3948 html 10 10 2012 11 05 32 AM 1 Open the top cover 2 Place the document face down on the scanner glass NOTE Make sure the upper left corner of the front of the item aligns with the arrow on the printer 3 Close the top cover ...

Страница 55: ...t www dell com supplies or by phone Replacing Ink Cartridges 1 Turn on your printer 2 Lift the printer unit The ink cartridge carrier moves and stops at the loading position unless the printer is busy 3 Press down on the ink cartridge lever to raise each ink cartridge lid 4 Remove the old ink cartridges CAUTION Before performing any of the procedures listed in this section read and follow the safe...

Страница 56: ... and bottom of each ink cartridge NOTE Do not touch the gold contact area on the back or the metal nozzles on the bottom of the ink cartridges NOTE The following illustration shows a black cartridge and a color cartridge used for normal printing For photo printing use a photo cartridge and a color cartridge 7 Insert the new ink cartridges Make sure the black or photo ink cartridge is secure in the...

Страница 57: ... 1 Load plain paper For more information see Loading Paper 2 Use the left and right Arrow buttons to scroll to MAINTENANCE and then press the Select button 3 Use the left and right Arrow buttons to scroll to Align Cartridges and then press the Select button An alignment page prints The ink cartridges align when the page prints You may discard the alignment page when the alignment is complete To al...

Страница 58: ...t print or do not print correctly Vertical lines appear jagged or edges appear rough To clean the nozzles from the operator panel 1 Load plain paper For more information see Loading Paper 2 Use the left and right Arrow buttons to scroll to MAINTENANCE and then press the Select button 3 Use the left and right Arrow buttons to scroll to Clean Cartridges and then press the Select button To clean the ...

Страница 59: ...ing the Default Operator Panel Settings To change the default settings on the operator panel 1 Turn on the printer 2 Change the operator panel settings 3 Use the left and right Arrow buttons to scroll to SETUP and then press the Select button 4 Use the left and right Arrow buttons to scroll to Defaults and then press the Select button 5 Use the left and right Arrow buttons to scroll to Set Default...

Страница 60: ... to scroll to Set Defaults and then press the Select button 5 Use the left and right Arrow buttons to scroll to Use Factory and then press the Select button Settings are reset to factory defaults Restoring Language to Factory Default You can restore the language on your display to factory default without using the printer menus NOTE Using this key sequence will also restore all other selected sett...

Страница 61: ...ad the paper For more information see Loading Paper 3 With your document open click File Print The Print dialog box opens 4 Click Preferences Properties Options or Setup depending on the program or operating system The Printing Preferences dialog box opens 5 On the Print Setup and Advanced tabs make any necessary changes for your document 6 When you finish customizing your settings click OK The Pr...

Страница 62: ...ove each photo after it exits the printer to prevent your photos from sticking together or smudging Printing Envelopes 1 Turn on your computer and printer and make sure they are connected 2 Load the envelope with the print side facing up 3 With your document open click File Print The Print dialog box opens 4 Click Preferences Properties Options or Setup depending on the program or operating system...

Страница 63: ... customer support see the section for information on setting up a connection with a Bluetooth enabled device You can also visit the Dell Support website at support dell com This website contains the latest documentation Ensure that you read the documentation that came with your Bluetooth device for setup instructions Setting up a Connection Between Your Printer and a Bluetooth Enabled Device You n...

Страница 64: ...bled device 1 Turn on the printer 2 Insert a USB Bluetooth adapter into the USB port located on the front of the printer NOTE A Bluetooth adapter is not included with the printer 3 Use the left and right Arrow buttons to scroll to BLUETOOTH and then press the Select button 4 Use the left and right Arrow buttons to scroll to Discovery and then press the Select button 5 Use the left and right Arrow ...

Страница 65: ...ic pass key on the Bluetooth device before connecting and sending print jobs to the printer 6 The Pass Key menu opens on the operator panel display if you set the security level to High Use the keypad to enter your four digit pass key and then press the Select button 7 Use the left and right Arrow buttons to scroll to Yes when prompted to save the new pass key and then press the Select button Prin...

Страница 66: ...nected to a computer and a PictBridge camera is connected to your printer some of the functions of your printer operator panel buttons may be unavailable These functions become available after you disconnect the PictBridge camera from your printer 4 Turn on your digital camera The printer automatically enters PictBridge mode 5 See the instructions included with your camera to begin printing photos...

Страница 67: ...or more information see Loading Paper 3 With your document open click File Print 4 Click Preferences Properties Options or Setup depending on the program or operating system The Printing Preferences dialog box opens 5 On the Advanced tab select Poster from the Layout drop down list 6 Select the size of the poster 7 On the Print Setup tab and Advanced tab make any additional changes for your docume...

Страница 68: ...k Properties Preferences Options or Setup depending on the program or operating system 4 Click the Advanced tab 5 From the Layout drop down menu select Booklet 6 If you are printing a large booklet select a number of Printed sheets per bundle a Click Options Layout Options b From the Printed sheets per bundle drop down menu select a number of printed sheets per bundle NOTE A bundle is a set number...

Страница 69: ...in paper You cannot duplex print on envelopes card stock or photo paper 1 Turn on your computer and printer and make sure they are connected 2 Load the paper For more information see Loading Paper 3 With your document open click File Print 4 Click Preferences Properties Options or Setup depending on the program or operating system 5 Click the Advanced tab and then select the 2 sided printing check...

Страница 70: ...t of your screen when you send a print job Click Cancel Printing to cancel the current print job From the Taskbar 1 Double click the printer icon at the bottom right portion of your computer screen or the Taskbar 2 Double click the print job that you want to cancel 3 Click Cancel Sent From a Bluetooth Enabled Device From the printer Press the Cancel button to cancel the print job and terminate the...

Страница 71: ...ferred settings the default print settings for most programs open the Printing Preferences dialog box from the Printers folder 1 In Windows Vista a Click Control Panel b Click Hardware and Sound c Click Printers In Windows XP click Start Settings Control Panel Printers and Other Hardware Printers and Faxes In Windows 2000 click Start Settings Printers 2 Right click the Dell 948 icon 3 Select Print...

Страница 72: ... html 10 10 2012 11 05 37 AM From the Maintenance tab There are no print settings to set as default from the Maintenance tab From here you can Install clean and align ink cartridges Print a test page Get information on sharing your printer on a network ...

Страница 73: ...se visit http support dell com support Setup Problems Computer Problems Verify your printer is compatible with your computer The printer supports Windows Vista Windows XP and Windows 2000 only Windows ME Windows 98 and Windows 95 are not supported by this printer Make sure you turned on both your printer and your computer Check the USB cable Ensure the USB cable is firmly connected to your printer...

Страница 74: ...ng and Reinstalling Software Correct communication problems between the printer and the computer Remove the USB cable from your printer and your computer Reconnect the USB cable to your printer and your computer Turn off the printer Unplug the printer power cable from the electrical outlet Reconnect the printer power cable into the electrical outlet and turn on the printer Restart your computer Se...

Страница 75: ... the same USB port that was originally used for the printer Also do not install printer drivers multiple times from the Drivers and Utilities CD Printer Problems Ensure the printer power cable is firmly connected to the printer and the electrical outlet Determine if the printer has been held or paused 1 In Windows Vista a Click Control Panel b Click Hardware and Sound c Click Printers In Windows X...

Страница 76: ...Jam then press A printhead carrier jam occurred Remove obstructions from the carrier path or close the cartridge carrier lids and then press the Select button Clear paper jam then press A paper jam exists in the printer Clear the paper jam For more information see Check for a paper jam Cover Open The printer unit is open Close the printer unit Paper Size Photo size is larger than paper size Press ...

Страница 77: ...rd or device is inserted in the printer Remove all memory cards and devices Unplug the camera to use other printer features A non functioning button is pressed while the printer is in PictBridge mode Remove the PictBridge connection to be able to use the printer for other functions Load PLAIN 8 5x11 and press Or Load PLAIN A4 paper and press A paper type other than plain paper is loaded into the p...

Страница 78: ...the printer 2 Lift the printer unit 3 Firmly grasp the paper and gently pull it from the printer 4 Close the printer unit 5 Turn on the printer and print the document again Paper jam in the duplex unit 1 Remove the duplex unit cover Some photos removed from card by computer A photo selected by the user on the proof sheet has been deleted or removed from the memory card Reprint the proof sheet sele...

Страница 79: ...er jam near the ADF 1 Lift the ADF cover located to the left of the ADF input tray 2 Firmly grasp the paper and then gently pull it from the printer 3 Close the ADF cover 4 Press the Select button 5 Resend your print job to print any missing pages Avoiding Jams and Misfeeds You can avoid most jams and misfeeds by following these guidelines Use media that follows the printer s media guidelines For ...

Страница 80: ...are using the following media remove each sheet as it exits and allow it to dry Photo paper Glossy paper Transparency Labels Envelopes Iron on transfers Extend dry time when duplexing print jobs If ink is smeared on the bottom of the pages of your duplex print jobs extend the time for the printed side to dry before the duplex unit feeds the paper back into the printer and prints on the other side ...

Страница 81: ...ory resources on your computer when print speed is slow Close all applications not in use Try minimizing the number and size of graphics and images in your document Consider purchasing more Random Access Memory RAM for your computer Remove fonts that you rarely use from your system Uninstall the printer software and then reinstall it For more information see Removing and Reinstalling Software Sele...

Страница 82: ...wspaper descreen and then click OK 5 Click Copy Now Make sure the document or photo is loaded correctly on the scanner glass or into the Automatic Document Feeder For more information see Loading Original Documents Check paper sizes Make sure the paper size being used matches the size you selected on the operator panel or the Dell All In One Center Scanning Problems Check for blinking lights and e...

Страница 83: ...cable into the electrical outlet and turn on the printer Restart your computer Change the scan resolution to a lower value if scanning takes too long or freezes the computer 1 In Windows Vista a Click Programs b Click Dell Printers c Click Dell AIO Printer 948 In Windows XP and Windows 2000 Click Start Programs or All Programs Dell Printers Dell AIO Printer 948 2 Select Dell All In One Center The ...

Страница 84: ...ick Advanced The Advanced Scan Settings dialog box opens 4 From the Image Patterns tab select Remove image patterns from magazine newspaper descreen and then click OK 5 Click Scan Now Choose another application if scanning to an application fails Using the operator panel 1 From the main menu use the left or right Arrow button to scroll to SCAN and then press the Select button 2 From the Scan Mode ...

Страница 85: ...ter When using DSL broadband service make sure you have a DSL filter installed on your phone cord Contact your Internet Service Provider for more information Make sure your computer is not connected to the Internet by dial up modem when trying to fax When using an external modem make sure it is turned on and is correctly connected to your computer When the printer memory is full print a fax activi...

Страница 86: ...ion Select Pattern 1 if telephones in your country subscribe to a detection pattern using frequency shift keying FSK Select Pattern 2 if telephones in your country subscribe to a detection pattern using dual tone multifrequency DTMF 6 Press the Select button If the quality of the fax is poor set the quality of the outgoing fax to Ultrafine 1 From the main menu use the left and right Arrow buttons ...

Страница 87: ...e sure the file format of the images is supported by the printer Only images in JPEG and a limited set of TIFF formats can be printed directly from the memory card Only TIFF formats created directly from digital still cameras and not modified by any application are supported If you want to print photos stored on the memory card in a different file format the photos must be transferred to your comp...

Страница 88: ...e ink cartridges For more information see Aligning Ink Cartridges and Cleaning the Ink Cartridge Nozzles For additional solutions go to http support dell com support General Guidelines for Selecting or Loading Print Media Attempting to print on damp curled wrinkled or torn paper can cause paper jams and poor print quality Use only high quality copier grade paper for the best print quality Avoid pa...

Страница 89: ...ontains digital photo files If the memory card or USB key has both documents and photos stored on it the printer asks the user which file to print For more information see Photo Mode Printing Photos Saving Photos to Your Computer 1 Insert the memory card or USB key If the memory card or USB key contains photos only the printer automatically switches to the PHOTO mode If the memory card or USB key ...

Страница 90: ... of TIFF formats can be printed directly from the memory card or USB key Only TIFF formats created directly from digital still cameras and not modified by any application are supported If you want to print photos stored on the memory card or USB key in a different file format the photos must be transferred to your computer before printing For more information see Saving Photos to Your Computer Pri...

Страница 91: ...e the left and right Arrow buttons to specify which photos on the memory card or USB key to print on the proof sheet 5 Press the Start button The proof sheet prints 6 Follow the instructions on the proof sheet to select which photos to print and to choose a layout and paper type to use Fill in the circle with the red eye icon below a photo to reduce the red eye effect on the printout NOTE Make sur...

Страница 92: ...B key contains documents and photos the display asks which files to print Use the left and right Arrow buttons to scroll to Documents and then press the Select button For information on which file types are supported by your printer see Office File Mode 3 Use the left and right Arrow buttons to scroll to the file that you want to print 4 Press the Start button NOTICE Do not remove the memory card ...

Страница 93: ...rview Environmental Specifications Power Consumption and Requirements Memory 32 MB SDRAM 4 MB FLASH 4 MB Fax Connectivity USB 2 0 high speed Duty cycle average 1 000 pages per month Printer life Printer 18 000 pages Scanner 12 000 scans ADF 6 000 scans Temperature Relative Humidity Condition Temperature Relative humidity non condensing Operation 61 to 90 F 8 to 80 Storage 34 to 140 F 5 to 80 Shipp...

Страница 94: ... Specifications and Requirements Your operating system must meet the minimum system requirements Maximum input current 1 0 A Average power consumption Standby mode Operational mode 10 W 32 W NOTE If you are faxing over a telephone line connected to a DSL modem install a DSL filter to avoid interference with the analog fax modem signal NOTE ISDN integrated service digital network and cable modems a...

Страница 95: ...lopes 162 x 229 mm C6 Envelopes 114 x 162 mm DL Envelopes 110 x 220 mm Chokei 3 Envelopes 120 x 235 mm Chokei 4 Envelopes 90 x 205 mm Chokei 40 Envelopes 90 x 225 mm Kakugata 3 Envelopes 216 x 277 mm Kakugata 4 Envelopes 197 x 267 mm Kakugata 5 Envelopes 190 x 240 mm Kakugata 6 Envelopes 162 x 229 mm 10 envelopes Greeting cards index cards postcards or photo cards Photo Post card 4 x 6 inches Inde...

Страница 96: ...Specifications file T htdocs systems prn948 en en d0e12058 html 10 10 2012 11 05 45 AM Cables Your printer uses a Universal Serial Bus USB cable sold separately ...

Страница 97: ...d then press the Select button 5 Use the left and right Arrow buttons to scroll through the submenus and change the settings For more information see Copy Mode 6 Press the Start button NOTE If you press the Start button without changing the settings from the submenus the copy is printed with the current default settings Using Your Computer 1 Turn on your computer and printer and make sure they are...

Страница 98: ... Original Documents 4 Use the left and right Arrow buttons to scroll to COPY and then press the Select button 5 Use the left and right Arrow buttons to scroll to Quality and then press the Select button 6 Use the left and right Arrow buttons to scroll to Photo and then press the Select button 7 Press the Start button Using Your Computer 1 Turn on your computer and printer and make sure they are co...

Страница 99: ... Press the Start button 6 Follow the instructions on your printer display Making a Duplex Copy Your printer comes with a built in duplex unit that performs duplex copies on your document without the need to manually re orient the sheets It picks the paper after printing on one side and feeds it back to the printer to print on the side that is still blank 1 Load your original document For more info...

Страница 100: ...re Copy Settings to Choose a copy quality Select the paper size Select the original document size Lighten or darken your document Reduce or enlarge your document 5 Click the Advanced button to change options such as paper size and quality 6 To make any changes click the following tabs Click this tab To Print Select the paper size and type Select borderless printing options Select the print quality...

Страница 101: ...stems prn948 en en d0e5583 html 10 10 2012 11 05 46 AM 7 Click OK 8 After customizing your settings click Copy Now Remove image patterns from magazines or newspapers descreen Reduce the background noise on your color document ...

Страница 102: ...e and peripherals Support for third party software and peripherals is provided by the original manufacturer including those purchased and or installed through Software Peripherals DellWare ReadyWare and Custom Factory Integration CFI DellPlus Contacting Dell You can access Dell Support at support dell com Select your region on the WELCOME TO DELL SUPPORT page and fill in the requested details to a...

Страница 103: ...keting dell com Asian Pacific countries only sales_canada dell com Canada only Warranty and Return Policy Dell Inc Dell manufactures its hardware products from parts and components that are new or equivalent to new in accordance with industry standard practices For information about the Dell warranty for your printer refer to the Owner s Manual ...

Страница 104: ...nal Documents NOTE Do not load postcards photo cards photo paper or small images in the Automatic Document Feeder ADF Place these items on the scanner glass 3 Use the left and right Arrow buttons to scroll to SCAN and then press the Select button 4 Use the left and right Arrow buttons to scroll to Scan To Computer and then press the Select button 5 If your printer is connected locally a The printe...

Страница 105: ...items on the scanner glass 3 In Windows Vista a Click Programs b Click Dell Printers c Click Dell AIO Printer 948 In Windows XP or Windows 2000 Click Start Programs or All Programs Dell Printers Dell AIO Printer 948 4 Select Dell All In One Center The Dell All In One Center opens NOTE You can also open the Dell All In One Center from the operator panel on your printer When your printer is in Scan ...

Страница 106: ...ns to scroll through the available computers to which you want your scan to be sent b When the computer you want to scan to appears on the display press the Select button c If the computer has a PIN number associated with it use the keypad to enter the four digit PIN NOTE The PIN is not required by default it is only required if the computer you want to send your scan to has a PIN set You can view...

Страница 107: ...hotos Into a Single File 1 Turn on your computer and printer and make sure they are connected 2 Load your original document on the scanner glass For more information see Loading Original Documents 3 In Windows Vista a Click Programs b Click Dell Printers c Click Dell AIO Printer 948 In Windows XP and Windows 2000 Click Start Programs or All Programs Dell Printers Dell AIO Printer 948 4 Select Dell...

Страница 108: ...uttons to scroll to SCAN mode and then press the Select button 4 Use the left and right Arrow buttons to scroll to Scan To Computer and then press the Select button 5 Use the left and right Arrow buttons to choose the computer where you want to send the document or photo and then press the Select button The printer scans the computer for a list of applications where the scan can be opened NOTE The...

Страница 109: ...4 From the Dell Networking Options dialog click Change your PC name and PIN for network scanning 5 Follow the instructions on the screen 6 When you have specified a computer name or a PIN click OK Editing Scanned Text Using Optical Character Recognition OCR OCR software converts a scanned image to editable text within a word processing program NOTE For customers using Japanese or Simplified Chines...

Страница 110: ...Turn on your computer and printer and make sure they are connected 2 Load your original document For more information see Loading Original Documents 3 In Windows Vista a Click Programs b Click Dell Printers c Click Dell AIO Printer 948 In Windows XP and Windows 2000 Click Start Programs or All Programs Dell Printers Dell AIO Printer 948 4 Select Dell All In One Center The Dell All In One Center op...

Страница 111: ...indows 2000 Click Start Programs or All Programs Dell Printers Dell AIO Printer 948 4 Select Dell All In One Center The Dell All In One Center opens 5 From the Productivity Tools section click Save an image on my computer 6 Follow the instructions on your screen to save an image on your computer E Mailing a Scanned Image or Document 1 Turn on your computer and printer and make sure they are connec...

Страница 112: ... Printer 948 In Windows XP and Windows 2000 Click Start Programs or All Programs Dell Printers Dell AIO Printer 948 4 Select Dell All In One Center The Dell All In One Center opens 5 Click Preview Now NOTE If the size of the scan found in the upper right corner of the preview window appears in red you do not have the system resources available to perform the scan at the resolution or size you have...

Страница 113: ...ttings or See More Copy Settings 6 Click Advanced The Advanced Scan Settings dialog box opens 7 On the Image Patterns tab click Remove image patterns from magazine newspaper descreen 8 Select the Best Quality or the Best Speed option 9 In the What was scanned drop down menu select the type of item you scanned or copied 10 Click OK to save the settings 11 Scan or copy the item Converting Your Photo...

Страница 114: ...ect While saving provide rotate and rename options 9 Click Scan Now Changing Scan Settings Using the Operator Panel You can change the copy settings from the Scan Mode menu on the operator panel For more information about settings see Scan Mode Using Your Computer 1 In Windows Vista a Click Programs b Click Dell Printers c Click Dell AIO Printer 948 In Windows XP and Windows 2000 Click Start Progr...

Страница 115: ...he sensitivity of the auto crop tool Set the area to be scanned Use the OCR program to convert scanned items to text Indicate that you are scanning multiple items Update the list of applications to send scans to Update the default fax driver Image Enhancements Straighten images after scan deskew Sharpen your blurry images Adjust the brightness of your image Adjust the color correction curve gamma ...

Страница 116: ...ll rights reserved Redistribution and use in source and binary forms with or without modification are permitted provided that the following conditions are met 1 Redistributions of source code must retain the above copyright notice this list of conditions and the following disclaimer 2 Redistributions in binary form must reproduce the above copyright notice this list of conditions and the following...

Страница 117: ...ors of a free program will individually obtain patent licenses in effect making the program proprietary To prevent this we have made it clear that any patent must be licensed for everyone s free use or not licensed at all The precise terms and conditions for copying distribution and modification follow GNU GENERAL PUBLIC LICENSE TERMS AND CONDITIONS FOR COPYING DISTRIBUTION AND MODIFICATION 0 This...

Страница 118: ...e executable However as a special exception the source code distributed need not include anything that is normally distributed in either source or binary form with the major components compiler kernel and so on of the operating system on which the executable runs unless that component itself accompanies the executable If distribution of executable or object code is made by offering access to copy ...

Страница 119: ...OR THE PROGRAM TO THE EXTENT PERMITTED BY APPLICABLE LAW EXCEPT WHEN OTHERWISE STATED IN WRITING THE COPYRIGHT HOLDERS AND OR OTHER PARTIES PROVIDE THE PROGRAM AS IS WITHOUT WARRANTY OF ANY KIND EITHER EXPRESSED OR IMPLIED INCLUDING BUT NOT LIMITED TO THE IMPLIED WARRANTIES OF MERCHANTABILITY AND FITNESS FOR A PARTICULAR PURPOSE THE ENTIRE RISK AS TO THE QUALITY AND PERFORMANCE OF THE PROGRAM IS W...

Страница 120: ...ing a restrictive license from a patent holder Therefore we insist that any patent license obtained for a version of the library must be consistent with the full freedom of use specified in this license Most GNU software including some libraries is covered by the ordinary GNU General Public License This license the GNU Lesser General Public License applies to certain designated libraries and is qu...

Страница 121: ...e files and the date of any change c You must cause the whole of the work to be licensed at no charge to all third parties under the terms of this License d If a facility in the modified Library refers to a function or a table of data to be supplied by an application program that uses the facility other than as an argument passed when the facility is invoked then you must make a good faith effort ...

Страница 122: ... License You must supply a copy of this License If the work during execution displays copyright notices you must include the copyright notice for the Library among them as well as a reference directing the user to the copy of this License Also you must do one of these things a Accompany the work with the complete corresponding machine readable source code for the Library including whatever changes...

Страница 123: ...ree software distribution system which is implemented by public license practices Many people have made generous contributions to the wide range of software distributed through that system in reliance on consistent application of that system it is up to the author donor to decide if he or she is willing to distribute software through any other system and a licensee cannot impose that choice This s...

Страница 124: ...e recommend making it free software that everyone can redistribute and change You can do so by permitting redistribution under these terms or alternatively under the terms of the ordinary General Public License To apply these terms attach the following notices to the library It is safest to attach them to the start of each source file to most effectively convey the exclusion of warranty and each f...

Страница 125: ...pment some are optional that will enable you to perform fax functions Equipment Benefits See this section printer phone cord provided Make copies and send and receive faxes without the use of a computer Connecting Directly to a Telephone Wall Jack printer telephone sold separately two phone cords one provided Use the fax line as a normal telephone line Set up your printer wherever your telephone i...

Страница 126: ...tor lower connector on the printer to an active telephone wall jack 2 Remove the blue protective plug from the PHONE jack connector middle connector 3 Connect a phone cord from the telephone to the PHONE jack connector middle connector NOTE If phone communication is serial in your country such as Germany Sweden Denmark Austria Belgium Italy France and Switzerland remove the blue plug from the PHON...

Страница 127: ...nect a phone cord from the answering machine to a telephone 4 Connect a phone cord from the answering machine to the PHONE jack connector middle connector NOTE If phone communication is serial in your country such as Germany Sweden Denmark Austria Belgium Italy France and Switzerland you must remove the blue plug from the PHONE jack connector middle connector and insert the supplied yellow termina...

Страница 128: ...r 948 b Select Dell Fax Setup Utility The Dell Fax Setup Wizard Query dialog box opens c Click No The Dell Fax Setup Utility dialog box opens d Click the Ringing and Answering tab e From the Pick up on the drop down menu select 5 rings f Click OK A confirmation dialog box opens g Click OK to overwrite the fax settings on your printer h Click Close 6 On your answering machine set the number of ring...

Страница 129: ... insert the supplied yellow terminator for your fax to work correctly You will not be able to use this port for additional devices in these countries Sending a Fax Sending a Quick Fax Using the Operator Panel 1 Make sure your printer is properly set up to send and receive faxes For more information see Setting Up the Printer With External Devices 2 Load the original document For more information s...

Страница 130: ...delete the number Task Method Sending to a fax number Use the keypad to enter a number You can enter a maximum of 64 digits in a fax number Sending a fax to an entry in the Phone Book Enter the number that corresponds to the speed dial number of the contact Use the Phone Book menu a Use the left and right Arrow buttons to scroll to FAX and then press the Select button b From the Enter Fax Number d...

Страница 131: ...contact to the phonebook click Add this recipient to phonebook 9 If you want to send the fax to more than one recipient click Add another recipient b From the Enter Fax Number display press the Select button c Use the left and right Arrow buttons to scroll to Fax Setup and then press the Select button d Use the left and right Arrow buttons to scroll to Dialing and Sending and then press the Select...

Страница 132: ...end a fax Sending Advanced Faxes Using the Operator Panel If you are using your printer as a standalone fax machine you can use the various Fax submenus to customize your outgoing faxes From the Fax Menu you can Send a delayed fax Send faxes using your Speed Dial list Manage your phonebook to send faxes to individuals or groups Create and print a fax history Create and print a fax report For more ...

Страница 133: ...omated answering systems to answer their calls set up your printer for On Hook dialing 1 Make sure your printer is properly set up to send and receive faxes For more information see Setting Up the Printer With External Devices 2 Load the original document facing down on the scanner glass For more information see Loading Original Documents 3 From the operator panel use the left and right Arrow butt...

Страница 134: ... have your printer connected to an answering machine and Auto Answer is turned on the answering machine answers the call If a fax tone is detected the answering machine is disconnected and the printer receives the fax If a fax tone is not detected the answering machine completes the call Receiving a Fax Manually You can turn the Auto Answer feature off if you wish to control the faxes that you rec...

Страница 135: ...etting Using Your Computer 1 Turn on your computer and printer and make sure they are connected 2 Make sure your printer is properly set up to send and receive faxes For more information see Setting Up the Printer With External Devices 3 In Windows Vista a Click Programs b Click Dell Printers c Click Dell AIO Printer 948 In Windows XP or Windows 2000 Click Start Programs or All Programs Dell Print...

Страница 136: ...ided Print and then press the Select button Using the Computer 1 Turn on your computer and printer and make sure they are connected 2 Make sure your printer is properly set up to send and receive faxes For more information see Setting Up the Printer With External Devices 3 In Windows Vista a Click Programs b Click Dell Printers c Click Dell AIO Printer 948 In Windows XP or Windows 2000 Click Start...

Страница 137: ...e number of times you want the machine to redial and the time between those attempts if the fax cannot be sent on the first try Choose whether to scan the entire document before or after dialing the number Specify a maximum send speed and a print quality for outgoing faxes Convert the fax automatically to be compatible with the receiving fax machine regardless of the send settings Ringing and Answ...

Страница 138: ...he left and right Arrow buttons to scroll to FAX and then press the Select button 2 From the Enter Fax Number display press the Select button Select whether you want to forward a fax or print it and then forward it Specify a fax number to which faxes are forwarded Manage blocked faxes Fax Printing Reports Choose to automatically resize oversize faxes so they print on one page or keep the oversized...

Страница 139: ...r and printer and make sure they are connected 2 Make sure your printer is properly set up to send and receive faxes For more information see Setting Up the Printer With External Devices 3 In Windows Vista a Click Programs b Click Dell Printers c Click Dell AIO Printer 948 In Windows XP or Windows 2000 Click Start Programs or All Programs Dell Printers Dell AIO Printer 948 4 Select Dell Fax Setup ...

Страница 140: ... or group dial number press Follow the instructions on the display 4 Press the Start button to start sending your fax Blocking Faxes Creating a Blocked Fax List Using the Operator Panel 1 From the main menu use the left and right Arrow buttons to scroll to FAX and then press the Select button 2 From the Enter Fax Number display press the Select button 3 From the Fax menu use the left and right Arr...

Страница 141: ...e information see Setting Up the Printer With External Devices 3 In Windows Vista a Click Programs b Click Dell Printers c Click Dell AIO Printer 948 In Windows XP or Windows 2000 Click Start Programs or All Programs Dell Printers Dell AIO Printer 948 4 Select Dell Fax Setup Utility The Dell Fax Setup Wizard Query dialog box opens 5 Click No The Dell Fax Setup Utility dialog box opens 6 Click the ...

Страница 142: ...Blocked Fax List the transmission is disconnected Using Your Computer 1 Turn on your computer and printer and make sure they are connected 2 Make sure your printer is properly set up to send and receive faxes For more information see Setting Up the Printer With External Devices 3 In Windows Vista a Click Programs b Click Dell Printers c Click Dell AIO Printer 948 In Windows XP or Windows 2000 Clic...

Страница 143: ... the printer detects a fax from a machine without Caller ID the transmission is disconnected Using Your Computer 1 Turn on your computer and printer and make sure they are connected 2 Make sure your printer is properly set up to send and receive faxes For more information see Setting Up the Printer With External Devices 3 In Windows Vista a Click Programs b Click Dell Printers c Click Dell AIO Pri...

Страница 144: ...Select button 4 From the main menu use the left and right Arrow buttons to scroll to Reports and then press the Select button 5 From the Reports menu you can view or print your fax activity Using the Computer 1 In Windows Vista a Click Programs b Click Dell Printers c Click Dell AIO Printer 948 In Windows XP and Windows 2000 Click Start Programs or All Programs Dell Printers Dell AIO Printer 948 2...

Отзывы: