background image

SN301-8CH

51  

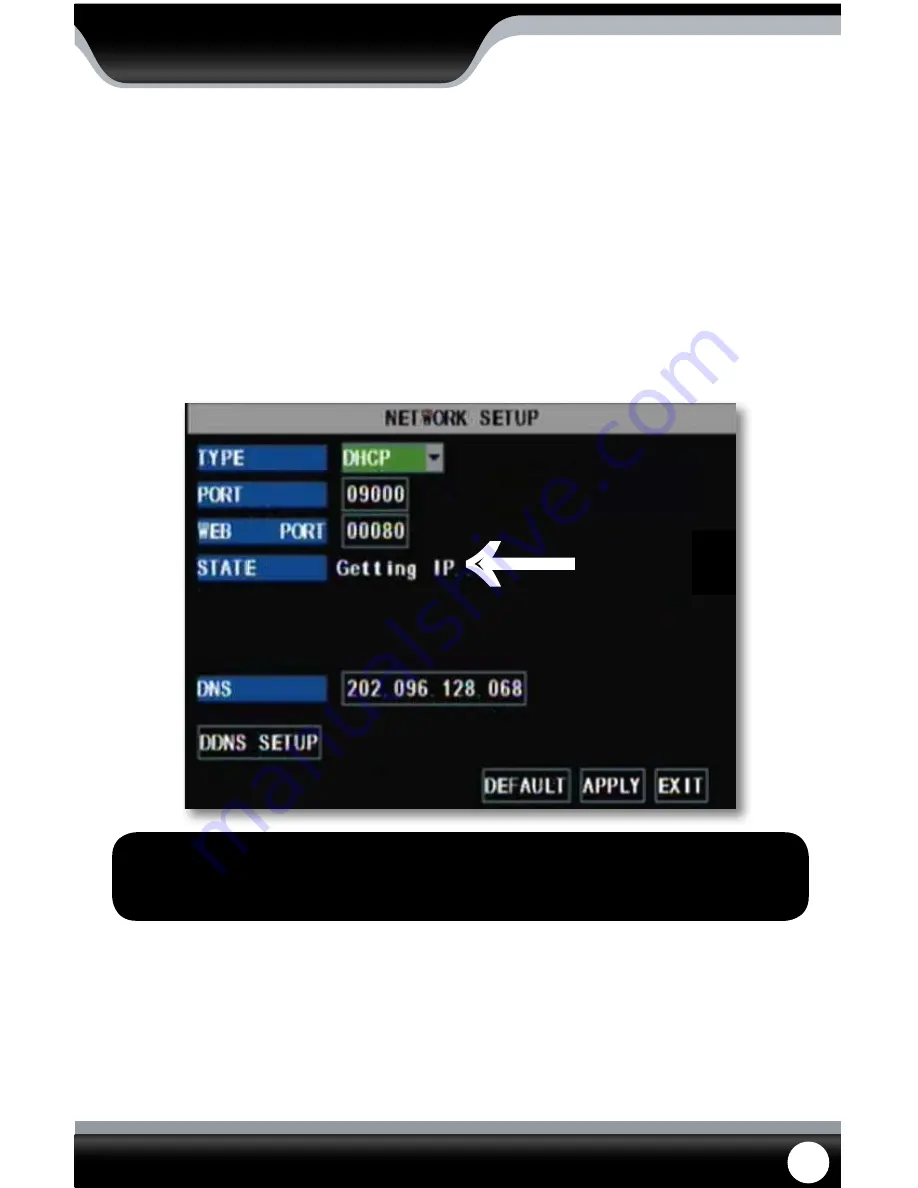
1.  Press “Menu.” 
2.  Enter password if prompted. The default password is

 123456.

3.  Select “NETWORK SETUP.”
4.  Make sure the “IP Mode” is set to DHCP. This setting is acceptable for most users. 

•  If the IP mode is not set to DHCP, use the drop down list next to “type” and change the type so that it is set to 

DHCP. You must hit “apply” and exit for the DVR to restart and retrieve an IP address

5.  Write down your IP address, port and web port. This information will be used in the next few steps to view the 

DVR on your computer as well viewing the DVR over the Internet.

ONCE ACQUIRED, 

YOUR IP ADDRESS 

WILL APPEAR HERE

NETWORK GUIDE

Finding your DVR’s IP Address

By default, the DVR IP mode is set to DHCP. This means the DVR will automatically retrieve an IP address from the 

router that it is connected to. Unless your network requires a static IP address leave the DVR IP mode set as DHCP. 

Note:  If your router does not support DHCP, contact your network administrator to supply you with 

the proper IP information. If the DVR needs to store PPPoE (DSL/ADSL) settings contact your ISP 

(Internet Service Provider) for the proper IP address settings. 

Every computer that is accessing the DVR will need to be configured to download and run ActiveX controls. This 

change only needs to be made one time on the computer that is accessing the DVR. This can be done by following 

either of the two methods below. 

Preparing Your Computer for Viewing the DVR:

Содержание SN301-8CH

Страница 1: ...SN301 8CH 1 INSTRUCTION MANUAL V1 2 Model SN301 8CH www defender usa com 8 Channel H 264 Smart DVR Security System w Coaching iMenu and 8 Outdoor NightVision Surveillance Cameras...

Страница 2: ...r assistance with setup Please contact us via one of the methods below Toll free telephone 1 866 946 7828 For more product information visit www defender usa com Email support defender usa com Online...

Страница 3: ...ted to the repair replacement or refund of the purchase price at Defender s option 2 This warranty becomes void if the product shows evidence of having been misused mishandled or tampered with contrar...

Страница 4: ...nitor 10 Connecting a PTZ Camera 10 POWERING ON DVR 10 GETTING STARTED 11 Using the Mouse 11 ViewingYour Cameras 11 FUNCTION MENU 12 Function Menu Options 12 MAIN MENU 15 Using the Keyboard 16 Camera...

Страница 5: ...Outside Of your Network 56 Option 1 57 Option 2 58 Testing Port Forwarding 59 IfYou Cannot Connect 60 DDNS Setup 61 Logging into Software 64 ONLINE SOFTWARE 65 Live Mode 66 PTZ Options 67 OTHER MOUSE...

Страница 6: ...ess space so you will never miss an important event This manual was written to ensure that you get the most out of your SN301 8CH DVR 8 x Camera Mounts Camera Mounting Hardware Quick Start Guide Instr...

Страница 7: ...e Live Customer Support Assistance is available whenever you need it Simply visit www defender usa com for video networking guides simple tips on how to protect your property and instructional videos...

Страница 8: ...nel split screen to view all of your cameras Zoom mode allows you to enlarge a portion of the camera s view to get a closer look and Sequence mode cycles through all camera views at preset interval ti...

Страница 9: ...age 12 Fast Forward Fast forwards playback footage 13 Pause Pauses playback footage 14 Function Opens up sub menu 15 Menu Opens up main menu 16 PTZ Opens up PTZ control buttons DVR FRONT 1 VGA Connect...

Страница 10: ...ording based on the 24 hour schedule 10 Pause Pauses playback footage and starts stops sequence mode 11 Play Calls up the playback menu 12 Fast Forward Fast forwards through playback footage and allow...

Страница 11: ...d the area being monitored Each camera comes with 60 of video power wire If longer wiring distance is required 60 extensions can be purchased DF10W from your local re seller or at www defender usa com...

Страница 12: ...wer supply D 5 Attach the BNC to RCA connector L to the video inputs J on the back of the DVR 6 Connect the yellow male RCA plug H from the 60 ft cable to the BNC to RCA K connector on your DVR 7 Repe...

Страница 13: ...3 Insert the power supply wire into the rear DC 12V port on the DVR After a few seconds the splash screen will appear and the DVR will start up POWERING ON DVR CONNECTING A PTZ CAMERA The SN301 8CH su...

Страница 14: ...SN301 8CH simple and efficient Using the mouse will make controlling the DVR very similar to using a computer It will allow you to easily click on items to select them and make desired changes The mou...

Страница 15: ...e DVR use the navigational key pad on the front of the DVR to move and when the option is highlighted press enter To exit press the menu button TheFunctionMenucanbeaccessed3differentways FUNCTION MENU...

Страница 16: ...have this function Directional keys Clicking on the directional arrows moves the camera in the direction of that arrow Tosetupcruise 1 Right click the mouse and open PTZ 2 Select Cruise Set 3 Select...

Страница 17: ...ras will then start sequencing through 2 To stop auto sequence double click the screen and you will return to the quad view screen PIP Mode PIP stands for picture in picture This mode allows you to vi...

Страница 18: ...2 Apply This button will apply and save changes made to the current menu page 3 Exit To exit the current menu select exit at the bottom of the screen Note Allsubmenushavesomeoralloftheaboveoptions Mai...

Страница 19: ...oard s CAMERA SETUP The camera setup menu allows you name each camera adjust where the title of the camera appears on screen adjust the color of each camera turn cameras on and off as well as decide o...

Страница 20: ...ted camera will appear along with scroll bars to adjust Hue Brightness Contrast and Saturation 2 To adjust each bar make sure it is highlighted in red To turn the settings up and down click and drag t...

Страница 21: ...N MENU Auto Sequence When you select AUTOSEQ at the bottom of the screen a separate menu pops up This menu has all the camera channels and sequence times in seconds The time in seconds next to each ca...

Страница 22: ...and press select 2 Select apply to save settings Audio Rec ToturnaudiorecordingOnorOff 1 Select the drop down menu beside Audio Rec 2 Highlight which camera you would like the audio to record from an...

Страница 23: ...ke to set that schedule for Tochangetheschedule 1 At the bottom of the schedule area highlight the type of recording you would like to insert and press select a check mark will appear in the correspon...

Страница 24: ...l desired schedules select apply to save settings and exit to exit back to the record setup menu Note Pleasebeaware thatyoumustset ascheduleforeach camera thatis connectedunless youdecidetosetall came...

Страница 25: ...s changes often Most home or office networks today do not use static IP addresses If you are unsure of whether you need a static or dynamic IP address please contact your network administrator PPPoE U...

Страница 26: ...e the communication to the DVR It is used as a gateway to the main port The media port should be left as 80 unless port 80 being blocked by your ISP ToChangetheportyouareusing 1 Select the drop down m...

Страница 27: ...s This feature is used if you have a Dynamic IP address from your ISP and the IP address is constantly changing ThesetupforDDNSonyourcomputerisinnetworkingguideonPg61 TosetupyourDDNSontheDVR 1 Highlig...

Страница 28: ...a particular month you can view times and footage from each day of that month by double clicking on the day in the calendar below 7 The days and times that have Motion Alarm recorded footage stored o...

Страница 29: ...of all the recordings from that day 5 If you would like to filter out the types of recordings on this list select what type of recording you would like to see from the drop down menu next to the word...

Страница 30: ...ack section of the manual Pg 45 To view the backed up footage on a CD DVD follow the basic instructions for your CD DVD player MAIN MENU DEVICES Selecting this menu option opens up a separate sub menu...

Страница 31: ...Free Space Tells you how much space you have available to record on the HDD before all the HDD space is used up Usable RecTime Amount of remaining time available to record HDD Menu Overwrite When the...

Страница 32: ...e menu and the DVR will restart FormattingHDDdoesnotchangeanysettings itonlyerasesallyourrecordedfootage USB Format USB format erases anything you have stored on your USB device Before formatting make...

Страница 33: ...Next to the word Duration highlight and select how long you would like the alarm to sound for when the alarm is triggered 5 Once you have set the alarm settings to your liking select apply to save yo...

Страница 34: ...le and Symbian operating systems The mobile setup menu allows you to input the user name and password you would be using to view your DVR through your mobile phone It also allows you to adjust which p...

Страница 35: ...on detection on off 2 Select on or off from the drop down list to turn the motion detection on or off for that camera 3 Repeat for all desired cameras 4 Select apply to save the changes Tochangethesen...

Страница 36: ...like to adjust the motion detection area and a separate screen will appear with a red mask on the picture and a grid 2 The screen is fully red this is because the DVR is automatically set to detect mo...

Страница 37: ...n as well as video standard Language Eight languages to choose from Info Gives you information about the device software version and the MAC address Maintenance Allows you to adjust auto maintenance r...

Страница 38: ...ar 2 Type the time in the order of the selected format listed below date format then select enter to close the keyboard 3 Select apply to save your changes 1 Select the scroll bar next to date format...

Страница 39: ...lect apply to save your changes TocustomizetheDVR sdaylightsavingtimeadjustment 1 Select the scroll bar next to DST mode and list will appear 2 Highlight custom and press select a custom list will app...

Страница 40: ...ill appear 2 Highlight and select On to turn the password enable on 3 Select apply to save your changes ToChangethePassword You have the option to change the password for user and admin A user will on...

Страница 41: ...world there are two main video systems NTSC and PAL NTSC stands for NationalTelevision System Committee and is used in parts of North America and Japan PAL stands for Phase Altering Line and it is use...

Страница 42: ...ave your settings and exit the menu 4 The system will restart and open with your set language settings System Information This area allows you to view information about your DVR The information you ca...

Страница 43: ...f the DVR 3 Select system update it should take a few minutes to update everything 4 Once the update is complete your DVR will restart with the new software on it Toloaddefault Loading default setting...

Страница 44: ...es for that date Once you have searched for a particular month you can view times and footage from each day of that month by double clicking on the day in the calendar below 7 The days and times that...

Страница 45: ...f you would like to filter out the types of recordings on this list select what type of recording you would like to see from the drop down list next to the word TYPE You can view alarm normal or all 6...

Страница 46: ...this button will play the footage if it is paused rewinding or fast forwarding or stopped 1 2 1 4 1 8 or normal speed 4 Pause Forward Pressing this button once will pause the playback footage After th...

Страница 47: ...cking up footage directly to your computer Toviewfootagethoughyourcomputer 1 Insert included software CD into disk drive and double click to install the playback software 2 Follow the installation gui...

Страница 48: ...must select play from the top menu and then scroll down and select Play from there Once play is selected the video will begin to play AnEntireFolder 1 Select File Open Local Disk Find the USB device...

Страница 49: ...rease Rate Moves the video faster Next Hour Moves video forward an hour if video is over an hour long AllVideo This option does not apply to your DVR Capture Picture This option takes a photo of the s...

Страница 50: ...eobackaframe 13 ForwardFrame Movesthevideoforwardaframe 14 Rewind Rewindsfootage Eachtimeyoupressthisicon thefasterthefootagewillrewind 2x 4x 8x 16x 15 FastForward Fastforwardsthefootage eachtimeyoupr...

Страница 51: ...u would like the avi footage to save and select OK Once everything has saved properly a screen will appear and notify you To view the footage open it with an avi compatible video player PLAYBACK Setti...

Страница 52: ...the settings menu 2 Move the bar along the line to make the Brightness Contrast Hue and Saturation settings higher or lower 3 When the settings are adjusted to your liking select OK Help Menu The help...

Страница 53: ...nternet Explorer The version of I E will be displayed A genuine and fully updated version ofWindows XP Vista or newer Note ThecomputerandDVRneedtobeconnectedtothesamerouterforinitialsetup Acomputerwil...

Страница 54: ...PEARHERE NETWORK GUIDE Finding your DVR s IP Address By default the DVR IP mode is set to DHCP This means the DVR will automatically retrieve an IP address from the router that it is connected to Unle...

Страница 55: ...MPT or ENABLED Download unsigned ActiveX controls PROMPT Initialize and script ActiveX controls not marked as safe PROMPT Run ActiveX controls and plug ins ENABLE Script ActiveX controls marked as saf...

Страница 56: ...R to be downloaded and the DVR to be viewed on the computer 10 Click apply 11 Click OK TheIPaddressusedintheexampleaboveisforinternal networkviewing IfyouaretryingtoaccesstheDVRfroma remotelocationyou...

Страница 57: ...ill be a yellow information bar that pops up below the address bar in Internet Explorer Click on the yellow information bar and then select InstallThis Add on for All Users onThis Computer Please be p...

Страница 58: ...www portforward com BEFOREYOU BEGIN PORT FORWARDINGYOUWILL NEED The DVR connected to a router Your computer hooked up to the same network router as the DVR The brand and model number of your router th...

Страница 59: ...routers Select the router most similar to yours 3 Once selected another program will appear in a separate screen select the get started icon in the bottom left corner 4 Make sure the volume is at a re...

Страница 60: ...any type of system as the instructions for port forwarding are similar for all products 6 Follow the step by step instructions for your router on www portforward com Be sure to use the set ports on th...

Страница 61: ...t you will see a box saying what port 6 In the box put the port numbers you set the DVR to The default ports are 80 and 9000 you have to forward both please make sure you check both ports 7 Click the...

Страница 62: ...port forwarding up correctly A pop up blocker is preventing the ActiveX controls from prompting you to install Your router is blocking your computer from using the external IP address from the same n...

Страница 63: ...name and password that you use for the DynDNS account you will create in the following pages Fill out DDNS setup with DYNDNS account information TOVIEW ONLINE SOFTWARE USING EXTERNAL IP ADDRESS 1 Open...

Страница 64: ...n be left blank unless you would like to enter it 5 Read and agree to the acceptable use policy by checking the box and click Create Account 6 An account verification email will be sent to the email a...

Страница 65: ...amily name or your business name as long as it is easy to remember 6 Choose a domain name from the drop down menu We recommend using dyndns org 7 In the IP address field type in the external IP addres...

Страница 66: ...n your account s host name in Internet Explorer If you didn t create an account you can use your external IP address in Internet Explorer if on a different computer or your DVR s internal IP address i...

Страница 67: ...r cameras 5 8 Default To restore all settings to the default settings select the Default button on the bottom of the screen Apply To save changes select apply at the bottom of the screen Exit To exit...

Страница 68: ...rmation on Pg 74 4 Capture Pressing this button prompts the DVR to take a snapshot of the screen and automatically save the picture to the selected location on your computer To select a location see S...

Страница 69: ...o the places you would like the PTZ camera to cruise to and click the load button at each desired position 3 If you select the cls button the set positions will be cleared 4 Click save once you have s...

Страница 70: ...the channel the footage was recorded on the size of the footage 5 Select the footage you would like to view from this list and double click it to play it 6 If you would like to refresh to the newest...

Страница 71: ...eo player devices When selecting this you will be asked to select the video you want converted as well as where you want the video converted to source and destination file Once you have selected the v...

Страница 72: ...ct apply to save settings TosetyourDVRforschedulerecord 1 Select the drop down menu beside Record Mode 2 Highlight the words TIMER and press select 3 Select apply to save settings Tosetyourrecordsched...

Страница 73: ...ameras days times and settings select apply to save settings ONLINE SOFTWARE Schedule Copy Function Selecting the COPY button will copy one day s schedule and paste it into other days that you specify...

Страница 74: ...o longer shaded in red the area will no longer detect motion 4 Once motion detection areas have been determined exit the screen by right clicking or pressing esc and select apply to save settings Moti...

Страница 75: ...ormation to select should be specified in the PTZ manual 3 Once all the correct information is inputted into the online software select apply to save changes NETWORK SETUP MENU The network setup menu...

Страница 76: ...www bandwidthplace com and have your bandwidth tested To adjust the bandwidth on your software click on the scroll list next to Internet bandwidth and select the bandwidth of your choice The higher t...

Страница 77: ...DST DST stands for daylight saving time you can adjust the DVR to change its time for you when daylight saving time approaches so you don t have to go back and do it yourself You can also customize wh...

Страница 78: ...e The available recording time you have left on the HDD in hours SoftVersion This area shows you the software version of the online viewing software Mac Address This is the DVR identification LOGOUT C...

Страница 79: ...iTunes account and that you have port forwarded an extra port for mobile viewing MOBILEVIEWING FromyouriPhone 1 Open and Run the aplayer application 2 Select the setup icon in the bottom right corner...

Страница 80: ...please ensure that you have the blackberry desktop manager installed on your compute and you have port forwarded an extra port for mobile viewing Fromyourcomputer 1 Connect your BlackBerry to your com...

Страница 81: ...open the memory card folder 2 Insert included CD into drive and open up to view files 3 Copy and paste the viewing software onto the phone s memory card or installation folder Host Input your DVR s IP...

Страница 82: ...Default access point Choose the access point used to access the Internet Server address Input the DVR s External IP address in this section Server Port Insert the set port for the Mobile connection Us...

Страница 83: ...on it Adjust the sunshade top of camera to let more sun hit the camera My night vision will not turn on I can t see at night Night vision turns on automatically on the cameras when the sensor detects...

Страница 84: ...d each of the cameras Check Camera Setup from the main menu to see if any of the cameras are turned off I have lost video footage This could be from lost footage due to tampering of cameras Make sure...

Страница 85: ...LED flicker through the DVR monitoring device Try replacing the batteries in the remote I plugged a mouse into the USB port but it s not working Make sure the mouse is connected to the proper USB port...

Страница 86: ...Always Manual Time Schedule Record Motion Refresh Rate 240 IPS for NTSC 200 IPS for PAL Triplex Operations Recording Playback and Network Transmission Remote Control Operation Yes Audio I O 1 RCA Audi...

Страница 87: ...ayback mode Key Lock Yes Video Loss Detection Yes CameraTitle Supports up to 8 letters Video Adjustable Hue Color Contrast Brightness Date Display Formats YY MM DD DD MM YY MM DD YY Daylight Saving Ye...

Страница 88: ...Allows the camera to be desk or wall mountable 6 4 PIN DIN Female Connection connects to male RCA One to Four Power Supply Cable 1 Female 12V Connection 2 Camera Power Supply Ports The One to Four po...

Страница 89: ...of the ports of the four port power supply D 5 Attach the BNC to RCA connector L to the video inputs J on the back of the DVR 6 Connect the yellow male RCA plug H from the 60 ft cable to the BNC to R...

Страница 90: ...0nm Video Output 4 PIN DIN to RCA TV System NTSC Viewing Angle 60 Degrees Electronic Shutter 1 60 1 100000 sec BLC No AGC Automatic ELC Automatic Line Lock No Iris Control No Gamma Correction 0 45 Whi...

Страница 91: ...f the CDS sensor is blocked night vision mode will be active and may produce extra light in your camera s picture Move your camera to another location Picture is too dark If using at night make sure y...

Страница 92: ...extension SP301 C UpgradeyourcameratoahigherresolutionandadvancedUVfilters foraccurateandvibrantcolours SP100 ST Alertallpotentialcriminalsofyoursecurityandhelpdetercrimewith awindowsticker SGN100 Al...

Страница 93: ...s Quick Start Guides Specification Sheets Software Updates Firmware Upgrades www defender usa com Disclaimer Defender does not endorse the use of any Defender products for illegal activities Defender...

Отзывы: