34
Step 1:
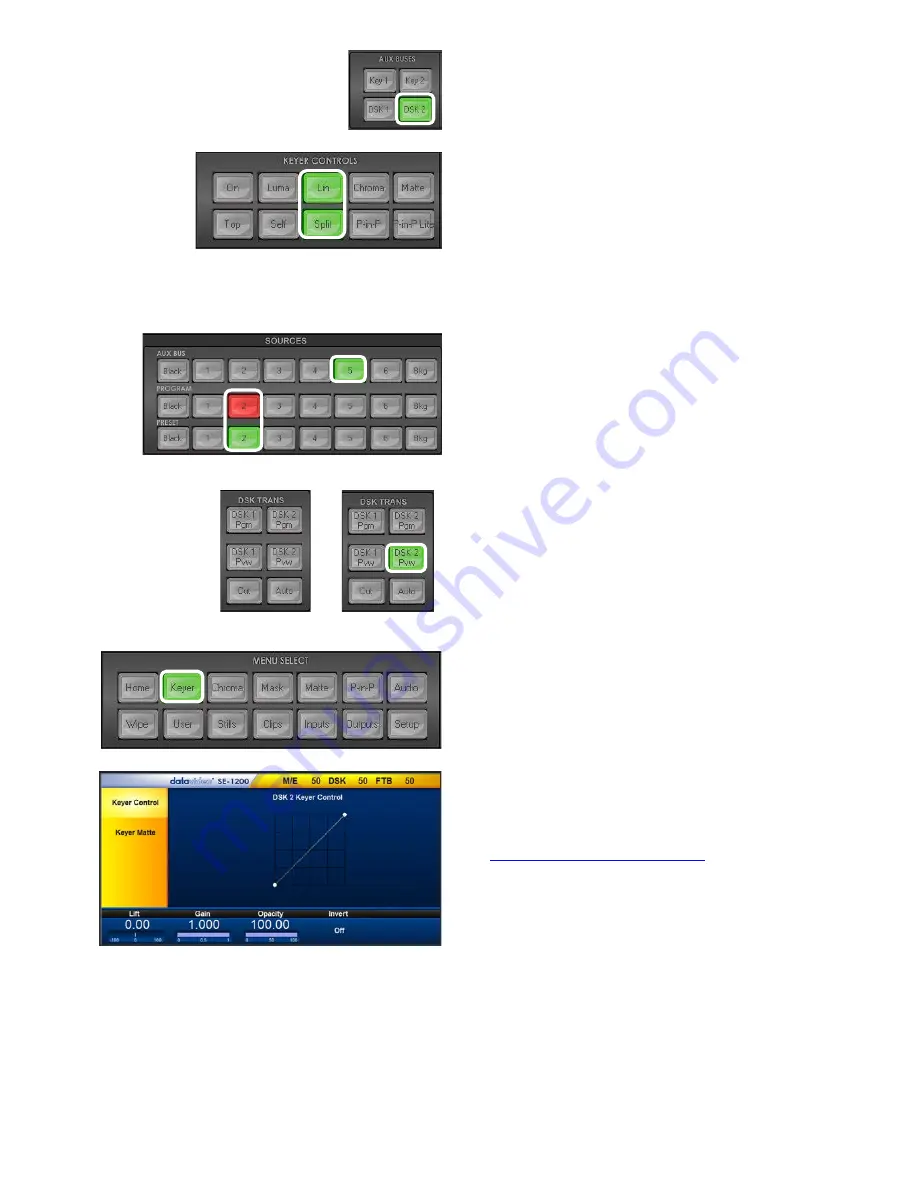
Choose the DSK Keyer channel that you wish
to use. In our example, we clicked the
DSK 2 button
on the
AUX BUSES
panel
.
Step 2:
We then choose the
Lin
or Linear
and Split
buttons
from the
KEYER CONTROLS
panel to select a
linear key.
Note:
If the DSK input only has one source (FILL) for
keying, press
Self
key button.
In our example
the DSK
input has two sources for
Fill
and
Key
, so we select the
Split button
instead.
Step 3:
The
Split button
is
backlit green
, select the CG
key source
on
the
AUX BUS Row
(input 5).
Step 4:
Click
Split button again
, now
backlit yellow
,
this time select the CG
Fill
source
on
AUX BUS Row
(input 2).
DSK OFF
PVW ACTIVE
Step 5:
To see the current keying effect on the Multi
view
Preview image
only
click on the
DSK 2 PVW
button
in the
DSK TRANS panel
so it becomes backlit
green.
Step 6
: To adjust the Luma key settings. Click the
Keyer button
in the
MENU SELECT
panel and the
menu screen will appear as shown on the left here.
The options in the blue bar along the bottom of the
Screen will allow you to calibrate for a white or black
key using the
Lift
,
Gain
,
Opacity
and
Invert Functions
.
The
Keyer Control section (7.1.1)
will explain the
effects of
Lift
,
Gain, Opacity
and
Invert.
Step 7:
Once you are happy with the settings of the
key you can take it to the program output with a fade
transition.
To do this click the
Auto button
in the
DSK
TRANS panel
.
Содержание SE-1200MU
Страница 1: ...1...
Страница 8: ...8 1 2 System Diagram...
Страница 57: ...57 Appendix 4 Dimensions All measurements in millimetres mm...
Страница 60: ...60 Service and Support...


