User’s Manual
314
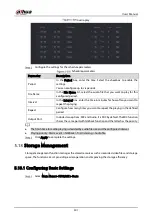
Parameter
Description
File Size
Enter the length of the uploaded recorded video.
If the entered length is less than the recorded video length, only a
section of the recorded video can be uploaded.
If the entered length is more than the recorded video length, the
whole recorded video can be uploaded.
If the entered length is 0, the whole recorded video will be
uploaded.
Picture Upload Interval
(Sec.)
If this interval is longer than snapshot interval, the system takes the
recent snapshot to upload. For example, the interval is 5 seconds,
and snapshot interval is 2 seconds per snapshot, the system
uploads the recent snapshot every 5 seconds.
If this interval is shorter than snapshot interval, the system uploads
the snapshot per the snapshot interval. For example, the interval is
5 seconds, and snapshot interval is 10 seconds per snapshot, the
system uploads the snapshot every 10 seconds.
To configure the snapshot interval, select Main Menu > CAMERA >
Encode > Snapshot.
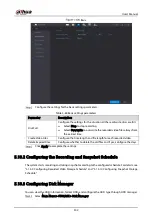
Channel
Select the channel that you want to apply the FTP settings.
Day
Select the week day and set the time period that you want to upload the
recorded files. You can set two periods for each week day.
Period 1, Period 2
Record type
Select the record type (Alarm, Intel, MD, and General) that you want to
upload. The selected record type will be uploaded during the configured
time period.
Click Test.
The system pops up a message to indicate success or failure. If failed, check the network
connection or configurations.
Click Apply to complete the settings.
Security Center
You can set security options to strengthen device security and use the device in a much safer way.
5.19.1
Security Status
Security scanning helps get a whole picture of device security status. You can scan user, service and
security module status for detailed information about the security status of the device.
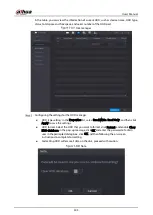
Detecting User and Service
Green icon represents a healthy status of the scanned item, and orange icon represents a risky status.
●
Login authentication: When there’s a risk in the login authentication, the icon will be in orange to
warn risk. You can click Details to see the detailed risk description.
Содержание DH-XVR71 H-4K-I2 Series
Страница 24: ...User s Manual 15 Fasten screws...
Страница 67: ...User s Manual 58 TCP IP Configure the settings for network parameters...
Страница 103: ...User s Manual 94 Main menu...
Страница 114: ...User s Manual 105 Analog channel Digital channel Configure the settings for the image parameters...
Страница 189: ...User s Manual 180 Details Click Register ID Register ID Click to add a face picture...
Страница 212: ...User s Manual 203 Search results Click the picture that you want to play back Playback...
Страница 235: ...User s Manual 226 Search results Select the face that you want to play back Registered information...
Страница 239: ...User s Manual 230 Details Click Register ID Register ID Click to add a face picture...
Страница 254: ...User s Manual 245 Sensor pairing In the Access Type list select USB Gateway Click Add Add USB gateway Click Pair...
Страница 314: ...User s Manual 305 Main stream Sub stream...
Страница 347: ...User s Manual 338 Update Click Update Browse Click the file that you want to upgrade Click OK...
Страница 362: ...User s Manual 353 Legal information...
Страница 370: ...User s Manual 361 Abbreviations Full term VBR Variable Bit Rate VGA Video Graphics Array WAN Wide Area Network...
Страница 388: ...User s Manual 379 Appendix Figure 7 7 Check neutral cable connection...
Страница 394: ...User s Manual...


