background image

ENG

4

1

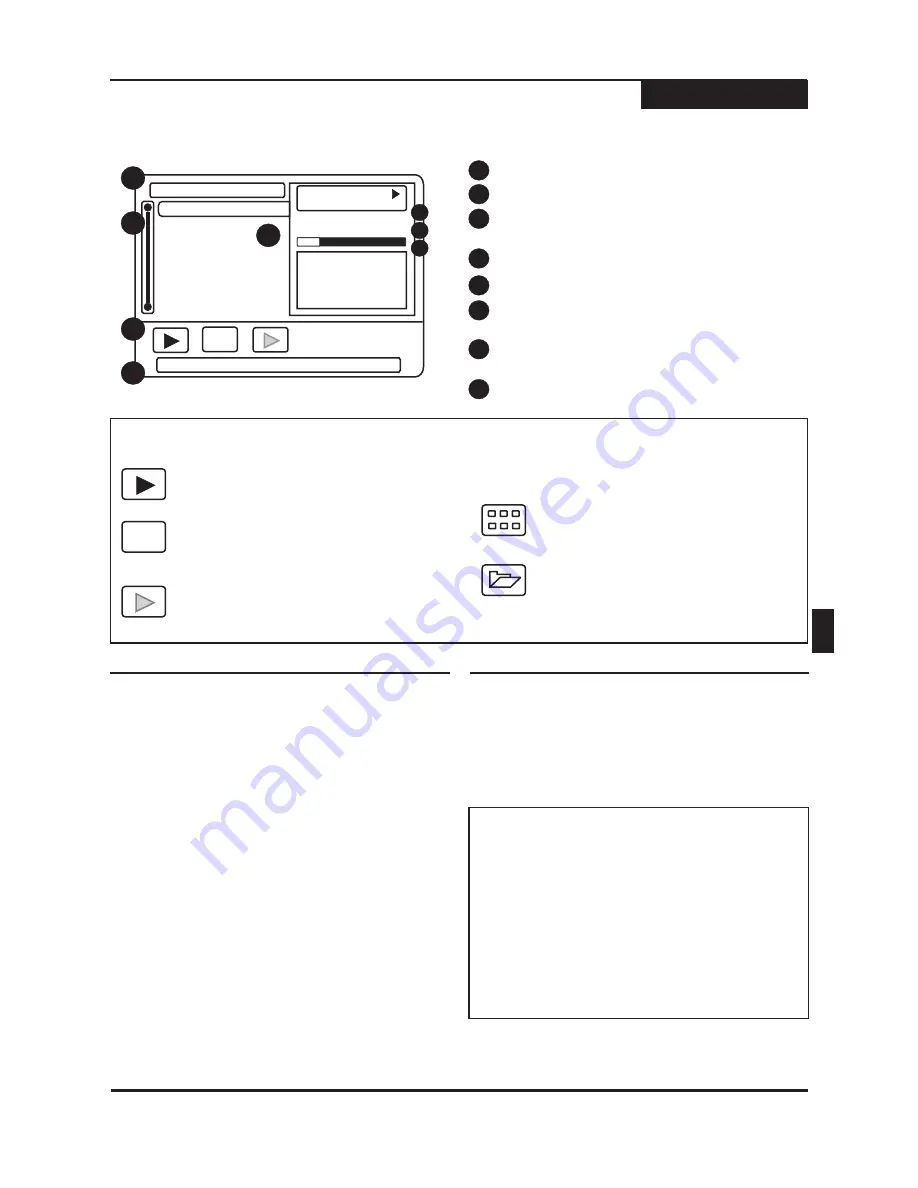
The file format.

2

The display bar for the file list.

3

Displays up to 10 music files at one time. Use the

/

keys to navigate this list.

5 6

Use the

the Action Menu.

/

keys to navigate

3 4

PLAY

- Begin playback of a file.

Mode

PLAY MODE

- Select from available

playback modes including Shuffle, Repeat,
Normal and more.

8

7

6

5

Displays current and Action Menu functions.

Progress bar and total time of the file.

Action Menu Icons

Viewing JPG / Play Mp3

On-screen Player

Press

on any file to start the ACTION MENU.

ENTER

THUMBNAIL PLAY

- Begin thumbnail

display playback mode.

TYPE

- Select the desired file type to be

listed on-screen. Choose from picture,
music or all.

Type

All

1

3

Mode

Type

All

MP3 / WMA disc

SONG_ONE.MP3

Total:
Play mode:

00:56 / 04:28

SONG_ONE.MP3

SONG_TWO.MP3

SONG_THREE.MP3

SONG_FOUR.MP3

SONG_FIVE.MP3

5 tracks

Normal

This unit can play an audio CD, JPG and Mp3 file on a disc. A handy on-screen player will appear automatically.

JPG Images & Slideshows

To display a JPG file, use the

keys to select a

file then press

or

to display a file.

5 6

/

ENTER

PLAY

1

The above screen displaying the files on the disc
will automatically begin. Please see above.

2

Inserting a JPG Disc

2

5

4

FOLDER MODE

- Switches the FILE

DISPLAY MODE to display the folders on a
disc. (This option appears only in SPLIT
MODE.

To begin a JPG SLIDE SHOW with the image you
have selected, use the

key and select the MODE

icon and press ENTER. From the available menu
options, select a playback mode. SLIDE SHOW
play mode options include, shuffle, play all, etc.

4

Press the MENU or STOP key to exit the
slideshow and return to the on-screen player.

4

3

MP3 file playback

Inserting a MP3 Disc

Use the

keys to navigate the Action menu items to

select other playback features as listed above.

5 6

3 4

/

keys to select tracks you wish to

playback, then press

to begin playback. Use

the

/

PLAY

1

The disc will automatically begin playback of tracks
beginning with the first one.

2

This unit supports CD-R/RW discs recorded with JPG
and Mp3 files.

JPG files must be named with the extension “.JPG”

JPG images must be saved with “standard”
encoding, rather than “progressive” encoding.

Discs created with personal computers may have
problems playing due to differences in recording
techniques. Compatibility with all recordable
formats is not guaranteed.

!

!

!

!

MP3 files must be named with the extension “.Mp3”

Notes

16

During playback of JPG files, you can use the

o rotate either clockwise or

counterclockwise.

5 6

3 4

/

and

/

keys t

5

Play

Displays the currently playing file selected play
mode.

Displays Total number of music tracks, Percentage
of files played and Current Playback Function icon.

6

7

8

Содержание CH-DVR 1600MU

Страница 1: ...S FOR USA 1 61 1 1 6 1 2005 04 09 HAN HUA OPTICS LIMITED COMPANY Model Part No Part Remark Scale Date Pages Edition DVR 1600 P C C G M Penny Penny File Internal External 40 015 405400 0503C F F Change MANUAL DVR 1600 ENG ES Ver A 2005 04 09 6 0 05 03 05 2005 03 09 Penny 0503C G G Change macrovision 3 ...

Страница 2: ...eo Playback 000 00 00 VIDEO DVD R W RECORD STAND BY L AUDIO R VIDEO IN 2 DV IN DVR 1600 DVD RECORDER WITH PROGRESSIVE SCAN PLAYBACK TM DVD Recorder Player DVR 1600 With Operation Guide Operation Guide ENG ES TM TM JPG JPG ...

Страница 3: ......

Страница 4: ...sults from misuse abuse or an act of God such as flood are not covered This warranty does not permit recovery of consequential or incidental damages Some states do not allow the exclusion or limitation of incidental or consequential damages so the above limitation may not apply to you 5 HOW DO YOU GET SERVICE You must be issued a Return Merchandise Authorization RMA number by CyberHome s Customer ...

Страница 5: ......

Страница 6: ... during lightning storms or when unused for long periods of time Refer all servicing to qualified service personnel Servicing is required when the apparatus has been damaged in any way such as when the power supply cord or plug is damaged liquid has been spilled objects have fallen into the apparatus the apparatus has been exposed to rain or moisture or when the unit does not operate normally or h...

Страница 7: ...corder control Delete Rename Titles Auto Insert Chapter Markers Your recordings are playable on most DVD Players Plays DVD SVCD VCD MPG JPG Audio CD Formats Fast Forward Reverse Slow Motion Playback Frame by Frame Stepping Repeat Playback Chapter Title Disc A B Restrict playback by Ratings User Defined Password Password Change MP3 Player JPG Slideshows with Thumbnail preview Zoom to x4 with Pannin...

Страница 8: ...Changing the Audio Track 14 Subtitles 14 Displaying Playback Session Information 14 Jumping to a Chapter or Time Point 15 Repeat Playback 15 Repeat Playback user defined segment 15 Bookmark 15 Screen Saver 15 Disc Playback Playback Interface 16 Inserting a JPG Disc 16 Inserting a MP3 Disc 16 Common Problems and Solutions 27 Troubleshooting DVR 1600 Specifications 28 Specifications Table of Content...

Страница 9: ...areful not to scratch or damage the disc surface To prevent discs from becoming bent or deformed they should be vertically kept in the disc storage case To prevent damage avoid leaving discs in your car where they may be subject to direct sunlight and high temperature Do not use any disc accessory to improve the audio quality disc protective solutions or lens cleaner These products may damage the ...

Страница 10: ...OOKMARK GOTO ZOOM PLAY PAUSE FAST FORWARD STOP SLOW NEXT A B REPEAT REPEAT 1 ALL CM SKIP EDIT SOURCE Press to access the Bookmark menu a current point on the disc can be accessed quickly without searching Press to jump to a Title Chapter or Time on the disc Press to magnify the screen with DVD and JPG discs Plays a disc chapter or track Press to pause playback press one more time to return to norm...

Страница 11: ...lastic Tab Pull 6 Remote Control Battery Holder Handle Release Clip Battery Replace the battery check for the correct polarity of the battery in the battery holder Slide the battery holder back into the remote 3 15 Functions Front Display AUDIO 1 2 3 4 5 6 8 VIDEO DVD R W TIMER RECORD PHOTO 7 AUDIO VIDEO DVD R W PHOTO Displays during playback of an Audio CD MP3 etc Glows during playback of a DVD V...

Страница 12: ...D SOCKET ANTENNA IN OUT VIDEO INPUT 1 STEREO AUDIO OUTPUT COMPOSITE VIDEO OUTPUT S VIDEO INPUT STEREO AUDIO INPUTS COAXIAL DIGITAL AUDIO OUTPUT S VIDEO OUTPUT COMPONENT PROGRESSIVE SCAN VIDEO OUTPUT Plug the matching end of the power cord into the unit before connecting the other end to the wall socket For Antenna or Cable TV connection Passthrough connection to TV does not transfer the output sig...

Страница 13: ...ess on the remote control or front panel STANDBY ON 2 Your TV must be equipped with AV inputs like those pictured to the right in order to connect this unit If your TV does not have AV inputs you will need a RF Modulator to connect the recorder to your TV s antenna cable input as shown below RF Modulators are available at major electronics retailers RF Modulator Older TV with coaxial antenna cable...

Страница 14: ... recommended that you use this type of connection for better picture quality First obtain a special S Video cable Connect the S Video output from the unit to the corresponding input on your TV 1 On your TV select the S Video input This is normally done by selecting Video 2 or AV2 with the remote control On some TVs this is done by selecting a particular channel On your TV select the component or p...

Страница 15: ...DTS decoding capability These outputs require special cables not included COAXIAL Audio Output Connections 11 The Recorder Stereo audio amplifier or receiver AUDIO CABLE NOT INCLUDED 1 You can connect the coaxial output from the recorder to the coaxial digital input on an AV amplifier or receiver First obtain a special audio cable Connect the analog stereo output from the unit to the corresponding...

Страница 16: ...an setup the recorder s built in TV Tuner by auto scanning for available channels and then adding or deleting the channels you choose 2 You can press repeatedly to exit the SETUP MENU at any time RETURN Press to enter the SETUP MENU Select the TV CHANNEL menu with the keys and press SETUP ENTER 5 6 1 Restore Defaults Auto Scanning Channels This is the easiest way to fill your channel list with tho...

Страница 17: ...back Control to enable or disable the PBC function The PBC function enables a MENU on SVCD discs that support this feature Select the corresponding number for the Chapter you wish to play with the keys PBC NUMBER 5 Fast Forward Reverse Scanning To use the Fast Forward Reverse function with the remote control press the or key repeatedly to cycle through all speeds in the desired direction To resume...

Страница 18: ...le audio tracks These can contain multiple languages and different audio formats such as 5 1Channel 2 Channel and other languages 3 Press to exit the AUDIO MENU AUDIO Changing the Audio Track During playback press the button to access the SUBTITLE MENU SUBTITLE 1 2 Most DVD discs include at least one subtitle track in one language Subtitles are useful viewing movies in a foreign language or for he...

Страница 19: ...1 ALL REPEAT OFF Repeating a Disc Title or Chapter During playback when you reach the start of the segment you want to repeat press the button An icon is displayed on screen letting you know that the segment start point has been saved REPEAT A B REPEAT A 1 2 3 The key lets you define your own segments to repeat REPEAT A B Repeating a Segment You Define 15 When you reach the end of the segment you ...

Страница 20: ...LAY MODE to display the folders on a disc This option appears only in SPLIT MODE To begin a JPG SLIDE SHOW with the image you have selected use the key and select the MODE icon and press ENTER From the available menu options select a playback mode SLIDE SHOW play mode options include shuffle play all etc 4 Press the MENU or STOP key to exit the slideshow and return to the on screen player 4 3 MP3 ...

Страница 21: ...k panel 1 S VIDEO referred to as S VIDEO 1 and 1 Composite Video referred to as VIDEO 1 Note that both of these video inputs share the same stereo audio input Audio Video source such as DVD player or VCR with S Video Out You can easily select the AV input on this unit Selecting an Input Source 1 Connect the desired AV input source 2 Press and use the SOURCE 3 4 keys to select your desired input so...

Страница 22: ...on REC Pausing CM SKIP and Resume Recording At this point recording has started with no specific end time so you ll have to press the key to manually end the recording Alternatively you can specify the length of the recording in 30 minute intervals by pressing the key repeatedly STOP REC Specifying the Recording Time 1 Press repeatedly to set the length of the recording in 30 minute intervals Choo...

Страница 23: ...he current title Rename Title Erase Disc Rename Disc Label Rename the Title with the On Screen Keyboard Erase a DVD RW disc Rename the Disc Label 4 1 2 3 6 5 8 7 9 3 The Action Menu also can be used to playback a title Use the keys to select the icon and then press 3 4 PLAY ENTER Rename 10 1 2 Enter the Title Menu Use the keys to select the title you wish to erase 5 6 1 2 Enter the Title Menu Use ...

Страница 24: ...eturn Exit Clear all Back Done Done Letters Numbers Signs Space bar Caps CM Skip 0 1 To select LETTERS press the key to move to the TABS on the left of the virtual keyboard 3 2 Use the keys to select other keyboards 5 6 3 Press the key to move to the virtual keyboard of your choice 4 Timer Recordings are designed for unattended operation and will work when the recorder is in Standby Mode 1 To Begi...

Страница 25: ...NTER 4 To exit the Schedule Screen press SCHEDULE Saving the Schedule 1 2 1 To change a recording schedule press the key to access the Schedule Screen SCHEDULE Editing a Saved Schedule Schedule No Starting time Length Source Status 28 Feb 2006 08 00PM 1 03 05 05 08 30AM 01 30 1 Ready 2 Wed 10 30AM 01 00 Svideo Ready 2 Use the keys to select the entry you wish to edit 5 6 3 Use the keys to select t...

Страница 26: ...tles Default DVD Audio Default DVD Subtitle Off Version Restore Recording Language Rating Clock Default setting Sets the language used by the SETUP MENU and ON SCREEN DISPLAY Default and are supported ENGLISH ENGLISH SPANISH Default setting Sets the default language used by DVD Menus As an example if a DVD disc contains multiple menu languages such as Spanish and English and this setting is set to...

Страница 27: ...ter you have defined a user password you would enter that value in this field If you forget the value of your user password later you can always use the factory password to change the value 3351 2 Move to the NEW PASSWORD with the key 6 3 Use the keys to enter your new user password using a maximum of 4 digits NUMBER 6 Use the key to move to OK and press 6 ENTER You can setup your own USER PASSWOR...

Страница 28: ...al to VHS Lower than VHS SP LP EP EP SLP Standard Play Long Play Extended Play Extended Play Super Long Play 1 HR 2 HRs 3 HRs 4 HRs 7 HRs 8 Hrs Mode Quality Max Time 1 2 Use the keys to select an option 3 4 Default setting Control whether or not Chapter Markers are automatically inserted during your recordings You can select the interval from or minutes or turn this feature 5 min 5 10 15 OFF Press...

Страница 29: ... the VIDEO MENU SETUP Default setting Your DVD Player will work with televisions supporting various video inputs including composite S Video component and Progressive Scan S Video Output 2 If you plan to use the component connection use the key to change the output to 4 Component 3 Press to exit the VIDEO MENU SETUP 1 When using the composite or S Video connection select S Video A V Output Audio 1...

Страница 30: ...O SCAN ENTER 1 Channel 34 Channel 35 Channel 37 Channel 38 Channel 36 Channel 34 Channel 35 Channel 36 Channel 37 Channel 38 Channel 34 Channel 35 Channel 37 Channel 38 Channel 36 Press to exit the SETUP MENU SETUP 4 AUTO SCAN automatically scans for available channels The unit saves those channels received at sufficient signal strength This subject was discussed earlier Further topics include ski...

Страница 31: ...be set wrong for your Television type Enter the SETUP MENU and select the A V OUTPUT VIDEO menu Try changing the TV SHAPE setting to 4 3 PanScan Pan Scan if you are using a standard TV or 16 9 Wide if your TV is a widescreen type 4 Common Problems and Solutions Troubleshooting Live Recording Will Not Start The Video Input Source may be protected with MacroVision Copy Protection The disc may alread...

Страница 32: ...l to Noise Ratio 90dB Audio Dynamic Range 90dB Harmonic Distortion 0 001 W PEAK Audio Performance Component Video Y 1 0Vp p 75 Ohm Negative Sync Pb Pr 7Vp p 75 Ohm Mini DIN 4 Pin 75 Ohm S Video One Pin Jack 1Vp p 75 Ohm Composite Video Coaxial Digital One Pin Jack 5Vp p 75 Ohm Analog Audio Stereo 2 0VRMS 470 Ohm Input Connections Output Connections Physical Mini DIN 4 Pin 75 Ohm Rear S Video One P...

Страница 33: ......

Страница 34: ...s Esta garantía no permite recuperos por daños fortuitos o consecuentes Algunos estados no admiten la exclusión o limitación de los daños fortuitos o consecuentes por lo tanto la limitación precedente puede no aplicarse en su caso 5 CÓMO DEBE TRAMITAR UNA REPARACIÓN Se le debe entregar un número de Autorización de Devolución de Mercadería ADM en español RMA en inglés de parte del Centro de Atenció...

Страница 35: ......

Страница 36: ...sulte toda reparación con personal especializado Se requieren reparaciones cuando el aparato ha sido dañado de cualquier manera como cuando se daña el cable de alimentación o el enchufe se ha derramado líquido han caído objetos dentro del aparato el aparato ha sido expuesto a la lluvia o humedad o cuando la unidad no opera normalmente o se ha caído Protección del cable de alimentación Para evitar ...

Страница 37: ...ática de Marcadores de Capítulos Sus grabaciones pueden reproducirse en la mayoría de los Reproductores de DVD Reproduce los formatos DVD SVCD VCD MPG JPG y CD de Audio Avance y Retroceso Rápido Reproduce en Cámara Lenta Avance Cuadro por Cuadro Repite la Reproducción Capítulo Título Disco y A B Restringe la reproducción por Calificaciones Contraseña Definida por el Usuario Cambio de Contraseña Re...

Страница 38: ...Saltar a un Capítulo o Punto de Tiempo 14 Saltar a un Capítulo o Punto de Tiempo 15 Repetir la Reproducción 15 Repetir la Reproducción segmento definido por el usuario 15 Señaladores 15 Salvapantallas 15 Reproducción de Discos Interfaz de Reproducción 16 Insertar un Disco de JPG 16 Insertar un Disco de Mp3 16 Problemas Comunes y Soluciones 27 Solución de Problemas Especificaciones del DVR 1600 28 ...

Страница 39: ...o rayar o dañar la superficie del disco Para evitar que los discos se doblen o deformen deberían ser guardados verticalmente en sus cajas Para prevenir daños evite dejar los discos en su automóvil donde pueden sufrir exposición directa a la luz solar y a alta temperatura No use ningún disco accesorio para mejorar la calidad de audio soluciones protectoras de discos o limpiador de lentes Estos prod...

Страница 40: ... Control Remoto FuncIones SEÑALADOR IR A ZOOM AUDIO AVANCE RAPIDO REPITE A B REPITE 1 TODO BORRAR EDIT FUENTE Marcador presione menu para poder tener acceso al marcador el disco le dara el acceso rapido sin tener que cargarlo Presione para saltar directamente a un Título Capítulo o Tiempo en el disco Presione para agrandar la pantalla con DVD y discos JPG Selecciona una pista de audio en discos DV...

Страница 41: ...o de manera que se vea la cubierta trasera Jale la lengüeta plástica para activar la pila en el control Su Control está ahora listo para ser usado 1 2 Para reemplazar la pila del control apriete el clip para soltarla mientras tira de la manija del contenedor de la pila para acceder a la batería 30 30 El control remoto funciona mejor cuando se apunta directamente a la unidad Manténgalo dentro de un...

Страница 42: ...S DE AUDIO ESTÉREO SALIDA COAXIAL DE AUDIO DIGITAL S VIDEO SALIDA SALIDA DE BARRIDO PROGRESIVO COMPONENTE DE VIDEO Enchufe el extremo correspondiente del cable de alimentación en la unidad antes de conectar el otro extremo a la toma de la pared Para conexión de Antena o TV por Cable La conexión hacia el televisor no transmite la señal de salida desde el Grabador de DVD Entrada Compuesta de Video p...

Страница 43: ...ntrol remoto o el panel frontal MODO DE ESPERA ENCENDIDO 2 Su televisor debe estar equipado con entradas AV como las que se muestran en la imagen a la derecha para poder conectar esta unidad Si su televisor no tiene entradas AV necesitará un Modulador RF para conectar la grabadora a la entrada de antena cable de su televisor como se muestra debajo Los Moduladores RF están disponibles en las princi...

Страница 44: ...deo de la unidad a la entrada correspondiente en su televisor 1 En su televisor seleccione la entrada S Video Esto se realiza normalmente eligiendo Video 2 o AV2 con el control remoto En algunos televisores esto se hace seleccionando un canal particular 2 Conexiones S Video y Componente de Video Conexiones 10 CABLE S VIDEO NO INCLUIDO La Grabadora La Grabadora CABLE DE COMPONENT VIDEO NO INCLUIDO ...

Страница 45: ...apacidad de decodificación de Dolby o DTS Estas salidas requieren cables especiales no incluidos Salida de Audio Conexiones 11 La Grabadora Amplificador o receptor de audio estéreo CABLE DE AUDIO NO INCLUIDO 1 Puede conectar la salida coaxial de la grabadora a la entrada coaxial digital en un amplificador o receptor AV Primero obtenga un cable especial de audio Conecte la salida estéreo analógica ...

Страница 46: ...ctor en la parte trasera de la unidad puede configurar el Sintonizador de TV incorporado de la grabadora buscando automáticamente los canales disponibles y luego agregando o borrando los canales que usted elija Select the TV CHANNEL menu with the Presione para ingresar al MENÚ DE CONFIGURACIÓN Seleccione el menú CANALES DE TV con las teclas y presione INTRO CONFIG 5 6 1 2 Puede presionar repetidam...

Страница 47: ...trol de Reproducción para habilitar o deshabilitar la función de PBC La función de PBC habilita un MENÚ en discos SVCD con soporte para esta característica Seleccione el número correspondiente al Capítulo que desee reproducir con las teclas PBC NUMÉRICAS 5 Avance Retroceso Rápido Para usar la función de Avance Retroceso Rápido con el control remoto presione la tecla o repetidamente para alternar t...

Страница 48: ...n pistas de audio múltiples Éstas pueden contener múltiples lenguajes y diferentes formatos de audio tales como 5 1Channel 2 Channel y otros lenguajes 3 Presione para salir del Menú de Audio AUDIO Cambiar la Pista de Audio Durante la reproducción presione el botón para acceder al MENÚ DE SUBTÍTULOS SUBTITULOS 1 2 La mayoría de los discos de DVD incluyen al menos una pista de subtítulos en un lengu...

Страница 49: ...o comenzará ahora a repetirse REPITE A B REPITE A B Para cancelar la repetición y retomar la reproducción normal presione nuevamente El icono de repetición en la pantalla cambiará a REPITE A B REPITE DESACTIVADO Cuando no hay actividad o la reproducción del disco permanece pausada por un período de alrededor de 5 minutos se cargará el Salvapantallas protegiendo al televisor del quemado de pantalla...

Страница 50: ...debido a las diferencias en las técnicas de grabación Los nombres de los archivos MP3 deben tener la extensión Mp3 Notas 16 Presiona el Menu or STOP para salir del y regresar a la pantalla SILDE SHOW Usa las para seleconar las pistas que deseas regresar y periona PLAY para emezar a regresar Usa de botones para navegar en el numero de cosa para selecionar otro regreso de la lista de arriba 5 6 3 4 ...

Страница 51: ...nel trasero 1 de S VIDEO llamada S VIDEO 1 y 1 de Video Compuesto llamada VIDEO 1 Nótese que ambas de estas entradas de video comparten la misma entrada de audio estéreo Fuente de Audio Video como un reproductor de DVD o VCR con Salida S Video Puede elegir fácilmente la entrada AV en esta unidad Eligiendo una Fuente de Entrada 1 Conecte la fuente de entrada AV deseada 2 Presione FUENTE y utilice l...

Страница 52: ...rabación REC Pausar Salteo de Publicidades y Retomar Grabación En este punto la grabación ha comenzado sin un tiempo específico de finalización por lo que tendrá que presionar la tecla para finalizar manualmente la grabación Como alternativa puede especificar la duración de la grabación en intervalos de 30 minutos presionando la tecla repetidamente STOP REC Especificando el Tiempo de Grabación 1 P...

Страница 53: ...ucción del título seleccionado Muestra las Vistas Previas de Capítulo y Reproduce Capítulos Renombra el título con el Teclado en Pantalla Borra el título actual Borra un disco DVD RW Renombrar la Etiqueta del Disco 4 1 2 3 6 5 8 7 9 10 1 2 Entrar el Menu de Titulos Utilice las teclas 5 6 para seleccionar el Título que desee borrar 4 Para regresar a la Pantalla de Títulos presione MENU 1 2 Entrar e...

Страница 54: ...ra seleccionar otros teclados 3 Presione la tecla 4 para moverse hacia el teclado virtual de su elección Las Grabaciones con Temporizador están diseñadas para la operación sin supervisión y funcionarán con la grabadora en el Modo en Espera 1 Para Comenzar a programar el horario de una grabación presione el botón en el control remoto Accederá a la Pantalla de Horario de la grabadora HORARIO Grabaci...

Страница 55: ...GREGAR INTRO CANCELAR INTRO 4 Para salir de la Pantalla de Horarios presione HORARIO Guardando el horario 1 2 1 Para cambiar un horario de grabación presione la tecla para acceder a la Pantalla de Horario HORARIO Editar un horario guardado 2 Use las teclas 5 6 para seleccionar la entrada que quiera editar 3 Use las teclas para seleccionar el icono de y presione 3 4 EDITAR GRABACION INTRO 4 Edita l...

Страница 56: ... los Menús de DVD Por ejemplo si un disco DVD contiene menús en múltiples idiomas tales como español e inglés y esta opción está configurada en ESPAÑOL entonces se usará el menú en español El DVD debe tener soporte para menú en múltiples idiomas para que esta configuración funcione Las opciones son y INGLÉS INGLÉS ESPAÑOL FRANCÉS Menú de AUDIO de DVD por Omisión INGLÉS INGLÉS ESPAÑOL FRANCÉS Confi...

Страница 57: ...que has definido una contraseña de usuario debería ingresar un valor en este campo Si se olvida el valor de su contraseña de usuario luego siempre puede usar la contraseña de fábrica para cambiar el valor 3351 2 Muévase a NUEVA CONTRASEÑA con la tecla 6 3 Utilice las teclas para ingresar su nueva contraseña de usuario utilizando un máximo de 4 dígitos NUMÉRICAS 6 Utilice la tecla para moverse a OK...

Страница 58: ...HRs 3 HRs 4 HRs 7 HRs 8 Hrs Duración Extendida Duración Extendida Súper Larga Duración Modo Calidad Tiempo Máx 1 2 Use las teclas para seleccionar una opción 3 4 Configuración de Fábrica Controla si los Marcadores de Capítulos son insertados automáticamente durante las grabaciones o no Puede elegir el intervalo entre ó minutos o esta característica 5 min 5 10 15 DESACTIVAR Presione para salir del ...

Страница 59: ...eo incluyendo compuesto S Video component y Barrido Progresivo S Video Salida 2 Si planea utilizar la conexión component utilice la tecla para cambiar la salida a 4 Component 3 Presione para salir del MENU DE VIDEO CONFIG 1 Cuando utilice la conexión compuesta o de S Video seleccione S Video Salida de A V Audio 1 2 Utilice las teclas para elegir una opción 3 4 Configuración de Fábrica Crudo Determ...

Страница 60: ...ante la BÚSQUEDA AUTOMÁTICA INTRO 1 Canal 34 35 37 38 Canal Canal Canal Canal 36 Canal 34 35 36 37 38 Canal Canal Canal Canal Canal 34 35 37 38 Canal Canal Canal Canal 36 Presione para salir del MENU DE CONFIGURACIÓN CONFIG 4 La BÚSQUEDA AUTOMÁTICA busca automáticamente canales disponibles La unidad guarda aquellos canales recibidos con la suficiente fuerza de señal Este tema fue tratado previamen...

Страница 61: ...MENÚ DE CONFIGURACIÓN y seleccione el menú SALIDA A V VIDEO Pruebe cambiando la opción FORMA DE TV a 4 3 PanScan Barrido Panorámico si está utilizando un televisor estándar o 16 9 Amplio si su televisor es del tipo Pantalla Ancha widescreen Problemas Comunes y Soluciones Solución de Problemas La Grabación en Vivo No Comienza La fuente de entrada de video puede estar protegida con Protección anti c...

Страница 62: ... Lineal DVD 4Hz a 20kHz CD de Audio Proporción Señal Ruido 90dB Rango Dinámico de Audio 90dB Distorsión Armónica 0 001 PICO W Performance De Audio Component Video Y 1 0Vp p 75 Ohm Sincronía Negativa Pb Pr 7Vp p 75 Ohm Mini DIN de 4 Pines 75 Ohm S Video Jack de Un Pin 1Vp p 75 Ohm Composite Video Coaxial Digital Jack de Un Pin 5Vp p 75 Ohm Audio Analógico Estéreo 2 0VRMS 470 Ohm Conexiones de Entra...

Отзывы: