


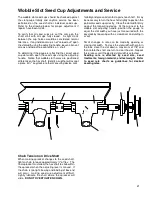


Wobble Slot Seed Cup Adjustments and Service
The wobble slot seed cups should be checked against
the slot gauge initially and anytime service has been
performed on the seed shaft or individual seed cups.
Refer to the drawing below for proper adjustment if
repairs have been made.
To verify that all seed cups are set the same on the
shaft, start with all cups fully closed. A slight crack
between the cup halves would be considered normal
tolerance. If any individual cup is not "zeroed out," open
the slot width using the adjusting handle, loosen allen set
screws and adjust to equal others on shaft.
To determine if the gauge is reflecting the correct seed
cup slot width, open the seed cups using the adjusting
handle. Notice that wobble slot halves are positioned
differently on the hex shaft. Identify a cup that will accept
a piece of ½" keystock or other measuring device com
fortably and give solid contact against each half. It may
be necessary to turn the hex shaft slightly to position the
particular seed cup correctly. Close the slot width firmly
against the measuring device. At the cup next to the
wobble slot adjusting handle, position the gauge to
equal the slot width you have just measured with the
keystock by loosening with a screwdriver and sliding in
or out.
Small changes in rate can be made by opening or
closing slot width. To close the slot width with grain in
the box, close the slot down a maximum of 1/8" and
then rotate the shaft one turn to clear the slot. Repeat
this process until the desired slot width is selected.
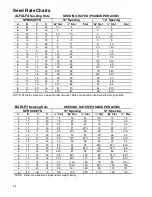
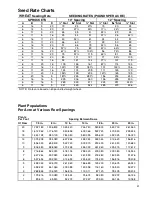
Seeding rate is affected by seed size, seed
treatments, foreign material, and test weight. Refer
to seed rate charts as guidelines for desired
seeding rates.
Chain Tension on Drive Shaft
When making sprocket changes to the seed shaft,
tighten chain to leave approximately ½" of flex. The
final sprocket must allow the hex shaft to slide within
the sprocket when the adjusting lever is moved. If
the chain is too tight, bowing and binding of box end
will occur making seed cup adjustment difficult.
Lightly lubricate the shaft where the sprocket will
slide.
DO NOT OVERTIGHTEN CHAIN.
21
Содержание 3200
Страница 1: ...3200 Trash Shank OWNER S MANUAL 01 10 601401 ...
Страница 5: ...Safety RECOGNIZE SAFETY INFORMATION UNDERSTAND SIGNAL WORDS FOLLOW SAFETY INSTRUCTIONS 3 ...
Страница 6: ...Safety OPERATE SAFELY AVOID TIP OVERS KEEP RIDERS OFF MACHINE 4 ...
Страница 7: ...Safety HANDLE FUEL SAFELY AVOID FIRES PREPARE FOR EMERGENCIES WEAR PROTECTIVE CLOTHING 5 ...
Страница 8: ...Safety USE SAFETY LIGHTS AND DEVICES TRANSPORT SAFELY 6 ...
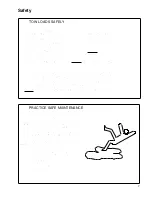
Страница 9: ...Safety TOW LOADS SAFELY PRACTICE SAFE MAINTENANCE 7 ...
Страница 10: ...Safety AVOID HIGH PRESSURE FLUIDS CHARGE ROW MARKER HYDRAULIC SYSTEM 8 ...
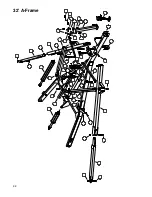
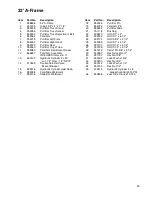
Страница 34: ...32 A Frame 32 ...
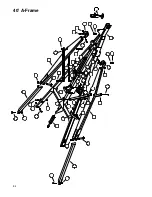
Страница 36: ...40 A Frame 34 ...
Страница 38: ...Center Frame Section 36 ...
Страница 40: ...32 Left Wing Section 38 ...
Страница 42: ...32 Right Wing Section 40 ...
Страница 44: ...40 Left Wing Section 42 ...
Страница 46: ...40 Right Wing Section 44 ...
Страница 48: ...Center Drive Assembly 46 ...
Страница 50: ...Left Drive Assembly 48 ...
Страница 52: ...Right Drive Assembly 50 ...
Страница 54: ...Box Assembly 52 ...