


IMPORTANT:
USE 1/4" x 2 1/2" OD x
1 1/32" ID WASHER FOUND
IN BOLT BOX.
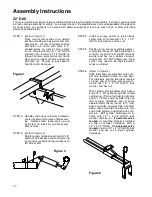
Assembly Instructions
40' Drill
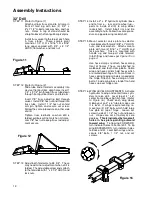
STEP 7
(Refer to Figure 7)
Install hitch on front of A-frame (lug on
hitch goes on top, pointing to back of drill)
with 1 1/2" x 9 1/2" pin. Clevis is attached
to front of hitch with 1 1/2" x 9 1/2" pin.
These pins are secured with 5/16" x 3"
HHCS and lock nuts. Install ratchet turn-
buckle between lug on A-frame and lug on
hitch with pins provided with turnbuckle.
Install hose carrier on side of hitch lug with
two (2) 1/2" x 2" HHCS, lock washers, and
hex nuts.
Figure 7
STEP 8
(Refer to Figure 8)
Lift wing frame assembly at point of bal-
ance and align U-shaped part on wing
frame with spool on center frame hinge.
Insert 1 1/2" x 11 3/8" hinge pin (pin with
square head) from front so small stop on
wing frame keeps pin from turning. Se-
cure with 1 1/2" hex nut. Tighten set
screw in nut. Lower wing to ground. At-
tach plastic tube on inside cup of drill box
to shank feed tube located on hinge.
Secure with hose clamp. Use the same
procedure to assemble opposite wing.
Figure 8
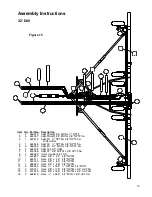
STEP 9
(Refer to Figure 9)
Install front pull bar swivels into holes in
front of A-frame. Secure with 1" x 4 1/2"
HHCS, 1/4" thick flat washers
(1/4" x 2
1/2" OD x 1 1/32" ID)
, and lock nuts. The
front pull bars are installed with fold arm
holes to outside of A-frame. They are
attached to swivels with 1" x 9" HHCS and
lock nuts.
Be sure head of bolt is in
toward A-frame.
Figure 9
6
6
6
6
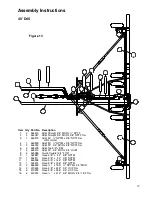
STEP 10
(Refer to Figure 10)
With long end of spool on rear pull bar up,
attach clevis end to swivel ball plate on
front of wings with 1" x 4" HHCS and lock
nut. Connect front and rear pull bars with
1 1/2" x 9 3/4" square head pin and 1 1/2"
hex nut with set screw.
Head of pin is
down.
Figure 10
Install a fold arm on top and bottom of each front pull
bar with other end attached to top and bottom of slide
plate with 1" x 10 1/2" HHCS and lock nuts.
15
Содержание 3200
Страница 1: ...3200 Trash Shank OWNER S MANUAL 01 10 601401 ...
Страница 5: ...Safety RECOGNIZE SAFETY INFORMATION UNDERSTAND SIGNAL WORDS FOLLOW SAFETY INSTRUCTIONS 3 ...
Страница 6: ...Safety OPERATE SAFELY AVOID TIP OVERS KEEP RIDERS OFF MACHINE 4 ...
Страница 7: ...Safety HANDLE FUEL SAFELY AVOID FIRES PREPARE FOR EMERGENCIES WEAR PROTECTIVE CLOTHING 5 ...
Страница 8: ...Safety USE SAFETY LIGHTS AND DEVICES TRANSPORT SAFELY 6 ...
Страница 9: ...Safety TOW LOADS SAFELY PRACTICE SAFE MAINTENANCE 7 ...
Страница 10: ...Safety AVOID HIGH PRESSURE FLUIDS CHARGE ROW MARKER HYDRAULIC SYSTEM 8 ...
Страница 34: ...32 A Frame 32 ...
Страница 36: ...40 A Frame 34 ...
Страница 38: ...Center Frame Section 36 ...
Страница 40: ...32 Left Wing Section 38 ...
Страница 42: ...32 Right Wing Section 40 ...
Страница 44: ...40 Left Wing Section 42 ...
Страница 46: ...40 Right Wing Section 44 ...
Страница 48: ...Center Drive Assembly 46 ...
Страница 50: ...Left Drive Assembly 48 ...
Страница 52: ...Right Drive Assembly 50 ...
Страница 54: ...Box Assembly 52 ...