


Operating Instructions
Field Operation. . .
(cont'd)
Disconnect all wing carrier latch plates. (Failure
to do so will cause damage to frame and folding
mechanism.) Activate tractor control valve to
folding cylinder. This unfolds drill. (See folding
and unfolding instructions.) Folding or unfolding
should be done slowly. (Make sure folding
cylinder is equipped with restrictor valve as
shown in the plumbing layout. Level, firm soil
conditions reduce strain on hydraulic fold pieces
while folding and unfolding and definitely add to
life of implement.
2. Lower implement into field position and make
sure center frame section is level. If unit is not
level, adjustment can be made by using ratchet
screw on hitch. A double check can be made by
checking the relative working depth of front and
back row shanks after a test run of operating the
implement at normal working speed.
LEVELING ADJUSTMENTS:
Activate hydraulics to wing and center frame
cylinders to raise drill. Level top of 4" x 6" center
frame tube using hitch jack. Check each wing
about midway out on 4" x 6" tube to make sure it is
level. If wings require leveling, remove two (2) 3/8"
bolts which hold large hex plate on top of hinge.
Loosen set screw in side of 1 1/2" hex nut and
loosen nut. Hinges are set at factory at zero
degrees.
This is indicated by two small holes
in hex plate pointing outward toward wing.
To
tip wing FORWARD, turn indicator holes to front of
drill. To tip wing BACKWARDS, turn indicator
holes to back of drill. Level both wings and re-
secure 3/8" bolts, 1 1/2" nut, and set screws.
(Refer to Figure below.)
CAUTION:
Before filling grain boxes,
properly hitch the drill to tractor to pre-
vent possibility of drill tipping over back-
ward.
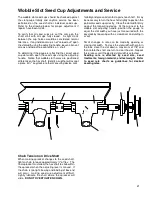
3. Before filling box with seed, rotate seed shaft.
The elements of weather, dirt, etc. may cause
corrosion and freeze seed shaft from time of
previous seeding. Remove undesirable material
from inside of box. A small amount of penetrat-
ing oil ( or similar light lubricant) in each wobble
slot feed cup would be helpful.
Seed Stoppage. . .
1. Stoppage in the boot area occurs in wet condi-
tions. Never drop implement in ground from a
stand still. Turning too short and backing one
wing will cause stoppage.
2. Bridging in drill box may occur in oats and corn.
An agitator may need to be installed. Powdered
inoculant on soybeans may cause bridging and
stoppage of the feed cup. It can cause the shaft
to turn hard causing excessive wear. Liquid
inoculant is recommended. Addition of pow-
dered graphite with each filling may be helpful
when using inoculated seed.
3. Spider webs in feed spout and tube will restrict
seed passage and are hard to detect. Before
starting to drill - with the drill out of the ground,
rotate the seed shaft, making certain seed
passes through each spout and tube.
4. Check drill often making certain unit is function-
ing and seeding properly. If not, take corrective
action.
20
Содержание 3200
Страница 1: ...3200 Trash Shank OWNER S MANUAL 01 10 601401 ...
Страница 5: ...Safety RECOGNIZE SAFETY INFORMATION UNDERSTAND SIGNAL WORDS FOLLOW SAFETY INSTRUCTIONS 3 ...
Страница 6: ...Safety OPERATE SAFELY AVOID TIP OVERS KEEP RIDERS OFF MACHINE 4 ...
Страница 7: ...Safety HANDLE FUEL SAFELY AVOID FIRES PREPARE FOR EMERGENCIES WEAR PROTECTIVE CLOTHING 5 ...
Страница 8: ...Safety USE SAFETY LIGHTS AND DEVICES TRANSPORT SAFELY 6 ...
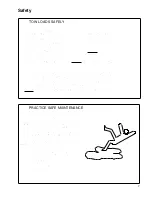
Страница 9: ...Safety TOW LOADS SAFELY PRACTICE SAFE MAINTENANCE 7 ...
Страница 10: ...Safety AVOID HIGH PRESSURE FLUIDS CHARGE ROW MARKER HYDRAULIC SYSTEM 8 ...
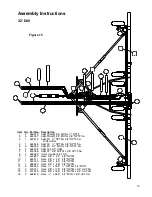
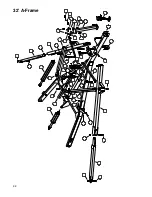
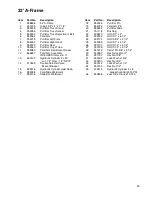
Страница 34: ...32 A Frame 32 ...
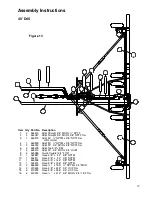
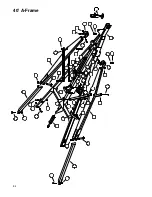
Страница 36: ...40 A Frame 34 ...
Страница 38: ...Center Frame Section 36 ...
Страница 40: ...32 Left Wing Section 38 ...
Страница 42: ...32 Right Wing Section 40 ...
Страница 44: ...40 Left Wing Section 42 ...
Страница 46: ...40 Right Wing Section 44 ...
Страница 48: ...Center Drive Assembly 46 ...
Страница 50: ...Left Drive Assembly 48 ...
Страница 52: ...Right Drive Assembly 50 ...
Страница 54: ...Box Assembly 52 ...