CRU
R T X 4 1 0 / 6 1 0 / 8 0 1 - I R U s e r M a n u a l A 9 - 4 6 8 - 0 0 0 5 R E V 1 . 0
- 6 -
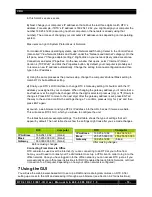
***Two disks from each of the RAID 6 sets could fail without loss of data. The loss of three disks in the
same striped RAID 6 set fails, then the entire RAID will fail.
4 Introduction to iSCSI
4.1 What is iSCSI?
iSCSI is a technology that allows a data storage device to be accessed over a TCP/IP network using
SCSI protocols. When your computer’s OS receives a request for data access, it generates a SCSI
command and then sends an IP packet across a network or direct Ethernet connection. A software utility
known as an iSCSI initiator is used to generate the SCSI commands. Such a utility must be installed on
the computer before it can access an iSCSI storage device (See Section 8 for installation instructions).
4.2 What is the Benefit of iSCSI?
An iSCSI storage device can be placed anywhere throughout a network, so the device can reside at a
great distance from the computer which accesses it. It is also a very fast connection when used on a
gigabit network, achieving speeds of 100 megabytes (MB)/sec or more. The connection it uses (RJ45—
standard Ethernet port) is commonly found on desktop and laptop computers, so there is no need to
purchase potentially expensive host bus adapters to provide a connection.
4.3 What is iSCSI Not?
iSCSI storage devices are not Network Attached Storage (NAS) devices. They have no built-in server
capabilities and therefore cannot be accessed by more than one computer at a time. Multiple computers
can only access the data if the iSCSI device is first attached to a single computer which is then set up as
a server.
5 Installation Steps
5.1 Hard Drive Installation
a)
Pull the ejection handle on the TrayFree bay to open the bay door.
b)
Insert a bare SATA hard drive into the bay. Make sure it is label-side up with the SATA connection on
the drive inserted first.
c)
Shut the bay door.
d)
You can optionally secure each bay door. Doing so is not necessary to operate RTX.
•
For RTX410 and RTX610, Insert an RTX Key into its key lock and turn it 90 degrees clockwise.
•
For RTX801-IR, use the Lock Tool to slide the lock to the “locked” position.
Sticker Card
Use the stickers on the provided sticker card to label each drive. This will prevent the drives from getting
mixed up when they are removed from the bays.
5.2 Operating RTX
a)
Connect RTX to a computer or network using the included Ethernet cable. Plug one cable into the “CH-
1” port. You can optionally plug a second cable into the “CH-2” port. The purpose of having multiple iSCSI
channels is to provide redundancy/failover and increased performance.
b)
Connect RTX to a power outlet with the included power cord.
c)
Install the hard drives into RTX (See Section 5.1).
d)
Flip the power switch on the rear of the unit to turn on RTX.
e)
If you have not yet configured RTX for access, refer to Sections 6, 7, and 8. Section 6 will tell you how
to connect RTX to your network or computer. Section 7 contains instructions for accessing the GUI and


