background image

PN 12071   R122210

42

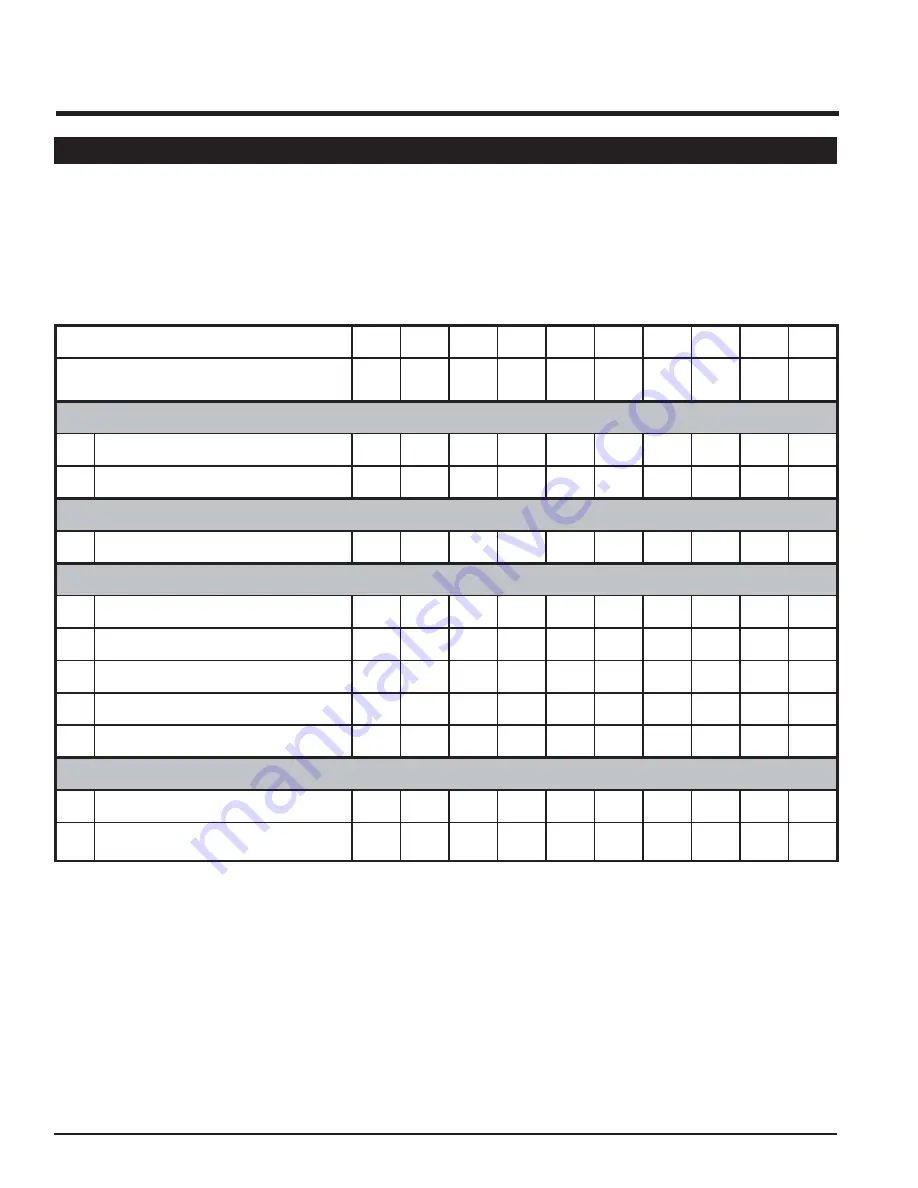
SERVICE & MAINTENANCE

Section

6


ACTION 

CODE: 


   =  CHECK OR INSPECT                   

CL  =  CLEAN 


L   =  LUBRICATE 


C    =  CHANGE

HOURS

SERVICED BY

DAILY

L

PTO CROSS JOURNAL ZERKS

GEARBOX OIL LEVEL

16 HOURS

L

PTO INNER TUBE

40 HOURS

L

PTO SHIELD RETAINING BEARING

L

PTO DISCONNECT MECHANISM

TENSION OF IDLER GEARS

FAN HOUSING AND AIRWAY

PLASTIC ECCENTRIC ROLLERS

YEARLY

C

GEARBOX OIL

CONDITION OF FRICTION DISC 
TORQUE LIMITER (SLIP CLUTCH)

6.1   MAINTENANCE CHECKLIST

Along with a servicing interval, perform a visual inspection. Maintenance personnel can often detect potential problems 
from any unusual sounds made by such components as shafts, bearings and drives.

These service recommendations are based on normal operating conditions. Severe or unusual conditions may require 
more frequent attention. Copy this page to continue record.

Содержание Air Reel

Страница 1: ...IAL NUMBER HERE Manual P N 12071 Rev 122210 Companion to P N 12088 SN Range B00034 D00000 OWNER S MANUAL AGCO CHALLENGER FHB SERIES GLEANER SERIES 2 3 5 7 8 GLEANER MASSEY FERGUSON 8200 MASSEY FERGUSON 9750 9850 ...

Страница 2: ...ifications are to be made without the written permission of Crary Industries Part replacements should be with original equipment supplied by Crary Industries THE CRARY INDUSTRIES STATEMENT OF PRODUCT SAFETY As a manufacturer of specialized agricultural equipment Crary Industries fully recognizes its responsibility of providing its customers products that perform their expected use in a reasonably ...

Страница 3: ...arranty does not cover normal wear items including but not limited to bearings belts pulleys filters and chipper knives 3 This warranty does not cover normal maintenance service or adjustments 4 This warranty does not cover depreciation or damage due to misuse negligence accident or improper maintenance 5 This warranty does not cover damage due to improper setup installation or adjustment 6 This w...

Страница 4: ...owing tables show the number of boxes included in all kits available for a AGCO Air Reel Refer to your packing slip to see which kits you should have received Then ensure that all boxes were shipped Contact your dealer immediately if any boxes are missing SEAL KIT KIT NUMBER NUMBER OF BOXES IN KIT 12050 1 16516 1 GEARBOX MOUNT DRIVE KIT KIT NUMBER NUMBER OF BOXES IN KIT 22676 1 DRIVELINE KIT KIT N...

Страница 5: ...RS 25 4 15 REEL SUPPORT INSTALLATION MASSEY FERGUSON 9750 26 4 15 1 MANUAL FORE AFT HEADERS 26 4 15 2 ELECTRIC HYDRAULIC FORE AFT 26 4 16 REEL TO HEADER INSTALLATION 27 4 17 MANIFOLD TILT 27 4 18 AIR HOSE 28 4 19 ELECTRICAL WIRING 30 4 20 OPTIONAL EQUIPMENT 31 4 20 1 AUXILIARY REEL TINE KIT 31 4 20 2 GEARBOX FAN EXTENSION 32 OPERATION 34 5 1 MACHINE COMPONENTS 35 5 2 INITIAL ADJUSTMENTS 36 5 2 1 R...

Страница 6: ...r owners Call your Crary dealer or distributor if you need assistance information or additional copies of the manuals Many people have worked on the design production and delivery of this machine They have built into it the highest quality of materials and workmanship The information in this manual is based on the knowledge study and experience of these people through years of manufacturing specia...

Страница 7: ...entially hazardous situation that if not avoided could result in death or serious injury and includes hazards that are exposed when guards are removed It may also be used to alert against unsafe practices CAUTION Indicates a potentially hazardous situation that if not avoided may result in minor or moderate injury It may also be used to alert against unsafe practices IMPORTANT Instructions that mu...

Страница 8: ... has not read and understood all operating and safety instructions is not qualified to operate the machine An untrained operator exposes himself and bystanders to possible seri ous injury or death Do not modify the equipment in anyway Unauthor ized modification may impair the function and or safety and could affect the life of the equipment 1 Read and understand the Owner s Manual and all safe ty ...

Страница 9: ...prerequisite for the safest operation of your machine Maintenance including lubrications should be performed with the machine stopped and locked out 1 Read and understand the Owner s Manual and all safety decals before servicing adjusting or repairing 2 Install and secure all guards and shields before starting or operating 3 Keep hands feet hair and clothing away from all mov ing and or rotating p...

Страница 10: ...c fluid piercing the skin surface 8 Before applying pressure to the system make sure all components are tight and that lines hoses and cou plings are not damaged 1 Keep bystanders especially children away from drive shafts 2 Be extremely careful when working around PTO shafts drivelines or other rotating shafts 3 Do not remove or modify protective shields or guards 4 Do not step across a PTO shaft...

Страница 11: ... sure that the installation area is clean and dry 2 Be sure temperature is above 50 F 10 C 3 Decide on the exact position before you remove the backing paper 4 Remove the smaller portion of the split backing paper 5 Align the decal over the specified area and carefully press the small portion with the exposed sticky back ing in place 6 Slowly peel back the remaining paper and carefully smooth the ...

Страница 12: ...se to operate this equipment until such information has been reviewed Annually review this information before the season start up Make these periodic reviews of SAFETY and OPERATION a standard practice for all of your equipment An untrained operator is unqualified to operate this machine Asign off sheet is provided for your record keeping to show that all personnel who will be working with the equ...

Страница 13: ...a that requires your SAFETY AWARENESS Think SAFETY Work SAFELY REMEMBER If safety decals have been damaged removed or become illegible or parts have been replaced without safety decals new decals must be applied New safety decals are available from the manufacturer or an authorized dealer SAFETY DECALS Section 3 Decal location B PN 11002 Decal Warning A PN 11001 Decal Caution ...

Страница 14: ...PN 12071 R122210 10 ...

Страница 15: ...th sufficient capac ity for the load 3 When necessary have someone assist you 4 Do not allow spectators in the working area WARNING 1 The sawhorses must be capable of supporting 600 pounds each 2 The sawhorses must be at least 3 feet high 3 The sawhorses must be blocked to keep the mani fold from rolling WARNING 3 Remove the bat assemblies from the crate and place to the side 4 Remove the lag scre...

Страница 16: ...ab See Figure 5 Pull the yoke and inner profile out of the tubing 2 Remove the spring pin 3 Find a pipe that is large enough to slide the inner profile inside but is small enough that the end yoke will not pass through This pipe should extend at least 4 inches past the end of the driveline inner profile A Insert the inner profile into the pipe B Place a steel plate on the floor and with the yoke p...

Страница 17: ...er panel Tap the holes for 1 2 bolts 3 Install the mount plate support to the header with four 1 2 x 1 1 4 serrated flange bolts Figure 7 Torque bolts to 75 ft lbs 4 Attach the gearbox mount plates to the mount plate support with four 1 2 x 1 1 4 serrated flange bolts and locknuts Do not tighten yet 5 Use a jack or hoist to position the gearbox inside the gearbox mount plates Using four 1 2 x 1 1 ...

Страница 18: ... two 1 2 x 1 bolts and washers Torque to 75 ft lbs 5 As needed adjust the gearbox within the gearbox mount plates so that the drive shaft is parallel to the top of the header Also check both ends of the shaft for equal distance between the shaft and the back panel of the header 6 Torque all gearbox mounting bolts to 75 ft lbs 7 Attach the shield mount assembly to the left hand side of the gearbox ...

Страница 19: ...UTCH SHIELD DRIVE SHAFT SHIELD MOUNT ASSEMBLY 1 2 x 1 1 4 HEX BOLT 5 16 x 3 4 BOLT 5 16 KEY 3 8 x 1 HEX BOLT DRIVELINE SUPPORT BRACKET BUSHING SHIELD WELDMENT 1 2 x 1 BOLT 4 4 RIGHT HAND DRIVE KIT 18 24 FT HEADERS Figure 9 RH drive 18 24 ft headers ...

Страница 20: ... shaft until the bearing mount plate rests against the left side of the vertical header angle Cut the drive shaft shield as needed to allow room for the bearing 8 Install the bearing mount plate to the vertical header angle Feed two 3 8 x 1 carriage bolts through the existing square holes in the angle and secure the bolts with washers and serrated flange nuts Figure 10 Driveline support bracket 9 ...

Страница 21: ...IP CLUTCH SHIELD 5 16 x 3 4 BOLT 3 8 x 1 HEX BOLT SHIELD MOUNT ASSEMBLY FLANGETTE BEARING BEARING MOUNT PLATE DRIVE SHAFT SHIELD 3 8 x 1 CARRIAGE BOLT 5 16 KEY DRIVE SHAFT 1 2 x 1 BOLT SHIELD WELDMENT BUSHING 4 5 RIGHT HAND DRIVE KIT 25 35 FT HEADERS Figure 11 RH drive 25 35 ft headers ...

Страница 22: ...c mounting plate assembly aligned with the indicator mark on the RH LH end clamps See Section 5 2 for additional information NOTE Do not tighten the nuts for the nylon rollers yet Figure 13 NOTE Figure 12 Eccentric mounting plate right hand shown DO NOT TIGHTENYET Figure 13 Do not tighten nuts yet 3 8 X 1 CARRIAGE BOLT RIGHT HAND ECCENTRIC MOUNT PLATE 3 8 FLAT WASHER 5THTOOTH INDICATOR MARK 3 8 CE...

Страница 23: ...F MANIFOLD 4 9 IDLER GEAR INSTALLATION FRONT 1 Assemble one idler gear assembly each to the RH LH end clamps and to all idler mount clamps front side of manifold only using one 3 8 X 2 bolt three 3 8 flat washers and one 3 8 center locknut per each idler gear assembly Figure 16 2 Use a small pry bar between the outside wall of the manifold tubing and the idler gears with approx 5 lbs of force Figu...

Страница 24: ...1 32 X 7 8 self tapping screws through the air tube into the holes of the mani fold Figure 19 You may use an impact wrench for this step D Follow steps A through D for the remaining air tubes 4 Install the double air tubes to the manifold outside holes Follow step 3 for installation instructions Make sure that the opening of the single and double air tubes face towards the rear of Air Reel Figure ...

Страница 25: ...semble the reel bat assemblies to the reel arms A Determine the correct orientation of the reel bat The RH and LH pivot straps point to the rear of the Air Reel B Install the bearing base onto the end of the reel arm and secure with a nylon locknut and bolt in the bottom hole C Position the reel bats into the bearing bases D Attach the plastic bearing caps by installing one 5 16 x 2 bolt one 5 16 ...

Страница 26: ...e reel drive shaft Figure 22 2 Insert the 5 16 bolts through the shaft coupler and install locknuts Do not tighten yet 3 Install the hydraulic motor A Line up the key on the shaft of the hydraulic motor with the key way of the shaft coupler B Align the mounting holes of the hydraulic motor with the mounting holes of the motor mount clamp The brace clamp assemblies will be used during reel to heade...

Страница 27: ...e plastic rollers should turn with the reel IMPORTANT 4 Bolt the eccentric arm assembly to the reel bat assem blies with a 1 2 x 2 1 2 button head bolt 5 Adjust each plastic roller against the eccentric ring and tighten 3 8 hardware to 30 ft lbs You may need to insert additional washers between the roller and the eccentric mount plate to center the eccentric ring on the rollers PLASTIC ROLLERS 1 2...

Страница 28: ...pad onto the LH reel arm 4 Insert the 3 8 x 3 bolt bushings and locknut in the hole at the end of the reel arm Torque to 30 ft lbs 5 Thread the adjustable bracket into the nut on the reel support Turn the bolt into the nut so it protrudes slightly through the nut 6 Position the adjustment bracket so that the reel sup port assembly can extend forward to the end of its slot Secure the adjustment bra...

Страница 29: ... the reel support 2 Slide the reel support and pad onto the LH reel arm 3 Attach the reel support to the OEM fore aft electric actuator A Gleaner 5 7 8 series Attach the base of the OEM actuator bracket to the reel support with a 1 2 x 4 bolt and nylock nut Figure 27 B All other headers Install an attachment plate to each side of the reel support with two 1 2 x 4 bolts washers and nylock nuts Then...

Страница 30: ... 2 x 3 1 2 BOLT LH REEL SUPPORT ASSEMBLY ADJUSTMENT BRACKET 1 2 x 3 BOLT 5 Position the adjustment bracket so that the reel sup port assembly can extend forward to the end of its slot Secure the adjustment bracket to the reel arm with a 1 2 x 3 1 2 bolt and nut Torque to 75 ft lbs 6 Repeat steps 1 5 to install the RH reel support assembly on the OEM RH reel arm Ensure the left and right reel suppo...

Страница 31: ...fold so the line of sight along the air tubes is directed just behind the cutterbar Section 5 2 6 Tighten the pivot clamp assembly on the manifold 7 Slide the tube cap onto the LH end of the manifold 8 Secure the tube cap with an 8 3 8 t bolt clamp 4 16 REEL TO HEADER INSTALLATION Avoid crushing injury or death from fall of raised reel Before working on or under a raised reel place all con trols i...

Страница 32: ... degree elbow Figure 33 Hose connector weldment 8 Determine the length of flex hose needed to reach the hose connector weldment and cut the hose as needed Do not leave slack in this portion of flex hose 9 Slide the flex hose and an 8 3 8 t bolt clamp onto the back end of the hose connector weldment 10 Place an 8 11 16 t bolt clamp over each end of the 90 degree elbow 11 Slide the 90 degree elbow o...

Страница 33: ...0 29 ASSEMBLY ELBOW SUPPORT BAND 45 ELBOW 8 11 16 T BOLT CLAMP 90 ELBOW 8 3 8 T BOLT CLAMP FLEX HOSE 8 11 16 T BOLT CLAMP 8 3 8 T BOLT CLAMP HOSE CONNECTOR WELDMENT 5 16 x 1 BOLT Figure 34 Hose assembly 4 18 AIR HOSE ...

Страница 34: ...tuators 15 Amp Manifold Tilt 6 Amp Air Volume and plug in Figure 35 5 Mount the intermediate harness connectors to a con venient location on the combine feeder house Place all controls in neutral or off stop combine engine set parking brake remove ignition key wait for all mov ing parts to stop then properly block machine before servicing adjusting repairing or unplugging WARNING Figure 35 Switch ...

Страница 35: ...ure the pitch of the auxiliary reel tines line up with the existing reel tines NOTE 3 Rotate the auxiliary reel tine assembly until the square end sets into the square hole of the pivot strap 4 Insert the 3 8 X 2 1 2 carriage bolt through the square hole of the auxiliary reel tine assembly and fasten the 3 8 flat washer and 3 8 center locknut 5 Tighten the 3 8 center locknut to 30 ft lbs 6 Repeat ...

Страница 36: ...castle nut E Bolt upper fan housing to lower fan housing with 3 8 x 1 1 4 bolts F Reinstall indicator weldment onto butterfly shaft and tighten set screw 3 Mount gearbox fan extension to combine A Refer to Section 4 7 for fan gearbox installation instructions B Select appropriate support bracket for combine model C Bolt mounting bracket onto header D Remove upper RH bolt on gearbox mount plate Bol...

Страница 37: ... 9 15051 NUT 3 8 SERRATED FLANGE NC ZP 12 10 15055 NUT 3 4 NF CASTLE ZP 1 11 15097 WASHER 1 2 SAE FLAT ZP 8 12 15098 WASHER 3 4 SAE FLAT ZP 1 13 15099 WASHER 7 8 SAE FLAT ZP 2 KIT GEARBOX FAN EXTENSION OPTION ITEM PART NUMBER DESCRIPTION QTY 14 15332 SCREW 1 4 20 X 1 4 SET 1 15 15364 BOLT 3 8 X 1 1 4 HHCS GR5 ZP 12 16 16466 ROTOR FAN 12 88 X 2 5 7 8 B CW HSPD ALUM 1 17 21193 8 FAN SIDE W BUTTERFLY...

Страница 38: ...ness concern and prudence of personnel involved in the operation trans port maintenance and storage of equipment or in the use and maintenance of facilities 1 Read and understand the Owner s Manual and all safety signs before servicing adjusting or repairing 2 Install and secure all guards and shields before start ing or operating 3 Keep hands feet hair and clothing away from all moving and or rot...

Страница 39: ...ion of these two systems results in superior harvesting efficiency Please take the time to familiarize yourself with the proper adjustment and operation of your Air Reel You will be well rewarded for your time in increased performance and crop yields A Air Manifold B Drive Shaft C Reel Bat Arm Assy D Air Tube E Reel Bat Assy F Reel Tine G Hydraulic Motor H Eccentric Arm Assy I Gearbox J Fan K Fan ...

Страница 40: ...l adjustment LINE OF SIGHT AIRTUBE 1 MIN 4 Adjust reel height to achieve a 1 minimum clearance between the reel tines and sickle at maximum sickle flex height Set cylinder stops at this position 5 Move reel ahead until fingers are a minimum of 1 from the ground Install a stop on the reel arm to prevent forward travel from this point 6 Loosen pivot clamp and adjust so the actuator is in middle of s...

Страница 41: ...le is with the 5th tooth middle tooth on the eccentric mount plate assembly aligned with the indi cator mark on the RH LH end clamps Figure 41 3 From the RH side of the machine move the tine pitch adjustment wrench CCW to change the tine pitch for ward Move the tine pitch adjustment wrench CW to change the tine pitch backward Figure 40 4 Tighten the three 3 8 X 1 carriage bolts to their speci fied...

Страница 42: ... the season see Service and Maintenance Section 9 Check condition of auger driveshaft slip clutch friction discs Run in is recommended at the start of the season see Service and Maintenance Section Place all controls in neutral or off stop combine engine set parking brake remove ignition key wait for all mov ing parts to stop then properly block machine before servicing adjusting repairing or unpl...

Страница 43: ...ic rollers for uneven wear 6 Refer to the normal servicing and maintenance sched ule as defined in the Service Record 5 5 CONTROLS Before starting to work all operators should familiarize themselves with the location and function of the controls and safety devices Some machines may vary due to different models of combines and headers MANIFOLD TILT 1 Moving the toggle switch to the FORE position Fi...

Страница 44: ...eel to bring the crop into the header DO operate reel as slow as possible DO operate reel as close to auger as possible DO keep tines as perpendicular to sickle as possible DO use air to feed crop across the sickle DO adjust air tube angle to maximize crop flow across the sickle DO make adjustments gradually DO verify proper air tube position whenever adjusting reel height or fore and aft position...

Страница 45: ...heck condition of the rotary screen bearings 4 Make a list of all parts needed for repairs and order them immediately Repairs can then be done when time permits and prevent unnecessary down time at the start of next season 5 Lubricate all grease points to remove any water residue from the washing and prevent rusting during the storage period Rotate all moving parts to distribute lubricant to all s...

Страница 46: ...G AND AIRWAY PLASTIC ECCENTRIC ROLLERS YEARLY C GEARBOX OIL CONDITION OF FRICTION DISC TORQUE LIMITER SLIP CLUTCH 6 1 MAINTENANCE CHECKLIST Along with a servicing interval perform a visual inspection Maintenance personnel can often detect potential problems from any unusual sounds made by such components as shafts bearings and drives These service recommendations are based on normal operating cond...

Страница 47: ... remove and clean thor oughly Also clean lubricant passageway Replace fitting if necessary 6 2 FLUIDS AND LUBRICANTS 6 3 GREASING CHECKING THE GEARBOX OIL LEVEL Check the gearbox oil level daily Figure 46 Check more frequently if leaks exist around any of the plugs or shaft seals The oil level in the gearbox should be no higher than the bottom of the driveshaft CHANGING THE GEARBOX OIL Each gearbo...

Страница 48: ...he reel bat arm assembly has any radial movement it will be necessary to make adjustments When adjusting the tension of the idler to internal gears follow this procedure 1 Loosen the 3 8 center locknuts which are on the idler gear assembly on the front side of the manifold 2 Insert a small pry bar between the outside wall of the manifold tubing and the idler gears Apply approx 5 lbs of force to sl...

Страница 49: ...ar If no wear is detected proceed to Step 5 2 If uneven wear is detected loosen and remove the bolt and hardware for each roller that is defective 3 Inspect the radial bearings that are seated in the rollers check to see if they turn freely 4 If replacement parts are needed consult your local authorized Crary dealer 5 Reassemble the eccentric roller assembly as shown in Figure 50 6 Readjust the ro...

Страница 50: ...4 Remove bolts and disassemble all components 5 Check the condition of all parts especially the friction discs Figure 53 6 If replacement parts are needed consult your local authorized Crary dealer 7 Reassemble all components 8 Tighten nuts following an alternating cross pattern until the clutch slips momentarily upon initial startup and then continues to operate normally Figure 51 Fan housing and...

Страница 51: ...le one notch at a time closer to perpendicular Gradually adjust air flow closer to auger until crop is feeding properly Gradually adjust air volume to achieve optimum crop flow with minimum amount of air Gradually increase auger speed Gradually increase header speed Crop not feeding head first Gradually increase reel speed Gradually increase air flow to tilt head of crop towards header Down or lod...

Страница 52: ...ECIFICATIONS SPEED OF HYDRAULIC DRIVE 0 59 RPM DIAMETER BAT REEL 48 NUMBER OF BATS 6 Ø48 00 Efficiency Pressure Horsepower 4000 3000 2000 1000 CFM 10 20 30 40 50 4500 RPM FORWARD CURVE 8 OUTLET FAN ROTOR SIZE 16 50 DIA X 3 00 WIDE STATIC PRESSURE HORSEPOWER EFFICIENCY 10 30 20 40 50 ...

Страница 53: ... 7 8 14 UNF straight thd o ring 1 dia woodruff key shaft Roller stator displacement 8 0 cu in per rev HYDRAULIC MOTOR MG SERIES PERFORMANCE CHART Series MG08 8 0 Cu In Rev Pressure PSID 500 1000 1500 1800 2000 2400 Flow GPM Speed RPM Torque in lbs 0 5 12 10 7 5 3 446 955 1479 1797 2011 1 0 27 24 21 19 17 13 465 989 1515 1931 2043 2469 2 0 55 52 49 46 44 40 481 1023 1571 1901 2120 2558 3 0 84 81 77...

Страница 54: ...s in reassembly TIGHTENING O RING FITTINGS 1 Inspect O ring and seat for dirt or obvious de fects 2 On angle fittings back the center locknut off until washer bottoms out at top of groove 3 Hand tighten fitting until back up washer or washer face if straight fitting bottoms on face and O ring is seated 4 Position angle fittings by unscrewing no more than one turn 5 Tighten straight fittings to tor...

Страница 55: ... SAE 8 N m Ft lb N m Ft lb N m Ft lb 1 4 7 5 5 5 11 8 16 12 5 16 15 11 23 17 34 25 3 8 27 20 41 30 61 45 7 16 41 30 68 50 95 70 1 2 68 50 102 75 149 110 9 16 97 70 149 110 203 150 5 8 122 90 203 150 312 230 3 4 217 160 353 260 515 380 7 8 230 170 542 400 814 600 1 298 220 786 580 1220 900 1 1 8 407 300 1085 800 1736 1280 1 1 4 570 420 2631 1940 2468 1820 METRIC BOLT DIAMETER BOLT TORQUE 4 8 8 8 10...

Страница 56: ......

Страница 57: ......

Страница 58: ......

Страница 59: ......

Страница 60: ...Crary Industries 237 12th St NW P O Box 849 West Fargo ND 58078 0849 PH 1 800 247 7335 FAX 701 282 9522 www crary com ...

Отзывы: