background image

Viper Installation, Service & Decommissioning Manual

© 2022, Marmon Foodservice Technologies Inc.

- 89 -

Publication Number: 620073146SER 


B

ARREL

 M

OTOR

 R

EPLACEMENT

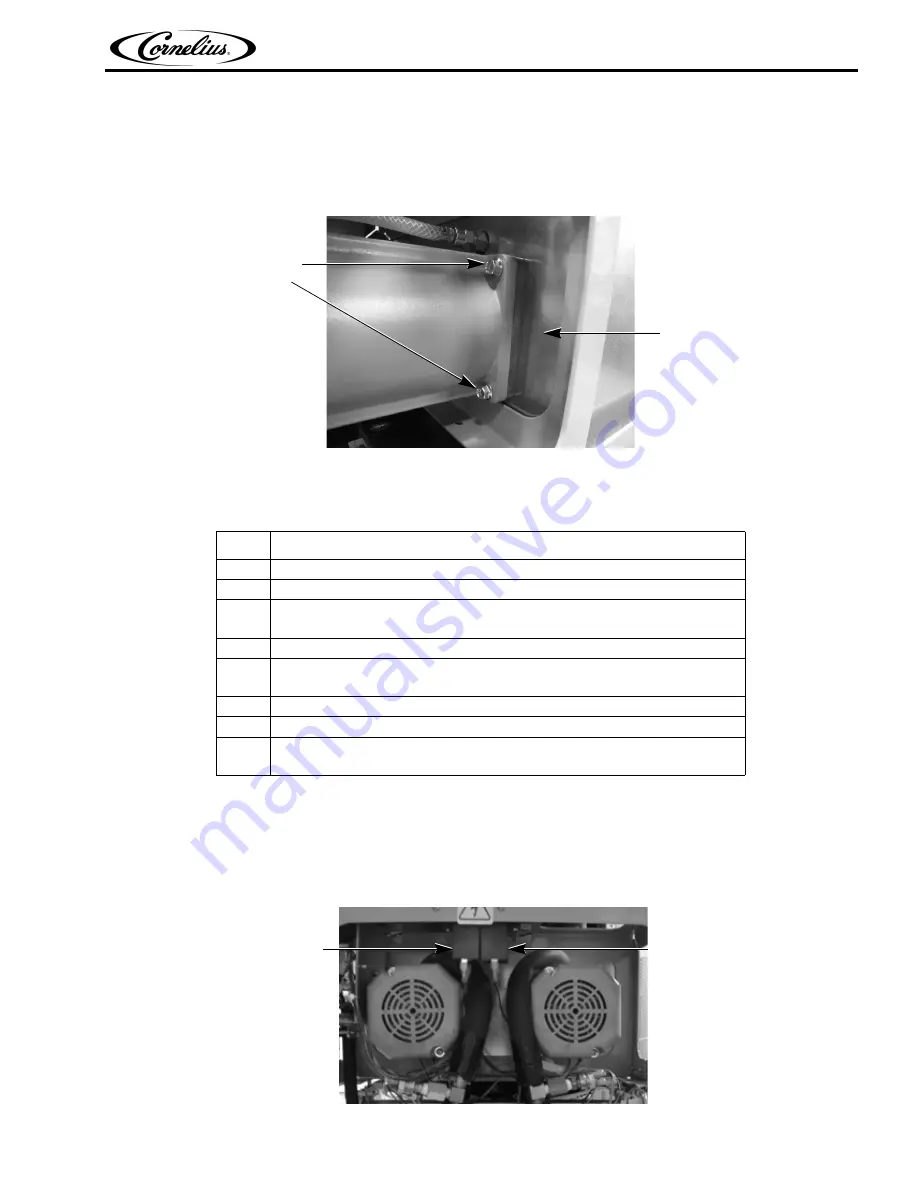
The barrel motor does not require any special alignment when being replaced. It mounts on four (4) bolts. These bolts are 
screwed into threaded bosses in the foam pack barrel assembly, as shown in Figure 70. To replace a barrel motor, perform 
the procedure in Table 73

 Figure 70. Side View of Motor Showing Two of the Four Mounting Bolts

M

OTOR

 R

UN

 C

APACITOR

 R

EPLACEMENT

The motor run capacitors, shown in Figure 71, are mounted at the rear of the unit between the barrel motors. To replace a 
run capacitor, perform the procedure in Table 74

 Figure 71. View of Motor Run Capacitors

Table 73.

Step

Action

1

Perform the procedure in Steps 1 through 8 of Table 73

2

Disconnect the motor from the circuit by unplugging the connector.

3

Remove the motor by removing the four (4) bolts holding the motor to the barrel 
assembly.

4

Install the replacement motor and connect the connector.

5

Replace the motor seal, scraper blade assembly onto the motor shaft in the barrel, as 
described in Table 73

6

Reconnect power to the unit.

7

Refill the barrel with product. “Filling a Barrel” on page 67.

8

When barrel fill is complete, perform a motor calibration. “Calibrating a Motor” on 
page 73.

Barrel Motor

Mounting

Bolts

Foam

Pack

Motor Run

Capacitor

Motor Run

Capacitor

Содержание R-454C

Страница 1: ...54C Installation Service and Decommissioning Manual Release Date TBD Publication Number 620073146SER Revision Date March 21 2022 Revision A Visit the Cornelius web site at www cornelius com for all yo...

Страница 2: ...rences including but not limited to 1 other than normal and proper use and normal service conditions with respect to the Product 2 improper voltage 3 inadequate wiring 4 abuse 5 accident 6 alteration...

Страница 3: ...Requirements 11 Installing The Drip Tray 13 Installing The Graphics Sheet 14 Installing The Flavor Card 14 Cart Information and Mounting 14 Servicing Motorman Dispensing Valves 15 Suggested Sanitizers...

Страница 4: ...45 CO2 System 48 Water System 51 Syrup System 51 Control Panel 51 Introduction 51 Control Panel Display 51 Control Panel Buttons 52 Control Panel Menu Descriptions 54 System Menus 54 Main Menu 54 Unit...

Страница 5: ...rting the Unit 76 Preventative Maintenance 77 Summary 77 Monthly Maintenance 77 Cleaning Air Filter 77 Annual Maintenance 78 Inspecting and Replacing Scraper Blades 78 Cleaning the Syrup Connections 7...

Страница 6: ...cement 96 Syrup Pressure Switch Replacement 96 Water Pressure Switch Replacement 97 Display Board Replacement 98 Control Board Replacement 98 Backward Forward Compatibility with Older Software Version...

Страница 7: ...g Overrun is a Variable The percentage or degree of overrun depends on a number of factors The specific syrup BRIX low dispensing volume carbonation level in the liquid product and freezing of the pro...

Страница 8: ...spensed during peak use periods Carbonation Level in Liquid Product Affects Overrun The higher the specific carbonation level in a given product the greater the potential for carbonation breakout in f...

Страница 9: ...mple 62A0815xxxxxx would be a unit produced during the 15th week of 2008 COUNTER LOCATION Select a location in a well ventilated area close to a grounded electrical outlet and backroom connections The...

Страница 10: ...he MOUNTING TEMPLATE see Figure 3 for locating the required clearance hole in the counter for these utility lines COUNTERTOP TEMPLATE INSTALLATION INSTRUCTIONS Use the template shown in Figure 3 and t...

Страница 11: ...electrical and supply connections on the bottom of the unit below the rear locations The bottom connection locations may be used if the unit is located directly against a wall The electrical connectio...

Страница 12: ...d for AC power input perform the procedure as mentioned in Table 3 Table 3 Step Action 1 nsure that power to the unit is off DO NOT plug the power cord into the wall outlet at this time 2 50 Hz unit r...

Страница 13: ...ections should be sized installed and maintained according to federal state and local laws NOTE Size install and maintain the water pipe connections and fixtures directly connected to a potable water...

Страница 14: ...e Bulk System requires a secondary regulator with a maximum inlet pressure of 200 psi NOTE CO2 connections require 3 8 I D tubing All hoses must reach the back of the unit plus an adequate amount of e...

Страница 15: ...rect Connection to Syrup Inlet on Syrup Pump 1 2 to 3 8 Inch Fitting Reducer Water Inlet Syrup Line 1 Syrup Line 2 CO2 Inlet BIB Syrup BIB Syrup BIB Pump C E D G BIB Pump C E D BIB Pump C E D Syrup Li...

Страница 16: ...provides a minimal operational test of the power to the unit Perform the procedure in Table 4 Table 4 Step Action 1 Verify the voltage being supplied to the unit It should be between 215 and 245 Volt...

Страница 17: ...ART INFORMATION AND MOUNTING The Viper unit may be mounted on a mobile cart Cornelius part no 620043075 for 2 barrel unit 620053990 for 3 barrel unit and 620046556 for 4 barrel unit which allows some...

Страница 18: ...change the caged o rings in each dispensing valve on the unit Suggested Sanitizers KAY 5 Sanitizer Cleaner 100 PPM Mix one packet of KAY 5 Sanitizer Cleaner per 2 5 gallons of tap water 70 100 F 24 3...

Страница 19: ...ice ball grate if applicable and dispensing valve If parts are excessively coated wipe clean with a paper towel to remove excess syrup and lubricant especially from caged o ring and dispensing valve...

Страница 20: ...the BIB connectors rinsing and refilling the system NOTE Sanitizing should only be performed by qualified service technicians Suggested Sanitizers KAY 5 Sanitizer Cleaner 100 PPM Mix one packet of KAY...

Страница 21: ...solution rinse them with warm water and place them on clean paper towels 11 Carefully re install the valve and corresponding parts into the faceplate and re install the faceplate onto the machine Vipe...

Страница 22: ...per Blades 12 Perform a leak test on the barrel See Motor Seal Leak Test Sanitizing the Barrel Sanitize the syrup system and barrel by performing the procedure shown in Table 9 Table 9 Step Action 1 U...

Страница 23: ...from the system turn the barrel OFF 5 Place a container under the barrel dispensing valve Open the dispensing valve and dispense all rinse water from the barrel When the pressure in the barrel drops...

Страница 24: ...wered up the Main Check menu shown in Figure 15 is displayed Figure 15 The software runs tests on the flash memory and the EEPROM If they pass PASS is displayed to the right of the appropriate line an...

Страница 25: ...at should be set are the formatting options These formatting options are located in the Option Setup menu To access the Option Setup menu press the MENU button on the Barrel Status menu This displays...

Страница 26: ...lay to set the proper minute 6 Select AM PM field If the 12 hour clock option is selected use the left and right arrows to select the AM PM field 7 Set AM PM Use the button at the bottom of the displa...

Страница 27: ...m of the display to set the correct month 6 Select SPRING WEEK Use the up and down arrows to select SPRING WEEK 7 Set SPRING WEEK Use the or buttons at the bottom of the display to set the correct wee...

Страница 28: ...display the clock settings in 12 hour format 1 08 P press the 12 HR button To display settings in 24 hour format 23 05 press the 24 HR button Setting the POS Lighting POS Lighting is controlled by th...

Страница 29: ...DAY 3 Set DAY Use the and buttons at the bottom of the display to set the desired day or all days 4 Select DEFROST LOCK 1 Use the up and down arrows to highlight DEFROST LOCK 1 5 Set hour field Use th...

Страница 30: ...10 Set Wake up day time Repeat Steps 5 through 7 11 Save the WAKEUP set ting Press the BACK button at the bottom of the display to save the wake up setting When the sleep and wake up settings are com...

Страница 31: ...73146SER 28 2022 Marmon Foodservice Technologies Inc Figure 24 When the viscosity settings are complete press the BACK button to save the settings and return to the Select menu shown in Figure 19 NOTE...

Страница 32: ...he water connection to the unit Table 18 Step Action 1 Turn on the water supply to the unit 2 Check the system for leaks 3 The Do Not Drink and Out of Product lights remain on NOTE The H2O Out error d...

Страница 33: ...is set to 30 psig if not correct NOTE The expansion tank regulator should not be adjusted when pressure is applied to the barrels 4 Check and set the CO2 barrel regulators located on the front of the...

Страница 34: ...important to the quality of the final product The BRIX menu provides a measured amount of product with a constant volume so that a BRIX comparison can be made between samples The unit is set to provi...

Страница 35: ...button again Collect a sample from the cup 10 Place adequate amount of the sample on a refractometer and read the BRIX value A target BRIX reading of 13 0 1 0 is normally desired for sugar based syru...

Страница 36: ...ow regulator to clean out the sample tube and close the valve at end of the sample tube 5 Once the BRIX is properly set turn the product supply valve to the upright Prod uct position for the barrel yo...

Страница 37: ...librating a Motor Motors are factory calibrated but storage and transit can cause a shift in calibration Calibration establishes a new baseline for the motor assembly This allows the system to determi...

Страница 38: ...nc 35 Publication Number 620073146SER Figure 31 Select Screen Table 25 Step Action Procedure 1 Select Motor Setup Use the Up and Down arrows to highlight MOTOR SETUP on the Maintenance menu 2 Select t...

Страница 39: ...feature is activated on the System menu When security is turned on users can only access the Main and Setup menus The word LOCKED appears in the upper left corner of the display to inform users that...

Страница 40: ...Sleep display on Barrel Sta tus menu A Sleep time set B Clock incorrectly set C No or incorrect wake up time set A Check programming B Check programming C Check programming Barrel Status OFF A Not act...

Страница 41: ...ter Flow Rate 4 barrel unit low cap single compressor 100 gal per hr at 25psig min flowing pressure Water Pressure 25psig 0 17 MPa min 90 psig 0 62 MPa max Ventilation Clearance Standard Condenser 2 o...

Страница 42: ...85 20 80 85 85 85 85 85 15 80 80 80 80 85 85 85 85 10 75 80 80 80 80 80 85 85 85 85 5 75 75 75 75 80 80 80 80 80 85 0 75 75 75 75 75 75 75 80 80 80 10 20 30 40 50 60 70 80 90 100 Length of Run ft Vip...

Страница 43: ...Viper Installation Service Decommissioning Manual Publication Number 620073146SER 40 2022 Marmon Foodservice Technologies Inc BLANK...

Страница 44: ...Viper Installation Service Decommissioning Manual 2022 Marmon Foodservice Technologies Inc 41 Publication Number 620073146SER VIPER E 2 FLAVOR R 454C SERVICE PROCEDURES...

Страница 45: ...Viper Installation Service Decommissioning Manual Publication Number 620073146SER 42 2022 Marmon Foodservice Technologies Inc BLANK...

Страница 46: ...igned as a guide to the technician in maintaining and servicing the Viper system The Viper system is simple in design and has built in features and diagnostic controls to help the service technician q...

Страница 47: ...n carbonated drinks is like anti freeze in water The higher the BRIX the greater the resistance of the product to freezing Conversely in products with lower BRIX freezing takes place at higher tempera...

Страница 48: ...d a lighted merchandiser The cladding is easily removable to facilitate installation service and maintenance Each barrel has a transparent faceplate with an integral relief valve and a removable self...

Страница 49: ...Viper Installation Service Decommissioning Manual Publication Number 620073146SER 46 2022 Marmon Foodservice Technologies Inc Figure 33 Viper System 2 Barrel Refrigeration R454C Schematic...

Страница 50: ...Viper Installation Service Decommissioning Manual 2022 Marmon Foodservice Technologies Inc 47 Publication Number 620073146SER Figure 34 Viper 2 Barrel Wiring Diagram W Transducer...

Страница 51: ...used to adjust barrel overrun expansion for various products The pressure settings for various types of syrup are shown in Table 27 Overrun CO2 pressure is applied to the CO2 control solenoids through...

Страница 52: ...n level of citric acids etc will impact settings These settings are to provide initial adjustments to achieve product overruns in the 80 120 range Table 27 Syrup Type Syrup Type Set Viscosity Pressure...

Страница 53: ...Viper Installation Service Decommissioning Manual Publication Number 620073146SER 50 2022 Marmon Foodservice Technologies Inc Figure 36 2 Barrel System Schematic...

Страница 54: ...rectly In addition to controlling the unit the control system keeps track of the diagnostic information used when adjusting and or repairing the machine The control system needs to be accessed in the...

Страница 55: ...arrows that may be used on a screen to activate and control various the functions of the system Each button that is active for a given menu has a label directly above it The label describes what that...

Страница 56: ...Viper Installation Service Decommissioning Manual 2022 Marmon Foodservice Technologies Inc 53 Publication Number 620073146SER Figure 38 Software Structure...

Страница 57: ...39 is the home screen for the unit During normal operation this screen is displayed on the control panel Figure 39 Main Screen Table 28 Button Description MENU Displays the Main menu ON Turns on the...

Страница 58: ...down arrow to view the data on all barrels in the system Refer to Table 30 for button functions UNIT DATA 12 51P MAR 04 1 FREEZE OUTLET TEMP 33o F VISCOSITY 9 REFRIGERATION ON DEFROST TIMER 2 50 23 B...

Страница 59: ...there is a loss of motor on off functionality TCO OPEN System TCO Temperature Cut Off has occurred on the refrigeration outlet of a barrel or the 24VAC power has failed COMM ERR IO System A communica...

Страница 60: ...rrel The motor is reporting no current draw when activated Motor is unplugged or ther mal cutoff has tripped FILL ERROR Barrel Barrel has not filled properly within 2 min H2O OUT System Water pressure...

Страница 61: ...up the unit options use the Up and Down arrows on the right side of the control panel to highlight the choices on the display When the desired option is highlighted press the GO button to access that...

Страница 62: ...selected use the left and right arrows to select the AM PM field 7 Set AM PM Use the button at the bottom of the display to set the AM PM setting To set the date perform the procedure in Table 37 Tab...

Страница 63: ...DST 3 Set DST on Use the button to turn on daylight savings time 4 Select SPRING MONTH Use up and down arrows to select SPRING MONTH 5 Set SPRING MONTH Use the or buttons at the bottom of the display...

Страница 64: ...efrost lockouts may be programmed for individual days of the week or for all days of the week depending on location requirements Setting the Sleep and Wake up Times Sleep and wake up times are set on...

Страница 65: ...5 Set hour field Use left and right arrows to select hour field 6 Use the and buttons at the bottom of the display to set the desired hour 7 Set minute field Use left and right arrows to select minute...

Страница 66: ...se the Up and Down arrows to highlight the desired barrel 3 Select range field Use Left and Right arrows to select range field 4 Set range Use the or buttons at the bottom of the display to set the de...

Страница 67: ...y settings in 24 hour format 23 05 press the 24 HR button Setting the POS Lighting POS Lighting is controlled by the POS LIGHTING field on the Option Setup menu Figure 49 To turn off the merchandiser...

Страница 68: ...n Table 48 BARREL MAINT 12 51P MAR 04 1 PURGE 2 OFF BACK PURGE FILL SPIN Figure 51 Barrel Maintenance Screen Purging a Barrel NOTE Table 45 Step Action Procedure 1 Purge a barrel From the Select menu...

Страница 69: ...Down arrows to highlight the desired barrel 3 Select Run function Press the SPIN button at the bottom of the display to start the motor in the highlighted barrel 4 Stop the procedure Press the STOP bu...

Страница 70: ...gas solenoid for a barrel to prevent damage from occurring Table 49 Display Description POS LIGHTING This selection turns the Point Of Sale lighting on and off COMPRESSOR 1 This selection turns the c...

Страница 71: ...s how long it has been since the motor seal was inserted on a specific barrel DEFROST 1 HHHHH MM Shows how long the barrel has been in defrost mode FILL CYCLES 1 Shows the number of times the barrel h...

Страница 72: ...ss the BRIX button a fourth time Collect this sample in a cup and close the valve at end of the sample tube 9 Measure BRIX Place adequate amount of the product on a refractometer and read the BRIX val...

Страница 73: ...ologies Inc Figure 56 For Carbon Splash Panel Mounting Screws Product Supply Valve Barrel 1 Product Supply Valve Barrel 2 Valves shown in BARREL position w Splash Panel Removed Flow Controls Barrel 2...

Страница 74: ...stalled It provides the correct table of electrical characteristics from imbedded settings located in non volatile memory Perform the procedure described in Table 54 to change the motor type setting I...

Страница 75: ...rrel Use the Up and Down arrows to highlight the desired barrel 5 Start calibration Press the CAL button at the bottom of the Motor Setup menu to start the calibration pro cess The calibration cycle c...

Страница 76: ...connect external gauges to the system To view this information go to the Unit Data screen shown in Figure 41 and press the UNIT button The System screen shown in Figure 61 is displayed The number and...

Страница 77: ...umber 620073146SER 74 2022 Marmon Foodservice Technologies Inc NOTE If a pressure sensor is open the pressure reading is 386 PSIG UNIT 12 51P MAR 04 LINE VOLTAGE 229 LINE FREQUENCY 60 LOW PSIG 1 60 HI...

Страница 78: ...ensed and discarded to increase throughput and help assure that product quality is maintained NOTE Data in Table 57 assumes equipment has been correctly installed commissioned and calibrated as per di...

Страница 79: ...quality to diminish Cornelius recommends that the viscosity settings be set at the lowest possible setting to achieve the desired drink quality In most typical installations using a sugar based syrup...

Страница 80: ...r when changing syrup types Check Water Filter Every six months or if water pressure in the sys tem is low Change or Rotate Scraper Blades Every 12 months Check for Leaks Every 12 months Clean BIB Con...

Страница 81: ...le 59 for a listing of the annual maintenance items Inspecting and Replacing Scraper Blades Scraper blades should be inspected for wear during the annual maintenance check To inspect the blades perfor...

Страница 82: ...step 18 to lubricate or change the caged o rings in each dispensing valve on the unit Suggested Sanitizers KAY 5 Sanitizer Cleaner 100 PPM Mix one packet of KAY 5 Sanitizer Cleaner per 2 5 gallons of...

Страница 83: ...ove the knob spring sleeve and lever from the dispensing valve 11 Remove spring fitting from dispensing valve 12 Press the valve with the caged O ring down and out of the dispensing valve body 13 Care...

Страница 84: ...For 5 25 Sodium Hypochlorite bleach mix 2 2 fl oz 66mL of bleach in 5 gallons of tap water 75 95 F 24 35 C This will ensure a bleach solution of 200 PPM of available chlorine Figure 65 17 Assemble the...

Страница 85: ...ution rinse them with warm water and place them on clean paper towels 10 Carefully re install the valve and corresponding parts into the faceplate and re install the faceplate onto the machine Viper I...

Страница 86: ...ng Scraper Blades on page 76 12 Perform a leak test on the barrel Motor Seal Leak Test on page 86 Sanitizing the Barrel Sanitize the syrup system and barrel by performing the procedure shown in Table...

Страница 87: ...arrel When the pressure in the barrel drops from the Barrel Maintenance menu press the PURGE button to re pres surize the barrel with CO2 As the wash water level lowers in the barrel partially close t...

Страница 88: ...3 Remove the rear cover of the unit 4 Disassemble the water filter Use two wrenches if necessary 5 Remove the filter and rinse it under running water to remove any debris 6 Reassemble the filter 7 Co...

Страница 89: ...it Failure to disconnect the power could result in serious injury death or equipment damage Table 70 Step Action 1 Purge the barrel Purging a Barrel on page 67 2 When purging is complete disconnect po...

Страница 90: ...not lubricate the static side outer portion of the seal This could cause the seal to rotate in the bore and leak 6 Carefully slide the seal over the motor shaft and press it firmly until is fully seat...

Страница 91: ...ction 1 Turn the 3 way Product Supply valve behind the splash panel to the Off horizontal position 2 From the Maintenance menu press the FILL button for the barrel This pressurizes the barrel with CO2...

Страница 92: ...nit between the barrel motors To replace a run capacitor perform the procedure in Table 74 Figure 71 View of Motor Run Capacitors Table 73 Step Action 1 Perform the procedure in Steps 1 through 8 of T...

Страница 93: ...er from the unit 2 Remove the rear cover 3 Disconnect the spade clips from the defective capacitor 4 Remove the mounting screw from the base of the capacitor 5 Replace the capacitor 6 Reverse the proc...

Страница 94: ...wer from the unit Failure to disconnect the power could result in serious injury death or equipment damage 9 Reverse the procedure to install the new pump Table 76 Step Action 1 Disconnect power from...

Страница 95: ...unit 2 Disconnect and bleed the water and syrup lines to remove pressure from the system 3 Remove the rear cover and side panels 4 Remove the water and syrup lines from the input to the valves 5 Remo...

Страница 96: ...connect power from the unit 2 Remove the access panel two 2 screws and the right side panel 3 Turn off the CO2 source and then turn the Product valve 90 degrees to the off position 4 Relieve pressure...

Страница 97: ...ompressor In Step 1 disconnect electrical power from the unit Failure to disconnect the power could result in serious injury death or equipment damage Table 79 Step Action 1 Disconnect electrical powe...

Страница 98: ...ne can be spliced back together 8 Remove the compressor and Unsweat the discharge line 9 Reverse the procedure to install the new compressor 10 Replace the dryer 11 Evacuate the system and recharge it...

Страница 99: ...itches Sold Out Indicators are located along the left and right sides of the unit near the front There is one switch for each barrel in the system Figure 79 shows the syrup pressure switch on the left...

Страница 100: ...nnect electrical power from the unit Failure to disconnect the power could result in serious injury death or equipment damage Table 83 Step Action 1 Disconnect power to the unit 2 Remove the appropria...

Страница 101: ...D REPLACEMENT When replacing or testing electronic components be sure to wear a static strap that is connected to a chassis ground This protects the electronic components from any static charge while...

Страница 102: ...d followed 30 seconds later with X BRL TEMP OUT If either of these messages is displayed after changing a control board check the software version The current software version for each board can be fo...

Страница 103: ...a static strap that is connected to a chassis ground This protects the electronic components from any static charge while working on the unit The motor board is located in the E Box to the right of t...

Страница 104: ...for 60 Hz and 196 265 VAC for 50 Hz B Error range 180 260 A 1 Check line voltage 2 Check T1 T2 with Compressor run ning B Correct line voltage Frozen Barrel A Low Brix B Broken beater bar C Broken dr...

Страница 105: ...roper spacing around unit Fan Motor A Bad connection B Bad motor C Cracked or bent fan blade A Check connect B Replace motor C Replace fan blade Hot Gas Valve A Miswired B Defective coil C Defective p...

Страница 106: ...Viper Installation Service Decommissioning Manual 2022 Marmon Foodservice Technologies Inc 103 Publication Number 620073146SER VIPER E 2 FLAVOR R 454C DECOMMISSIONING PROCEDURES...

Страница 107: ...oved from site promptly and all isolation valves on the equipment are closed off CAUTION Recovered refrigerant shall not be charged into another REFRIGERATING SYSTEM unless it has been cleaned and che...

Страница 108: ...ing FLAMMABLE REFRIGERANTS ensure that there are labels on the equipment stating the equipment contains FLAMMABLE REFRIGERANT Decommissioning If safety is affected when the equipment is taken out of s...

Страница 109: ...special care that drained refrigerant will not float back into the building B Evacuate the refrigerant circuit C Purge the refrigerant circuit with oxygen free nitrogen for 5 min not required for A2L...

Страница 110: ...osal Ensure sufficient ventilation in the work area Remove the refrigerant Where controlled refrigerant recovery is required follow all local regulatory guidelines and requirements Where refrigerant r...

Страница 111: ...Cornelius Inc www cornelius com...

Отзывы: