background image

Digital Video Recorder 

 31 

The DVR supports two-way audio communications between a local system and a PC running 
RAS.  Highlighting the box beside 

Remote Audio Channel

 and pressing the   button allows 

you to select the audio channel that sends audio to the remote site.  Selecting 

Select From RAS


will send audio of the channel selected from RAS. 


NOTE:  Depending on network conditions, audio might be interrupted or out of 
synchronization during transmission.


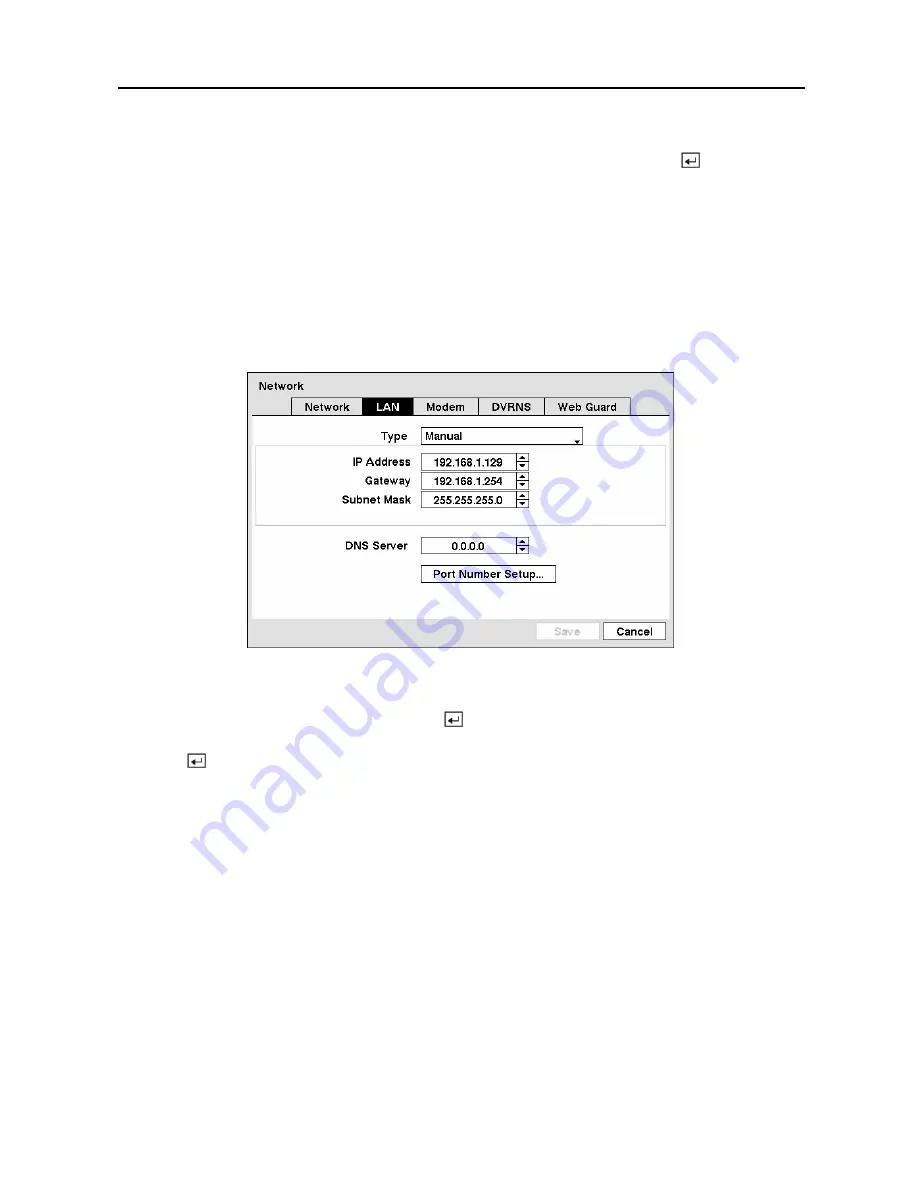
LAN Setup Screen 


Highlight the 

LAN

 tab, and the LAN screen displays. 


Figure 44 — LAN (Manual) setup screen. 


Highlight the box beside 

Type

 and press the   button.  You can select the type of network 

configuration from: 

Manual

DHCP

 and 

ADSL (with PPPoE)

.  Select the desired type and 

press the   button. 
 
Selecting 

Manual

 from the Type allows you to set up LAN parameters manually. 


NOTE:  You will need to get the appropriate IP Address, Gateway and Subnet Mask from 
your network administrator. 


Change the numbers by highlighting them and using the 

Up

 and 

Down

 arrow buttons to 

increase or decrease the number. 


The factory default LAN settings are: 
 IP 

Address: 

192.168.1.129 

 Gateway: 

192.168.1.254 

 Subnet 

Mask: 

255.255.255.0 


Содержание CADV-H-XD16

Страница 1: ...nual Continental Access EH Series DVRs XD Model CADV H XD16 16 Channel DVR w 500 GB Hard Drive A Napco Security Group Company 355 Bayview Ave Amityville NY 11701 P 631 842 9400 F 631 842 9135 www cica...

Страница 2: ......

Страница 3: ......

Страница 4: ...IDE REASONABLE PROTECTION AGAINST HARMFUL INTERFERENCE WHEN THE EQUIPMENT IS OPERATED IN A COMMERCIAL ENVIRONMENT THIS EQUIPMENT GENERATES USES AND CAN RADIATE RADIO FREQUENCY ENERGY AND IF NOT INSTAL...

Страница 5: ...ipment C If the equipment has been exposed to rain or water D If the equipment does not operate normally by following the operating instructions adjust only those controls that are covered by the oper...

Страница 6: ...NC NO Normally Closed Normally Open 6 ARI Alarm Reset In 6 Connecting to the RS485 Port 7 Connecting to the USB Ports 7 Connecting to the RS232 Port 8 Connecting to the Ultra Wide SCSI Port 8 Connect...

Страница 7: ...Storage Screen 23 User Setup Screen 26 Shutdown Screen 29 Logout Screen 29 Network Notification Setup 30 Network Screen 30 LAN Setup Screen 31 Modem Setup 34 DVRNS Setup 35 WebGuard Setup 36 Notifica...

Страница 8: ...laying Recorded Video 82 RW Rewind Button 83 FF Fast Forward Button 83 BACKWARD Button 83 FORWARD Button 83 SEARCH STOP Button 83 Camera Buttons 1 to 16 83 DISPLAY Button 83 ZOOM Button 83 Shuttle Rin...

Страница 9: ...05 Web Search Mode 107 Appendix D Time Overlap 109 Appendix E Troubleshooting 110 Appendix F Connector Pin Outs 111 I O Connector Pin Outs 111 RS485 Connector Pin Outs 111 Appendix G Map of Screens 11...

Страница 10: ...l 11 Figure 21 Infrared remote control 12 Figure 22 Login screen 16 Figure 23 Setup screen 17 Figure 24 Virtual Keyboard 17 Figure 25 Information screen 18 Figure 26 Upgrade screen 19 Figure 27 Setup...

Страница 11: ...Figure 73 Event menu 54 Figure 74 Alarm In Settings screen 54 Figure 75 Alarm In Actions 1 screen 55 Figure 76 Alarm In Notify menu 56 Figure 77 Alarm In Actions 2 screen 56 Figure 78 Motion Detectio...

Страница 12: ...menu 85 Figure 111 Go to the Date Time screen 86 Figure 112 Calendar Search screen 86 Figure 113 Event Log Search screen 87 Figure 114 Event Log Search Option screen 88 Figure 115 Text In Search scree...

Страница 13: ...User s Manual x...

Страница 14: ...ack y User friendly Graphical User Interface GUI Menu System y Multiple Recording Modes Time lapse Pre event Alarm Motion and Panic y Two way Audio Communications y 4 Channel Audio Recording and 1 Cha...

Страница 15: ...t can be set to record over the oldest video once the disk is full Your DVR uses a proprietary encryption scheme making it nearly impossible to alter video You can view video and control your DVR remo...

Страница 16: ...for Adding Hard Disk Drives y Screws for Attaching SCSI Connector y Infrared Remote Control Required Installation Tools No special tools are required to install the DVR Refer to the installation manu...

Страница 17: ...connectors are auto terminated Do NOT connect a cable to the Loop BNC unless it is connected to a terminated device because it will cause poor quality video Connecting the Monitor Figure 5 Video Out c...

Страница 18: ...not have amplified audio output so you will need a speaker with an amplifier The DVR does not have a pre amplifier for audio input so the audio input should be from an amplified source not directly fr...

Страница 19: ...y Open Figure 10 Relay Alarm Output connectors Connect the device to the COM and NC Normally Closed connectors or COM and NO Normally Open connectors NC NO is a relay output which sinks 2A 125VAC 1A 2...

Страница 20: ...ided to connect external hard disk CD RW or flash drives for video clip copying or system upgrades One USB port is on the rear panel and the other two are on the front panel Position external drives c...

Страница 21: ...onnect the external SCSI hard disk drive RAID cable to the high density 68 pin female UltraWide SCSI port The length of SCSI cable should not exceed 5 feet 1 5 meters You can connect up to 8 UltraWide...

Страница 22: ...he rare occasions that you want to return all the settings to the original factory settings CAUTION When using the Factory Reset you will lose any settings you have saved If you want to use the same D...

Страница 23: ...rned on after connecting the power cord disconnect the power cord wait 10 seconds and restart the DVR by following the proper connection procedures WARNING ROUTE POWER CORDS SO THAT THEY ARE NOT A TRI...

Страница 24: ...ote control while laid out differently perform the same functions as those on the front panel The following describes each button and control Take a few minutes to review the descriptions You will use...

Страница 25: ...ay not be supported depending on the DVR model POWER LED The POWER LED is lit when the unit is On HDD LED The HDD LED flickers when the DVR is recording or searching video on the hard disk drive NETWO...

Страница 26: ...in the PTZ mode BACKWARD Button Pressing the BACKWARD button goes to the previous image The button on the front panel is also used for Near Focus in the PTZ mode RW Rewind Button Pressing the RW butto...

Страница 27: ...the PTZ Pan Tilt Zoom mode which allows you to control properly configured cameras ZOOM Button Pressing the ZOOM button zooms the current image on the screen A PIP with a rectangle temporarily display...

Страница 28: ...n the Search mode clip copying can be done instantly by pressing and holding the button for two or more seconds Shuttle Ring The Shuttle Ring only functions in the Playback mode The Shuttle Ring is sp...

Страница 29: ...nd date display language camera audio remote control record mode network and password Your DVR can be set up using various screens and dialog boxes Throughout the screens you will see Highlighting the...

Страница 30: ...ter you want in the name or title and press the button That character appears in the title bar and the cursor moves to the next position Pressing toggles between the upper and lower case keyboards bac...

Страница 31: ...D and press the button Change the number by highlighting it and using the Up and Down arrow buttons to increase and decrease the number from 0 to 99 NOTE The System ID number is used to identify the u...

Страница 32: ...The Upgrade button will be deactivated if the hard disk drive has not been formatted as it requires the space for temporary files when upgrading the system CAUTION The USB device must be FAT16 or FAT...

Страница 33: ...ou can scroll through the log pages by using the Up and Down arrows or you can go directly to a log page by entering the log page number in the box at the bottom left of the screen Highlight Close and...

Страница 34: ...o save your selected format Highlight the first box beside Time and press the button The individual sections of the time will highlight Use the Up and Down arrow buttons to change the number Use the L...

Страница 35: ...the button to add the date Dates can be deleted by highlighting the beside the date and pressing the button NOTE Holidays that do not fall on the same date each year should be updated once the current...

Страница 36: ...time the DVR was synchronized with the time server Highlight Run as Server and press the button Pressing the button toggles between On and Off When it is On the DVR you are setting up will run as a t...

Страница 37: ...rd disk drive can be formatted and used only for archiving NOTE The DVR does NOT support USB hard disk drives with a version lower than 2 0 NOTE System upgrades require formatting internal or SCSI har...

Страница 38: ...b and the Storage Status screen displays Figure 36 Storage Status screen The Type column displays the type of storage device The Disk Bad column displays the percentage of bad sectors Not formatted in...

Страница 39: ...front of the Group Name it indicates that the group has been expanded and all of the User Names within that group are displayed below the Group Name If there is a in front of the Group Name it indica...

Страница 40: ...pressing the button will toggle between that authority level being turned On and Off The authority levels that can be turned On and Off are y Shutdown The user can shut the system down on a local sys...

Страница 41: ...to a Group and password You can use camera buttons 1 to 9 on either the front panel or remote control to assign the password The password can be up to 8 digits You will be asked to confirm the passwo...

Страница 42: ...40 Shutdown screen After selecting Shutdown and pressing the button a screen will appear telling you when it is safe to disconnect power Logout Screen Highlight Logout in the System menu and press the...

Страница 43: ...er Speed Press the Up and Down arrow buttons to set the Transfer Speed from 50Kbps to 100Mbps Highlight the second box beside Transfer Speed You can select the unit of measure for the transfer speed b...

Страница 44: ...ight the LAN tab and the LAN screen displays Figure 44 LAN Manual setup screen Highlight the box beside Type and press the button You can select the type of network configuration from Manual DHCP and...

Страница 45: ...mbers setup screen Change the numbers by highlighting them and using the Up and Down arrow buttons to increase or decrease the number The factory default Port settings are Remote Admin 8200 Remote Cal...

Страница 46: ...l not be selected Figure 47 LAN ADSL setup screen Highlight the box beside ID and press the button A virtual keyboard appears allowing you to enter the ID for ADSL connection Highlight the box beside...

Страница 47: ...ght Enable and press the button to toggle between On and Off You will only be able to change the settings if Modem is enabled Highlight the box beside Baud Rate and press the button A list of baud rat...

Страница 48: ...address or domain name of the DVRNS server NOTE You will need to get the IP Address or domain name of the DVRNS Server from your network administrator NOTE You can use the domain name instead of IP ad...

Страница 49: ...TION If you want to use the same DVR name registered on the DVRNS server after initializing the system using the factory reset you need to contact the DVRNS server manager Please record and save the h...

Страница 50: ...n screen displays You will be able to change the Mail and Callback settings Figure 51 Notification Mail setup screen Highlight Enable and press the button to toggle between On and Off You will only be...

Страница 51: ...rd to enter the e mail address NOTE The e mail address must include the character to be a valid address Highlight the box beside Recipient and enter the recipient s e mail address Use the virtual keyb...

Страница 52: ...elephone number of the computer running RAS Highlight the box beside Outside Line Call and enter any numbers that must be dialed for an outside line for your telephone system for example 9 Highlight t...

Страница 53: ...Resolution column and select the recorded image resolution from High and Standard NOTE Selecting High resolution will decrease the maximum recording speed of all the cameras within the same camera gro...

Страница 54: ...ton A list of PTZ devices appears Select your camera from the list and press the button You will need to connect the camera to the RS232 or RS485 connector on the back of the DVR following the camera...

Страница 55: ...and press the button The Audio setup screen appears Figure 59 Audio setup screen The DVR can record up to four audio inputs Highlight the box beside the input and press the button A list of cameras ap...

Страница 56: ...alarm output can be given its own title by highlighting the box under the Title heading and pressing the button A virtual keyboard appears allowing you to enter the title Highlighting the boxes under...

Страница 57: ...will be active in 15 minute increments from 00 00 to 24 00 The Mode box allows you to set how the alarm reacts during the scheduled time When set to On the Alarm Out is active during the scheduled tim...

Страница 58: ...y Freeze Sequence The icon displays while in the Freeze mode and the displays while in the Sequence mode y Screen Group The number of screen group displays when the DVR is not in the 4x4 display mode...

Страница 59: ...You can adjust the horizontal and vertical margins so that text and icons will not be hidden beyond the edges of the monitor Figure 63 OSD Margin screen Highlight the Main Monitor tab to switch to th...

Страница 60: ...t window as the cameo NOTE Sequence cannot be used in the 4x4 display mode of the 16 channel and 3x3 mode of the 8 channel DVR You can adjust the display dwell time by highlighting the box beside Inte...

Страница 61: ...e RS232 and RS485 If the RS232 port and RS485 port are in use for PTZ control networking or text input the remote keyboard cannot be configured Highlight Setup and select the correct Baud Rate Parity...

Страница 62: ...enu and press the button The Record setup screen appears Figure 68 Record setup screen Highlighting Recycle and pressing the button toggles between On and Off In the Recycle mode the DVR records over...

Страница 63: ...e panic recording You can set the dwell from 5 minutes to 1 hour Select No Limit if you want to stop panic recording manually Highlighting the Panic Recording ips and pressing the button allows you to...

Страница 64: ...nt the DVR to record during certain times When the DVR is in the Time mode the icon displays at the top left corner of the screen The DVR will record and displays the icon at the top left corner of th...

Страница 65: ...You can select from Very High High Standard and Low You can save your changes by highlighting Save and pressing the button Selecting Cancel exits the screen without saving the changes Pre Event Scree...

Страница 66: ...ttings You can save your changes by highlighting Save and pressing the button Selecting Cancel exits the screen without saving the changes Archive Screen Highlight Archive in the Record menu and press...

Страница 67: ...o data until more space is made available You can save your changes by highlighting Save and pressing the button Selecting Cancel exits the screen without saving the changes Event Settings Your DVR ca...

Страница 68: ...it senses an input on one of its alarm input connectors Highlight the desired box under the Record heading and press the button A list of cameras appears Select the cameras that you want the DVR to r...

Страница 69: ...ng the button Highlight OK and press the button to accept your changes NOTE For the Notify action the notify item you select should be enabled in the Notification setup screen and the DVR should be re...

Страница 70: ...the screen without saving the changes Motion Detection Screen Highlight Motion Detection in the Event menu and press the button The Motion Detection setup screen appears Figure 78 Motion Detection Set...

Страница 71: ...o will be displayed Any detected motion within the zone will be displayed in red You can define the area of the image where you want to detect motion e g a doorway Highlight the box under the Zone hea...

Страница 72: ...excessive event logging and remote notification of motions detected after the motion dwell time by adjusting the motion ignoring dwell intervals Highlight the box beside Motion Ignoring Interval and p...

Страница 73: ...up screen Highlight the box under the Alarm Out heading and press the button A list of Alarm Outputs appears You can associate as many Alarm Outs with that camera as you wish When the DVR detects moti...

Страница 74: ...ts motion on the selected camera s input Highlight the desired box under the Spot Monitor heading and press the button A list of SPOT monitors and cameras appears Each SPOT monitor can be associated w...

Страница 75: ...DVR checks to see if anything is obscuring the camera Highlight the slider bar beside Check Obscuration and use the Left and Right arrow buttons to adjust the setting The sensitivity can be set from N...

Страница 76: ...tton A list of Alarm Outputs appears You can associate as many Alarm Outs with that camera as you wish When the DVR detects video loss on the selected camera it will trigger output signals on all the...

Страница 77: ...Loss changes by highlighting Save and pressing the button Selecting Cancel exits the screen without saving the changes Text In Screen Highlight Text In in the Event menu and press the button The Text...

Страница 78: ...for different types of text input devices and there will be different parameter boxes for you to enter information Highlight the box beside Transaction Start and press the button Use the virtual keybo...

Страница 79: ...Sensitive box and press the button to toggle between On and Off Refer to the device manufacturer s documentation to determine if the text strings are Case Sensitive If the device distinguishes between...

Страница 80: ...nd pressing the button Highlight OK and press the button to accept your changes NOTE For the Notify action the notify item you select should be enabled in the Notification setup screen and the DVR sho...

Страница 81: ...nterval that you want the DVR to run self diagnostics on the system You can select from 1 hr to 30 days or Never Highlight the Setup box beside Check Recording and press the button The Check Recording...

Страница 82: ...ys or Never Highlight the Storage tab and the Storage screen displays Figure 95 Storage screen Highlight the box beside Disk Bad Notify and press the button Select percentage level of bad disk sectors...

Страница 83: ...ly you will be asked to set the Time Highlight the first box beside Temperature Threshold and press the button Use the Up and Down arrow buttons to scroll through the numbers Refer to the hard disk dr...

Страница 84: ...r sound if an event is detected NOTE Alarm Out action cannot be set to System and Panic Record events Highlight the Notify box beside the desired event System Panic Record Check Recording Check Alarm...

Страница 85: ...screen on the Event menu Check Alarm In and Check Recording will be highlighted when each event is detected based on the settings you made in the System Event setup screen on the Event menu Panic Rec...

Страница 86: ...er 2 Installation it is ready to record Live Monitoring As soon as the DVR completes its initialization process it will begin showing live video on the attached monitor and playing live audio through...

Страница 87: ...reeze the current image on the screen until you press the button again While in the Freeze mode the icon displays in bottom left corner if Freeze is selected in the Display setup screen OSD tab To dis...

Страница 88: ...the system the user can control PTZ cameras The DVR will control cameras with Pan Tilt and Zoom capabilities Press the PTZ button to enter the PTZ mode and press the button again to exit the PTZ mode...

Страница 89: ...dialog box will appear Select the number you want to assign to the preset and press the button Use the virtual keyboard to enter the preset name Press the button to load the PTZ preset and the Preset...

Страница 90: ...on the toolbar to pan or tilt the camera in the direction you want The other controls on the toolbar perform as described below Zoom In Out Focus Near Far Iris Open Close Set Load Preset Image Adjustm...

Страница 91: ...e of the camera buttons Covert Camera If a camera is set up as Covert 1 in the Camera setup screen Settings tab that camera will not be displayed unless a user with Covert Camera View authority logs i...

Страница 92: ...Figure 105 Sequence menu When the Spot Monitor is in the sequence mode you can set the camera s display dwell time Refer to Chapter 3 Configuration Display Screen section for details Using a Mouse You...

Страница 93: ...ide the PIP to move to another area of the image you want enlarged Second click and hold the mouse button on the enlarged video and drag the video Selecting Display shows the following menu Figure 107...

Страница 94: ...ou can set the resolution for each camera individually When set to Standard the DVR has a maximum recording speed of 480 ips 240 ips for 8 channel model When set to High the DVR has a maximum recordin...

Страница 95: ...isplayed on the screen will be selected and when in the PIP display format the camera displayed on the PIP screen will be selected for the search channel During the Triplex mode the DVR maintains the...

Страница 96: ...ord protected BACKWARD Button Pressing the BACKWARD button goes to the previous image FORWARD Button Pressing the FORWARD button goes to the next image SEARCH STOP Button Pressing the SEARCH STOP butt...

Страница 97: ...age by image By turning the jog dial counterclockwise you play video backward image by image You can use a mouse for convenient playback control Position the mouse pointer at the bottom of the search...

Страница 98: ...video from the event log see below for more details y Text In Search Searches text input strings see below for more details y Motion Search Searches motion events see below for more details y Clip Cop...

Страница 99: ...e selected time a message appears alerting you that no image was recorded at that time The PLAY PAUSE RW FF Jog and Shuttle can now be used to review the surrounding video Calendar Search Figure 112 C...

Страница 100: ...light GO and press the button The selected date and time will display The PLAY PAUSE RW FF Jog and Shuttle can now be used to review the surrounding video NOTE It is possible that no recorded image di...

Страница 101: ...een On and Off When set to Off you can enter a specific Date and Time When set to On the search will be from the first recorded image Highlight the box beside To and press the button to toggle between...

Страница 102: ...rts of event recorded data The DVR will display the events not the camera channels that occurred and that also are recorded on the camera channel that you selected If you do not select a camera channe...

Страница 103: ...Input information will be overlaid on the image while the recorded video is played at regular speed You can also narrow your event search by selecting the Option button and setting up the new search c...

Страница 104: ...f When this feature is On the search will find only those text strings in which the case matches Once you set your desired search conditions highlight Search and press the button to display the search...

Страница 105: ...in the defined area Museum Search detects if a defined object has moved Highlight the box beside Zone and press the button An image from the video appears with a grid overlaid You can turn sensor bloc...

Страница 106: ...XP Refer to the Appendix A USB Hard Disk Drive Preparation for information on preparing the external drive for clip copy The clip copy can be simply done by pressing the MENU button or the FREEZE but...

Страница 107: ...select the storage device on which you would like to record the video clip You can choose from Internal CD RW Internal DVD RW USB Storage and USB CD RW CAUTION The USB device for clip copy must be FAT...

Страница 108: ...d up To do this highlight the Close button and press the button You can return to the Clip Copy screen at any time to check the progress Refer to Appendix B Reviewing Clip Files for instructions on ho...

Страница 109: ...to prevent unexpected loss of recorded video data that might be caused by disk damage or corruption You can set up disk mirroring by highlighting Storage in the System menu and pressing the button Fi...

Страница 110: ...source disk will be copied to the destination disk If the source disk is formatted and has no data the disks will not be resynchronized Resynchronization takes about 40 minutes per each 10GB of capac...

Страница 111: ...User s Manual 98...

Страница 112: ...rties General File System If the file system is NOT FAT32 format format the USB IDE hard disk drive using the FAT32 format 5 If the USB IDE hard disk drive is not partitioned go to Administrative Tool...

Страница 113: ...un the FDISK utility by clicking Start then RUN Type fdisk and click OK 6 When the MS DOS command prompt appears type Y and hit the enter key 7 In the FDISK Option menu choose 5 Change current fixed d...

Страница 114: ...ecordable CD insert the CD in your computer s CD drive Double clicking the target clip file starts the ClipPlayer program NOTE It is suggested that the computer used for the ClipPlayer program has at...

Страница 115: ...ng of the video clip Click the to play the video clip in fast reverse Click the to go back one frame of the video clip Click the to play the video clip Click the to go forward one frame of the video c...

Страница 116: ...cons display in bottom right corner indicates the clip file has not been tampered with and indicates the system has detected tampering NOTE If the VGA card or monitor for your PC does not support 640x...

Страница 117: ...number set in the Network setup screen WebGuard tab in the address field http ip address port number NOTE You will need to get the appropriate IP address for the DVR you want to connect to and the We...

Страница 118: ...n WebGuard again Web Monitoring Mode WebWatch is a remote web monitoring program that allows you to monitor live video transmitted in real time from the remote DVR Figure 124 WebWatch screen Click the...

Страница 119: ...ay mode When changing the screen format the selected camera on the current screen will be located in the first cell of the new layout Click the camera button 1 to 16 to select the camera to be viewed...

Страница 120: ...cally be disconnected if there is no activity for a specified amount of time Figure 125 WebSearch screen Click the to log out the WebGuard program Click the to access to the web monitoring mode Positi...

Страница 121: ...es found within the time parameters The Timetable window located at the bottom displays the time information for the image of the date selected on the calendar If more than one video stream in the sam...

Страница 122: ...eo streams by selecting a specific time or time range If you want to search recorded video at four o clock during the overlapping time range using a search menu such as Go to the Date Time select the...

Страница 123: ...settings Live Video Very Bright If a cable is attached to the Loop connector make certain it is connected to a properly terminated device DVR has stopped recording If hard disk drive is full you will...

Страница 124: ...16 Alarm Inputs 1 to 16 GND Chassis Ground 6 connectors NC Relay Alarm Output Normally Closed COM Relay Common NO Relay Alarm Output Normally Open AO 2 to 16 Alarm Outputs 2 to 16 ARI Alarm Reset In...

Страница 125: ...User s Manual 112 Appendix G Map of Screens...

Страница 126: ...t Disk Time Zone Change Disk Full Time Sync Auto Deletion Time Sync Fail Search Begin Disk Bad Search End Login Clip Copy Begin Logout Clip Copy End Setup Begin Clip Copy Cancel Setup End Clip Copy Fa...

Страница 127: ...found 102 Extracting package failed 103 LILO failed 104 Rebooting failed 105 Invalid package 106 ODD firmware upgrade failed 300 Remote connection failed 301 Remote network error 302 Remote upgrade is...

Страница 128: ...File already existed 6 Not enough space 7 Creating temporary file failed 8 Opening disk failed 9 Formatting disk failed 10 Database has been changed 11 Appending failed 12 Bad sector 13 No executable...

Страница 129: ...Duplex 480ips NTSC 400ips PAL 8 ch Model Real time Duplex 240ips NTSC 200ips PAL INPUTS OUTPUTS Alarm Input 8 or 16 TTL programmable as NC or NO Alarm Output 7 or 15 TTL open collector terminal block...

Страница 130: ...orage EIDE hard disk drive up to 4 up to 3 with an internal CD RW drive or DVD RW drive Secondary Storage UltraWide SCSI hard disk drive RAID Built in CD RW drive USB hard disk drive CD RW drive or fl...

Страница 131: ...or human health from uncontrolled waste disposal please separate this from other types of wastes and recycle it responsibly to promote the sustainable reuse of material resources Household users shou...

Отзывы: