

61
FR
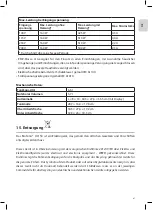
REMARQUE : L'élément chauffant n'est pas conçu pour
maintenir
la température sélectionnée,
mais plutôt pour être activé au démarrage du nettoyage suivant et désactivé lorsque la tempéra-
ture est atteinte. Le contrôle thermostatique n'est pas une option du BioSonic UC150.
ATTENTION
La fonction chauffe du BioSonic UC150 (lorsqu'elle est activée) n'est active que
jusqu'à la température définie. Si la température est atteinte avant la fin du cycle
de nettoyage, l'élément chauffant s'arrête, mais le cycle se poursuit. Lors d'une
utilisation prolongée, le processus naturel de cavitation continuera de chauffer
la solution au-delà de la température définie, cependant à une vitesse inférieure
sans l'élément chauffant. Ce phénomène n'empêche pas l'unité de fonctionner
correctement.
Activation de la fonction chauffe
Pour obtenir le code d’activation, rendez-vous sur http://biosonic.coltene.com ou adressez un
courriel au service clients à [email protected] ou [email protected].
REMARQUE : La température dans la cuve est affichée dans la barre supérieure de l'écran LCD.
L'appui sur la touche
00 vector graphics: single-icons and screen buttons
CB
M 1:1
20.10.2016
30-settings
31-temperature-large
32-temperature-medium
33-temperature-small
34-program-light
35-program-regular
36-program-heavy
37-program-my
38-timer-medium
39-timer-large
40-solution
41-degas
hot surface
42-log
43-information
44-close-lid
45-lid-is-open
46-lid-was-open
47-repair
48-software-update
60-attention
warning/caution
61-instructions
51-statusbar-standby-closed
52-statusbar-standby-opened
20-A-button-checked
20-B-button-checked-feedback
50-A-button-standby
50-B-button-standby-feedback
21-A-button-save
21-B-button-save-feedback
22-A-button-home
22-B-button-home-feedback
25-A-button-play
25-B-button-play-feedback
26-A-button-pause
26-B-button-pause-feedback
23-A-button-back
23-B-button-back-feedback
24-A-button-download
24-B-button-download-feedback
62-A-button-ok
62-B-button-ok-feedback
pour activer cette fonction fera apparaître une nouvelle fenêtre sur
l'écran. Lors de la première activation de cette fonction, l'utilisateur doit impérativement saisir le
code d'activation. Appuyez sur
00 vector graphics: single-icons and screen buttons
CB
M 1:1
20.10.2016
30-settings
31-temperature-large
32-temperature-medium
33-temperature-small
34-program-light
35-program-regular
36-program-heavy
37-program-my
38-timer-medium
39-timer-large
40-solution
41-degas
hot surface
42-log
43-information
44-close-lid
45-lid-is-open
46-lid-was-open
47-repair
48-software-update
60-attention
warning/caution
61-instructions
51-statusbar-standby-closed
52-statusbar-standby-opened
20-A-button-checked
20-B-button-checked-feedback
50-A-button-standby
50-B-button-standby-feedback
21-A-button-save
21-B-button-save-feedback
22-A-button-home
22-B-button-home-feedback
25-A-button-play
25-B-button-play-feedback
26-A-button-pause
26-B-button-pause-feedback
23-A-button-back
23-B-button-back-feedback
24-A-button-download
24-B-button-download-feedback
62-A-button-ok
62-B-button-ok-feedback
une fois le code saisi. La fonction chauffe peut à présent être
utilisée.
Régler la température souhaitée
• Appuyez sur le bouton
00 vector graphics: logo and buttons
CB
M 1:1
20.10.2016
04-A-button-program-light
05-A-button-program-regular
06-A-button-program-heavy
07-A-button-program-my
04-B-button-program-light-feedback
05-B-button-program-regular-feedback
06-B-button-program-heavy-feedback
07-B-button-program-my-feedback
11-A-button-settings
08-A-button-log
09-1-A-button-heater-first
10-A-button-solution-degas
11-B-button-settings-feedback
08-B-button-log-feedback
09-2-A-button-heater-after-code
09-B-button-heater-feedback
10-B-button-solution-degas-feedback
12-A-button-language-measurest
13-A-button-date-time
14-A-button-my-setup
15-A-button-information
12-B-button-language-measures-feedback
13-B-button-date-time-feedback
14-B-button-my-setup-feedback
15-B-button-information-feedback
16-A-button-degas
16-B-button-degas-feedback
01-logo-loading
03-product-name
02-logo-information
. Réglez la température entre 25 °C (75 °F) et 60 °C (140 °F).
• Sélectionnez « ÉLÉMENT CHAUFFANT ACTIVÉ » pour activer la fonction chauffe. Appuyez sur
00 vector graphics: single-icons and screen buttons
CB
M 1:1
20.10.2016
30-settings
31-temperature-large
32-temperature-medium
33-temperature-small
34-program-light
35-program-regular
36-program-heavy
37-program-my
38-timer-medium
39-timer-large
40-solution
41-degas
hot surface
42-log
43-information
44-close-lid
45-lid-is-open
46-lid-was-open
47-repair
48-software-update
60-attention
warning/caution
61-instructions
51-statusbar-standby-closed
52-statusbar-standby-opened
20-A-button-checked
20-B-button-checked-feedback
50-A-button-standby
50-B-button-standby-feedback
21-A-button-save
21-B-button-save-feedback
22-A-button-home
22-B-button-home-feedback
25-A-button-play
25-B-button-play-feedback
26-A-button-pause
26-B-button-pause-feedback
23-A-button-back
23-B-button-back-feedback
24-A-button-download
24-B-button-download-feedback
62-A-button-ok
62-B-button-ok-feedback
pour valider la température.
• Le symbole
00 vector graphics: single-icons and screen buttons
CB
M 1:1
20.10.2016
30-settings
31-temperature-large
32-temperature-medium
33-temperature-small
34-program-light
35-program-regular
36-program-heavy
37-program-my
38-timer-medium
39-timer-large
40-solution
41-degas
hot surface
42-log
43-information
44-close-lid
45-lid-is-open
46-lid-was-open
47-repair
48-software-update
60-attention
warning/caution
61-instructions
51-statusbar-standby-closed
52-statusbar-standby-opened
20-A-button-checked
20-B-button-checked-feedback
50-A-button-standby
50-B-button-standby-feedback
21-A-button-save
21-B-button-save-feedback
22-A-button-home
22-B-button-home-feedback
25-A-button-play
25-B-button-play-feedback
26-A-button-pause
26-B-button-pause-feedback
23-A-button-back
23-B-button-back-feedback
24-A-button-download
24-B-button-download-feedback
62-A-button-ok
62-B-button-ok-feedback
s'affiche en haut de l’écran principal si l’élément chauffant est activé. L'élément
chauffant fonctionnera alors pendant le cycle de nettoyage sélectionné.
• Sélectionnez « ÉLÉMENT CHAUFFANT DÉSACTIVÉ » si vous ne souhaitez pas la fonction chauffe.
• Le symbole
00 vector graphics: single-icons and screen buttons
CB
M 1:1
20.10.2016
30-settings
31-temperature-large
32-temperature-medium
33-temperature-small
34-program-light
35-program-regular
36-program-heavy
37-program-my
38-timer-medium
39-timer-large
40-solution
41-degas
hot surface
42-log
43-information
44-close-lid
45-lid-is-open
46-lid-was-open
47-repair
48-software-update
60-attention
warning/caution
61-instructions
51-statusbar-standby-closed
52-statusbar-standby-opened
20-A-button-checked
20-B-button-checked-feedback
50-A-button-standby
50-B-button-standby-feedback
21-A-button-save
21-B-button-save-feedback
22-A-button-home
22-B-button-home-feedback
25-A-button-play
25-B-button-play-feedback
26-A-button-pause
26-B-button-pause-feedback
23-A-button-back
23-B-button-back-feedback
24-A-button-download
24-B-button-download-feedback
62-A-button-ok
62-B-button-ok-feedback
clignotera sur l’écran principal pour indiquer que la chauffe est en cours pendant
un cycle de nettoyage. Les informations actualisées relatives à la température sont toujours
affichées dans la partie supérieure de l'écran LCD.
REMARQUE : L'élément chauffant est activé uniquement lorsqu'un cycle de nettoyage est initié.
Pour cette raison, il est recommandé d'effectuer un pré-cycle (avec élément chauffant activé)
lorsqu'une température spécifique est souhaitée. Le cycle peut être exécuté sans charge de net-
toyage et la longueur du cycle dépend alors de la température souhaitée.
REMARQUE : l'utilisateur peut changer l'unité de température de C en F dans le menu Réglages.
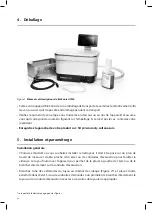
Содержание BioSonic UC150
Страница 281: ...281 EL BioSonic UC150 1 BioSonic BioSonic BioSonic BioSonic UC150...
Страница 284: ...284 4 1 BioSonic UC150 BioSonic http warranty coltene com 5 4...
Страница 285: ...285 EL BioSonic UC150 AC 9 GFCI 19 cm BioSonic 11 UC150...
Страница 292: ...292 2 3 9...
Страница 293: ...293 EL 10 Colt ne Whaledent coltene update USB BioSonic UC150 USB USB BioSonic UC150 USB USB USB...
Страница 297: ...297 EL 1 BioSonic UC150 BioSonic UC150 Ultrasonic Cleaner Performance Test BioSonic UC150 www coltene com 2...
Страница 298: ...298 BioSonic ST16...
Страница 299: ...299 EL 3 8 4 BioSonic UC150 5 BioSonic UC150 6 BioSonic 7...
Страница 300: ...300 8 BioSonic BioSonic BioSonic www coltene com BioSonic 9 NiTi E mail...
Страница 301: ...301 EL Colt ne Colt ne 14 2 000 m 10 IEC 60664 1 2...
Страница 303: ...303 EL 15 BioSonic UC150 2012 19 16 BioSonic UC150 Colt ne Whaledent...
Страница 304: ...304 COLT NE WHALEDENT AG Colt ne Whaledent C W 24 C W C W C W...
Страница 333: ...333 JA BioSonic UC150 1 BioSonic Ultrasonic BioSonic BioSonic 1 BioSonic UC150...
Страница 336: ...336 4 1 BioSonic UC150 BioSonic http warranty coltene com 5 4...
Страница 337: ...337 JA UC150 9 GFCI 19 cm BioSonic 11 BioSonic UC150...
Страница 344: ...344 9 10 Colt ne Whaledent USB coltene update BioSonic UC150 USB USB 1 BioSonic UC150 USB USB USB...
Страница 346: ...346 13 14 15 20 21 22 23 24 25 26 27 28 39 40 41 1 42 43 44 45 46...
Страница 347: ...347 JA 47 48 49 50 69 LCD GFIC IEC 1 BioSonic UC150 BioSonic UC150 www coltene com 2 1...
Страница 348: ...348 1...
Страница 349: ...349 JA BioSonic ST16 Dental Sowing Tray 3 8 BioSonic UC150 5 BioSonic UC150 6 BioSonic 7...
Страница 350: ...350 8 BioSonic BioSonic BioSonic BioSonic www coltene com 9 E...
Страница 353: ...353 JA 16 BioSonic UC150 2 Coltene Whaledent COLTENE WHALEDENT AG Colt ne Whaledent C W 24 C W...
Страница 354: ...354 C W C W C W C W C W 1 2...
Страница 355: ...355 JA 1 1 Colt ne Whaledent AG Feldwiesenstrasse 20 9450 Altst tten Switzerland E 2 http warranty coltene com...
Страница 359: ...359 ZH BioSonic UC150 1 BioSonic BioSonic BioSonic BioSonic UC150...
Страница 360: ...360 2 BioSonic BioSonic BioSonic BioSonic UC150 2 105 C...
Страница 362: ...362 4 1 BioSonic UC150 BioSonic http warranty coltene com 5 4 BioSonic UC150 9 GFCI...
Страница 363: ...363 ZH 19 7 5 BioSonic 11 BioSonic UC150...
Страница 369: ...369 ZH 12 2 3 9 10 Colt ne Whaledent...
Страница 370: ...370 Setup Information CheckMark Home coltene update USB BioSonic UC150 USB USB Biosonic UC150 USB Update USB USB...
Страница 372: ...372 25 26 27 28 39 40 41 42 43 44 45 46 47 48 49 50 69 GFIC IEC FAQ 1 BioSonic UC150 BioSonic UC150 www coltene com...
Страница 373: ...373 ZH 2 BioSonic ST16...
Страница 374: ...374 3 8 4 BioSonic UC150 5 BioSonic UC150 6 BioSonic 7 8 BioSonic BioSonic BioSonic BioSonic www coltene com...
Страница 375: ...375 ZH 9 Coltene Coltene...
Страница 380: ...380 Figure 4 Figure 6 Figure 8 Figure 5 Figure 7 Figure 9 Fill Lines max and min Figure 10 Figure 11...
Страница 382: ......
Страница 383: ......
Страница 384: ......
Страница 385: ......
Страница 386: ......
Страница 387: ......
Страница 388: ......
Страница 389: ......


