139
PT
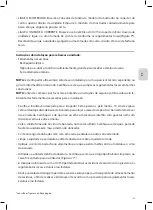
Operação do aquecedor
O modelo BioSonic UC150 está equipado com um aquecedor para acelerar o aquecimento da so-
lução no depósito. Ao selecionar uma temperatura, o aquecedor recebe ordem de ativação du-
rante o ciclo de limpeza seguinte, permanecendo ativo até a temperatura ser alcançada.
NOTA: a funcionalidade de aquecimento não foi concebida para
manter
a temperatura seleciona-
da, mas sim para ser ativada no início do ciclo de limpeza seguinte e desativada assim que a tem-
peratura definida for alcançada. O controlo termostático não é uma função do Biosonic
UC150.
CUIDADO!
A função de aquecimento do BioSonic UC150 (caso esteja ativada) decorre ape-
nas até que seja alcançada a temperatura definida. Se a temperatura definida for
alcançada antes do fim do ciclo de limpeza, o aquecedor desliga-se, mas o ciclo
continua. Através do uso prolongado, o processo de cavitação natural continua a
aquecer a solução além da temperatura pretendida, mas mais lentamente sem o
aquecedor. Quando isso ocorre, a unidade ainda funciona devidamente.
Ativar a funcionalidade de aquecimento
Para obter o código de ativação, ir a http://biosonic.coltene.com ou enviar um e-mail para a assis-
tência ao cliente através do endereço [email protected] ou [email protected].
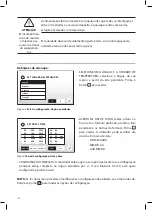
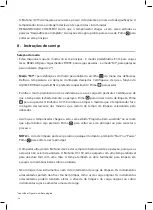
NOTA: a temperatura no depósito é exibida na barra superior do ecrã de LCD. Premir o botão
00 vector graphics: single-icons and screen buttons
CB
M 1:1
20.10.2016
30-settings
31-temperature-large
32-temperature-medium
33-temperature-small
34-program-light
35-program-regular
36-program-heavy
37-program-my
38-timer-medium
39-timer-large
40-solution
41-degas
hot surface
42-log
43-information
44-close-lid
45-lid-is-open
46-lid-was-open
47-repair
48-software-update
60-attention
warning/caution
61-instructions
51-statusbar-standby-closed
52-statusbar-standby-opened
20-A-button-checked
20-B-button-checked-feedback
50-A-button-standby
50-B-button-standby-feedback
21-A-button-save
21-B-button-save-feedback
22-A-button-home
22-B-button-home-feedback
25-A-button-play
25-B-button-play-feedback
26-A-button-pause
26-B-button-pause-feedback
23-A-button-back
23-B-button-back-feedback
24-A-button-download
24-B-button-download-feedback
62-A-button-ok
62-B-button-ok-feedback
para ativar esta funcionalidade abrirá um novo ecrã no mostrador. Na primeira vez em que esta
funcionalidade é ativada, o utilizador tem de introduzir o código de ativação. Prima
00 vector graphics: single-icons and screen buttons
CB
M 1:1
20.10.2016
30-settings
31-temperature-large
32-temperature-medium
33-temperature-small
34-program-light
35-program-regular
36-program-heavy
37-program-my
38-timer-medium
39-timer-large
40-solution
41-degas
hot surface
42-log
43-information
44-close-lid
45-lid-is-open
46-lid-was-open
47-repair
48-software-update
60-attention
warning/caution
61-instructions
51-statusbar-standby-closed
52-statusbar-standby-opened
20-A-button-checked
20-B-button-checked-feedback
50-A-button-standby
50-B-button-standby-feedback
21-A-button-save
21-B-button-save-feedback
22-A-button-home
22-B-button-home-feedback
25-A-button-play
25-B-button-play-feedback
26-A-button-pause
26-B-button-pause-feedback
23-A-button-back
23-B-button-back-feedback
24-A-button-download
24-B-button-download-feedback
62-A-button-ok
62-B-button-ok-feedback
assim que
tiver introduzido o código. A função de aquecimento está agora disponível para ser utilizada.
Defina a temperatura desejada
• Prima o botão
00 vector graphics: logo and buttons
CB
M 1:1
20.10.2016
04-A-button-program-light
05-A-button-program-regular
06-A-button-program-heavy
07-A-button-program-my
04-B-button-program-light-feedback
05-B-button-program-regular-feedback
06-B-button-program-heavy-feedback
07-B-button-program-my-feedback
11-A-button-settings
08-A-button-log
09-1-A-button-heater-first
10-A-button-solution-degas
11-B-button-settings-feedback
08-B-button-log-feedback
09-2-A-button-heater-after-code
09-B-button-heater-feedback
10-B-button-solution-degas-feedback
12-A-button-language-measurest
13-A-button-date-time
14-A-button-my-setup
15-A-button-information
12-B-button-language-measures-feedback
13-B-button-date-time-feedback
14-B-button-my-setup-feedback
15-B-button-information-feedback
16-A-button-degas
16-B-button-degas-feedback
01-logo-loading
03-product-name
02-logo-information
. Defina a temperatura entre 25 °C (75 °F) e 60 °C (140 °F).
• Escolha “AQUECEDOR ON” para ativar a função de aquecimento. Prima
00 vector graphics: single-icons and screen buttons
CB
M 1:1
20.10.2016
30-settings
31-temperature-large
32-temperature-medium
33-temperature-small
34-program-light
35-program-regular
36-program-heavy
37-program-my
38-timer-medium
39-timer-large
40-solution
41-degas
hot surface
42-log
43-information
44-close-lid
45-lid-is-open
46-lid-was-open
47-repair
48-software-update
60-attention
warning/caution
61-instructions
51-statusbar-standby-closed
52-statusbar-standby-opened
20-A-button-checked
20-B-button-checked-feedback
50-A-button-standby
50-B-button-standby-feedback
21-A-button-save
21-B-button-save-feedback
22-A-button-home
22-B-button-home-feedback
25-A-button-play
25-B-button-play-feedback
26-A-button-pause
26-B-button-pause-feedback
23-A-button-back
23-B-button-back-feedback
24-A-button-download
24-B-button-download-feedback
62-A-button-ok
62-B-button-ok-feedback
para aceitar a
temperatura.
• Se o aquecedor estiver ligado (ON), será exibido um símbolo
00 vector graphics: single-icons and screen buttons
CB
M 1:1
20.10.2016
30-settings
31-temperature-large
32-temperature-medium
33-temperature-small
34-program-light
35-program-regular
36-program-heavy
37-program-my
38-timer-medium
39-timer-large
40-solution
41-degas
hot surface
42-log
43-information
44-close-lid
45-lid-is-open
46-lid-was-open
47-repair
48-software-update
60-attention
warning/caution
61-instructions
51-statusbar-standby-closed
52-statusbar-standby-opened
20-A-button-checked
20-B-button-checked-feedback
50-A-button-standby
50-B-button-standby-feedback
21-A-button-save
21-B-button-save-feedback
22-A-button-home
22-B-button-home-feedback
25-A-button-play
25-B-button-play-feedback
26-A-button-pause
26-B-button-pause-feedback
23-A-button-back
23-B-button-back-feedback
24-A-button-download
24-B-button-download-feedback
62-A-button-ok
62-B-button-ok-feedback
no cimo do ecrã principal. O
aquecedor irá agora funcionar durante o ciclo de limpeza selecionado.
• Escolha “AQUECEDOR OFF” se não desejar o aquecedor.
Содержание BioSonic UC150
Страница 281: ...281 EL BioSonic UC150 1 BioSonic BioSonic BioSonic BioSonic UC150...
Страница 284: ...284 4 1 BioSonic UC150 BioSonic http warranty coltene com 5 4...
Страница 285: ...285 EL BioSonic UC150 AC 9 GFCI 19 cm BioSonic 11 UC150...
Страница 292: ...292 2 3 9...
Страница 293: ...293 EL 10 Colt ne Whaledent coltene update USB BioSonic UC150 USB USB BioSonic UC150 USB USB USB...
Страница 297: ...297 EL 1 BioSonic UC150 BioSonic UC150 Ultrasonic Cleaner Performance Test BioSonic UC150 www coltene com 2...
Страница 298: ...298 BioSonic ST16...
Страница 299: ...299 EL 3 8 4 BioSonic UC150 5 BioSonic UC150 6 BioSonic 7...
Страница 300: ...300 8 BioSonic BioSonic BioSonic www coltene com BioSonic 9 NiTi E mail...
Страница 301: ...301 EL Colt ne Colt ne 14 2 000 m 10 IEC 60664 1 2...
Страница 303: ...303 EL 15 BioSonic UC150 2012 19 16 BioSonic UC150 Colt ne Whaledent...
Страница 304: ...304 COLT NE WHALEDENT AG Colt ne Whaledent C W 24 C W C W C W...
Страница 333: ...333 JA BioSonic UC150 1 BioSonic Ultrasonic BioSonic BioSonic 1 BioSonic UC150...
Страница 336: ...336 4 1 BioSonic UC150 BioSonic http warranty coltene com 5 4...
Страница 337: ...337 JA UC150 9 GFCI 19 cm BioSonic 11 BioSonic UC150...
Страница 344: ...344 9 10 Colt ne Whaledent USB coltene update BioSonic UC150 USB USB 1 BioSonic UC150 USB USB USB...
Страница 346: ...346 13 14 15 20 21 22 23 24 25 26 27 28 39 40 41 1 42 43 44 45 46...
Страница 347: ...347 JA 47 48 49 50 69 LCD GFIC IEC 1 BioSonic UC150 BioSonic UC150 www coltene com 2 1...
Страница 348: ...348 1...
Страница 349: ...349 JA BioSonic ST16 Dental Sowing Tray 3 8 BioSonic UC150 5 BioSonic UC150 6 BioSonic 7...
Страница 350: ...350 8 BioSonic BioSonic BioSonic BioSonic www coltene com 9 E...
Страница 353: ...353 JA 16 BioSonic UC150 2 Coltene Whaledent COLTENE WHALEDENT AG Colt ne Whaledent C W 24 C W...
Страница 354: ...354 C W C W C W C W C W 1 2...
Страница 355: ...355 JA 1 1 Colt ne Whaledent AG Feldwiesenstrasse 20 9450 Altst tten Switzerland E 2 http warranty coltene com...
Страница 359: ...359 ZH BioSonic UC150 1 BioSonic BioSonic BioSonic BioSonic UC150...
Страница 360: ...360 2 BioSonic BioSonic BioSonic BioSonic UC150 2 105 C...
Страница 362: ...362 4 1 BioSonic UC150 BioSonic http warranty coltene com 5 4 BioSonic UC150 9 GFCI...
Страница 363: ...363 ZH 19 7 5 BioSonic 11 BioSonic UC150...
Страница 369: ...369 ZH 12 2 3 9 10 Colt ne Whaledent...
Страница 370: ...370 Setup Information CheckMark Home coltene update USB BioSonic UC150 USB USB Biosonic UC150 USB Update USB USB...
Страница 372: ...372 25 26 27 28 39 40 41 42 43 44 45 46 47 48 49 50 69 GFIC IEC FAQ 1 BioSonic UC150 BioSonic UC150 www coltene com...
Страница 373: ...373 ZH 2 BioSonic ST16...
Страница 374: ...374 3 8 4 BioSonic UC150 5 BioSonic UC150 6 BioSonic 7 8 BioSonic BioSonic BioSonic BioSonic www coltene com...
Страница 375: ...375 ZH 9 Coltene Coltene...
Страница 380: ...380 Figure 4 Figure 6 Figure 8 Figure 5 Figure 7 Figure 9 Fill Lines max and min Figure 10 Figure 11...
Страница 382: ......
Страница 383: ......
Страница 384: ......
Страница 385: ......
Страница 386: ......
Страница 387: ......
Страница 388: ......
Страница 389: ......

