


35
DE
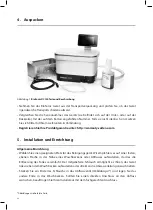
Heizbetrieb
Das Modell BioSonic UC150 ist mit einer Heizung ausgestattet, um die Erwärmung der Lösung im
Tank zu beschleunigen. Durch die Wahl einer Temperatur wird die Heizung während des nächs-
ten Reinigungszyklus aktiviert und bleibt aktiv, bis die Temperatur erreicht ist.
HINWEIS: Die Heizfunktion dient nicht dazu, die gewählte Temperatur
aufrechtzuerhalten
, sondern
aktiviert sich beim Start des nächsten Reinigungszyklus und deaktiviert sich, sobald die eingestellte
Temperatur erreicht ist. Das BioSonic UC150 weist keine thermostatische Steuerung auf.
VORSICHT!
Die Heizfunktion des BioSonic UC150 läuft (sofern aktiviert) nur bis zur einge-
stellten Temperatur. Wenn die eingestellte Temperatur vor dem Ende des Reini-
gungszyklus erreicht wird, schaltet sich die Heizung aus, der Zyklus wird jedoch
fortgesetzt. Bei längerem Betrieb erwärmt sich die Lösung durch den natürlichen
Kavitationsprozess über die eingestellte Temperatur hinaus, jedoch mit vermin-
derter Geschwindigkeit ohne Heizung. Dies ist kein Fehler; das Gerät funktioniert
weiterhin ordnungsgemäß.
Aktivieren der Heizfunktion
Besuchen Sie http://biosonic.coltene.com, um den Aktivierungscode zu erhalten, oder senden
Sie eine E-Mail an [email protected] oder [email protected].
HINWEIS: Die Temperatur im Tank wird oben auf dem LCD-Display angezeigt. Wenn Sie die Taste
00 vector graphics: single-icons and screen buttons
CB
M 1:1
20.10.2016
30-settings
31-temperature-large
32-temperature-medium
33-temperature-small
34-program-light
35-program-regular
36-program-heavy
37-program-my
38-timer-medium
39-timer-large
40-solution
41-degas
hot surface
42-log
43-information
44-close-lid
45-lid-is-open
46-lid-was-open
47-repair
48-software-update
60-attention
warning/caution
61-instructions
51-statusbar-standby-closed
52-statusbar-standby-opened
20-A-button-checked
20-B-button-checked-feedback
50-A-button-standby
50-B-button-standby-feedback
21-A-button-save
21-B-button-save-feedback
22-A-button-home
22-B-button-home-feedback
25-A-button-play
25-B-button-play-feedback
26-A-button-pause
26-B-button-pause-feedback
23-A-button-back
23-B-button-back-feedback
24-A-button-download
24-B-button-download-feedback
62-A-button-ok
62-B-button-ok-feedback
drücken, um diese Funktion zu aktivieren, wird ein neuer Bildschirm auf dem Display aufgerufen.
Beim ersten Aktivieren dieser Funktion muss der Benutzer den Aktivierungscode eingeben. Drücken
Sie
00 vector graphics: single-icons and screen buttons
CB
M 1:1
20.10.2016
30-settings
31-temperature-large
32-temperature-medium
33-temperature-small
34-program-light
35-program-regular
36-program-heavy
37-program-my
38-timer-medium
39-timer-large
40-solution
41-degas
hot surface
42-log
43-information
44-close-lid
45-lid-is-open
46-lid-was-open
47-repair
48-software-update
60-attention
warning/caution
61-instructions
51-statusbar-standby-closed
52-statusbar-standby-opened
20-A-button-checked
20-B-button-checked-feedback
50-A-button-standby
50-B-button-standby-feedback
21-A-button-save
21-B-button-save-feedback
22-A-button-home
22-B-button-home-feedback
25-A-button-play
25-B-button-play-feedback
26-A-button-pause
26-B-button-pause-feedback
23-A-button-back
23-B-button-back-feedback
24-A-button-download
24-B-button-download-feedback
62-A-button-ok
62-B-button-ok-feedback
, nachdem der Code eingegeben wurde. Die Heizfunktion kann jetzt verwendet werden.
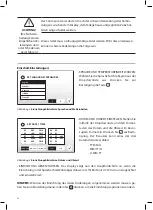
Einstellen der gewünschten Temperatur
• Drücken Sie die Taste
00 vector graphics: logo and buttons
CB
M 1:1
20.10.2016
04-A-button-program-light
05-A-button-program-regular
06-A-button-program-heavy
07-A-button-program-my
04-B-button-program-light-feedback
05-B-button-program-regular-feedback
06-B-button-program-heavy-feedback
07-B-button-program-my-feedback
11-A-button-settings
08-A-button-log
09-1-A-button-heater-first
10-A-button-solution-degas
11-B-button-settings-feedback
08-B-button-log-feedback
09-2-A-button-heater-after-code
09-B-button-heater-feedback
10-B-button-solution-degas-feedback
12-A-button-language-measurest
13-A-button-date-time
14-A-button-my-setup
15-A-button-information
12-B-button-language-measures-feedback
13-B-button-date-time-feedback
14-B-button-my-setup-feedback
15-B-button-information-feedback
16-A-button-degas
16-B-button-degas-feedback
01-logo-loading
03-product-name
02-logo-information
. Stellen Sie die Temperatur zwischen 25 °C und 60 °C ein.
• Wählen Sie „HEIZUNG EIN“ (HEATER ON), um die Heizfunktion zu aktivieren. Drücken Sie
00 vector graphics: single-icons and screen buttons
CB
M 1:1
20.10.2016
30-settings
31-temperature-large
32-temperature-medium
33-temperature-small
34-program-light
35-program-regular
36-program-heavy
37-program-my
38-timer-medium
39-timer-large
40-solution
41-degas
hot surface
42-log
43-information
44-close-lid
45-lid-is-open
46-lid-was-open
47-repair
48-software-update
60-attention
warning/caution
61-instructions
51-statusbar-standby-closed
52-statusbar-standby-opened
20-A-button-checked
20-B-button-checked-feedback
50-A-button-standby
50-B-button-standby-feedback
21-A-button-save
21-B-button-save-feedback
22-A-button-home
22-B-button-home-feedback
25-A-button-play
25-B-button-play-feedback
26-A-button-pause
26-B-button-pause-feedback
23-A-button-back
23-B-button-back-feedback
24-A-button-download
24-B-button-download-feedback
62-A-button-ok
62-B-button-ok-feedback
, um
die Temperatur zu bestätigen.
• Oben auf dem Hauptbildschirm wird das Symbol
00 vector graphics: single-icons and screen buttons
CB
M 1:1
20.10.2016
30-settings
31-temperature-large
32-temperature-medium
33-temperature-small
34-program-light
35-program-regular
36-program-heavy
37-program-my
38-timer-medium
39-timer-large
40-solution
41-degas
hot surface
42-log
43-information
44-close-lid
45-lid-is-open
46-lid-was-open
47-repair
48-software-update
60-attention
warning/caution
61-instructions
51-statusbar-standby-closed
52-statusbar-standby-opened
20-A-button-checked
20-B-button-checked-feedback
50-A-button-standby
50-B-button-standby-feedback
21-A-button-save
21-B-button-save-feedback
22-A-button-home
22-B-button-home-feedback
25-A-button-play
25-B-button-play-feedback
26-A-button-pause
26-B-button-pause-feedback
23-A-button-back
23-B-button-back-feedback
24-A-button-download
24-B-button-download-feedback
62-A-button-ok
62-B-button-ok-feedback
angezeigt, wenn die Heizung aktiviert ist.
Die Heizung läuft nun während des gewählten Reinigungszyklus.
• Wählen Sie „HEIZUNG AUS“ (HEATER OFF), wenn keine Beheizung erwünscht ist.
• Auf dem Hauptbildschirm blinkt das Symbol
00 vector graphics: single-icons and screen buttons
CB
M 1:1
20.10.2016
30-settings
31-temperature-large
32-temperature-medium
33-temperature-small
34-program-light
35-program-regular
36-program-heavy
37-program-my
38-timer-medium
39-timer-large
40-solution
41-degas
hot surface
42-log
43-information
44-close-lid
45-lid-is-open
46-lid-was-open
47-repair
48-software-update
60-attention
warning/caution
61-instructions
51-statusbar-standby-closed
52-statusbar-standby-opened
20-A-button-checked
20-B-button-checked-feedback
50-A-button-standby
50-B-button-standby-feedback
21-A-button-save
21-B-button-save-feedback
22-A-button-home
22-B-button-home-feedback
25-A-button-play
25-B-button-play-feedback
26-A-button-pause
26-B-button-pause-feedback
23-A-button-back
23-B-button-back-feedback
24-A-button-download
24-B-button-download-feedback
62-A-button-ok
62-B-button-ok-feedback
, wenn die Heizung während eines
Reinigungszyklus läuft. Die aktuellen Temperaturangaben werden immer oben auf dem LCD-
Display angezeigt.
HINWEIS: Die Heizung schaltet sich erst ein, wenn ein Reinigungszyklus gestartet wurde. Es wird
daher empfohlen, einen Vorzyklus (mit aktivierter Heizung) durchzuführen, wenn eine
Содержание BioSonic UC150
Страница 281: ...281 EL BioSonic UC150 1 BioSonic BioSonic BioSonic BioSonic UC150...
Страница 284: ...284 4 1 BioSonic UC150 BioSonic http warranty coltene com 5 4...
Страница 285: ...285 EL BioSonic UC150 AC 9 GFCI 19 cm BioSonic 11 UC150...
Страница 292: ...292 2 3 9...
Страница 293: ...293 EL 10 Colt ne Whaledent coltene update USB BioSonic UC150 USB USB BioSonic UC150 USB USB USB...
Страница 297: ...297 EL 1 BioSonic UC150 BioSonic UC150 Ultrasonic Cleaner Performance Test BioSonic UC150 www coltene com 2...
Страница 298: ...298 BioSonic ST16...
Страница 299: ...299 EL 3 8 4 BioSonic UC150 5 BioSonic UC150 6 BioSonic 7...
Страница 300: ...300 8 BioSonic BioSonic BioSonic www coltene com BioSonic 9 NiTi E mail...
Страница 301: ...301 EL Colt ne Colt ne 14 2 000 m 10 IEC 60664 1 2...
Страница 303: ...303 EL 15 BioSonic UC150 2012 19 16 BioSonic UC150 Colt ne Whaledent...
Страница 304: ...304 COLT NE WHALEDENT AG Colt ne Whaledent C W 24 C W C W C W...
Страница 333: ...333 JA BioSonic UC150 1 BioSonic Ultrasonic BioSonic BioSonic 1 BioSonic UC150...
Страница 336: ...336 4 1 BioSonic UC150 BioSonic http warranty coltene com 5 4...
Страница 337: ...337 JA UC150 9 GFCI 19 cm BioSonic 11 BioSonic UC150...
Страница 344: ...344 9 10 Colt ne Whaledent USB coltene update BioSonic UC150 USB USB 1 BioSonic UC150 USB USB USB...
Страница 346: ...346 13 14 15 20 21 22 23 24 25 26 27 28 39 40 41 1 42 43 44 45 46...
Страница 347: ...347 JA 47 48 49 50 69 LCD GFIC IEC 1 BioSonic UC150 BioSonic UC150 www coltene com 2 1...
Страница 348: ...348 1...
Страница 349: ...349 JA BioSonic ST16 Dental Sowing Tray 3 8 BioSonic UC150 5 BioSonic UC150 6 BioSonic 7...
Страница 350: ...350 8 BioSonic BioSonic BioSonic BioSonic www coltene com 9 E...
Страница 353: ...353 JA 16 BioSonic UC150 2 Coltene Whaledent COLTENE WHALEDENT AG Colt ne Whaledent C W 24 C W...
Страница 354: ...354 C W C W C W C W C W 1 2...
Страница 355: ...355 JA 1 1 Colt ne Whaledent AG Feldwiesenstrasse 20 9450 Altst tten Switzerland E 2 http warranty coltene com...
Страница 359: ...359 ZH BioSonic UC150 1 BioSonic BioSonic BioSonic BioSonic UC150...
Страница 360: ...360 2 BioSonic BioSonic BioSonic BioSonic UC150 2 105 C...
Страница 362: ...362 4 1 BioSonic UC150 BioSonic http warranty coltene com 5 4 BioSonic UC150 9 GFCI...
Страница 363: ...363 ZH 19 7 5 BioSonic 11 BioSonic UC150...
Страница 369: ...369 ZH 12 2 3 9 10 Colt ne Whaledent...
Страница 370: ...370 Setup Information CheckMark Home coltene update USB BioSonic UC150 USB USB Biosonic UC150 USB Update USB USB...
Страница 372: ...372 25 26 27 28 39 40 41 42 43 44 45 46 47 48 49 50 69 GFIC IEC FAQ 1 BioSonic UC150 BioSonic UC150 www coltene com...
Страница 373: ...373 ZH 2 BioSonic ST16...
Страница 374: ...374 3 8 4 BioSonic UC150 5 BioSonic UC150 6 BioSonic 7 8 BioSonic BioSonic BioSonic BioSonic www coltene com...
Страница 375: ...375 ZH 9 Coltene Coltene...
Страница 380: ...380 Figure 4 Figure 6 Figure 8 Figure 5 Figure 7 Figure 9 Fill Lines max and min Figure 10 Figure 11...
Страница 382: ......
Страница 383: ......
Страница 384: ......
Страница 385: ......
Страница 386: ......
Страница 387: ......
Страница 388: ......
Страница 389: ......


