background image

Configuring the In-Sight Sensor Using In-Sight PC Host 

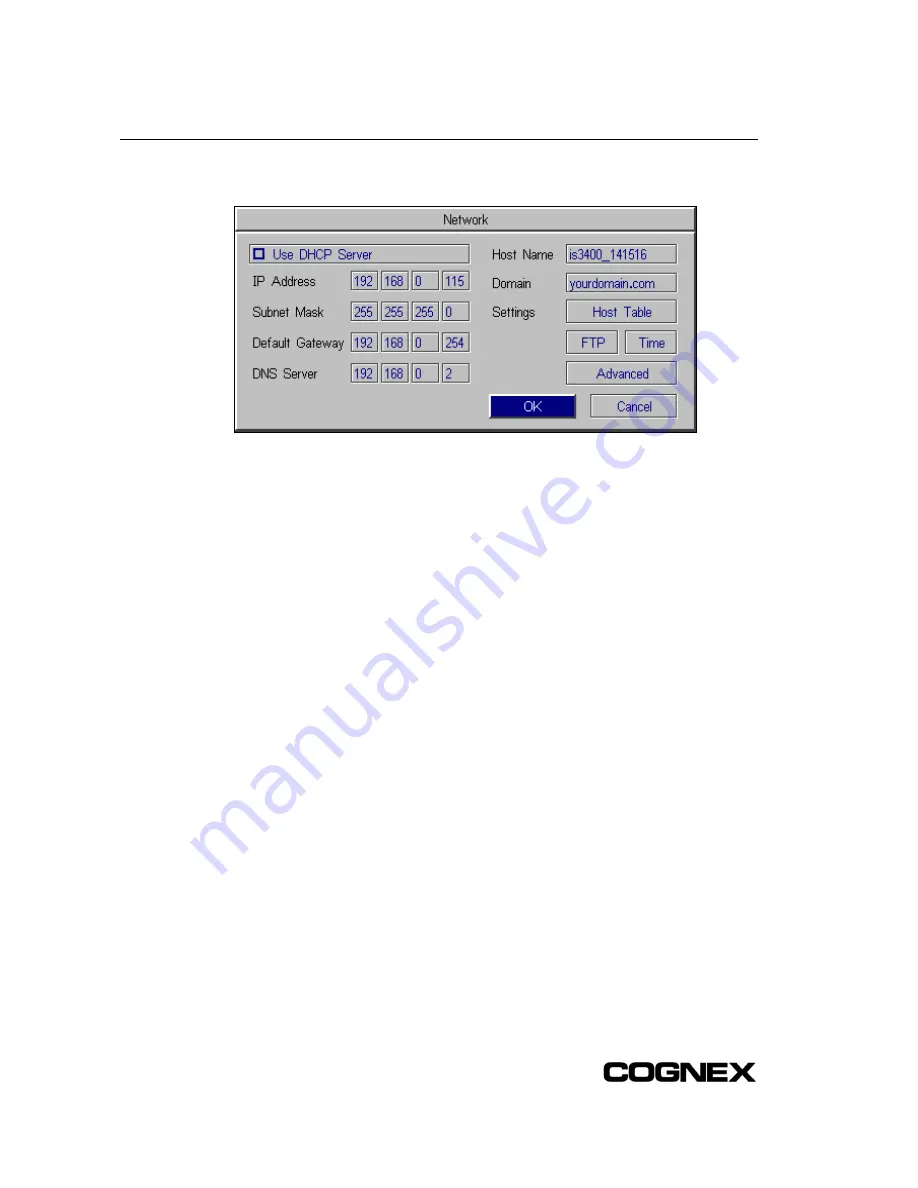
4.  From the System Menu, select Network to open the Network dialog (Figure C-10). 


Figure C-10: Network Dialog 

The following network settings can be changed using the Network dialog:


IP Address

: Assigns a unique identifier for each In-Sight sensor on the network, which 

must be consistent with the IP address-numbering scheme of the local network. 


Subnet Mask

: Specifies which parts of the In-Sight 3400 sensor's IP address are the 

same for all hosts on the local network, and which are unique to each host.  


Default Gateway

: Specifies the IP address of the gateway host, if available on the 

network. The gateway host is responsible for sending and receiving data between hosts 
on different networks. 


DNS Server

: Specifies the IP address of the host on the network providing DNS 

resolution, if available. 


Host Name

: Opens the text entry dialog for entering the Host Name for the In-Sight 

sensor, as it will appear when browsing the network. If the local system is a networked 
PC running In-Sight PC Host software, the Host Name will automatically be inherited 
from the Computer Name defined in the Windows operating system. Each In-Sight 
sensor has its host name set automatically the first time it boots. For example, an  
In-Sight 3400 sensor's host name is "is3400_xxxxxx". For every sensor, "xxxxxx" is 
given by the last 6 characters of the sensor’s unique MAC Address. For example, an  
In-Sight 3400 sensor with the MAC Address 00-d0-24-14-15-16 will be assigned the 
host name, "is3400_141516". 


Domain

: Specifies the network Domain for the host network. 


Host Table

: Specifies a local mapping of host names to IP addresses.  


FTP

: Configures the File Transfer Protocol (FTP).  


Advanced

: Opens the Advanced dialog to configure the sensor’s DHCP Timeout. The 

DHCP Timeout specifies the time an In-Sight sensor will wait for a DHCP server to 
respond with an available IP address, when the sensor is configured for DHCP. If a 
DHCP server does not provide the sensor with an IP address within the specified 
timeout period, network communication on the sensor will be suspended. The sensor 
will not attempt to connect to the network again until power is cycled on the sensor.  

68  


Содержание In-Sight 3400

Страница 1: ......

Страница 2: ......

Страница 3: ... Cognex Corporation Cognex Corporation is not responsible for any errors that may be present in either this document or the associated software This document may not be copied in whole or in part nor transferred to any other media or language without the written permission of Cognex Corporation Cognex P N 597 0025 02 Copyright 2003 2005 Cognex Corporation All Rights Reserved The hardware and porti...

Страница 4: ... 336 EEC Electromagnetic Compatibility Directive Compliance Standards EN 55011 Class A EN 61000 3 2 EN 61000 3 3 EN 61000 6 2 EN 6100 4 2 3 4 5 6 8 11 Certificate Number CE 058 European Representative Cognex France Immeuble le Patio 104 avenue Albert 1er 92563 Rueil Malmaison France Safety LISTED UL 508 Standard for Industrial Control Equipment CUL Certification marks are present on products FCC P...

Страница 5: ...a other than the In Sight cameras specified in this document this may damage the remote head camera the In Sight sensor or both Do not install the In Sight 3400 sensor where it is directly exposed to environmental hazards such as excessive heat dust moisture humidity impact vibration corrosive substances flammable substances or static electricity Do not route In Sight cables and wires near high vo...

Страница 6: ...Precautions iv ...

Страница 7: ... 13 2 4 Connecting the Model 1450 I O Expansion Module 15 2 5 Adding the Sensor to a Network Using the In Sight 3400 GUI 17 2 5 1 Installing to a DHCP Network 17 2 5 2 Installing to a Non DHCP Network 18 2 5 3 Verifying the In Sight 3400 Sensor Network Connection 22 2 6 Installing the In Sight Software on a Windows PC 24 2 7 Adding the Sensor to a Network Using In Sight Explorer 25 2 7 1 Installin...

Страница 8: ...e Dimensions 52 4 3 4 Remote Head Camera Mount Dimensions 53 4 3 5 Control Pad Dimensions 54 Appendix A 55 A 1 Configuring Microsoft Windows Network Settings 55 A 1 1 Configuring the IP Address and Subnet Mask 55 Appendix B 57 B 1 Configuring the In Sight Sensor s I O Settings Using In Sight Explorer 57 B 1 1 Configuring the I O Expansion Module 57 B 1 2 Enabling Hardware Handshaking 59 Appendix C...

Страница 9: ... Wires 15 Figure 2 10 Model 1450 I O Expansion Module Connections 16 Figure 2 11 System and Settings Menus 18 Figure 2 12 Network Dialog 19 Figure 2 13 Logon Dialog 23 Figure 2 14 In Sight Connection Manager 26 Figure 2 15 User Name and Password 27 Figure 2 16 MAC Address 28 Figure 2 17 Set Network Configuration Dialog 29 Figure 2 18 Enter IP Address 30 Figure 2 19 Network Settings Dialog 32 Figur...

Страница 10: ...on 63 Figure C 4 IP Configuration Message Box 64 Figure C 5 IP Configuration Successful Message Box 64 Figure C 6 System Menu 65 Figure C 7 Logon Dialog 66 Figure C 8 System Menu 67 Figure C 9 Settings Menu 67 Figure C 10 Network Dialog 68 Figure C 11 System Menu 69 Figure C 12 Settings Menu 70 Figure C 13 Discrete Output Dialog Default Settings 70 Figure C 14 Discrete Output Dialog I O Expansion ...

Страница 11: ...tions 38 Table 4 2 In Sight 3400 Remote Head Camera General Specifications 39 Table 4 3 Remote Head Camera Enclosure Specifications 40 Table 4 4 Acquisition Trigger Input Specifications 40 Table 4 5 High Speed Output Specifications Table 41 Table 4 6 Control Pad Port Pin Numbers and Assignments 44 Table 4 7 24VDC Breakout Connector Cable Pin Out 45 Table 4 8 I O Module Cable Pin Out 46 Table 4 9 N...

Страница 12: ...List of Tables x ...

Страница 13: ...rise network The spreadsheet also allows local or remote monitoring of the In Sight sensor s operation during runtime without using a PC This manual describes how to install the In Sight 3400 sensor 1 2 In Sight Support Other resources with information about the In Sight 3400 sensor and its spreadsheet interface include Getting Started with In Sight Cognex P N 590 6368 English 590 6368F French 590...

Страница 14: ...1 3 In Sight 3400 Components The In Sight 3400 sensor is shipped with the components shown in Figure 1 1 Component part numbers and descriptions are listed in Table 1 1 Figure 1 1 Standard In Sight 3400 Components 2 ...

Страница 15: ... end and standard RJ 45 connector on the other Crossover Coupler P N 185 0080 Attaches to the RJ 45 connector of the network cable to provide crossover CAT5 5e cable functionality when connecting the In Sight 3400 sensor directly to a PC or other In Sight sensor Control Pad P N 800 5746 1 Used to navigate and configure the In Sight spreadsheet user interface Attaches to the In Sight 3400 sensor vi...

Страница 16: ...uration The standalone configuration requires a local VGA display to configure applications and monitor the In Sight 3400 sensor s runtime operation In this configuration the jobs that can be stored are limited to the amount of local storage available on the In Sight 3400 sensor A remote serial device must be used for storing image files or for additional job storage Control Pad VGA Display Power ...

Страница 17: ... PC running In Sight Explorer connected by a switch router In this configuration any In Sight sensor on the network can be configured using either the In Sight 3400 GUI or the In Sight Explorer software In Sight Explorer also provides additional job storage and image and data archiving for all three In Sight sensors on the network The network switch router may also connect to another network switc...

Страница 18: ...s an In Sight 3400 sensor located on each In Sight network provides local job configuration and image display for all In Sight sensors without a PC As in the example in the previous section the In Sight network shown below includes an In Sight 3400 sensor two In Sight 5000 series sensors and a PC running In Sight Explorer connected to the same network switch router However the switch router for th...

Страница 19: ... Module 15 2 5 Adding the Sensor to a Network Using the In Sight 3400 GUI 17 2 6 Installing the In Sight Software on a Windows PC 24 2 7 Adding the Sensor to a Network Using In Sight Explorer 25 2 1 Connecting the In Sight 3400 Vision Sensor This section describes the connection of the In Sight 3400 to its standard components and optional I O modules For a complete list of options and accessories ...

Страница 20: ...tions Alternatively this connector is used to attach the I O Cable to an optional In Sight I O Expansion Module which adds general purpose discrete I O and light control functionality Refer to Table 4 7 and Table 4 8 pages 45 and 46 ENET Connector Connects the In Sight sensor to a network The ENET connector provides the Ethernet connection to external network devices Refer to Table 4 9 page 47 CAM...

Страница 21: ...l Pad Connection 2 Attach the video cable of a VGA monitor or flat panel display to the In Sight sensor s VGA connector Figure 2 2 Figure 2 2 VGA Connection 3 Attach a CS Mount or C Mount with 5mm extension ring lens to the In Sight 3400 remote head camera Installing a lens allows you to see the In Sight 3400 sensor acquire live video images The exact lens focal length needed depends on the workin...

Страница 22: ...ing or disconnecting the remote head camera Hot plugging the remote head camera can damage the In Sight sensor and or remote head camera Figure 2 3 CAM Connection 5 Verify that the 24VDC supply is not receiving power and then connect the power supply to the 2 pin terminal plug on the Breakout Cable Attach the Breakout Cable to the 24VDC connector on the sensor Figure 2 4 Figure 2 4 Power Connectio...

Страница 23: ...ed If nothing appears on the display verify that the monitor is on and that the cable is properly connected If the spreadsheet is displayed over a grayscale grid pattern the CAM LED will be red indicating that no synchronization signal could be established Remove power from the sensor reconnect the camera cable to the remote head and the sensor and then restore power to the sensor 4 Press the A3 b...

Страница 24: ...3 Optionally connect the DB9 male connector of an RS 232 serial cable to the corresponding DB9 female connector on the Breakout Module 4 Plug the DB15 male connector of the Breakout Module cable into the corresponding female connector on the Breakout Module 5 Plug the M12 connector of the Breakout Module cable into the In Sight 3400 sensor s 24VDC connector 6 Plug the wire leads from a 24VDC suppl...

Страница 25: ...modules To Connect the Model 1460 I O Expansion Module to the In Sight Sensor 1 Verify the 24VDC power supply being used is switched off 2 Connect the power and ground wires from remote I O devices to terminals on the 1460 I O Expansion Module Figure 2 6 Figure 2 6 Connecting I O Wires a Use a Flat head screwdriver to loosen the screw terminals b Insert the wire leads from remote I O devices into ...

Страница 26: ...rresponding DB9 female connector on the Expansion Module Figure 2 7 4 Plug the I O Module Cable s DB15 male connector into the corresponding female connector on the Expansion Module Figure 2 7 Connecting the I O Cable and Serial Cable 5 Plug the M12 connector of the I O Module Cable into the In Sight 3400 sensor s 24VDC connector Figure 2 8 Figure 2 8 Connecting the Expansion Module to In Sight 14...

Страница 27: ...k and can damage the hardware Do not connect the 24VDC source to any terminals other than the 2 pin 24VDC power connector Figure 2 9 Connecting 24VDC and Ground Wires 2 4 Connecting the Model 1450 I O Expansion Module Like the 1350 Breakout Module and the Model 1460 I O Expansion Module the optional Model 1450 I O Expansion Module provides convenient access to the In Sight 3400 sensor s power seri...

Страница 28: ... Expansion Module processor before being sent to remote devices 3 Optionally connect the DB9 male connector of an RS 232 serial cable to the corresponding DB9 female connector on the Model I O 1450 Expansion Module 4 Plug the I O Module Cable s DB15 male connector into the corresponding female connector on the Expansion Module 5 Plug the M12 connector of the Model 1450 I O Module Cable into the In...

Страница 29: ...DHCP server automatically assigns the In Sight 3400 sensor a network IP address and Subnet Mask NOTE When installing the In Sight 3400 sensor to an existing network consult your network administrator to determine whether a DHCP server is available 2 5 1 Installing to a DHCP Network The In Sight 3400 sensor is pre configured for an existing network with a DHCP server After connecting the Network ca...

Страница 30: ...t 3400 sensor may also be configured remotely using a PC running the In Sight Explorer software program or another In Sight 3400 sensor already installed on the network Refer to Section 2 6 for details on adding the sensor to a network using In Sight Explorer Configuring Network Settings Using the In Sight 3400 GUI 1 Supply power to the In Sight 3400 sensor and its local display 2 From the In Sigh...

Страница 31: ...ning on the local network If a DHCP server does not respond within 60 seconds after startup the sensor will boot without network support enabled If the network has a DHCP server and the Use DHCP Server check box is enabled the DHCP server will automatically configure the In Sight 3400 sensor s network settings on startup Optionally a new Host Name may be assigned When the Use DHCP Server checkbox ...

Страница 32: ...net Mask is 255 255 240 0 192 168 0 0 16 The 192 168 0 0 16 private network can be interpreted either as a block of 256 class C network IDs or as a 16 bit assignable address space 16 host bits which can be used for any subnetting scheme within the private organization The 192 168 0 0 16 private network allows valid IP addresses from 192 168 0 1 to 192 168 255 254 The default Subnet Mask is 255 255...

Страница 33: ...e DHCP server A Domain name e g yourdomain com is an alias for a network e g 192 168 0 0 A DNS Server maintains the data cross referencing host to IP addresses The DNS Server setting determines which host is contacted by IP address by translating a given Host Name into its corresponding IP address Host Name The Host Name assigns a name or alias for the In Sight 3400 sensor as it will appear when b...

Страница 34: ...esses Neither FTP Settings nor Host Table settings are required for installing the In Sight 3400 sensor to a network Advanced Settings The Advanced button opens the Advanced dialog to configure the sensor s DHCP Timeout The DHCP Timeout specifies the time an In Sight sensor will wait for a DHCP server to respond with an available IP address when the sensor is configured for DHCP If a DHCP server d...

Страница 35: ...ayed in the lower left corner of the spreadsheet NOTE To log on to a sensor you must supply a valid User Name and password New In Sight sensors are shipped with a User List containing three standard accounts admin monitor and operator each of these accounts is configured with a blank password 5 Open the System menu and select Live to view an acquired image If the image appears the In Sight 3400 se...

Страница 36: ...t that includes a networked In Sight sensor Perform the following Steps to Install the In Sight Software 1 Shut down any applications on your PC 2 Insert the In Sight installation CD ROM into your PC s CD ROM drive The install program should start automatically follow the setup dialogs as they appear on screen 3 When the installation program is complete remove the CD from the CD ROM drive Verify t...

Страница 37: ...sing In Sight PC Host 2 7 1 Installing to a DHCP Network The In Sight 3400 sensor is pre configured for an existing network that uses a DHCP server After connecting the network cable and supplying power the DHCP server will automatically detect the In Sight 3400 sensor configure its settings and add it to the network If your network does not use a DHCP server use the In Sight Connection Manager to...

Страница 38: ...work settings This installation may also require changes to network settings in Microsoft Windows see Appendix A page 55 1 Ensure that the sensor is connected to the network and has power 2 Open the In Sight Connection Manager from the Cognex Program group on the Start Menu 3 Select the second option Setup one or more In Sight vision sensors to work on my network Figure 2 14 Click Next Figure 2 14...

Страница 39: ... 3400 Vision Sensor 4 You may need to supply administrative credentials User Name and Password for at least one In Sight sensor on your network in order to proceed Figure 2 15 Click Next Figure 2 15 User Name and Password 27 ...

Страница 40: ...rnately you can simply cycle power on any In Sight sensors you would like to configure and the In Sight Connection Manager will automatically add the corresponding MAC address to the list after they reboot Click Next NOTE The MAC address is located on the serial number label affixed to the In Sight 3400 sensor This identifier is factory assigned unique for every In Sight sensor and cannot be chang...

Страница 41: ...n the local network and which are unique to each host See Table 2 3 or consult your network administrator for more information 8 Optionally enter values for the Default gateway DNS server and Domain these settings will be applied to every sensor Default Gateway Specifies the IP address of the gateway host if available on the network The gateway host is responsible for sending and receiving data be...

Страница 42: ...on 10 For each sensor in the table Figure 2 18 enter a unique IP address in the New IP column Optionally you can type in meaningful names for each sensor under the New Name column 11 Click Next Figure 2 18 Enter IP Address 30 ...

Страница 43: ...ounts admin monitor and operator each of these accounts is configured with a blank password Refer to Appendix C for details on logging on to your sensor using In Sight PC Host 1 Attach a lens to the In Sight 3400 sensor to verify the acquisition of live video images The exact focal length needed depends on the working distance and the field of view required in your machine vision application For n...

Страница 44: ...ppear in the In Sight Network If the local system is a networked PC running the In Sight Explorer software the Host Name will automatically be inherited from the Computer Name defined in the Windows operating system Each In Sight sensor has its host name set automatically the first time it boots For example an In Sight 3400 sensor s host name is is3400_xxxxxx For every sensor xxxxxx is given by th...

Страница 45: ...s the time an In Sight sensor will wait for a DHCP server to respond with an available IP address when the sensor is configured for DHCP If the sensor times out network communication will be suspended The sensor will not attempt to connect to the network again until power is cycled on the sensor EIP I O Watchdog Timeout Action Specifies the In Sight Ethernet IP implicit connection timeout behavior...

Страница 46: ...In Sight 3400 Installation 34 ...

Страница 47: ...s the size of a region and increments numeric values In the spreadsheet pressing this button while holding the A4 button selects an entire column of cells The down direction moves the highlight down increases the size of a region and decrements numeric values The left direction moves the highlight left decreases the width of a region rotates a region counter clockwise curves a region up and select...

Страница 48: ...irm a change Press and hold down A1 to open the Enter menu Pressing A1 is similar to pressing ENTER on a computer keyboard In a property sheet press A2 to access Interactive Graphics mode In the Formula Editor press A2 to access editing shortcuts including backspace In Numeric Edit mode press A2 to zero numbers In the spreadsheet press A3 to open the System menu In all other contexts press A3 to c...

Страница 49: ...ecifications 37 4 2 Detailed I O Specifications 40 4 3 Dimensional Drawings 50 4 1 General Specifications The following sections list general specifications for the In Sight 3400 sensor and remote head camera and the remote head camera enclosure 37 ...

Страница 50: ...T is recommended Supports DHCP factory default or static IP address Communications Serial RS 232C port 4800 to 115 200 baud rates Power 24VDC 10 isolated 500mA Material Painted cast aluminum housing Mounting Four 6 86mm 27 thru holes Dimensions Width 293 1mm 11 54 Depth 142 5mm 5 61 Height 45 5mm 1 79 Mechanical Weight 1094g 2 lb 7 oz Temperature 0 to 60 C Operating 40 to 85 C Storage Humidity 95 ...

Страница 51: ...1in 0 254mm both x and y from lens C mount axis to center of imager Material Anodized cast aluminum housing Mounting Three M3 threaded holes Dimensions 32mm 1 26 diameter 50mm 1 97 length Mechanical Weight 68g 2 4 oz without lens Temperature 0 to 50 C Operating 30 to 80 C Storage Humidity 95 non condensing Operating and Storage Protection IP20 NEMA 1 Only remote head without lens or enclosure Shoc...

Страница 52: ... sections 4 2 1 Acquisition Trigger Input Table 4 4 Acquisition Trigger Input Specifications SPECIFICATION DESCRIPTION ON 20 to 28V 24V nominal Voltage OFF 0 to 3V 12V nominal threshold ON 1 8 to 2 7mA OFF 150µA Current Resistance 10 000 Ohms Delay 62µSec nominal latency between leading edge of trigger and start of acquisition Input pulse should be minimum of 1ms wide The acquisition trigger input...

Страница 53: ... Table SPECIFICATION DESCRIPTION Voltage 28V maximum through external load 200mA maximum sink current OFF state leakage current 200µA maximum External load resistance 120 Ohms to 10K Ohms Current Each line rated at a maximum 200mA protected against over current short circuit and transients from switching inductive loads High current inductive loads require external protection diode Both of the hig...

Страница 54: ...ulled down to 0V and 24V appears across the load Use a protection diode for a large inductive load with the anode connected to the output and the cathode connected to 24V Figure 4 2 High Speed Output Connection Example 1 Example 2 To connect to an NPN compatible PLC input connect Output 0 or Output 1 directly to the PLC input When enabled the output pulls the PLC input down to 0V Figure 4 3 High S...

Страница 55: ...put The output will pull the voltage down to 0V turning off the PLC input This creates an inversion with the PLC input ON when the In Sight output is OFF and vice versa Use an external NPN to PNP converter when this inversion is not desired Figure 4 4 High Speed Output Connection Example 3 The HSOUT status LEDs on the In Sight 3400 sensor indicate the state of the outputs The LEDs will illuminate ...

Страница 56: ...ovides pin numbers and assignments for the CONTROL PAD port Table 4 6 Control Pad Port Pin Numbers and Assignments PIN SIGNAL NAME PIN SIGNAL NAME PIN SIGNAL NAME 1 Power 5 VDC 6 Analog 1 cursor 1 1 Analog 2 cursor 2 Button 1 7 Button 2 1 2 Ground 3 Analog 0 cursor 8 Not connected 1 3 Analog 3 cursor 4 Ground 9 Power 5 VDC 1 4 Button 4 5 Ground 1 0 Button 3 1 5 Not connected 44 ...

Страница 57: ...tputs The Breakout cable is not terminated Table 4 7 Table 4 7 24VDC Breakout Connector Cable Pin Out PIN SIGNAL NAME WIRE COLOR 1 Power 24 VDC White Green 2 Trigger Green 3 Trigger White Orange 4 High Speed Out 0 Blue 5 High Speed Out 1 White Blue 6 RS 232 Receive RxD Orange 7 RS 232 Transmit TxD White Brown 8 Ground Brown If hardware handshaking is required an I O Expansion Module must be used 4...

Страница 58: ...e or 1450 I O Expansion Module is used all power and communication lines used by the In Sight 3400 sensor are connected via the I O Module cable The I O Module cable is available in 5M PN 185 0099 and 10M PN 185 0090 lengths NOTE Refer to the 1460 I O Expansion Module 1450 I O Expansion Module or 1350 Breakout Module Installation Manual for more connection information Table 4 8 I O Module Cable Pi...

Страница 59: ...r applications requiring a Crossover Cable The pin out for the Crossover Coupler matches that of a standard CAT5 e Crossover cable NOTE The wiring for this cable follows standard industrial Ethernet M12 specifications This varies from the 568B standard Table 4 9 Network Cable Pin Out SIGNAL NAME P1 PIN P2 PIN WIRE COLOR CROSSOVER COUPLER FEMALE CONNECTOR CROSSOVER COUPLER MALE CONNECTOR TPO 6 1 Wh...

Страница 60: ...ra cable connects the In Sight 3400 remote head camera to the sensor The Camera cable provides power and communications to the camera Table 4 10 Camera Cable Pin Out P1 PIN SIGNAL NAME P2 PIN 1 CTRL 1 2 CTRL 2 3 DAT 3 4 17V 4 5 10V 5 6 DAT 6 7 6V 7 8 GND 8 48 ...

Страница 61: ... 11 VGA Connector Pin Out PIN NAME DESCRIPTION 1 RED Red Video 75 Ohm 0 7 V p p 2 GREEN Green Video 75 Ohm 0 7 V p p 3 BLUE Blue Video 75 Ohm 0 7 V p p 4 ID2 Monitor ID Bit 2 5 GND Ground 6 RGND Red Ground 7 GGND Green Ground 8 BGND Blue Ground 9 KEY Key No pin 10 SGND Sync Ground 11 ID0 Monitor ID Bit 0 12 ID1 or SDA Monitor ID Bit 1 13 HSYNC or CSYNC Horizontal Sync or Composite Sync 14 VSYNC Ve...

Страница 62: ...wings for the In Sight 3400 sensor components are provided in the following sections 4 3 1 Sensor Dimensions The In Sight 3400 sensor dimensions are illustrated in Figure 4 5 Dimensions are in millimeters inches Figure 4 5 In Sight 3400 Sensor Dimensions 50 ...

Страница 63: ...Sight 3400 Vision Sensor 4 3 2 Remote Head Camera Dimensions The In Sight 3400 remote head camera dimensions are illustrated in Figure 4 6 Dimensions are in millimeters inches Figure 4 6 Remote Head Camera Dimensions 51 ...

Страница 64: ...ns 4 3 3 Remote Head Camera Enclosure Dimensions The remote head camera enclosure dimensions are illustrated in Figure 4 7 Dimensions are in millimeters inches Figure 4 7 Remote Head Camera Enclosure Dimensions 52 ...

Страница 65: ...emote Head Camera Mount Dimensions The remote head camera mounting bracket dimensions are illustrated in Figure 4 8 Dimensions are in millimeters inches Refer to Appendix D for installation instructions Figure 4 8 Remote Head Camera Mount Dimensions 53 ...

Страница 66: ...Specifications 4 3 5 Control Pad Dimensions The In Sight Control Pad dimensions are illustrated in Figure 4 9 Dimensions are in millimeters inches Figure 4 9 Control Pad Dimensions 54 ...

Страница 67: ...ask 1 Click Start then click on the Control Panel shortcut to open the Control Panel icon group 2 Click the Network and Internet Connections icon to open the Network and Internet Connections Dialog 3 Click the Network Connections icon to open the Network Connections Dialog 4 Right click the Local Area Connections icon and click Properties to open the Local Area Connections dialog 5 Highlight Inter...

Страница 68: ...he Subnet Mask defines which part of the sensor s IP address refers to the network and which part refers to the host The network part of the IP address is the same for all hosts on the same subnet and the remainder is unique to each host The default Subnet Mask setting of 255 255 255 0 is usually appropriate See Table 2 3 or consult your network administrator for more information NOTE Consult your...

Страница 69: ...igured using In Sight Explorer Refer to Appendix C for details on configuring the In Sight sensor s I O settings using In Sight PC Host B 1 1 Configuring the I O Expansion Module 1 Physically connect the I O Expansion Module to the In Sight sensor as described in the applicable I O Expansion Module Installation manual 2 Open the In Sight Explorer program and log on to the sensor 3 From the Sensor ...

Страница 70: ...d on an In Sight sensor to which the I O Expansion Module has just been added the Start Bit and Number of Bits parameters in WriteDiscrete must be changed to reflect the new configuration of the I O lines For example the physical output lines 0 and 1 become lines 8 and 9 HSOUT 0 and HSOUT 1 when the I O Expansion Module is enabled 6 Click OK to save the new settings to the sensor s flash RAM NOTE ...

Страница 71: ...it is automatically enabled for both inputs and outputs and hardware handshaking may be used in serial communications B 1 2 Enabling Hardware Handshaking 1 Physically connect the I O Expansion Module to the In Sight sensor as described in the applicable I O Expansion Module Installation manual 2 Open the In Sight Explorer program and log on to the sensor 3 From the Sensor menu Figure B 3 select th...

Страница 72: ... Sight Explorer 4 Select Hardware from the Handshake drop down list Figure B 4 Figure B 4 Serial Port Settings Dialog Refer to the In Sight Explorer Help file for details on using the Discrete and Serial Input Output functions in the In Sight spreadsheet 60 ...

Страница 73: ...n installing the In Sight 3400 sensor to an existing network consult your network administrator to determine whether a DHCP server is available Installing to a DHCP Network The In Sight 3400 sensor is factory configured for installation on an existing network with a DHCP server To add an In Sight 3400 sensor to a network using a DHCP server requires only connecting the sensor to the network and su...

Страница 74: ...ht PC Host to manually configure the In Sight 3400 sensor s network settings This installation may also require changes to network settings in Microsoft Windows see Appendix A page 55 1 Ensure that the sensor is connected to the network and has power 2 Open the In Sight PC Host program 3 From the In Sight spreadsheet open the System menu Figure C 1 4 Select Logon to open the Logon dialog Figure C ...

Страница 75: ...ew Host Configuration dialog Figure C 3 Figure C 3 New Host Configuration 7 Enter the last six characters of the In Sight 3400 sensor s 12 character MAC address without spaces or dashes Do not delete or change the first six characters that are already entered NOTE The MAC address is located on the serial number label affixed to the In Sight 3400 sensor This identifier is factory assigned unique fo...

Страница 76: ...rwrite the target In Sight 3400 sensor s Network settings If the checkbox is enabled the Use DHCP IP Address and Subnet Mask fields will be grayed out and the target sensor s network settings will be preserved 11 Click OK The message box shown in Figure C 4 appears Figure C 4 IP Configuration Message Box 12 Cycle power on the In Sight 3400 sensor by removing then applying power to the sensor s 24V...

Страница 77: ...are shipped with a User List containing three standard accounts admin monitor and operator each of these accounts is configured with a blank password 1 Attach a lens to the In Sight 3400 sensor to verify the acquisition of live video images The exact focal length needed depends on the working distance and the field of view required in your machine vision application For now any compatible lens may...

Страница 78: ...work dialog 6 Select a Host Name 7 The default User Name is admin The default password for the admin user is blank For now leave the User Name and Password fields configured with the default settings 8 From the Protocol drop down list select In Sight 9 Click the OK button to log on to the selected target In Sight sensor A message box appears while the logon is in progress C 1 3 Modifying the In Si...

Страница 79: ...lling the In Sight 3400 Vision Sensor 2 From the In Sight spreadsheet open the System menu Figure C 8 Figure C 8 System Menu 3 Select Settings to open the Settings menu Figure C 9 Figure C 9 Settings Menu 67 ...

Страница 80: ...system is a networked PC running In Sight PC Host software the Host Name will automatically be inherited from the Computer Name defined in the Windows operating system Each In Sight sensor has its host name set automatically the first time it boots For example an In Sight 3400 sensor s host name is is3400_xxxxxx For every sensor xxxxxx is given by the last 6 characters of the sensor s unique MAC A...

Страница 81: ...d outputs as well as the added serial hardware handshake capability The I O Expansion Module may be configured using In Sight PC Host Configuring the I O Expansion Module 1 Physically connect the I O Expansion Module to the In Sight sensor as described in the applicable I O Expansion Module Installation and Reference manual 2 Open the In Sight PC Host program and log on to the sensor 3 Open the Sy...

Страница 82: ... Using In Sight PC Host 4 Select Settings to open the Settings menu Figure C 12 Figure C 12 Settings Menu 5 Select Discrete Output to open the Discrete Output dialog Figure C 13 Figure C 13 Discrete Output Dialog Default Settings 70 ...

Страница 83: ... be changed to reflect the new configuration of the I O lines For example the physical output lines 0 and 1 become lines 8 and 9 HSOUT 0 and HSOUT 1 when the I O Expansion Module is enabled Figure C 14 Discrete Output Dialog I O Expansion Configuration 8 Select OK to save the new settings to the sensor s flash RAM NOTE An error message will appear if the I O Expansion Module is not attached to the...

Страница 84: ...h inputs and outputs and hardware handshaking may be used in serial communications Enabling Hardware Handshaking 1 Open the In Sight PC Host program and log on to the sensor 2 Physically connect the I O Expansion Module to the In Sight sensor as described in the applicable I O Expansion Module Installation and Reference manual 3 Open the System menu Figure C 15 Figure C 15 System Menu 72 ...

Страница 85: ...he In Sight 3400 Vision Sensor 4 Select Settings to open the Settings menu Figure C 16 Figure C 16 Settings Menu 5 Select Serial Port 1 to open the Serial Port 1 dialog Figure C 17 Figure C 17 Serial Port Dialog 73 ...

Страница 86: ...Configuring the In Sight Sensor Using In Sight PC Host 6 Select Hardware from the Handshake drop down list Figure C 18 Figure C 18 Serial Port Dialog Hardware Handshaking Enabled 74 ...

Страница 87: ...on may be present Figure D 1 Remote Head Camera Installation Diagram 1 Attach the remote head camera bracket item 4 to the mounting surface reference Figure 4 8 2 Attach the remote head camera item 5 to the remote head camera bracket using three M3 x 8mm Phillips head screws item 3 3 If required slide the Lens Tube item 6 over the remote head camera item 5 and secure to the remote head camera brac...

Страница 88: ...Installing the Remote Head Camera Mount 76 ...

Страница 89: ...e A2 button to Cancel If the A2 button is pressed the sensor will continue with the initialization using the previously configured settings including the selected Startup job If the sensor still fails to initialize the Startup job may be corrupted or incorrectly configured Repeat this procedure and select A4 to enter Safe Mode If the A4 button is pressed the sensor will enter Safe Mode In Safe Mod...

Страница 90: ...Installing the In Sight 3400 Vision Sensor www cognex com P N 597 0025 02 ...

Отзывы: