background image

USER MANUAL 


82

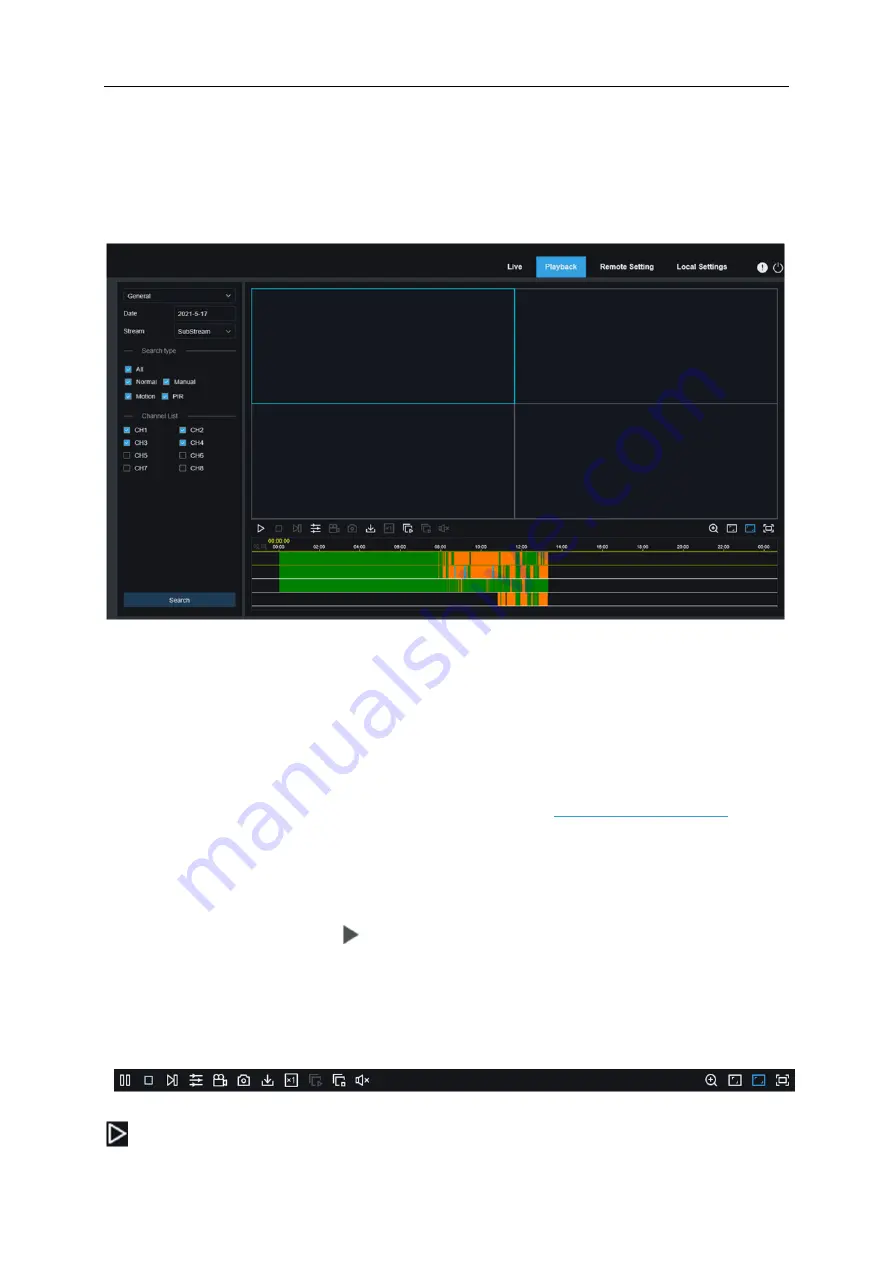
6.3.2 Playback 

You can search & play recorded files stored on the HDD inside the WIRELESS NVR, and save the 
video on your PC. 


Record Search:


1. Click the 

Playback

 icon in the upper right corner to enter the playback interface. 

2. Select the date to check the recording on the calendar. The days with recording is displayed with a red 
underline.  

3. Select the type of recording you want to query in "Type", or select "All" to query all types of recordings. 

4. Select the video stream you want to search and play. If you want to play sub-stream recordings, 
please make sure you have set the NVR to DualStream recording in 

4.2.2.1 Recording settings

5. Check the channel you want to play back in “Channel” (up to four channels can be searched and 
played back at the same time).   
6. Click the 

Search

 icon to search for video.   

7. Videos suitable for your search will be displayed on the timeline. Click the video clip you want to start 
playing, and then click the play icon 

  to play the video.   


6.3.2.1 Playback control icon   


  Play a single recording.


Содержание 57959

Страница 1: ... safe and dry place for future reference 21j When unpacking make sure that the product is intact and undamaged If any parts are missing or broken please call 1 888 866 5797 as soon as possible Copyright 2021 by Harbor Freight Tools All rights reserved No portion of this manual or any artwork contained herein may be reproduced in any shape or form without the express written consent of Harbor Freig...

Страница 2: ...s before installing video and or audio surveillance equipment 2 Install only according to these instructions Improper installation can create hazards 3 Do not overreach when installing this product Keep proper footing and balance at all times This enables better control in unexpected situations 4 Wear ANSI approved safety goggles during installation 5 Keep installation area clean and well lit 6 Ke...

Страница 3: ...shock do not attempt to disassemble NVR There are no serviceable parts inside 4 Do not expose the Power Adapter or NVR console to rain or wet conditions Water entering the Power Adapter or NVR console will increase the risk of electric shock 5 Do not abuse the Power Adapter cord Never use the cord for unplugging the plug from the outlet Keep cord away from heat oil sharp edges or moving parts Dama...

Страница 4: ...lug Do not use the tool if the power cord or plug is damaged If damaged have it repaired by a service facility before use If the plug will not fit the outlet have a proper outlet installed by a qualified electrician Figure A Outlets for 2 Prong Plug 1 The included Power Adapters do not require grounding 2 The Power Adapters may be used in either of the 120 volt outlets shown in the preceding illus...

Страница 5: ...ANTY IS EXPRESSLY IN LIEU OF ALL OTHER WARRANTIES EXPRESS OR IMPLIED INCLUDING THE WARRANTIES OF MERCHANTABILITY AND FITNESS To take advantage of this warranty the product or part must be returned to us with transportation charges prepaid Proof of purchase date and an explanation of the complaint must accompany the merchandise If our inspection verifies the defect we will either repair or replace ...

Страница 6: ...rtup Wizard 9 3 1 2 Network Configuration 9 3 1 3 Date Time 11 3 1 4 Disk 12 3 1 5 Resolution 13 3 1 6 Mobile 13 3 1 7 Summary 14 3 2 Live Viewing Screen 15 3 2 1 Camera Quick Toolbar 16 3 2 2 Task bar 16 Chapter 4 NVR System Setup 18 4 1 Channel 18 4 1 1 Channel 18 4 1 2 Private Zone 20 4 1 3 Motion Detection 21 4 1 4 Deterrence 23 4 2 Record 24 4 2 1 Encode 24 4 2 2 Record 27 4 2 3 Capture 29 4 ...

Страница 7: ...nt Search Playback Backup 68 5 1 3 Tag 71 5 1 4 External File 72 5 1 5 Picture Search 73 Chapter 6 Remote Access via Web Client 76 6 1 System Environment Requirements 76 6 2 Web Plugin Download and Installation 77 6 3 Web Client Manager 80 6 3 1 Live Interface 80 6 3 2 Playback 82 6 3 3 Remote Settings 85 6 3 4 Local Settings 86 Chapter 7 View the backup video on PC Mac 87 Chapter 8 Remote Access ...

Страница 8: ...e the equipment under the rain or humid environment like basement If the equipment is accidentally in contact with water please unplug the power cable and immediately contact your local dealer 5 Keep the surface of the equipment clean and dry Use soft and damp cloth to clean the outer case of WIRELESS NVR do not use liquid aerosol cleaners 6 Do not operate if any problems are found If there are an...

Страница 9: ... in the place with good ventilation 11 The attached power adapter can only be used for 1 set of WIRELESS NVR Do not connect more equipment or WIRELESS NVR may be restarted repeatedly because of insufficient power 12 Prevent the equipment from water dropping or splashing Do not place objects containing water such as flower vase on the equipment 13 Do not ingest battery Chemical Burn Hazard This pro...

Страница 10: ... 2 Insert a USB flash disk as a redundant hard disk for recording 5 Power port Connect with the power supply DC12V 2A 6 Reset button Press three seconds for password reset Press ten seconds for factory reset 7 SD card port Plug in SD card as a hard disk to record When the hard disk is working the SD card is not working Note Antenna Inside the NVR structure It is used to transmit and receive wirele...

Страница 11: ...enter the selected menu item and edit the setting 9 Decrease increase parameter value of control bar The volume can also be adjusted on the playback page 10 Down arrow key Volume decrease 11 Press to rewind during video playback 12 Press to fast forward during video playback 13 Press to play recorded video or enter the recording search menu 14 Press to start manual recording 15 Press to stop manua...

Страница 12: ...Live Viewing screen to open Camera Quick Toolbar o Click and hold to drag an area on motion mode or adjust the values of sliders and scales on menu mode 2 Mouse wheel o On the menu scroll the mouse wheel up and down to move the contents of the menu 2 2 Using the Virtual Keyboard When you need to enter data click the enter location and you will see the virtual keyboard automatically on the screen C...

Страница 13: ...6 1 1 General configuration New Admin name To set your own administrator name New Admin Password To set your own password The password must be a combination of 5 to 16 characters which can be numbers letters and symbols Confirm Password Enter your own password again Unlock Pattern Enable Enable unlock pattern Click the edit icon on the right to start setting the pattern Confirm the pattern twice a...

Страница 14: ...ELESS NVR Starting up 3 1 Startup Wizard Startup Wizard will help to configure the system and get the WIRELESS NVR works quickly 3 1 1 Startup Wizard Click the Start Wizard to proceed to the next step 3 1 2 Network Configuration ...

Страница 15: ...the same as the IP Address For example 192 168 001 001 DNS1 DNS2 DNS1 is the primary DNS server and DNS2 is a backup DNS server Usually it should be enough just to enter the DNS1 server address Port Web Port This is the port that you will use to log in remotely to the WIRELESS NVR e g using the Web Client If the default port 80 is already taken by other applications please change it The ONVIF port...

Страница 16: ...o set the system time Date format Choose from the dropdown menu to set preferred date format Time format Choose time format between 24Hour and 12Hour in the dropdown menu Time zone Set the correct time zone NTP NTP NTP stands for Network Time Protocol This feature allows you to synchronize the date and time automatically on the WIRELESS NVR over Internet Therefore the WIRELESS NVR needs to be conn...

Страница 17: ... 3 1 4 Disk If the HDD is installed in the WIRELESS NVR for the first time it must be formatted Select the HDD and then click Format HDD button to format the HDD Overwrite Use this option to overwrite the old recordings on the HDD when the HDD is full For example if you choose the option 7 days then only the last 7 days recordings are kept on the HDD To prevent overwriting any old recordings pleas...

Страница 18: ...itor The WIRELESS NVR supports to adjust the output resolution automatically to match the best resolution of your monitor when the system is starting up 3 1 6 Mobile If your WIRELESS NVR come with a P2P ID you can scan the QR code with your mobile app to view the WIRELESS NVR remotely ...

Страница 19: ...an check the system summary information you had set in the start wizard and finish the wizard Tick Don t show this window next time if you don t want to display Start Wizard when system reboot next time Click Finish button to save exit ...

Страница 20: ... This icon appears when the camera has detected PIR This icon appears when the camera has detected motion This icon indicates that the HDD is in error to work This icon indicates the HDD is unformatted This icon indicates the HDD is full Hard disk not found This icon indicates that the hard disk is read only Camera Quick Toolbar Alarm type and record status Task Menu Alarm thumbnail ...

Страница 21: ...en Press and hold the left button of your mouse to drag the area Click to adjust the image color of the channel You can adjust the HUE BRIGHT CONTRAST SATURATION of the image To switch the live view video stream between HD SD HD is mainstream live view SD is substream live view Click to turn on white light Click to pair with the camera Tag Click to add a tag 3 2 2 Task bar Click to open the Start ...

Страница 22: ... 3 Shutdown Click the button from Start Menu and then choose the action to be performed Click OK button the system will require to input the Admin password to authenticate Lock If necessary you can choose Lock Screen to lock the screen Reboot If necessary you can choose Reboot to reboot the system Shutdown If necessary you can choose Shutdown to shutdown the system ...

Страница 23: ...Network Device System parameters 4 1 Channel In this section you are allowed to configure the Wireless camera live viewing display pairing IP camera s image adjustment MESH mode switch setting and so on 4 1 1 Channel 4 1 1 1 Wireless Camera Channel Name Set up channel name Setup Click icon and enter into the setup page ...

Страница 24: ...i through which the camera communicates with the NVR STA The connection between the camera and the NVR is through the same LAN router network communication Choose a channel to configure Give a name to the camera Date format to display for the camera Time format to display for the camera Adjust the Bright value for the image color Adjust the Contrast value for the image color Adjust the Saturation ...

Страница 25: ...lected 4 1 2 Private Zone This menu allows you to create privacy zone s if you want to partially cover some certain part of the image You can create up to 4 privacy zones in any size and location on the camera image Enable the Privacy Zone and choose how many private zones you need The private zone will display as a red frame Click the edge of the red frame and drag it to any size to create a priv...

Страница 26: ...e Note The area of privacy zones you had set will be invisible in both live view recording video 4 1 3 Motion Detection This menu allows you to configure motion parameters When motion has been detected by one or more cameras your WIRELESS NVR will alert you to a potential threat at your home It does this by sending you an email alert with an attached image from the camera to use as a reference if ...

Страница 27: ...e main interface click the Alarm button to configure the motion detection alarm function view more on 4 3 1 Motion Detection Alarm Motion Detection Area Click Select All to set up the entire screen of the camera as the motion detection area Click Clear All to clear the entire area If you want to edit the size of the area please select the frame and change its position After the setting is complete...

Страница 28: ...equency of white light you can choose Low Middle High level Sensitivity Set sensitivity level Level 1 is the lowest sensitivity level while level 8 is the highest sensitivity level White light Deterrence area Click Select All to set up the entire screen of the camera as the white light deterrence area Click Clear All to clear the entire area If you want to edit the size of the area please select t...

Страница 29: ...ode This menu allows you to configure the image quality of recorded video or network transmission In general the main stream is the quality of the recorded video to be saved in the HDD the substream is the preview video quality through remote access such as web client and CMS Mobile bitstream defines the preview quality that can be viewed through remote access using mobile devices In the Audio int...

Страница 30: ...MANUAL 25 4 2 1 1 Main stream Resolution The resolution of the recorded video Video Encode Type Channel video encode type including 264 and 265 Audio If checked audio synchronous recording will be supported ...

Страница 31: ... MANUAL 26 4 2 1 2 Substream Resolution The resolution of the recorded video Video Encode Type Channel video encode type including 264 and 265 Audio If checked audio synchronous recording will be supported ...

Страница 32: ...llow the video to be recorded Stream Mode Choose the recording quality If you choose Dualstream the system will record main stream and substream at the same time if you choose single stream the system will only record single stream video PreRecord If this option is enabled the WIRELESS NVR starts recording a few seconds before an event occurs ...

Страница 33: ...nel If you want to use the same recording schedule for other channels use Copy function And then click Apply to save Channel Select the channel to set its recording parameter Normal When the time slot is marked green it indicates that the channel performs normal recording for that time slot PIR and Motion When the time slot is marked yellow it indicates the channel records when PIR and motion is d...

Страница 34: ...apture Auto Capture Enable or disable automatic capturing on the channel Stream Type Select the image resolution by mainstream or substream Normal Interval Snapshots are captured based on normal interval Alarm Interval Snapshots are captured based on alarm interval only when a motion is detected ...

Страница 35: ...rked green it indicates the channel is capturing snapshots based on the Normal Interval Motion When the time slot is marked yellow this indicates the channel is capturing snapshots based on Alarm Interval only when a motion is detected No Capture A time slot marked black means that there is no snapshot capturing scheduled for the time slot ...

Страница 36: ...is triggered Post Recording You can set the duration of the NVR s continuous recording after the event occurs The recommended recording time is 30 seconds but it can be set to a maximum of 5 minutes Show Message Check this box to display the icon on the live view display screen when motion is detected Send Email You can have the NVR automatically send you an email when it detects motion FTP Pictur...

Страница 37: ...splayed in full screen 4 3 2 Abnormal Alarm This menu allows you to configure the event type of the NVR Event Type Select the event type from the options below No Space on Disk When an HDD is full Disk Error If the HDD is not detected properly Video Loss If a camera is not connected properly Switch Check the box to enable the monitoring of the event Buzzer Set the buzzer duration when the event oc...

Страница 38: ... schedule for alarm output push notification FTP upload cloud upload buzzer and other functions Channel Select the channel and set up its capture parameters When the time period is marked as green it means that the function of the channel is enabled during the time period ...

Страница 39: ...ing parameters IP Address The IP address identifies the WIRELESS NVR in the network It consists of four groups of numbers from 0 to 255 which separated by periods For example 192 168 001 100 Subnet Mask Subnet mask is a network parameter which defines a range of IP addresses that can be used in a network If IP address is like a street where you live then subnet mask is like a neighborhood The subn...

Страница 40: ... if you log in on a Win7 system computer you need to check this option to switch to the HTTPS page Select wireless mode to use wireless network SSID Scan Click Scan to scan for wireless networks and select the wireless network that you need or use the soft keyboard to enter the SSID name of the wireless network in the SSID column Password Enter the password of the correspondent wireless network Ap...

Страница 41: ...example using a mobile application If the default port 9000 is already used by other applications please change it RTSP Port This is the port through which the NVR is allowed to transmit the real time stream to other device for example stream media player Https Port The Https port is the web browsing port which is mainly used for HTTPS services It is another HTTP that provides encryption and trans...

Страница 42: ...and password you obtained when creating an account on the webpage of the DDNS service provider After entering all the parameters click Test DDNS to test the DDNS settings If the test result is Network unreachable or DNS error please check whether the network is normal or whether the DDNS information is correct After the user has applied for the dynamic domain name service the browser can be used t...

Страница 43: ...il This menu allows you to configure email settings Please complete these settings if you want to receive the system notifications on your email when an alarm is triggered HDD is full HDD is in error state or video loss occurs ...

Страница 44: ... of your email User Name Enter your email address Password Enter the password of your email Receiver 1 3 Enter the email address that you want to receive the event notifications from the WIRELESS NVR Interval Configure the length of the time interval between the notification emails from the WIRELESS NVR To make sure all settings are correct click Test Email The system will send an email to your in...

Страница 45: ...2 Email Schedule You need to configure the schedule to fully implement the Email notification The color codes on email schedule have the following meanings PIR and Motion Green area Exception Red area Intelligent Blue area ...

Страница 46: ... Picture Quality Set up the quality of the pictures that are uploaded to the FTP Video Stream Type Set up the stream type of the video that is uploaded to the FTP Main stream and substream are optional Max Package Interval Set the maximum video time interval that is the maximum recording time of an event After this time another recording file will be created to continue recording Directory Name En...

Страница 47: ...USER MANUAL 42 4 5 4 2 FTP Schedule The colors on the email schedule have the following meanings PIR and Motion Yellow area Intelligent Blue area ...

Страница 48: ...the IP in the white list can connect to the device Enable Enable or disable the filtering function After enabling it you can choose to enable blacklist or whitelist Restricted Type Select the list to be set black list or white list Start Address Enter the starting address End Address Enter the ending address ...

Страница 49: ...k Format HDD To start formatting you need to enter your user name and password and then click OK to confirm to continue formatting Overwrite Use this option to overwrite the old recordings on the HDD when the HDD is full For example if you choose the option 7 days then only the last 7 days recordings are kept on the HDD To prevent overwriting any old recordings select OFF If you have disabled this...

Страница 50: ...e such as read write heads electronics and internal memory Long This is a longer test that verifies the above as well as performing a surface scan to reveal problematic areas if any and forces bad sector relocation Conveyance This is a very quick test that verifies whether the mechanical parts of the hard drive are working Note When performing the test your WIRELESS NVR will continue to work as no...

Страница 51: ...d Status The activation status of cloud storage Inactive Unactivated and activated Activated Capacity Cloud storage capacity the percentage bar is the percentage of cloud storage memory used and the one on the right is the remaining capacity total capacity Cloud Overwrite Set cloud storage overwrite frequency Video Type Set the format of the video that is uploaded to the cloud Folder Name The name...

Страница 52: ...sed of numbers For example two WIRELESS NVRs are installed in the same place the Device ID is 000000 for one of the WIRELESS NVRs and 111111 for another WIRELESS NVR When you want to operate the WIRELESS NVR with a remote controller both of the WIRELESS NVR may receive the signal from controller act at the same time If you want to control only the WIRELESS NVR with ID 111111 you can input the Devi...

Страница 53: ...od allows the web to communicate with the NVR within the setting time range If the setting time is exceeded without operating the web the web will prompt a timeout and the communication between the web and the NVR session ends Preview Playback Session Timeout Web preview playback session timeout period This function is used in conjunction with Web Session Timeout min Show Wizard If you want to dis...

Страница 54: ...ing time for different countries or regions Enable DST If Daylight Saving applies to your time zone or region check this option to enable Time Offset Select the amount of time that Daylight Saving has increased by in your time zone This refers to the difference in minutes between Coordinated Universal Time UTC and the local time Enable DST You can select how Daylight Saving starts and ends Check t...

Страница 55: ... 6 1 3 Output Configuration This menu allows you to configure video output parameters Select LIVE OUT mode in the Video Output drop down menu VGA HDMI Resolution Select a display resolution that is suitable for your TV 1920 x 1080 will suit most TVs If your WIRELESS NVR supports 4K output resolution you can select either 2K 2560 x 1440 or 4K 3840 x 2160 to adapt to higher resolution monitors Scale...

Страница 56: ...ll hide the mouse cursor when idle You can also disable this by selecting OFF Cursor Acceleration To adjust the speed to move the mouse cursor Transparency Click and hold the slider left or right to change how transparent the Menu Bar and Main Menu will appear on screen 4 6 2 Multi user Management This menu allows you to configure the user name password and user permission Scale To adjust the size...

Страница 57: ... up multiple user accounts with varying levels of access to the system Default User The default user is the default user that the NVR restarts to log in 4 7 2 1 Changing Password To change the password for the administrator or user accounts click the User Edit icon The password has to be a minimum of 5 characters and can contain a mixture of numbers and letters Enter your new password again to con...

Страница 58: ...er name 4 Click Password enter the password to be set 5 Click Confirm and enter the password again to confirm 6 Click Save and you will need to enter the administrator password for authentication 4 6 2 3 Setting User Permissions The administrator account is the only account that has full control of all system functions You can enable or disable access to certain menus and functions of each user ac...

Страница 59: ...o on to maintain the system Manual record Recording can be started manually and can be stopped manually Disk You can manage and control the operation of hard disk and U disk Remote Login Whether have the permission to remotely access the NVR Manual Capture You can manually start the screenshot and manually stop the recording Audio You can control channel audio and intercom Database Management Whet...

Страница 60: ...ary users have the right to playback the video of the selected channel 3 Click Save to save your modification 4 6 3 System Maintenance In this section you will be able to search and view the system log restore default settings upgrade the system export import system parameters and configure system auto reboot ...

Страница 61: ...en calendar 3 Select the type of events you would like to search for from the dropdown next to Log Type or select All to see the entire system log for the selected time period 4 Click Search 5 Browse system log events from your search period o Video events can be played back instantly by clicking in the Playback column o Use the buttons in the bottom right corner of the menu to move between pages ...

Страница 62: ...n choose to reset all settings at once or just settings on specific menus Restoring default settings will not delete recordings and snapshots saved to the hard drive Check the items you want to restore or check Select All to choose all items Click Apply to load default settings of your chosen items ...

Страница 63: ... the WIRELESS NVR s USB port 2 Click Select File button to choose the firmware file in your USB flash drive then Click OK 3 Click Upgrade button to start system upgrade The system upgrade will last around 5 10 minutes please do NOT power off the WIRELESS NVR or remove the USB from WIRELESS NVR during firmware upgrade ...

Страница 64: ...ings Click to save the WIRELESS NVR current system settings to the USB device You will be required to input the Admin password to authenticate Load Settings Once you have created a system settings export file you can import the settings on another NVR Click Load Settings button to pop up the USB flash driver menu and select the parameter file You will be required to input the Admin password to aut...

Страница 65: ...he system to auto reboot the WIRELESS NVR regularly It is recommended to keep this function enabled as it maintains the operational integrity of your WIRELESS NVR Auto Reboot Check to enable Time You can set the WIRELESS NVR to reboot by day week or month ...

Страница 66: ...3 6 Developer Mode Telnet enable or disable telnet Collect logs enable or disable collect logs Export log click the on off you can export log to USB disk Delete log click the on off you can delete log from the local disk ...

Страница 67: ...e IP cameras you want to upgrade firmware 2 Click Select File to select the update file from your USB flash drive then click OK 3 Click IPC Upgrade button to start upgrading You will be required to input the Admin password to authenticate Please do NOT power off the WIRELESS NVR and IP camera or remove the USB during the upgrading ...

Страница 68: ... 5 1 Information View system information such as device ID device model name IP address MAC address firmware version and so on If your WIRELESS NVR supports P2P function you will find the P2P ID P2P QR code in the information page You can scan this QR code with mobile app to remote view the WIRELESS NVR 4 6 5 2 Network State View network information ...

Страница 69: ...s you the ability to save important events both video and snapshots to a USB flash drive 5 1 Using Search Function Click Search button in the Start Menu to enter search section 1 Search Date Choose a date that you want to play back 2 Search Type the system provides different search types to narrow your search 3 Channel Selection to choose the channels you want to search play 4 Video Playback Contr...

Страница 70: ...ursor to the channel you want to capture and then click the icon to save the snapshot Add a default label mark the video playback start time at the current time of the current channel click to add Add a custom label click to add label a custom window will pop up you can name the label 5 Timeline Continuous recordings are shown with colored bars to represent different types of recording legend show...

Страница 71: ... to 24 00 5 Click the icon to start playback 6 Control the playback with buttons on Video Playback Controls 7 Use the timeframe options to view a smaller or larger time period 8 If you want to quickly save a section of video during playing back use the Video Clip backup function 9 Added the function of Tag click to add custom tags click to add default tags you can make a mark at the current time i...

Страница 72: ...on of your mouse and drag the cursor to the timeline where you want to end the video clip 7 The icon has been changed to icon click to save the video clip 8 Select a file type for your backup files click Save button to save the video clips Please make sure your USB driver has enough space to save the video clips 9 The backup drive menu appears Navigate to the folder you want the backup files to sa...

Страница 73: ...ch or check Search Type to choose all 3 Choose the channels you want to search or check Channel to choose all channels 4 Click icon to start search 5 Events fitting your search criteria are displayed in list form You can double click the left button of your mouse upon one of the events to play the video immediately 6 Click icons in the bottom right corner of the menu to browse between pages of eve...

Страница 74: ...button of your mouse upon one of the event system will show the event information on the left bottom corner of the screen 9 Descending order sort the file list in descending order 10 Select Check the box next the number of the event to select files or check the box next Select to select all events in the page 11 The number of selected files total size information will be displayed at the right bot...

Страница 75: ... of your mouse to exit the playback and return to event search window Add the new function of adding tags click to add custom tags click to add default tags you can make a mark at the current time in the current channel After the addition is complete you will be directed to the previously made mark in the tag playback interface to play back 4 The event you are playing now will be displayed on the ...

Страница 76: ... MANUAL 71 5 1 3 Tag You are allowed to view edit play back or delete all tags Select the time and channel and click to complete the search Click to jump to the position marked by the tag to play back video ...

Страница 77: ...USER MANUAL 72 5 1 4 External File This section allows you to play the video of the external USB flash drive Select the file on the left and the video will be played automatically ...

Страница 78: ... you want to search or check Search Type to choose all 3 Choose the channels you want to search or check Channel to choose all channels 4 Click button to start search 5 Pictures fitting your search criteria are displayed in list form You can double click one of the pictures to get a larger view 6 Click icons in the bottom right corner of the menu to browse between pages of pictures or input the pa...

Страница 79: ... Detailed view You can view the details of the events 8 When you click the left button of your mouse upon one of the pictures system will show the picture information on the left bottom corner of the screen 9 Check the box next the number of the event to select files or check the box next Select to select all pictures in the page 10 The number of selected files total size information will be displ...

Страница 80: ... pictures to a USB flash drive Click button to view the pictures in slideshow 3 Press button to exit preview control window and go back to picture search window Press button to pause press to resume slideshow Press button to display previous snapshot or group of snapshots press to display the next snapshot or group of snapshots Click button to view a single snapshot at a time click button to view ...

Страница 81: ...um Recommended CPU Intel Core i5 CPU Intel Core i5 CPU or higher RAM 4G or more 8G or more Hard Drive 500G or more 1000G or more Display RAM 2G or more 4G or more Display Resolution 1280 1024 1920 1080 OS Windows 7 and above Mac OS X 10 9 and above DirectX DirectX 11 Direct3D Acceleration Function Ethernet Adapter 10 100 1000M Ethernet Adapter IE Microsoft Internet Explorer Ver 11 10 9 8 It doesn ...

Страница 82: ...r IE Chrome Firefox 1 Launch the explorer on your PC and enter the WIRELESS NVR static IP address or DDNS domain name Host Name in the URL box 2 After step 1 enter the Web login page Input your user name and password to login the web client 3 After step 2 enter the Web control page of the WIRELESS NVR ...

Страница 83: ...ogle Chrome please use Version V41 or lower If you use V42 to V44 you need to enable NPAPI plugins Please enter chrome flags enable NPAPI on URL bar to find and enable NPAPI It doesn t support V45 or above so far For Mac SAFARI 1 Launch the Safari on your Mac and enter the WIRELESS NVR static IP address or DDNS domain name Host Name ...

Страница 84: ...ient locate the downloaded file and double click it 3 Click on Continue Install Enter user name and password for Mac computer Click on Install Software Close to finish installation 4 Close SAFARI and repeat step 1 to open the Web Client login page 1 2 3 4 ...

Страница 85: ...e channel list Turn on off live video streaming When the live video stream is turned on the icon is displayed in blue Manual recording icon Click to start recording streaming video manually Click again to stop recording Save the manual video to your computer When recording the icon is blue Manual snapshot icon Click to save a snapshot of the current real time display to your computer Bit rate icon...

Страница 86: ...ginal ratio Stretch Stretch the real time video to fit the entire area of each channel on the screen Enlarge the web client to full screen Manual recording Click to start manual recording of all displayed channels Click again to stop recording Save the manual video to your computer Manual capture Click to capture the current images of all displayed channels and save them to your computer Electroni...

Страница 87: ...elect All to query all types of recordings 4 Select the video stream you want to search and play If you want to play sub stream recordings please make sure you have set the NVR to DualStream recording in 4 2 2 1 Recording settings 5 Check the channel you want to play back in Channel up to four channels can be searched and played back at the same time 6 Click the Search icon to search for video 7 V...

Страница 88: ...f the selected channel at a certain time Select the file you want to download press the start download icon to start and you will see the download status Press the stop download icon to stop downloading Playback speed Click to select the playback speed Play all channels Click to play all the channels you choose to search Only available when the synchronized playback option is not selected Stop pla...

Страница 89: ...ct Picture from the drop down menu in the upper left corner 3 Select a day on the calendar to search Dates with snapshots are underlined in red 4 Select the type of picture you want to search from the list in the Search Type menu or select All to search for all types 5 Check the channels you want to search for recording 6 Click Search 7 Images that match your search criteria will be displayed on t...

Страница 90: ...USER MANUAL 85 6 3 3 Remote Settings You can configure the NVR settings remotely here Please refer to Chapter 4 NVR System Setup for more details about NVR settings ...

Страница 91: ... folder where you want to save the manual recording on your computer Download Path Click to browse and select the folder where you want to save the downloaded video to your computer Snapshot Path Click to browse and select the folder where you want to save the manually captured snapshot to your computer File Type Select the type of manual recording file you like Save Click to save the modification...

Страница 92: ...VideoPlayer_x x xx_xxxx_xx_xx exe for example VideoPlayer_1 0 15_2017_01_06 exe Minimum computer system requirements Intel Pentium 4 or above Microsoft system XP Vista 7 8 10 256MB RAM 16MB existing 1 Install the video playersoftware of the CD and run it 2 Copy the backup file to your computer 3 Click the Open File icon or click the icon in the playlist to load a single or multiple video files It ...

Страница 93: ...e or load folder 3 Play Control Play Pause playing Stop playing Play frame by frame Click once to play one frame of video Slow playback You can set 1 2 1 4 1 8 and 1 16 times speed playback Fast forward x2 x4 x8 and x16 speed playback can be set up 4 Volume Control Multi screen playback It allows multiple videos to be played at once When you select Multi screen playback you can drag the video of t...

Страница 94: ...o end the video clip Put the video player on top Display the video window in full screen 6 Advanced settings menu Select the language of the player and configure the functions of the player Basic Settings Set up stick on top mode Capture Settings Set the save format and save path of the snapshot ...

Страница 95: ...orts remote access through mobile devices which is based on Android and iOS operating systems 1 For Android device App Store or iOS device search for RXCamView in Google Play Store and install it 2 Run the application and the real time viewing screen will be displayed ...

Страница 96: ...ation and add a new device 1 Scan the QR code Scan the QR code to add a device 2 Online Search In the same local area network as the device search for the device and add it 3 Manual Add IP address ID Enter the IP address or P2P ID Media Port Enter media port in network settings User Name and Password Enter the User name and password of the NVR 1 2 3 ...

Страница 97: ...nnels a total of 80 channels can be displayed Capture Capture the image of the selected channel screen save it in the APP file list and download the captured picture to the mobile phone in the file list Record Record the selected channel save it in the APP file list and download the recorded video to the mobile phone in the file list Audio turn on or off the sound Intercom Two way device intercom ...

Страница 98: ...ble at WIRELESS NVR side to see if the cable is firmly connected and if it is worn out and needs to be replaced or to check if NTSC or PAL is selected consistently 4 Q How to prevent WIRELESS NVR from being influenced by heat A The WIRELESS NVR needs to dissipate heat while it is running Please place the WIRELESS NVR in a place with good air circulation and away from heat sources to ensure stabili...

Страница 99: ...USER MANUAL 94 ...

Страница 100: ... multiple decoders are connected 120ω resistance should be added at the far end of the AB line of the PTZ decoder to achieve reflection suppression and impedance matching Otherwise the PTZ control will be unstable 12 Q Why doesn t dynamic detection work A Please check if the motion detection time and motion detection regional setting are correct and if the sensitivity is set too low 13 Q Why doesn...

Страница 101: ... cables and RS 232 RS 485 and other interfaces when the power is on otherwise these ports will be easily damaged 5 Please check the HDD cable and data cable regularly to see if they are ageing 6 Please prevent the audio and video signals of WIRELESS NVR from being intervened by other electronic devices and prevent the HDD from being damaged by static electricity and induced voltage If the network ...

Отзывы: