background image


ci5000 Series Printer Technical Service Manual


Version 0.1 


3-10 

  Update firmware on the Printer. 

  Backup and restore all Graphics, Messages and Properties of the Printer. 

  Upload/Download Language files to the Printer. 

  Upload Graphics to the Printer. 

  Upload Font files to the Printer. 

  Upload IME files to the Printer. 

  Upload Keyboard image files to the Printer. 

 
The Ethernet interface can be used to: 

  Backup and restore all Graphics, Messages and Properties of the Printer. 

  Perform commands to select messages and update text in messages. 

  Perform commands to control the Printer. 

  Receive acknowledgements of Photocell trigger, Print Ready and Print Complete. 

  Receive warnings/errors. 

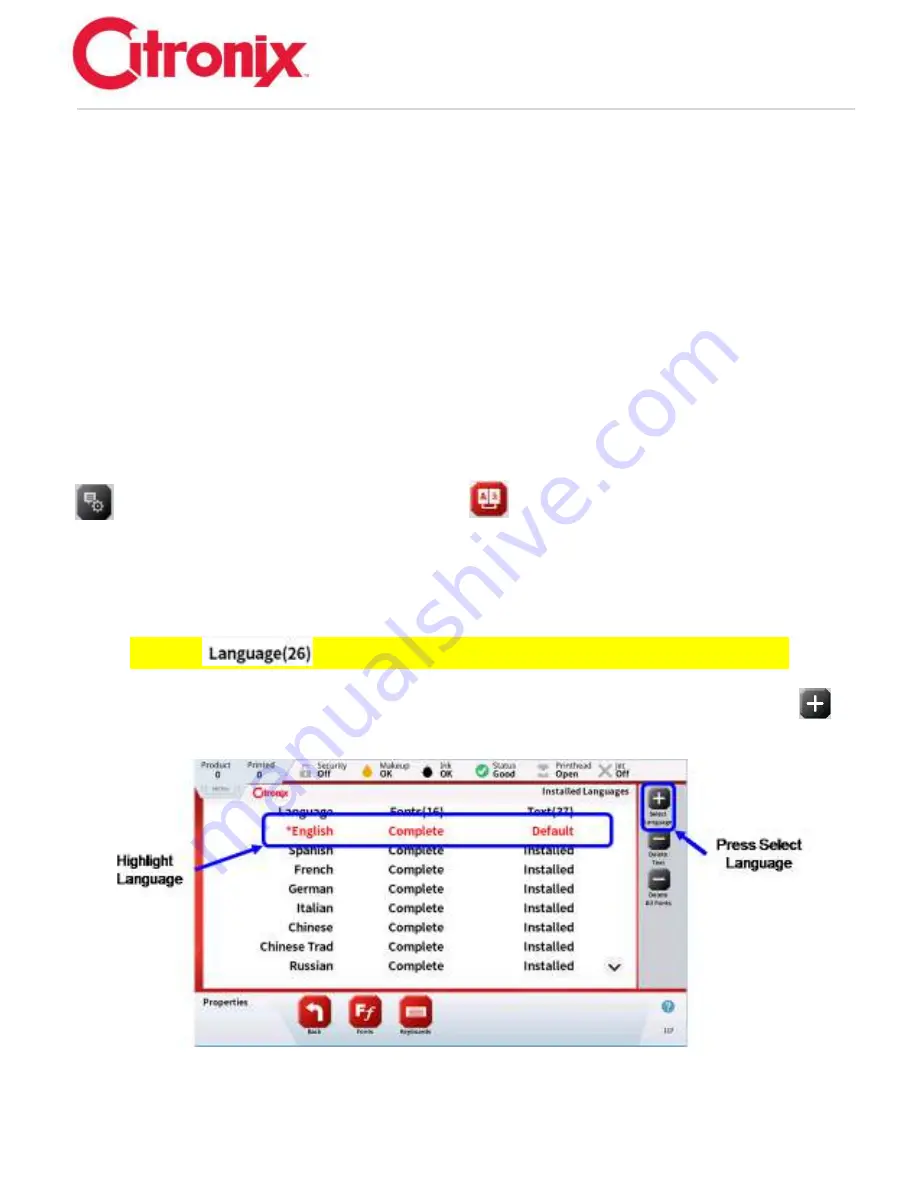
Changing System Language 

From the Home screen, press the [Menu Bar] Tab to open the Menu bar then select the [Properties]  

 button on the Menu Bar. Press the [Languages] 

 button in the Navigation Tool Bar to select 

the printer’s:


1.  Operating Language 
2.  Printed Fonts 

 
In this screen there are 3 columns showing the Language, Font, and Text. The Number beside each 
shows the number of that category that have been downloaded.  


Example: 

 this shows that 26 languages have been loaded onto this printer. 


To change/select a Language, first select/highlight the Language then press the [Select Language] 


button. This will change the operating Language of the printer. 


Individual Fonts can be viewed or deleted by pressing the [Font] button. A Language must be highlighted 
first.  

Содержание ci5200

Страница 1: ...ci5000 Series Printer Technical Service Manual Version 0 1 1 Citronix ci5000 Series Printer Technical Service Manual ci5200 ci5300 ci5500 ci5650 Revision 0 1 Part Number 012 1002 007 ...

Страница 2: ...ci5000 Series Printer Technical Service Manual Version 0 1 2 THIS PAGE INTENTIONALLY LEFT BLANK ...

Страница 3: ...the printer Calibration troubleshooting All rights reserved No part of this publication may be reproduced stored on a retrieval system or transmitted in any form or by any means electronic mechanical photocopying recording or otherwise without the prior permission of Citronix Inc To the best of our knowledge the information contained in this guide was correct at the time of printing Continual enha...

Страница 4: ...1 2015 Information Technology Equipment Immunity Characteristics Limits and Methods of Measurement IEC60950 1 2005 2nd ed A1 2009 A2 2013 Information Technology Equipment Safety Part 1 General Requirements 2014 35 EU Low Voltage Directive 2014 30 EU EMC Directive CE Marked accordingly certification date May 20 2016 Each product marketed is identical to the representative unit tested and found to m...

Страница 5: ...the device This device complies with Health Canada s Safety Code The installer of this device should ensure that RF radiation is not emitted in excess of the Health Canada s requirement Changes or modifications not expressly approved by the party responsible for compliance could void the user s authority to operate the equipment French Version Le présent appareil est conforme aux CNR d Industrie C...

Страница 6: ...GRAPHICAL USER INTERFACE SECTION 2 PRINTER OPERATION SECTION 3 INSTALLATION AND COMMISSIONING SECTION 4 STATUS BAR TROUBLESHOOTING SECTION 5 CLEANING AND MAINTENANCE SECTION 6 COMMUNICATIONS SECTION 7 SPARES ACCESSORIES SECTION 8 CALIBRATION SECTION 9 ci5650 AIR SYSTEM SECTION 10 REFERENCE SECTION 11 ...

Страница 7: ...on 1 8 Interfaces 1 8 Inputs opto isolated open collector or TTL type 1 8 Outputs 1 9 User Interface and Firmware Capabilities 1 9 Operating Environment 1 9 Electrical Requirements 1 9 Controller and Printhead Physical Characteristics 1 9 Printhead and Umbilical 1 11 Printhead 1 11 Umbilical 1 11 Printhead Dimension Drawings 1 11 Print Speeds and Print Quality Charts 1 13 Print Speed Chart Drop Si...

Страница 8: ...hart Drop Size HS50 External Encoder 1 20 Consumables and Delivery 1 21 Ink System 1 22 Ink and Makeup Tanks 1 24 Ink Pump 1 24 Ink System Valves Manifold 1 24 Pressure Transducer 1 26 Viscometer 1 26 The ciEasyServ Filter Module 1 26 Ink System Diagram 1 28 Print Head 1 29 Drop Generator 1 30 Nozzle 1 30 Charge Electrode and Strobe 1 30 Phase Detector 1 30 Deflector Plates 1 30 Gutter 1 30 Printh...

Страница 9: ...printer Use the day to day functionality of the printer Calibration troubleshooting Component replacements Before You Begin Before printing make sure 1 All warnings and notes have been read and understood 2 The ci5000 Series Printer is correctly installed and integrated with your production line 3 At least one message has been created programmed and saved refer to Section 3 Printer Operation or se...

Страница 10: ...inting inks do not cause problems However everybody using them should be familiar with the appropriate safety standards and be aware of the precautions that should be taken The following are basic requirements Proper standards of industrial practice relating to cleanliness and tidiness must be maintained Inks and their containers must be stored and handled with care Smoking or the use of open flam...

Страница 11: ... set aside for the purpose chosen for safety in case of fire Materials based on volatile flammable solvents must be stored in accordance with local regulations Fire Risk For an electrical fire do not use water If water must be used such as in the case of a Nitro cellulose ink fire see below the power MUST BE REMOVED first Many inks contain Nitro cellulose as the binder and remain highly flammable ...

Страница 12: ...erface and all interfacing connectors Low High voltage power supplies Pump Motor and the power switch The fluids compartment houses the ink system filter module and the ink and make up tanks These tanks are filled using their respective fill ports located on the top of the printer ...

Страница 13: ...n as the tablet has the touchscreen display ciSafeFill Reader and controller PCB The right hand side of the electronics cabinet houses the air filter The left side has the accessory connectors Beacon Photocell and encoder power plug and the power on off button Power On Off Button Flexible conduit Touch Screen Print Head Reader Tablet External Interface Connectors Power Cord Socket ...

Страница 14: ... Interfaces ci5200 Ci5300 Ci5500 ci5650 1 RS232 1 RS232 1 Ethernet 1 RS232 1200 up to 115 2KB USB USB USB SB Card SB Card SB Card Inputs opto isolated open collector or TTL type ci5200 ci5300 ci5500 ci5650 1 photocell 2 photocell 1 shaft encoder 1 shaft encoder 6 programmable Programmable options for Photocell 2 Remote message selection 255 possible selections Air Filter Ink System Cover ...

Страница 15: ...and stop operation Continuous print capability Programmable Password security Backup restore functions Real and expiration time and date coding Multiple operator languages Shift and rollover time and date coding Multi national character printing Unicode Product and batch counting coding Downloadable firmware updates Ethernet or USB Internet browser interface for ci5500 ci5650 Depending on the size...

Страница 16: ...bs 40 3 lbs Weight Printhead 2 lbs 2 lbs The weight of the Printhead and conduit is included in the Printer weight Ci5200 ci5300 ci5500 Side View ci5650 Side View Ci5200 ci5300 ci5500 Front View ci5650 Front View Cabinet Dimensions ci5200 ci5300 ci5500 ci5650 Height 14 2 inches 361mm 14 2 Inches 361mm Width 16 inches 406mm 17 7 inches 450mm Depth 15 9 inches 404mm 15 9 inches 404mm ...

Страница 17: ... 15 feet 4 5 meters or 20 feet 6 meters IP55 Protected against dust and has limited ingress no harmful deposit Protected against low pressure Jets of water from all directions limited ingress permitted IP65 Totally protected against dust Protected against low pressure Jets of water from all directions limited ingress permitted Printhead Dimension Drawings Straight Printhead Umbilical Fitting ci520...

Страница 18: ...ci5000 Series Printer Technical Service Manual Version 0 1 1 12 90 Degree Printhead Umbilical Fitting ci5500 ci5650 option Right Angle Printhead ci5500 ci5650 option ...

Страница 19: ...pplication the following factors need to be considered Line Speed Pixel Setting vertical resolution Print Resolution or dpi horizontal resolution or raster pitch Whether an external or internal encoder is used For more details reference Section 3 Printer Operation NOTE Print Quality Speed may be selected in increments of 20 to optimize for each application 300 is the best quality 0 is the fastest ...

Страница 20: ...4 234 71 1L12 0 876 701 214 1L12 100 419 335 102 1L12 200 283 227 69 1L12 300 214 171 52 1L16 0 292 350 107 1L16 100 178 214 65 1L16 200 126 151 46 1L16 300 97 117 36 2L7 0 1285 771 235 2L7 100 756 454 138 2L7 200 494 297 90 2L7 300 330 198 60 1L19 0 237 308 94 1L19 100 145 188 57 1L19 200 101 131 40 1L19 300 77 100 31 1L25 0 104 188 57 1L25 100 71 129 39 1L25 200 51 92 28 1L25 300 40 71 22 3L7 0 ...

Страница 21: ...0 280 336 103 1L16 100 171 206 63 1L16 200 121 145 44 1L16 300 93 112 34 2L7 0 1233 740 226 2L7 100 725 435 133 2L7 200 474 285 87 2L7 300 316 190 58 1L19 0 228 296 90 1L19 100 139 180 55 1L19 200 96 125 38 1L19 300 74 96 29 1L25 0 100 180 55 1L25 100 69 123 38 1L25 200 49 88 27 1L25 300 38 69 21 3L7 0 536 322 98 3L7 100 474 285 87 3L7 200 301 180 55 3L7 300 199 119 36 1L31 0 54 151 46 1L31 100 36...

Страница 22: ...7 2L7 100 536 321 98 2L7 200 350 210 64 2L7 300 233 140 43 1L19 0 168 219 67 1L19 100 103 133 41 1L19 200 71 93 28 1L19 300 55 71 22 1L25 0 74 133 41 1L25 100 51 91 28 1L25 200 36 64 20 1L25 300 29 52 16 3L7 0 396 238 72 3L7 100 350 210 64 3L7 200 222 133 41 3L7 300 147 88 27 1L31 0 43 121 37 1L31 100 27 77 23 1L31 200 20 55 17 1L31 300 15 42 13 4L7 0 314 188 57 4L7 100 260 156 48 4L7 200 152 91 2...

Страница 23: ...L7 300 224 134 41 1L19 0 161 210 64 1L19 100 98 128 39 1L19 200 68 89 27 1L19 300 52 68 21 1L25 0 71 128 39 1L25 100 49 87 27 1L25 200 34 62 19 1L25 300 28 50 15 3L7 0 380 228 69 3L7 100 336 202 61 3L7 200 213 128 39 3L7 300 141 85 26 1L31 0 42 117 36 1L31 100 26 74 23 1L31 200 19 52 16 1L31 300 14 40 12 4L7 0 301 181 55 4L7 100 250 150 46 4L7 200 146 87 27 4L7 300 97 58 18 Print Speed Chart Drop ...

Страница 24: ...00 152 197 60 1L19 200 105 137 42 1L19 300 81 105 32 1L25 0 76 213 65 1L25 100 48 135 41 1L25 200 34 96 29 1L25 300 27 75 23 3L7 0 613 368 112 3L7 100 518 311 95 3L7 200 329 197 60 3L7 300 221 133 40 1L31 0 61 172 52 1L31 100 39 109 33 1L31 200 28 78 24 1L31 300 22 60 18 4L7 0 499 300 91 4L7 100 408 245 75 4L7 200 225 135 41 4L7 300 150 90 27 Print Speed Chart Drop Size Micro External Encoder Maxi...

Страница 25: ... 78 101 31 1L25 0 73 204 62 1L25 100 46 129 39 1L25 200 33 92 28 1L25 300 26 72 22 3L7 0 588 353 108 3L7 100 497 298 91 3L7 200 315 189 58 3L7 300 212 127 39 1L31 0 59 165 50 1L31 100 37 105 32 1L31 200 27 75 23 1L31 300 21 58 18 4L7 0 479 287 88 4L7 100 392 235 72 4L7 200 216 129 39 4L7 300 144 86 26 Print Speed Chart Drop Size HS50 Internal Encoder Maximum Line Speed Pixel Setting Print Speed Qu...

Страница 26: ... 100 50 139 42 1L25 200 35 99 30 1L25 300 28 77 24 3L7 0 604 362 110 3L7 100 534 321 98 3L7 200 339 203 62 3L7 300 228 137 42 1L31 0 61 170 52 1L31 100 40 113 34 1L31 200 29 80 24 1L31 300 22 62 19 4L7 0 514 309 94 4L7 100 421 253 77 4L7 200 231 139 42 4L7 300 154 93 28 Print Speed Chart Drop Size HS50 External Encoder Maximum Line Speed Pixel Setting Print Speed Quality Selection Characters per s...

Страница 27: ...1L25 100 48 133 41 1L25 200 34 95 29 1L25 300 26 74 23 3L7 0 579 348 106 3L7 100 513 308 94 3L7 200 325 195 59 3L7 300 218 131 40 1L31 0 58 163 50 1L31 100 39 108 33 1L31 200 27 77 23 1L31 300 21 60 18 4L7 0 494 296 90 4L7 100 404 242 74 4L7 200 222 133 41 4L7 300 148 89 27 Consumables and Delivery Ink Makeup Types Full range MEK Acetone Ethanol Ink Makeup Colors Black Red Blue Yellow Green White ...

Страница 28: ...orts located on the top of the printer The following components are housed within the Ink system enclosure Ink and Make up Fill Ports Ink and Makeup Tanks ci5200 ci5300 ci5500 ci5650 Micro HS50 Pigment Heavy Pigment MEK Black Black Ethanol Black Black MEK Red Red MEK Blue Blue Acetone Black Black MEK Plastic Black MEK UV Readable UV Readable MEK Alcohol Resistant Black MEK Caustic Washable Green G...

Страница 29: ...nk Pump Ink System Valves and Manifold Pressure Transducer Viscometer Filter Module Fluid Level Sense Ink Manifold Ink Fill Port Viscometer Ink Tank Make up Fill Port Filter Module Make up Tank Make up Manifold behind bracket Ink Pump Pressure Transducer Module Base ...

Страница 30: ... adjustments explained in SECTION 5 Status Bar Troubleshooting CAUTION Dry Ink residue in the Ink pump may cause pump to de couple from the motor If the Printer is left idle for more than two weeks ensure the Printer is flushed completely of all Ink residues To remedy squirt Cleaning Solvent directly into the pump head using a Squirt Bottle via the inlet or outlet and allow to sit with solvent in ...

Страница 31: ... Service Press the Test Valves button in the Navigational Tool Bars Pressing selecting a valve while in this screen will activate the valve Pressing Selecting the No Valve or a different valve will deactivate the valve This will allow the user to test the operation of each valve NOTE The Test Valve screen cannot be selected while the jet is on ...

Страница 32: ...hinner the Ink The longer the ball fall time the thicker the Ink NOTE Further troubleshooting testing and adjustments are explained in SECTION 6 Cleaning and Maintenance Fault Finding Repair The ciEasyServ Filter Module The filter module enables quick and easy tool less filter changing The module and base have self sealing valves for a no drip clean change After scanning the tag the firmware will ...

Страница 33: ...ci5000 Series Printer Technical Service Manual Version 0 1 1 27 Alignment Quick release buttons 1 2 1 2 ...

Страница 34: ...ci5000 Series Printer Technical Service Manual Version 0 1 1 28 Ink System Diagram ...

Страница 35: ...pattern on the substrate to form characters The deflector plates create a constant electric field which deflects the charged ink droplets Uncharged droplets are collected in the gutter to be returned back to the Ink System to be reused NOTE Further troubleshooting testing and adjustments explained in SECTION 9 CALIBRATION The following components are housed within the Printhead enclosure 1 Drop Ge...

Страница 36: ...ter magnifying eyeglass Phase Detector The Phase Detector provides feedback that the drop charging is occurring correctly The drop charge timing is critical to the operation thus a feedback circuit is required to ensure this timing to maintain optimum print quality Deflector Plates The Deflector Plates generate an electrostatic field This field deflects drops by the amount of charge they received ...

Страница 37: ...ges are required to print thus the Printer will not print without the Printhead Cover in place The switch is integrated with the Printhead Body and the magnet is integrated with the Printhead Cover The cover switch will toggle an icon on the main screen to indicate if the Printhead is open or closed Printhead Temperature Sensor The Printhead contains a temperature sensor to ensure the flammable fl...

Страница 38: ...TENTS Page Introduction 2 2 Home Screen 2 2 Printer Status and Controls 2 3 1 Status Bar 2 3 2 Menus Tab 2 3 3 Navigation Tool Bar 2 4 4 Function Toolbar 2 4 5 Edit Button 2 5 6 Help Button 2 5 Menu Screens 2 6 1 Home Screen 2 6 2 Messages 2 7 3 Status 2 7 4 Service 2 8 5 Properties 2 8 6 Security 2 9 ...

Страница 39: ...UI is now available in Red or Blue background colors and also has a large Alert banner available These are selectable during the commissioning of the printer For more details see Section 4 11 Installation and Commissioning Commissioning Wizards Home Screen The home screen provides quick and easy access to the most commonly used statuses and printer functions It is used to start and stop printing a...

Страница 40: ...re shown by selecting the buttons shown below 1 Status Bar Important information on the health of the printer is provided in summary status bar It contains information on the status of the items listed below Additional information can be found in Section 4 1 Print Product Quantities 2 Security 3 Fluid Levels 4 System Health 5 Printhead 6 Ink System 2 Menus Tab The ci5000 Series Printer has 6 icons...

Страница 41: ...sing an icon takes one further down the directory tree and pressing the back button brings one up the directory tree 4 Function Toolbar The Function Toolbar is positioned on the right side of the screen only when additional functionality is needed for the screen Function Toolbars are used to edit or adjust specific settings for each specific Menu screen They will change depending on the Menu being...

Страница 42: ...t of options 6 Help Button Help button provides access to help information concerned with the current menu screen or option Then this icon is pressed a brief description of that screen or option will be displayed An example is selecting the Help button on the Main screen Using a smart phone with a barcode scanner the QR code can be scanned to take the user to a link where a more detailed descripti...

Страница 43: ...hnical Service Manual Version 0 1 2 6 Menu Screens 1 Home Screen The home screen provides quick and easy access to the most commonly used statuses and printer functions Each of the status and function items are described below ...

Страница 44: ...iable fields and formatting to a WYSIWYG message window There is also a well defined Search function that will search up to 30 character message names 3 Status The status screens provide more detailed information on each of the printer s subsystems They are typically used by the service engineer during maintenance and repairs They consist of the following screens ...

Страница 45: ...rations These settings should only be changed by a Citronix trained service engineer 1 Service 5 Run Pump 2 Flush Prime 6 HV Trip Set 3 Override 7 Configure 4 Test Valves 8 Advance Service NOTE Further troubleshooting testing and adjustments explained in SECTION 6 Cleaning and Maintenance Service Routines 5 Properties The Properties screen is used during installation to configure a printer for a g...

Страница 46: ...ect privileges logs in By default Security is disabled To enable Security you must have at least one user with security privileges Function Tool Bars are used to edit or adjust specific settings for each specific Menu screen They will change depending on the Menu being viewed Some will expand by pressing the Arrow button shown below This reveals additional Function buttons ...

Страница 47: ...ci5000 Series Printer Technical Service Manual Version 0 1 2 10 ...

Страница 48: ...ystem Date Time 3 8 Setting Host Interface Properties 3 9 Changing System Language 3 10 Setting Alarms 3 11 Files 3 12 Security 3 22 Create Message 3 24 Message Fields 3 35 Text Fields 3 35 Autocode 3 36 Bar Code 3 43 Graphic 3 45 How to Use Microsoft Paint to Create Printable Graphics 3 47 Message Options 3 53 Graphic Utility 3 53 Message Sequence 3 53 Message Codes External Message Select 3 55 D...

Страница 49: ...Adjust Parameters 3 62 Drop Size 3 63 Print Quality ciPrecisionPlus 3 64 Delay 3 64 Width 3 65 Gap 3 65 Orientation 3 65 Bold 3 66 Height 3 66 AutoPrint Pitch 3 66 Repeat Printing 3 66 Add Ink and Makeup 3 67 Status 3 69 Status Main 3 70 Event Log 3 70 Active Alarms 3 72 Viscosity Status 3 72 Speed 3 73 Filters 3 74 System Info 3 75 ...

Страница 50: ...approximately 40 seconds the printer will have fully booted up and is ready to start the jet Press the Jet Start button and the Jet Status located in the top right corner of the screen will change from Off to Starting The Jet Start button will show a countdown in the lower left hand corner of the screen and the Jet Start wording will flash Black and White while the printer is starting ...

Страница 51: ... tubing There will be a countdown shown in the bottom left hand corner of the Home screen and Jet Stop will flash Black and White Once this has completed the Jet Status will change to Off Power can now be safely turned off by pressing the Power button on the left side of the cabinet Safe Stop Pressing the Power button while the printer is Ready to Print will cause a Prompt screen shown below to be...

Страница 52: ...e Manifold loose 3 Turn ON the power 4 Press the Menu Bar Dropdown and select the Service button 5 Select Overrides and then select all of the Overrides This will ensure no errors will inhibit this process 6 Start the Jet by pressing the START button on the main screen This will flush the Printer of Ink 7 Press the STOP button on the main screen to stop the Printer after 2 minutes 8 Repeat steps 1...

Страница 53: ...Counter 2 Increment Counters All Message Left Right Message Up Down Message Mirror Down Print Trigger Print Enable Jet Off Jet In Off Reset Counter All Reset Counter 1 2 Increment Counter 1 2 or Off Debounce Sets photocell 1 2 debounce time in milliseconds Useful for filtering secondary electrical signals given by mechanical relays 0 99 ms Photocell 2 Option The Photocell 2 connection can be used ...

Страница 54: ...and ready for the next product Message Sequence uses a list of Messages to be printed Each photocell trigger will switch to the next Message in the list The list will wrap from the bottom back up to the top There may be up to 20 Messages in the list There is only one Message Sequence stored for use Message Codes uses a six line connector to signal a binary number from 0 to 255 This number indicate...

Страница 55: ...ool Bar to set the printer s 1 Date Time 2 Date Format 3 Time and Date Delimiters 4 Network Time settings if used Using the Edit button to edit change or select any of the time and or date settings 1 Setting changing the Date Time Press the Edit button using the number keypad enter change the date then press the Save button NOTE ensure the delimiter is inserted between the month day and year when ...

Страница 56: ...unications Interface for the Citronix Printer can be found in Section 7 Communications From the Home screen press the Menu Bar Tab to open the Menu bar then select the Properties button on the Menu Bar Press the Interface button in the Navigation Tool Bar to select the printer s 1 Serial Interface 2 Internet Interface 1 Serial Interface The RS232 or Serial interface can be used to Backup and resto...

Страница 57: ...rigger Print Ready and Print Complete Receive warnings errors Changing System Language From the Home screen press the Menu Bar Tab to open the Menu bar then select the Properties button on the Menu Bar Press the Languages button in the Navigation Tool Bar to select the printer s 1 Operating Language 2 Printed Fonts In this screen there are 3 columns showing the Language Font and Text The Number be...

Страница 58: ...erties button on the Menu Bar Press the Alarm Settings button in the Navigation Tool Bar to select the printer s 1 Alarms 1 Function 2 Alarms 2 Function 3 Alarms 3 Function 4 Relay Function not available in the ci5200 For each Alarm Relay there are 3 state functions that need to be set 1 What kind of alarm None Failure Warning Print Ready 2 Normal State Off On Flashing 3 Active State Off On Flashi...

Страница 59: ...to perform all upgrading and restore functions by using an on Board SD card or by plugging in a USB into the USB port on the CPU board From the USB or SD Card you can 1 Update Firmware 2 Install Fonts 3 Install Languages 4 Install IME Keyboards 5 Backup the printer 6 Restore the printer from a previous backup ...

Страница 60: ... onto the USB a file structure This is an automatic process To do this 1 insert the device USB or SD Card into the proper slot 2 Navigate to view the device by selecting Properties 3 Select Files 4 Select press the USB device Note this will take a few seconds for the printer to read and write the file structure to the device When this is completed the structure will be displayed on the screen ...

Страница 61: ... plugged into a PC to download the file into the appropriate folder On the USB there is a Citronix file with 2 sub files System Customer System is used for all system files 1 Firmware 2 Fonts 3 Language 4 Keyboards Customer are printer files printer specific and consist of 1 Backup 2 Bitmaps 3 Event Logs ...

Страница 62: ...file structure displayed 9 In the File Menu screen Press the Plus symbol next to the System folder to open the folder 10 Next open the Firmware folder by pressing the Plus symbol 11 Next Highlight the actual file and then press the Install Firmware button in the Function Tool Bar to download the firmware to the printer 12 There will be a confirmation screen displayed to confirm Yes or No if you wa...

Страница 63: ...downloading This will take a few seconds 6 When the download is complete the File Menu screen will be displayed again NOTE This process must be done for each Font individually Install Languages As mentioned in the previous section all of the Fonts Languages and Keyboard IME s will be installed onto every Citronix 5000 Series printer In case one was deleted or corrupted the following procedure will...

Страница 64: ...the Fonts Languages and Keyboard IME s will be installed onto every Citronix 5000 Series printer In case one was deleted or corrupted the following procedure will describe the reinstallation process using a USB 1 In the File Menu screen Press the Plus symbol next to the System folder to open the folder 2 Open the Keyboard folder by pressing the Plus symbol 3 The Keyboard IME s should be displayed ...

Страница 65: ...s must be done for each Keyboard individually CUSTOMER File When using a USB multiple printer files Backup Bitmaps and Event Logs can be stored onto one device USB Each Printer s files will be save in its own Customer file with the printer s serial number as the Customer File name ...

Страница 66: ... backup file will be automatically saved to the Printer s Serial number file if there are multiple The following procedure will save the Backup file 1 Highlight the device the Backup is to be saved 2 Press the Save Backup button 3 There will then be a screen displaying Writing while the file is downloading This will take a few seconds 4 The file will be displayed as the year month date time bak NO...

Страница 67: ... Bitmaps same as with the 3000 and older printers Those older bitmaps can be loaded onto a 5000 Series printer using the USB 1 Save all Bitmaps to be used in the Customer Printer Serial Number Bitmaps file when inserting onto the USB 2 Highlight the device the Bitmaps are stored 3 Open the Bitmaps folder by pressing the Plus button then highlight the Bitmap file to be used Only 1 bitmap can be dow...

Страница 68: ... Log 1 Highlight the device the Event Log needs to be stored USB or SD Card There is no further files need to opened unless they need to be viewed The Event Log will be saved only to that printer s Event Log File Folder 2 Press the Save Event Log button in the Function Tool bar 3 There will then be a screen displaying Writing while the file is downloading This will take a few seconds 4 When the Ev...

Страница 69: ... editing messages and possibly more Admins are appointed at the time of installation and are given access to setup these different users and what functions or abilities are allowed to be carried out on the printer To enable Security you must have at least one user with security privileges Logging in as an ADMIN To log on as an ADMIN level User first enter the Security Properties screen from the Ho...

Страница 70: ...ng the 4 selections on the Function Tool Bar located on the right side of the screen add delete edit or copy a user When adding a new User by pressing the button you will assign a User Name and then a Password REMEMBER these are case sensitive The edit each of the options by selecting Yes or No to allow or not allow that user access to that option or Menu When done press the back button to save an...

Страница 71: ...s are the only users able to Enable or Disable the Security feature Create Message Select the Messages button in the Navigational Tool Bar at the bottom or the screen OR you can also select the Menu Bar tab then select the Message option to take the user to the Message storage creation menu Select the Message Defaults button in the Navigation Bar ...

Страница 72: ...feature to change between small and large drops 60 and 75 micron at a touch of a button This also changes speed capability and is only available on ci5300 ci5500 ci5650 printer types a Normal 65 Micron drop b Macro 75 Micron drop 2 Print Quality ciPrecisionPlus is an incremental and smooth step control that enables an operator to fine tune the printed message for the best possible mix of speed and...

Страница 73: ...tion Ci5200 Ci5300 Ci5500 ci5650 5 5 Dot Matrix 1 or 2 Line 1 to 4 Line 1 to 5 Line 7 7 Dot Matrix 1 or 2 Line 1 to 3 Line 1 to 4 Line 9 9 Dot Matrix 1 Line 1 to 3 Line 1 to 3 Line 12 12 Dot Matrix 1 Line 1 or 2 Line 1 or 2 Line 2L7 2 Lines of 7 Dot Matrix 2 Line 2 Line 2 Line 16 16 Dot Matrix 1 Line 1 Line 1 Line 19 19 Dot Matrix N A 1 Line 1 Line 3L7 3 Lines of 7 Dot Matrix N A 3 Line 3 Line 25 ...

Страница 74: ...either cut off the top of the print or cause a HV Trip NOTE The setting goes down to 50 however if set to the minimum or close to the minimum it can clip the gutter and result in bad prints 5 Delay Sets delay in raster s stroke s between the print signal and the start of printing This setting can be set from 0 999999999 Example 6 Width Sets the print resolution spacing between printed raster s str...

Страница 75: ...6 different orientations available These are Upside Up Upside Down Mirror Up Mirror Down When the Tower Print Option is Enabled Tower CCW Tower CW Example 8 Bold This setting duplicates raster s stroke s increasing the width of characters This setting can be set from 0 9 NOTE the higher the Bold setting will affect the overall print speed ...

Страница 76: ... times a message will be printed after each product detection signal This setting can be set from 0 99999999 12 Repeat Pitch This setting sets the pitch between repeated prints in raster s stroke s This setting can be set from 0 999999999 13 AutoPrint Pitch This setting allows a secondary delay when using AutoPrint feature This delay is between each print cycle and is from beginning of a message t...

Страница 77: ...ilable 20 Alternate 7 This setting turns on the European 7 with the dash 21 Shifts This setting sets the number of Shifts used in a message There are a possible 24 shifts available the default is 3 Using the Navigation bar set all of the Shift Expiration Clocks and Counter defaults if used When all of the default settings are adjusted press the Back button located on the Navigation Bar Select the ...

Страница 78: ...ci5000 Series Printer Technical Service Manual Version 0 1 3 31 Enter the content of that field using the keyboard and then press Save The Field will be place in the Message ...

Страница 79: ...s field by pressing the Edit button as shown below Select the Font size from the list and press Save button NOTE Only the available fonts will be displayed to fit the message pixel size There could be more than 1 screen of fonts View the additional screens by pressing the arrow button circled below ...

Страница 80: ...2 Line 1 to 4 Line 1 to 5 Line 7 Dot 7 Dot Matrix 1 or 2 Line 1 to 3 Line 1 to 4 Line 9 Dot 9 Dot Matrix 1 Line 1 to 3 Line 1 to 3 Line 12 Dot 12 Dot Matrix 1 Line 1 or 2 Line 1 or 2 Line 16 Dot 16 Dot Matrix 1 Line 1 Line 1 Line 19 Dot 19 Dot Matrix N A 1 Line 1 Line 25 Dot 25 Dot Matrix N A 1 Line 1 Line 31 Dot 31 Dot Matrix N A N A 1 Line The new Font will be displayed in the WIZYWIG window ...

Страница 81: ...ield that needs to be moved will cause the Highlight to become a darker blue color this will allow the user to drag drop the field in the location you want it to be Then you can use the arrows to finely adjust the exact position When done press the Move Field button again to go back If additional fields are needed press the Add Field button to add a new field and follow the previous 3 steps When t...

Страница 82: ... 1 3 35 To select any message to print just touch and highlight the message and press Start Print button in the Function Tool Bar as seen above Message Fields Text Fields Text fields are non updating characters Primarily inputted using the on board keyboard ...

Страница 83: ...ies Expiration Date Based on real date and expiration date setup in System Properties and Application Properties Rollover Date Based on real date and rollover time setup in System Properties and Application Properties Expiration Rollover Date Based on real date rollover time and expiration date setup in System Properties and Application Properties Shift Based on real time and shift time setup in S...

Страница 84: ... 37 Note changing the Delimiter is done using the Field Date Delimiter property in screen 2 See below It is important that the date field is highlighted for the delimiter property to be available Time below are the different date options available for selection ...

Страница 85: ...3 38 Note changing the Delimiter is done using the Field Date Delimiter property in screen 2 See below It is important that the date field is highlighted for the delimiter property to be available Counter below shows how to insert a counter field into a message ...

Страница 86: ... property to be available There are up to 5 total counters that can be used in each message These are setup from the Message Defaults button found in the Navigational Tool Bar before creating a message or by using the Setting button also in the Navigational Tool Bar while creating or editing a message Once the number of counters being used has been selected the following will show how to edit the ...

Страница 87: ...in the Security section When this field is entered any user logged onto the printer will be displayed and printed Then needing to insert or edit a User field in a message press the Add Field button in the Function Tool Bar located on the right of the message edit creation screen Select Autocode field type and press Select then select User then press Select Example below Shift ...

Страница 88: ...ress the Edit button and using the numbers keypad enter the number of shifts that is required then press Save then press the back button Next press the Shifts button in the Navigation Tool Bar at the bottom of the Message Edit screen Setup the shift name s letter s or number s needing to be printed and set the times that correspond to those shifts When finished press the Back button to save the se...

Страница 89: ...he Service screen to view page 2 of the Service menu Press the Edit button and enter the name and or number 15 characters max of the Printer ID and then press Save The Printer ID will be displayed Next Create Edit the message to use the Printer ID Field by creating selecting the message and press the Add Field button select Autocode and press the Select button select Printer ID and press the Selec...

Страница 90: ...hnical Service Manual Version 0 1 3 43 Bar Code To add a Barcode to a message Press the Add Field button select Barcode from the list then press Select Next select from the list shown below the barcode needed then press Select ...

Страница 91: ...umeric characters or Counter Yes Automatic or Disabled Code 39 Up to 256 alpha numeric characters or Counter Yes Manual must enter Code 128 Up to 256 alpha numeric characters or Counter Yes Manual must enter UPC A 11 11 numeric characters Yes Automatic UPC E 6 6 numeric characters No Automatic EAN13 12 12 numeric characters Yes Automatic EAN8 7 7 numeric characters Yes Automatic Datamatrix Variabl...

Страница 92: ...ng the Alphanumeric Display shown on screen 2 to be changed to Yes See below Graphic Graphics Bitmaps can be inserted into messages and printed These need to be created in as a Monochrome Bitmaps This can be easily done using Microsoft Paint For more information on how to create graphics using Microsoft Paint see below Inserting a Graphic into a message Press the Add Field button and select Graphi...

Страница 93: ...e list and press the Select button Note Ensure the Message Pixel size will accommodate the graphic of the graphic could be cut off If this needs to be changed Press the Settings button in the Navigation Tool bar to change The graphic will be inserted to the message Use the Move Field button to adjust the placement inside the message ...

Страница 94: ...be used to create a monochrome bitmap image file that can be loaded on a CIJ Printer using the printer s built in FileUpdate htm web page utility This document provides a brief example of the steps involved Invoke MS Paint Click on the Window s Start button and at the Search programs and files entry box type in Paint followed with the Carriage Return Enter Key or click on the Paint program Use Pai...

Страница 95: ...venly divisible by 8 i e widths of 8 16 24 32 40 The bitmap image size is expressed as pixel Height x Width In this example the Paint program will be used to create a 31x48 bit pixel image of concentric rectangles Resize the work area to the Logo bitmap image size Click on Image Resize Set the graphic size First uncheck the Maintain aspect ratio box and select Pixels set Horizontal to 48 and Verti...

Страница 96: ... Printer Technical Service Manual Version 0 1 3 49 Click the OK Button and the work area will shrink Select the View tab and zoom in to increase the work area After zooming in on the work area return to the Home tab ...

Страница 97: ...l Service Manual Version 0 1 3 50 Since the printer is a monochrome use only black and white as the image colors Drawing the Image Select the Rectangle Shape using a mouse click Optional Select a Size for the lines and draw the Logo ...

Страница 98: ...ci5000 Series Printer Technical Service Manual Version 0 1 3 51 Draw a border long with other rectangles Save the Image Click on save Save file Rectangles31x48 as Monochrome Bitmap bmp ...

Страница 99: ... Technical Service Manual Version 0 1 3 52 Do you want to continue Yes Click OK Bitmap File Saved For instructions on loading the graphic files onto the printer see section 6 Cleaning and Maintenance for Uploading Graphics ...

Страница 100: ... When operating in the Message Sequence mode the Printer prints messages in order of a predetermined list for each print signal once this option is selected in Mode of Operation found in the Properties menu To add set a Message to the message sequence list 5 Press the Messages button in the Functional Tool Bar OR Menu Bar Tab and select the Messages button 6 Select Message Sequence 7 Press the Add...

Страница 101: ...ion 0 1 3 54 Example All messages in a message sequence must use the same drop size and height settings To set the drop size and height setting that will be used for the message sequence press the Settings button in the Navigation Tool Bar circled above ...

Страница 102: ...elect the desired message from the message list and then press Add 3 Using the number keypad enter the 3 digit number desired for that message then press Save 1 To change or edit the number press the Edit button and use the Numbers Keypad to change then press Save 2 To delete a message from the list press Delete There will be a confirmation screen confirming the message is to be deleted NOTE the m...

Страница 103: ...nal connection must ground the pins to change them to a 0 If nothing is connected the value is read as 255 If only 1 line Pin 2 bit 0 is to be used and the other 7 lines are unconnected the input value will be read as 255 and the other 7 lines are grounded the input value is read as either 0 Date Properties Setup screen date properties such as Week start date Hijri date and Atlas code Also used to...

Страница 104: ...onth Year Encoded Date YMD Allows entry of an encoded date Year Month Day Encoded Time HMS Allows entry of an encoded time Hours Minutes Seconds ISO definition The ISO definition of the week number is an international standard that many companies use According to the ISO definition the week must start on Monday Also the ISO definition for Week 1 may also be stated in different ways The week with t...

Страница 105: ...ha Day of Week Alpha Day of Month Alpha Month and Alpha Year Alpha Day of Week replaces the numeric day of week with the text entered on the Day of Week screen likewise with the rest of the Calendar Properties Time Properties The Time Properties screens allow users to define Alpha Characters for Hour Minutes and Seconds Use the Edit button to open the Time Properties screens Up to 9 characters can...

Страница 106: ...sion 0 1 3 59 Message Defaults See section above Create Message for details Edit Message Similar to create message Press the Messages Button in the Functional Tool Bar OR Menu Tab then press the Messages button to bring up the Message List shown below ...

Страница 107: ...0 Touch highlight the message to be edited then press the Edit Message button Touch to highlight the field to edited then press the Edit Field button found in the Function Tool Bar Use the Keyboard or Numbers keypad to edit the field and select Save when complete ...

Страница 108: ...ge List shown below Search by pressing the Search button in the Function Tool Bar shown below and using the keyboard type the message name then press the Save button All messages with the search criteria will be shown in the new Message List and can be printed by selecting the message if more than 1 and pressing the Start Print button or edited by pressing the Edit button Pressing the Clear Search...

Страница 109: ...Select highlight the message in the Message List and press Start Print The screen will return to the Home screen showing the message in the WYSIWYG window in the middle of the screen Print Adjust Parameters Print Adjust Parameters are printing functions that are message specific When these settings are adjusted and saved will be retained each time that message is recalled to print These can be dif...

Страница 110: ...ty 3 Delay 4 Width 5 Gap 6 Orientation 7 Bold 8 Height 9 Auto Print Pitch From the Main screen press the Print Adjust button located in the Navigation Tool Bar The following 2 screen are available to be adjust on the fly or while the printer is printing on line Drop Size The drop size changes the size of the printed drop This can make the print look darker or bolder however the drop size can will ...

Страница 111: ...y and 300 slowest speed best print quality The Print Quality will increment in steps of 20 To adjust the Print Quality press the Edit button to the right side of the Print Quality number Then select from the list while printing then press Select Adjust to the best print quality NOTE Delay and Width would also need to be adjusted once Print Quality has been set Delay Delay defines the amount of tim...

Страница 112: ... higher the number the wider the message length and the faster the print speed Gap Gap defines the amount of time space between printed characters Press the Edit button to the right side of the Gap number Select the desired spacing from the list then press Select NOTE Gap also effect print speed Example the higher the number the slower the print speed Orientation Orientation is the positioning dir...

Страница 113: ... 50 and 255 then press Save NOTE Setting the height too low can cause the print to clip the gutter block This causes the printhead to also get dirty Setting too high can also result in a dirty printhead and multiple HV Faults An average setting of 200 works best AutoPrint Pitch AutoPrint Pitch defines a fixed amount of time space from the beginning of one message to the beginning of the next when ...

Страница 114: ...enter the number for the spacing then press Save NOTE The Repeat Pitch is the distance from beginning of one message to the beginning of the next If the Repeat Pitch is too small the printer will lose Phase and fault out There must be a least 50 Raster space between prints Add Ink and Makeup To ensure the quality and proper fluid type each authorized Citronix ink and Make up bottle will have an ci...

Страница 115: ...ls match for approximately 2 seconds The screen will read and verify the fluids and give you further instructions once the scan is complete Once the fluid is verified remove open the Ink black or Makeup yellow fill capon top of the printer Do NOT remove the foil seal Insert the Ink or Makeup bottle in the proper fill port and rotate clockwise by 90 to lock it in place Makeup bottle inserted in fil...

Страница 116: ...akeup as Printer will not operate correctly NOTE Do NOT use Makeup in place of Cleaning Solvent or the Jet will not start correctly Status The Status screens provide more detailed information on each of the printer s subsystems These screens are typically used during maintenance and repairs They consist of the following screens 1 Status main screen Indicates status of the filters printer temperatu...

Страница 117: ...between 0 15 and indicates the position of Phase Phase Quality Indicates the quality of the phase return signal in a percentage Phase Range This shows the relative range the Phase is on the drops Pump Pressure Shows the actual pressure in psi or Bars read by the Pressure Transducer Pump RPS Shows feedback from the pump motor in rotations per second Event Log The event log is a list of events of a ...

Страница 118: ...ror Ink Message Misc and All Each event is Time and Date stamped Saving Event Logs can be saved to the on board SD Card or a USB drive by selecting the Files button then select the device the file is to be saved and press the Save Event Log button These files can then be transferred to a PC for review and or emailed ...

Страница 119: ...n 0 1 3 72 Active Alarms This screen displays any alarm condition that is currently active on the printer Viscosity Status This screen displays all the viscosity status of the printer Showing the expected current viscosity in Ball Fall Time or Centipoise ...

Страница 120: ...btained from the viscometer Calibrated at factory Calibration number Measured Measured viscosity Viscosity in CentiPoise Set Point Target viscosity Viscosity in CentiPoise Next Check Time until next viscosity check Time in seconds Ball Position of the ball High or Low Known or Unknown Speed This screen displays print speed information and when an Encoder is used can help to properly Dial in the pr...

Страница 121: ...hows line speed based on product Length input on Applications Properties screen Speed Status MPC Missing Product Count Message too large for the speed Count TFC Too Fast Count Attempting to print faster than processor s capability Count DNRC Did Not Receive Count In one for one mode product was detected but the new message was not received Count Phase Status Printing too fast to phase NOTE If the ...

Страница 122: ...CPU board information Printer Serial Number Power On Run Time hours The second page will display the local Distributor Information such as Distributor Name Contact Name Telephone Number and Email Address The Distributors may enter their contact information to be displayed on this screen by navigating to the Service screen and then pressing More then pressing the Advance Service button ...

Страница 123: ...ci5000 Series Printer Technical Service Manual Version 0 1 3 76 After entering the Advance Service password use the command SCONTACT Each of the four fields can then be edited ...

Страница 124: ...D COMMISSIONING SECTION 4 CONTENTS Page Unboxing the Printer 4 2 Mounting the Controller Printhead 4 3 Printer Installation 4 3 Connecting Peripherals 4 4 Cabinet Connections 4 4 Accessories 4 5 External Wiring Options 4 8 Connecting External Power 4 10 Commissioning Wizards 4 11 ...

Страница 125: ... pieces of foam These simply lift up and out Remove the printhead as you remove the left piece of foam as shown in the picture above Gently lay the printhead on the floor and you continue to remove the printer from the box Lift the Controller by placing 1 hand on each side of the Controller underneath the cabinet at the Fill Port Caps Black and Yellow Caps Note the Hand Hold cutouts in the bottom ...

Страница 126: ...t Remove the Power Cord QC sheet and Printers Operations Guide from the bottom of the box Mounting the Controller Printhead Printer Installation The following is general information for installing the printer in a wide range of working areas The printer cabinet and printhead installation dimensions are given in the diagrams in Section 1 Cabinet Positioning ...

Страница 127: ...Positioning The conduit must be kept away from power supply cables and other wiring capable of producing electrical noise The print head must also be electrically isolated This is normally achieved by the insulation coating on the printhead and its mounting components The print head and conduit must also be as free as possible from vibration The print head must be mounted perpendicular to the prin...

Страница 128: ...4 5 This prevents mistakes while connecting peripheral accessories by having different pin outs for each Making easier and faster printer installations as well as making it fast and easy to swap a printer between multiple production lines Accessories Photocells ...

Страница 129: ...ci5000 Series Printer Technical Service Manual Version 0 1 4 6 Encoder ...

Страница 130: ...ci5000 Series Printer Technical Service Manual Version 0 1 4 7 Beacon Options ...

Страница 131: ...ci5000 Series Printer Technical Service Manual Version 0 1 4 8 External Wiring Options External Connectors and pin out drawings for Accessories not offered by Citronix ...

Страница 132: ...ci5000 Series Printer Technical Service Manual Version 0 1 4 9 ...

Страница 133: ...ible The Power outlet should be on a dedicated line and not shared with other machines or motors The Power should be checked with a Multi meter for proper wiring voltage prior to plugging the printer in The 5000 Series Printers currently ship with either a standard U S European United Kingdom Chinese or Japanese Power cord If you need a power cord with a different type of plug we recommend purchas...

Страница 134: ...initially powered up the printer will automatically run a series of Commissioning Wizards These wizards are design to enable the user to properly setup the printer DO NOT SKIP THESE WIZARDS 1st Wizard Set System Language This wizard will guide the user to select the preferred language the printer s firmware will use for all operations of the printer Simply press the Open Wizard button in the Navig...

Страница 135: ...al Service Manual Version 0 1 4 12 The firmware will change back to the Wizard List screen showing this step has been completed 2nd Wizard System Settings Next select the next wizard System Settings and press the Open Wizard button ...

Страница 136: ... time as well as all the formats to be used Pressing the Edit button next to each option will allow the user to adjust set each option Using the numbers keypad enter the desired date time and press Save then press the Next Step button to move to the next step When all 8 steps are complete press the Next Step button to save and exit to the Main Wizard menu ...

Страница 137: ...Settings This 2 step wizard enables a large visible banner on the Home Screen and selects the Theme Color of all the screen backgrounds Red or Blue are the only options NOTE This will cause the printer to reboot to set After the reboot the Wizards will pick back up where it left off ...

Страница 138: ...t button next to each option will allow the user to set each option Select from the list and press Select then press the Next Step button to move to the next step When the 2 steps are complete press the Next Step button to save and exit to the Main Wizard menu 4th Wizard Fluid Fill ...

Страница 139: ...installing onto the printer This validates the right fluids are being put in and at the right time At this time it also resets the run hours for each fluid Just follow the instructions on each screen Note When the Tag is requested the wizard will not continue until the tag is read If too much time has been taken before presenting the tag you may have to press the Previous Step button to restart th...

Страница 140: ...ci5000 Series Printer Technical Service Manual Version 0 1 4 17 Make up Fill After the 6 steps are complete the firmware will move back to the Wizard Main menu showing the step as completed ...

Страница 141: ...nter Technical Service Manual Version 0 1 4 18 5th Wizard Ink System Prime Next press Ink System Prime and then press Open Wizard This 6 step process will correctly prime the ink system and affectively bleed out the air ...

Страница 142: ...cal Service Manual Version 0 1 4 19 Follow the instructions on the screen and proceed to the next step when directed After the 6 steps are complete the firmware will move back to the Wizard Main menu showing the step as completed ...

Страница 143: ...t Start and then press Open Wizard This wizard will move ink through the Printhead and jet ink out the Nozzle into the gutter Remove the Printhead cover and have a beaker paper towels squirt bottle of Cleaning Solvent protective clothing and eye wear to handle any initial Ink Jet missing the gutter ...

Страница 144: ...Follow the instructions on the screen and proceed to the next step when directed After the 3 steps are complete the firmware will move back to the Wizard Main menu showing the step as completed All of the Wizards have been successfully completed press the Back button to return to the Home Screen The printer is not ready to use Please allow at least 2 hours of jet run time to allow the ink viscosit...

Страница 145: ...TION 5 CONTENTS Page Introduction 5 2 Red Alerts 5 2 Amber Alerts 5 2 Fault Acknowledgement 5 2 Alert Status Bar Messages 5 3 Printer States 5 3 Status Jet Calibrating 5 4 Status Jet Off 5 4 Status Start Jet 5 5 Status Jet On 5 5 Status Jet Ready 5 6 Printer Faults 5 7 Print Quality Faults 5 9 ...

Страница 146: ... extinguish and the message will be removed Amber Alerts Amber alerts are used to inform the operator that the printer is in need of attention or that there are message handling errors If the fault condition is still present when acknowledged the amber LED will remain on and the alert bar message will show If the fault condition has cleared the amber LED will extinguish and the alert bar message w...

Страница 147: ... Printer Technical Service Manual Version 0 1 5 3 Alert Status Bar Messages Printer States Shown below are some of the more common printer states these will be shown in the status alert bar at the top of the screen ...

Страница 148: ...d but HV not on Security Enabled Jet Paused Print Disabled but HV not on Security Disabled Jet Ready Print Enabled and HV ON Jet Paused Print Disabled and HV ON Printhead Open Jet Stopping Printhead Closed Jet Stirring Makeup Level High Ink Level High Makeup Level OK Ink Level OK Makeup Level Low Ink Level Low Makeup Level Empty Ink Level Empty Overall Printer Status Security Status Fluids Status ...

Страница 149: ...et NOTE when the jet is starting the Text to the right of the Start button will flash black and white also a countdown will start on the bottom left of the screen while the system is starting Status Jet On NOTE The above picture shows the jet status with the printhead cover off ...

Страница 150: ...ci5000 Series Printer Technical Service Manual Version 0 1 5 6 Status Jet Ready In this Status the Deflection Field is activated and the printer will print the message selected with each print signal ...

Страница 151: ... fan is turning Phase Error 1 Check for Ink stream breakup 2 Check the distance from the Ink stream to the Phase Detector 3 Ensure the Ink stream is in the center of the Charge Electrode 4 Check the pressure and viscosity to verify Jet velocity 5 Check the location of the Phase Amplifier to make sure it is NOT too close to the Valve Valve wires or other possible source of noise See Section 9 2 3 P...

Страница 152: ...nents are clean and dry 4 Check the continuity of the Resonator Probe 5 Verify the modulation calibration High Viscosity Error 1 Ensure all the Fill caps are on tight 2 Check the Makeup Add Valve for operation 3 Ensure the Makeup Filter is primed 4 Verify the Viscometer Calibration Constant is the same as stated on the Calibration Label located inside the front door Low Viscosity Error 1 Verify th...

Страница 153: ...Technician 4 Ink out of viscosity a Ensure the proper ink and Make up are used b Contact your local Service Technician 5 Needing recalibration a Contact your local Service Technician The following are examples of faulty printing In most cases further investigations should begin with ensuring that the printhead is clean and properly aligned CLEANING AND MAINTENANCE SECTION 6 CONTENTS Page Cleaning ...

Страница 154: ...late 6 71 Charge Electrode Block Alignment 6 71 Changing Ink Makeup or Ink Makeup Tank Ink Refresh 6 72 Changing the Ink System Pump 6 73 Changing Cleaning an Ink System Valve and Gasket 6 74 Changing Removing the Pressure Transducer 6 75 Changing Cleaning the Pressure Restrictor 6 75 Changing Cleaning the Venturi Restrictors 6 77 Cleaning and Maintenance Proper Printhead Cleaning The Printer will...

Страница 155: ...Solvent compatible with the type of Ink being used 4 Check the Printhead for buildup of Ink deposits and when necessary use the appropriate Cleaning Solvent compatible with the type of Ink being used Pay particular attention to the Nozzle Plate Charge Electrode Phase Detector HV Plates and Gutter Block 5 Use a suitable container to catch the excess Cleaning Solvent and dispose of it in accordance ...

Страница 156: ...r a Printhead cleaning a Backflush Routine can be performed to clear partial or complete Nozzle blockages To perform a Backflush Routine 1 Stop the Jet by pressing the Stop Button 2 Once the printer has completely shut down locate the Backflush button in the Navigation Tool Bar on the main screen 3 Release the thumbscrew securing the Printhead front cover and slide the cover off 4 Press the Backfl...

Страница 157: ...ironment the printer is operating it may be necessary to clean or replace the air filter on a regular interval The Air Filter is located on the right hand side of the cabinet To clean or replace the Air Filter 1 Remove the Air Filter yellow cover together with the filter element 2 Remove the filter element by unclipping or unsnapping the filter element Tilt or twist the yellow cover to release one...

Страница 158: ...between routine maintenance schedules Depending on air quality of the environment it may be necessary to clean the Air Filter weekly To do this gently tap the filter element to remove dirt or use compress air to blow air through the filter element in the opposite direction to the normal flow Service Module Replacement The ci5000 series printers introduce ciEasyServ a quick easy no mess no fuss too...

Страница 159: ...e time each day that it initially appeared 2 The second error warning will appear at 144 jet running hours left This error warning will reappear once an hour until the next stage is reached 3 The third error warning will appear when there is 48 jet running hours and less left This error warning will reappear every 5 minutes until zero 0 hours are reached 4 This is the final error warning and will ...

Страница 160: ...urs remaining When ready to replace the Service Module first ensure the jet and pump are off see below Stop the jet Press the Stop button A countdown will appear in the bottom left hand corner of the Main screen and Jet Stop will flash black white while the system is stopping When the printhead has completed the proper shutdown the Jet icon in the top bar will show Off ...

Страница 161: ...ol Bar Then press the Replace ciEasyServ in the Navigation Tool Bar to start an automated replacement wizard ensure a new Service Module is readily available before pressing the Replacement button Present the Tag on the Service Module to the reader symbol on the Touch Panel as depicted on the screen When the Tag is approved remove the back cover as instructed on the next 2 steps ...

Страница 162: ... Module has been fitted Press the Next button in the Navigational Tool Bar at the bottom of the screen This will start a 3 step automated prime sequence As the priming sequence starts monitor the connections at the Service Module for any Leaks If a leak is seen press the Stop button and fix the leak The screen below will be displayed ...

Страница 163: ...ished press Next to continue Following the screen instructions refit the back cover Once the last screen is complete and the user has pressed the Next button the screen will change back to the Main filter screen showing the hours reset seen below Press the Back button 2 times to return to the Main Home screen Press the Jet Start button to now continue to run the printer ...

Страница 164: ...nal to the CPU board indicating the fan is turning If the signal is not received this error fault will be displayed Corrective Action 1 24V EXT fuse is open Reset Power this can be caused by connecting external peripherals incorrectly 2 The fan is not connected 3 The fan actually does not turn 4 The fan cable is faulty or damaged a Check tach wire connection for a loose fit in connector i Push wir...

Страница 165: ...stem will regulate the pressure to 15 psi 1 bar separate out the moisture and filter the air When this pressure is not sensed at the pressure sensor this error fault will be displayed Corrective Action 1 Check the incoming plant air is on and at a minimum of 25 psi 1 7 bar by checking the air gage on the Regulator on the right side of the printer See picture below 2 Check change the air filters 3 ...

Страница 166: ...n very slow printing The Phase Error occurs when the Phase Quality drops below 40 Corrective Action 1 Ensure the Phase Detector And Charge Electrode is not covered with ink clean and dry if necessary 2 Check for Ink stream breakup 3 Check the distance from the Ink stream to the Phase Detector see Fig 1 4 Ensure the Ink Stream is centered to the Phase Detector see Fig 2 5 Check the pressure and vis...

Страница 167: ...r Definition Charge Electrode charges the ink drops When a Positive charge is applied to the Charge Electrode Electrons are attracted from the Drop generator Earth When the drop breaks off the excess electrons are trapped The drop will have a Negative charge proportional to the voltage applied to the C E ...

Страница 168: ...ge Electrode is covered in Ink 3 Poor breakup modulation a No breakup Check Modulation Cable Fuse b Satellites ligaments very long tails on the drops or not breaking off in the center of charge electrode c Incorrect modulation Check settings against factory settings label 4 No charge applied Check charge cable 5 Incorrect ink stream alignment thru the Charge Electrode Must be centered See Fig 1 2 ...

Страница 169: ...rsion 0 1 6 25 Fig 1 To realign loosen the 2 screws securing the Strobe Block assembly and move to center then tighten screws See picture below NOTE do not overtighten the screws This can cause damage to the Printhead chassis Fig 2 Fig 3 Gutter Error ...

Страница 170: ...sing the ink off the Gutter Block while the ink stream is on this error fault will be displayed Corrective Action If you receive a Gutter error 1 Check the alignment of the Jet Ensure the ink stream in going into the gutter 2 Listen for a steady vacuum 3 Check continuity of the gutter sensor to the CPU Ink Reservoir Full Definition The Ink Tank level is monitored continuously with 3 level rods to ...

Страница 171: ...rom the main screen press the Menu tab and then select Service c Press Run Pump d Remove the inlet pressure tube from the manifold Fig 1 below and place in a beaker e Press the Increase button 2 times to start the pump f Pump ink from the Ink Tank until the level is at or below the mid level seam of the ink tank See Fig 2 below g Once this level is achieved press the Cancel button h Reinsert the i...

Страница 172: ...ci5000 Series Printer Technical Service Manual Version 0 1 6 28 Fig 1 Fig 2 High Voltage Trip Definition ...

Страница 173: ...from the main screen press the Menu tab and then select Service Press the HV Trip button in the Navigational Tool Bar Note the setting or recalibrate the setting by making sure the HV Plates are clean Ensure the Printhead Cover is on Then press the Automatic button This sequence will take about 30 seconds When finished press the Back button 2 times to return to the Main Screen 4 Watch for Ink buil...

Страница 174: ...n the printer is sitting in or in some cases where the CPU board has received some kind of corrupt data the CPU board may have an accidental offset and shows a pump off pressure outside of the 1 0psi This can be verified by pressing the Menu button then press the Status button Ensure the pump is off Corrective Action Reset the CPU board Pressure by 1 Tools Needed Reset Jumper part number xxx xxxx ...

Страница 175: ...xecuted will be displayed if entered correctly and the pressure should be reset to 0 7 Switch the power off and unplug the power cable from the left side of the printer remove the reset jumper and reconnect the Pressure Transducer Cable Reinstall the power cord and when the power is turned on again the pressure should be at 0 1 0 Pump Pressure Error PRESSURE HIGH Definition During operation or sta...

Страница 176: ...ually falls below the set point usually this is 40psi Corrective Action 1 The Filter Module is clogged or dirty Ensure that Filters have been changed within the timeframe specified in the maintenance chart 2 Ink Pickup Tube is too close to Return Tubes Ensure the Pickup Tube is set to the center of the ink tank and the return tubes are pointing away as seen in the picture below 3 Ensure the Pickup...

Страница 177: ...ction 1 Check the Fuses 2 Check the Pump Cable 3 Check the Pump Head for a seizure if the motor operates 4 Disconnect the Pump Head and perform a pump motor test described below Pump Motor Test a With the jet off remove the 3 screws that hold the pump to the motor and set aside Remove the pump from the motor and let the pump set on top of the Ink Manifold do not remove any tubing from the pump b R...

Страница 178: ...try f Using the marker mark a line on the magnetic cup of the motor see picture below as a location mark at the 6 o clock position then press the Increase button 1 time to start and rotate the motor at 5rps If the motor turns press Decrease 1 time to stop the motor and rotate the location mark to the next 7 o clock in this case position Repeat this step until all 12 positions have been tested ...

Страница 179: ...d quality prints When the ink is high the printer firmware automatically adds Make up to thin the ink down All of the Citronix inks are solvent based and therefore tend to thicken up while running thru evaporation and printing When the viscosity gets 1 5cP higher than the set point this error fault will be displayed Corrective Action 1 Ensure there is Makeup in the Makeup tank and the Pickup tube ...

Страница 180: ...yed Corrective Action 1 Verify the Viscometer Calibration Constant is the same as stated on the Calibration Label located inside the front door 2 Check the operation of the Viscometer Valve 3 Ensure the ball is moving by removing the Viscometer from the mounting bracket Flush the ink out of it and tilt the viscometer back and forth while observing LED 9 on the CPU board The LED will turn on when t...

Страница 181: ...e keypad enter the number then press Save Then press the Back button to return to the Main Menu High Pump Speed Definition The Citronix firmware controls monitors the pump speed in RPS Revolutions Per Second If the Pressure Transducer does not read the pressure set in the software example normal 40psi the firmware will increase the pump speed until that pressure is met When the pump speed exceeds ...

Страница 182: ...removing the pressure tube at the ink manifold output tube from the filter module placing it in a beaker and running the pump manually Low Pump Speed Definition When the pump speed continually drops below 15 RPS the error fault will be displayed and the printer will automatically shutdown to attempt to prevent damage to the ink system Corrective Action 1 Remove and clean the restrictor in the Ink ...

Страница 183: ...e the pump motor If 1 drive is not working this will display this error fault Corrective Action 1 Check the pump motor is plugged in correctly on each end 2 Replace the motor cable 3 Replace the motor Tach 3 Error Definition As mentioned above there are 3 motor drive signals inside the pump motor If 1 drive is not working this will display this error fault Corrective Action 1 Check the pump motor ...

Страница 184: ...d then Status to view the Nozzle Temperature Ensure the temperature is above 60 C 3 Inspect the wires on the printhead connector J3 pins 3 4 on the CPU board Ensure they are properly connected and there is no break in the wires 4 Check the sensor connection in the top compartment of the printhead for a good connection 5 Disconnect the wires at the printhead and unplug the J3 connector and use a Mu...

Страница 185: ...op Generator and is non repairable Corrective Action 1 See the corrective action 2 thru 6 for Printhead Temperature Fault TOO HOT Temperature Fault CPU TEMP TOO HOT Definition The Citronix ci5000 series printer cabinet has a temperature sensor that continually monitors the cabinet temperature to ensure the proper operating temperature is being maintained and removes solvent fumes from building up ...

Страница 186: ...re signal on the CPU board has been shorted The printer will shut down automatically and this error fault will be displayed The sensor is part of the CPU board and is non field repairable Corrective Action Replace the CPU board see page xx xx CPU Board replacement procedure Temperature Fault CPU TEMP SENSOR OPEN Definition The temperature signal on the CPU board has an electronic open The printer ...

Страница 187: ...Low Level rod the printer will shut the printer down to ensure the ink level does not drop below the Ink Pickup tube If this happens damage can happen to the Ink Pump Corrective Action 1 Add Ink see Section 3 Sub section Add Ink and Make up 2 If not low a Check that the level rod wires are connected to the proper level rods See the picture below Pic 1 b Ensure the power is off disconnect the Ink L...

Страница 188: ...el rod the printer will shut the printer down to ensure the ink viscosity does not get out of control and rise too high causing poor print quality or damage to the Ink Pump or other component failures or clogs Corrective Action 1 Add Make up see Section 3 Sub section Add Ink and Make up 2 If not low a Check that the level rod wires are connected to the proper level rods See the picture below Pic 1...

Страница 189: ...ci5000 Series Printer Technical Service Manual Version 0 1 6 45 Pic 3 Pic 4 Ink Reservoir Low ...

Страница 190: ...he Level Rod Wires from the rod on top of the Ink Manifold Then unplug the level rod cable from the CPU board J12connector Ohm each wire for continuity If a short in found replace the cable assembly 3 Replace the CPU board see the CPU Replacement procedure earlier in this manual Makeup Reservoir Full Definition The Make up Tank level is monitored continuously with 3 level rods to maintain the opti...

Страница 191: ...m and set the assembly aside d Remove the Make up fill port and tube by first removing the 3 screws securing the port to the cabinet Then pressing the top of the quick disconnect fitting located on the top of the Manifold shown in Pic 1 and pulling the tube up and out of the top of the Makeup Manifold e Using a 5 32 Allen wrench turn the two manifold securing cams turn counterclockwise f While lif...

Страница 192: ...e Make Up tank and ensure the level rods are not touching each other 2 Remove the Level Rod Wires from the rod on top of the Make Up Manifold Then unplug the level rod cable from the CPU board J11 connector Ohm each wire for continuity If a short in found replace the cable assembly 3 Replace the CPU board see the CPU Replacement procedure earlier in this manual Filter Service Required Definition T...

Страница 193: ...d should be reduced to print consistently Corrective Action Monitor the Speed screen found in the Status window while the line is running Ensure the Print Frequency has a smaller value than the Max Print Frequency This can be done by adjusting up or down the Print Quality Width Gap and Bold values in the Print Adjust screen After each adjustment always go back to the Speed screen to review the cha...

Страница 194: ...nition This warning error indicates either the wrong User Name or Password was used while trying to log into the security of the printer Corrective Action Contact your supervisor for the correct User Name and Password information and try logging on again NOTE Both User Names and Passwords are case sensitive Not Logged In wrong user name or password Definition When Security is enabled turned on use...

Страница 195: ...essing the screen Corrective Action There is no corrective action needed as this is a normal function of a Pigmented or Heavy Pigmented printer Flush Stop In Progress Definition When the Jet is being turned off the printer automatically performs a flush of the printhead nozzle Gutter During this process if Corrective Action No Action required Firmware Download Below Minute Definition This Error Wa...

Страница 196: ...tomatically OR press the Stop button and wait until the jet indicator states Off then turn off the power Power Off Before Jet Stop Definition If at any time the power is cut off or removed from the printer before a proper shutdown is completed this error fault will be displayed Corrective Action Perform a Backflush of the nozzle and start the jet see Section 6 Sub section Backflush Routine If the ...

Страница 197: ...0 1 6 53 Service Routines Backup Restore Backup Copies of the entire printer configuration messages graphics and system parameters are copied and stored to restore the original printer settings This can be done using the On Board SD card or a USB seen below ...

Страница 198: ...will be transferred over to the CLONE or COPY The Backup file can also be used to restore the original printer back to a previous working status This is useful if the CPU board needs to be erased or changed The backup file can be saved via the Ethernet SD or USB Backup Ethernet If the printer is connected to the same LAN as your computer you can open a web browser and type in the IP address of the...

Страница 199: ...Manual Version 0 1 6 55 2 Due to the difference in the way browsers save make sure to use Ctrl S Key or Select all then copy and paste into a file into Notepad The file must be saved with Save as type Text File txt file Encoding Unicode UTF 8 ...

Страница 200: ...hen turn the power on On the Menu Tab select the Properties button Select the Files icon in the Navigation Tool Bar Press to highlight the device you want to use to save the Backup file The example below shows the SD card is being used The USB will show Not Available if one is not inserted into the USB Port on the CPU board This indicates which device is being accessed ...

Страница 201: ...ci5000 Series Printer Technical Service Manual Version 0 1 6 57 Press the Save Backup button on the Functional Toolbar The backup file will be saved with a date and time ...

Страница 202: ...be removed and the files can be restored on another printer OR the card all of the files can be saved onto a PC The same procedure described above is used if selecting the USB Restore Ethernet If the printer is connected to the same LAN as your computer you can open a web browser and type in the IP address of the printer Click on the drop down box and select Restore Printer Click on Choose file an...

Страница 203: ...ce Manual Version 0 1 6 59 Press Send File Restore from USB or SD Card Ensure the Power is off then Insert the SD or USB into their respective ports and then turn the power on On the Menu Tab select the Properties button then select Files ...

Страница 204: ...be used if both are installed Touch the symbol left of Backups to reveal the list of backup files Touch to highlight the file to be used and press the Restore File button Firmware Updating Updating the firmware is made easy by using the USB The USB can be removed and installed while the power is on ...

Страница 205: ...t time the USB is used the printer will automatically install the File Structure onto the USB Now the USB can be removed and plugged into a computer to install the Firmware Note The new firmware must be loaded into the following file on the USB Citronix System Firmware Placing it in any other file or location will not be recognized by the printer Updating the firmware Once the USB is installed and...

Страница 206: ...will open to confirm the updating of the firmware Pressing OK will begin the installation process The following screen will be displayed while the firmware is being updated Once this process is complete the printer will reboot After the Printer has fully rebooted it can be used normally ...

Страница 207: ...ice Manual Version 0 1 6 63 Loading Fonts Languages and Keyboards Using the same process as Updating Firmware mentioned above install the fonts Languages and Keyboards onto the USB into their respective folders on the USB Fonts Keyboards ...

Страница 208: ...ges With each fonts Languages and Keyboards you will need to load each file separately Simply press the symbol to the left of the file you want to install and then touch select the file and press the install button in the Function Tool Bar on the right side of the screen ...

Страница 209: ...any graphic onto the USB in the following folder on the USB Citronix Customer SN Bitmaps These files must be Monochrome Bitmaps to be used on the Citronix printer Once the files have been loaded onto the USB and the drive plugged into the Printer s CPU board navigate to the USB and Press the to the left of the Bitmaps folder This will expand the folder showing all of the graphics Touch highlight t...

Страница 210: ...rsion 0 1 6 66 Once any all the graphics have been loaded it will be displayed in the Graphic list they will be ready to be inserted into any message NOTE If the graphic is not saved in the proper format the Install Bitmap button will not be displayed ...

Страница 211: ...Board NOTE Always use a ground strap or wrist strap when working on or handling the CPU Board ESD is a major contributor in many board failures 1 Ensure the printer has been or is shut down and the power cord removed from the socket on the left side of the printer shown below 2 Using a 5 32 inch Allen wrench unlock the 2 lock on the front door tablet assembly to gain access to the electronic secti...

Страница 212: ...coax connector is free 5 Carefully remove the Touch Screen s flat ribbon cable shown below by moving the flat black tab from the up position to the down Then carefully pull the ribbon cable from the connector 6 Now with everything unplugged from the CPU board remove the 8 Phillips head screws from the perimeter off the board and the board will be free from the tablet door ...

Страница 213: ... 69 NOTE ensure the board is place on or in an Anti Static bag or mat to protect against ESD Damage 7 Install the new CPU Board in the reverse order NOTE when installing the Touch screen flat ribbon cable take care NOT to bend or pinch the ribbon cable See below ...

Страница 214: ... 3 Remove the two screws that secure the Drop Generator and remove from Printhead base This provides direct access to the Nozzle Do not disconnect any cables 4 Remove the two Nozzle screws that secure the Nozzle to the Drop Generator and remove the Nozzle from the Drop Generator with a gentle rotating motion back and forth until the Nozzle is free from the Drop Generator 5 Either flush or ultrason...

Страница 215: ...e Place the beaker in the ultrasonic bath lightly floating in water for 3 to 6 minutes 3 Remove the Nozzle and dry it with clean air 4 Inspect the interior of the Nozzle using a microscope If debris remains continue to Stage 2 Stage 2 1 Place the Nozzle in a small beaker of PHETCH Citronix part number 016 1016 001 Place the beaker in the ultrasonic bath lightly floating in water for a maximum of 5...

Страница 216: ... power off using the appropriate shutdown routine 2 Remove the Ink System housing cover 3 Loosen the Ink Tank hold down screw shown in Pic 2 or the Service Module Base shown in Pic 3 4 Remove the Ink fill tube by first removing the 3 screws securing the Ink Fill Port to the cabinet then pressing the top of the quick disconnect fitting located on the top of the Ink Manifold shown in Pic 1 and pulli...

Страница 217: ... cover Changing the Ink System Pump 1 Disconnect the Ink tubes from the quick disconnect fitting on each side of the pump Place an absorbent material such as a paper towel to catch any Ink that is left in the pump head 2 Remove the three pump screws that secure the pump to the pump motor 3 Carefully remove the pump assembly from the motor 4 The pump is reinstalled using the reverse procedure Ensur...

Страница 218: ...id from the valve stem by removing the plastic hold down clip on the end of the Solenoid and removing from the valve 3 Remove the two screws securing the valve to the Ink manifold Remove the valve from the manifold taking care not to lose the valve gasket Flush the valve with solvent to prevent Ink from drying in it 4 Replace the cleaned valve replacement valve or replacement gasket NOTE If the va...

Страница 219: ...Ink System wall when replacing the Transducer cable Or unplug the cable from the Transducer when replacing only the Pressure Transducer 9 Using the appropriate wrench unscrew the Pressure Transducer from the manifold 10 Do not use thread tape or sealant and do not over tighten 11 Replace using the reverse procedure Then ensure the cable is re installed correctly and that the cables are secured awa...

Страница 220: ...fully unscrew the restrictor from the manifold 7 Carefully rinse the hole and inspect for dirt and or any other debris 8 If the restrictor is clogged simply wash with Cleaning Solvent until the clog is removed Hold the restrictor up to the light to inspect for possible blockages 9 Reinstall or replace the restrictor into the manifold Screw it into the manifold 10 complete turns and refit the grub ...

Страница 221: ...the correct order see Pic 3 below Before reinstalling hold them up to the light to ensure that they are clean 6 The restrictors must be screwed into the manifold to a precise depth This is accomplished by first removing the Vacuum valve 7 Looking into the first hole of the valve screw in PJ1 063 restrictor until it is covering 80 of the hole with the open section closest to the back of the printer...

Страница 222: ...ci5000 Series Printer Technical Service Manual Version 0 1 6 78 ...

Страница 223: ...view 7 2 Serial and Ethernet 7 2 RS232 Port 7 2 RS232 Settings 7 3 RS232 Timings 7 3 Ethernet 7 4 Ethernet Ports 7 5 Ethernet Timings 7 5 Printer Ethernet Settings 7 5 Command Interface 7 8 Videojet Emulation 7 11 Acknowledgements 7 12 Web Browser Utility 7 13 Firmware Upgrade 7 14 Backup 7 15 Restore 7 17 ...

Страница 224: ...commands to select messages and update text in messages o Perform commands to control the Printer o Receive acknowledgements of Photocell trigger Print Ready and Print Complete o Receive warnings errors The RS232 or Serial interface can be used to o Backup and restore all Graphics Messages and Properties of the Printer o Perform commands to select messages and update text in messages o Perform com...

Страница 225: ... use any flow control In order to avoid buffer overflows an external controller should pause occasionally when sending large amounts of data or sending many small commands The pause must be 1ms after every 256 characters or less This is done in Hyperterm by setting the line delay to 1 Hyperterm no longer comes with Windows OS other terminal emulators such as putty or CoolTerm are available for dow...

Страница 226: ...e terminal will be blank Type in the ST command followed by a carriage return to get the Printer status Ethernet The Ethernet connection is made to the P1 connector This is a standard RJ45 connector If the Printer is to be directly connected to a computer a crossover cable must be used If the Printer is to be connected to an Ethernet hub switch or router a standard Ethernet cable must be used ...

Страница 227: ...8 was developed to be used by a remote computer There is no welcome greeting or asynchronous messages The only responses are the result of commands Ethernet Timings The Ethernet ports do not need flow control Internal buffer processing must be performed A carriage return is required at the end of every command When sending large amounts of data for a Restore RR command a Message ME command or a Gr...

Страница 228: ...nternet nickname o Is limited to 15 characters o Has only UPPERCASE letters digits and a hyphen o Must start with a letter o Must not end with a hyphen Examples of valid names are PRINTER2 BOTTLER03 and FILLER LINE 4 This Internet nickname may be used by any software that supports WINS or DNS name resolution To test the connection the name may be used in the ping command The name may be used in a ...

Страница 229: ... get the Printer status Windows Settings The Windows networking information must be updated to work with the Printer These are accessed through Control Panel Network Connections Local Area Connections Properties Internet Protocol TCP IP Some Internet knowledge is required All features and options cannot be covered here ...

Страница 230: ...2 CR Counter Value None Displays Counter 2 current counter value CL CLY CR Clear Buffer Y N Clears current print buffer to generate a new one CM CM CR Clean Messages None Clears message storage deletes all messages CO See attached Counter See below Set up sequential counting of products CP CP CR Product Count None Displays current product count CR CR CR Counter Reset None Allows reset of the Produ...

Страница 231: ...lush or Smart Clean RO RO0345 CR Rollover Any time Time when system date is advanced RR RR CR Restore Restore file Restores all system and message settings RS RS CR Restart or Reboot None Performs a soft reset of Printer SH See below Shift Set See below Input shifts to allow printing of shift codes in message defaults SI Select Interpreter Message List and Select See below Provides the ability to ...

Страница 232: ...a TAB character decimal 9 may be used as the field separator To use one data field with a comma as data a TAB must be used after the MD Example string MD xxxxxxxx iiiiiiiiiiiiiii nnnnnnnnnnn bbbbbbbbbbbb CR Explanation x Field 1 Data i Field 2 Data n Field 3 Data b Field 4 Data Additional fields can be added by using the as the separator ME Message Command This command enables the ability to creat...

Страница 233: ...mand allows selection of a Message after the list of messages have been delivered to the host device via number of messages in the list Example output Available Messages left column number sel Date Time Name 1 11 29 2020 12 16 1 2 11 29 2020 12 16 2 3 12 5 2020 12 24 Test 4 00 00 0000 0 00 DEFAULT Enter Selection x to exit SM Select Message This command allows selection of a Message for printing r...

Страница 234: ...tarting or stopping the Printer The interface cable should first be disconnected from the Printer before turning off the VJ emulation Acknowledgements To assist in the control and timing of remote communication applications the Printer has three Acknowledgement options These Acknowledgements may be used at any time and for any reason such as performance evaluation or data logging Their use is not ...

Страница 235: ...e not in the order that they appear in the message Acknowledgement Photocell The Acknowledgement Photocell will transmit to an external computer whenever the Photocell Trigger is sensed This Acknowledgement will transmit a single character P The Acknowledgement Photocell will be transmitted at every Photocell Trigger whether the Jet is on or off and whether the Printer is ready to print or not Web...

Страница 236: ...e in Printer from the dropdown menu The page below will open Click the Browse button and navigate to the location you have the firmware store on the computer Note the firmware selected will be displayed Ensure the Reboot after programming box is checked If the time need to be updated check the box for Update Date Time Then click Send File ...

Страница 237: ...en the printer has been successfully reprogrammed Backup Clicking on the Backup Printer from the dropdown menu will open a separate window displaying the Backup file data as shown below Due to the differences in the way browsers save make sure to use File Menu bar Save as or Ctrl S Key or Select all then copy and paste into a file The file must be saved with Save as type Text File txt file Encodin...

Страница 238: ...the bottom of the highlighted file and verify that the highlighted area includes Graphics as the last tag of the last line This ensures that all of the data has been captured before copy and paste Paste the text in Notepad and save as a txt file Name the file as the Printer line or serial number so you will know which Printer it was from ...

Страница 239: ...nese Japanese etc will not restore correctly Restore In this option you can use a Backup file to restore any corrupt data on a Printer If a Backup file is used on the same CPU board all the Message Settings Message Service Setting etc will be restored If a Backup file is not used on the same CPU board all non hardware settings will be restored This can be used to clone Printers To restore a Printe...

Страница 240: ... the location you have saved the Backup file you are using to restore Select the file and press Open During the Restore process the printer will indicate a Restore is in progress When the restore is complete the Web Browser will display the following and the Printer screen will return to the Home screen ...

Страница 241: ...ECTION 8 Contents Page Cabinet 8 2 Electronics 8 2 Hydraulics 8 4 Printhead 8 10 Spares Tools 8 16 Consumables 8 16 Level 1 End Users Spares 8 17 Level 2 Service Engineers Spares 8 18 Tools 8 18 Options and Accessories 8 19 Photocell Encoder 8 19 Alarm Beacons 8 21 Stands Holders 8 21 ...

Страница 242: ...ctronics Image Part Number Description 110 0018 001 PCB CPU Tested Rev5 Specify machine type when ordering 004 1005 001 Power Switch Assembly 004 1108 001 IEC EMI Power Plug 002 2018 001 Front Tablet with touchscreen Stainless 004 2019 001 Front Tablet with touchscreen Black ...

Страница 243: ...le Assy Encoder 3 pin 022 2004 001 Cable Assy Photocell 4 pin 022 2005 001 Cable Assy Beaconl 7 pin 022 1057 001 Power Cord India 022 1058 001 Power Cord USA 022 1059 001 Power Cord China 022 1060 001 Power Cord EURO 022 1061 001 Power Cord UK 022 1022 001 Cable Assy Level Detect ...

Страница 244: ...er Technical Service Manual Version 0 1 8 4 004 1001 003 Fan Cooling 004 1028 001 Guard Fan 004 1047 004 Cover Air Filter 004 1002 001 PSU High Voltage 004 1029 001 Power Supply DC Hydraulics Image Part Number Description ...

Страница 245: ... 0 1 8 5 003 2055 001 Viscometer Assembly specify ink type when ordering 003 1235 001 Adapter Viscometer 6mm to 1 4inch 003 1228 001 Viscometer Bracket 003 1231 001 Strap Viscometer 003 1229 001 Service Module Base Unit 003 1233 001 Service Module Bracket ...

Страница 246: ...1 8 6 003 1243 001 Fitting Union Elbow 0 25OD 003 1244 001 Ferrule Flangeless 1 8in yellow 003 1245 001 Nut Flangeless Polypropylene 1 8in 003 1246 001 Feed Damper 003 2060 001 Printer Service Kit ci5000 8 000 hours Includes 1 x 003 1230 001 1 x 004 1015 003 ...

Страница 247: ...er Technical Service Manual Version 0 1 8 7 003 1230 001 Service Module ci5000 003 1005 001 Pump Head 003 1155 001 Pump Head Heavy Pigment Only for Heavy Pigment Printer 003 1006 001 Pump Motor 003 2047 001 Restrictor Kit ...

Страница 248: ...nical Service Manual Version 0 1 8 8 003 1202 001 Fitting 90 degree push to connect 003 1190 001 Cap Ink Fill Black 003 1191 001 Cap Makeup Fill Yellow 003 1023 001 Valve Ink Manifold 2 Way 003 1024 001 Valve Ink Manifold 3 Way ...

Страница 249: ...al Service Manual Version 0 1 8 9 003 1199 001 Fitting 0 125 push to connect 003 1200 001 Fitting 25 push to connect 003 1201 001 Fitting 375 push to connect 003 1042 002 O ring Pressure Transducer 003 1020 002 Pressure Transducer ...

Страница 250: ...l Version 0 1 8 10 003 2051 001 Assembly Ink Tank Manifold 003 2050 001 Assembly Makeup Tank Manifold 003 1014 002 Tank Ink 003 1014 003 Tank Makeup 019 1088 001 Screw hex head SS 2 75in holds down ink tank Printhead Image Part Number Description ...

Страница 251: ... 1002 004 Bracket Drop Generator 2003 2006 002 1002 005 Bracket Drop Generator 2007 002 1002 006 Bracket Drop Generator 2008 002 1008 006 Electrode Charge 002 1073 002 PCB Phase Amplifier Sensor Assy 002 2012 002 Cover Printhead Front 002 1011 004 Cover Printhead Back ...

Страница 252: ...lector GND Micro Only 002 2005 002 Assy Deflector Plate Angled 002 2022 001 Assy Deflector Plate Micro Only 019 1501 001 Screw Thumb Printhead 2007 002 2025 002 Nozzle Plate 65 2008 002 2026 002 Nozzle Plate 40 2008 Micro Only 002 2027 002 Nozzle Plate 50 2008 HS50 Only 002 2013 002 Assy Resonator Probe with o ring 2013 ...

Страница 253: ... Printer Technical Service Manual Version 0 1 8 13 002 1017 001 Fitting Gutter Barb 002 1013 003 Block Gutter 002 2007 001 Sensor Gutter 002 1098 001 Connector IDC Printhead Wires 002 1118 002 Cam Jet Alignment 2008 ...

Страница 254: ...er Technical Service Manual Version 0 1 8 14 003 1025 001 Valve Printhead 002 1003 003 Manifold Printhead Valve 002 1029 001 Gasket Printhead Valve 002 2008 002 Assy Strobe Block 002 2008 003 Assy Strobe Block Micro Only ...

Страница 255: ... Assy Drop Generator 2003 2007 Only for sale with ci580 ci700 ci1000 ci2000 Printer sold between 2003 2007 002 2002 003 Assy Drop Generator 2008 nozzle and calibration included 002 1100 003 O Ring Resonator Probe 2008 002 2009 001 Assembly Lid Switch 002 2024 001 HV Resistor Kit Printhead includes resistor heat shrink ...

Страница 256: ...ice Manual Version 0 1 8 16 002 1033 001 Contact Solder Charge Cable 004 1012 001 Connector Conduit Straight 004 1070 001 Connector Conduit 90 Degree Spares Tools Consumables Image Part Number Description 016 6009 001 Hand Cleaner Reduran ...

Страница 257: ...aner Stainless Steel 016 1016 001 Solution Nozzle Cleaning 4 oz Phetch Level 1 End Users Spares Spares recommended for end users are as follows Part Number Description Quantity 004 1059 001 Fuse Mains 5x20 3 15amp 2 004 1061 001 Battery 3V Backup Lithium 1 002 1083 003 Nozzle Printhead 65 2003 2007 1 003 1230 001 Service Module ci5000 1 004 1015 003 Filter Air 1 ...

Страница 258: ...y 1 002 1073 002 PCB Phase Amp Sensor Assy 1 003 1025 001 Valve PH 3 way 1 002 2002 003 Assy Drop Generator 2008 1 002 1012 003 Plate Deflector GND 1 002 2005 002 Assy Deflector Plate Angled 1 014 1032 001 Loupe Eye Piece 1 014 1051 001 Wrench Allen Key 1 16 inch 1 014 1078 001 Wrench Allen Key 1 32 inch 1 014 1067 001 Wrench Allen Key 3 16 inch 1 014 1066 001 Wrench Allen Key 5 32 inch 1 014 1074...

Страница 259: ... Slotted 1 8 inch 014 1075 001 Screwdriver Phillips 0 014 1080 001 Cutter Side Cutters 014 1052 001 Cutter Tubing 014 1076 001 Flashlight Service 014 1040 001 Pliers Flat Nose 014 1085 001 Wrist Strap ESD 014 1012 001 Squirt Bottle MEK Wash 014 1013 001 Squirt Bottle Ethanol Food Grade Wash 014 1081 001 Squirt Bottle Acetone Wash NOTE Tools can be sold separately using the part numbers listed in c...

Страница 260: ...Collector Output 015 2023 001 Photocell Retroreflective IP65 Connector Includes Banner N6 IP67 15ft 4 5M Cable Bracket screws NPN Open Collector Output LED Status Indicator 015 2024 001 Cable Photocell IP65 Connector 015 2006 003 Encoder Kit Shaft IP65 Connector Includes 9ft 3M Cable IP65 Spring Bracket 020 1083 001 Connector External 3 pin male encoder 020 1085 001 Connector External 4 pin male p...

Страница 261: ...Single Stage IP65 Connector Includes Warning light s 9ft 3M Cable Stand Mount Kit 015 2027 001 Beacon Alarm Dual Stage IP65 Connector Includes Warning light s 9ft 3M Cable Stand Mount Kit 015 2011 003 Beacon Alarm 3 Stage IP65 Connector Includes Warning light s 9ft 3M Cable Stand Mount Kit Stands Holders Image Part Number Description ...

Страница 262: ...hnical Service Manual Version 0 1 8 22 005 2008 003 Mounting Kit Printhead Floor 005 2010 003 Mounting Kit Conveyor Side 005 1044 001 Bracket Cap 2 Post 005 1081 002 Bracket Printhead Clamp 005 1082 001 Bracket Photocell Mount ...

Страница 263: ...hnical Service Manual Version 0 1 8 23 005 1080 001 Bracket Crossblock 2 x 5 005 1026 001 Bracket Flange 2 005 1083 001 Bracket Rod Cross Arm Printhead 005 1506 001 End Cap Printhead Arm 005 1502 001 Bracket Rod Handle 1 shaft ...

Страница 264: ...l Version 0 1 8 24 005 1503 001 Bracket Printhead Handle 1 9 16 shaft 005 1075 001 Bracket Alarm Beacon 005 1028 001 Bracket Leveling Feet 005 1069 001 Bracket Conveyor Mount 2 005 1027 001 Bracket Post 2 x 5 FT 005 1070 001 Bracket Post 2 x 2 FT ...

Страница 265: ...Image Part Number Description 022 1014 001 Cable Shielded RS232 10 feet 022 1015 001 Cable Shielded RS232 25 feet 022 1016 001 Cable Shielded RS232 50 feet 022 1017 001 Cable Cat 5 Ethernet Patch 10 feet 022 1018 001 Cable Cat 5 Ethernet Patch 25 feet 022 1019 001 Cable Cat 5 Ethernet Patch 50 feet ...

Страница 266: ...r Technical Service Manual Version 0 1 9 1 CALIBRATION SECTION 9 CONTENTS Page Calibration 9 2 Printhead Alignment 9 2 Band Adjustment to be completed for each drop size 9 7 Modulation Adjustment 9 9 Charge Adjustment 9 10 ...

Страница 267: ...thead like a Nozzle Plate Resonator Probe Drop Generator and or the Deflector Plate It is also good practice to perform a Calibration after a Preventative Maintenance or whenever the print quality is not consistent The following will be a guide to help any user to perform the correct Calibration process Printhead Alignment Proper printhead alignment starts from the bottom up 1 Align the ink stream...

Страница 268: ...ult overrides and then press the Back button as shown below This will allow the ink stream jet to run while alignment be performed without disrupting the procedure with one of these faults NOTE At each power off on the Overrides will default not selected o Next place a beaker or paper towel underneath the printhead in case the jet misses the gutter and then press the Jet Start button and observe t...

Страница 269: ...e tighten the securing screw Fig 2 Fig 3 o Next loosen the top securing screw shown in Fig 4 found on the right side of the Drop Generator Mounting bracket Fig 4 o Using the Adjustment cam shown in Fig 4 adjust the vertical alignment to center of the gutter hole shown in Fig 5 When the adjustment is complete tighten the securing screw Fig 5 o The jet should now be in the proper position in the gut...

Страница 270: ...allel to the ink stream shown in Fig 6 3 Adjust the Positive HV Plate so that the distance between the plates are shown in Fig 6 o Top to 3 5 to 4mm o Bottom is approximately 6mm 4 Adjust the Phase Detector until 100 Phase Quality is seen in the Status Screen o Rule to use is align with left edge of Charge Electrode Slot ...

Страница 271: ...ce Manual Version 0 1 9 6 5 Align the Charge Electrode so that the ink stream is centered in the slot This adjustment may be accomplished by first loosening the mounting screws and then gently levering the Charge Block using a screwdriver ...

Страница 272: ... Band Adjustment to be completed for each drop size Press the Menu Tab Bar and press the Service button 1 Set the Charge to 72 by pressing the Edit button and using the keypad enter 72 then press the Save button 2 Ensure or set the Pressure to 40psi by pressing the Edit button to the right of Pressure Using the keypad enter 40 and press the Save button ...

Страница 273: ...g the Edit Button to the right of Band select Band 0 from the list and press Save Take a print sample by pressing the Print Trigger button in the Function Tool Bar on the right edge of the screen The Bands range is from 10 to 10 Advance the Band by 1 wait 5 seconds then take a print sample after each adjustment Use both and ranges o Inspect each sample at each Band setting for print defects and se...

Страница 274: ...Modulation and selecting from the list and pressing Save Take a print sample as described in the previous step by pressing the Print Trigger button in the Function Tool Bar Advance the Modulation down to the next selection wait 5 seconds then take a print sample after each adjustment Inspect each sample at each Modulation setting looking for print defects NOTE A 100 volt window is the minimum acce...

Страница 275: ...the Charge setting at 68 72 76 by using the Edit button as described in the first step taking a print sample after each change Inspect each sample at each Charge setting looking for print defects The Charge setting is not fixed and if necessary can be set to alternative levels A 9 total Charge window is the acceptable scope range of this test 5 If achieved use the middle adjustment as the set poin...

Страница 276: ...cal Service Manual Version 0 1 9 11 NOTE Pressure can also be adjusted slightly to allow for additional Print Quality This should not be set outside 35 45psi for both normal and Macro drop sizes 45 55 for HS50 and Micro drop sizes ...

Страница 277: ...000 Series Printer Technical Service Manual Version 0 1 10 1 ci5650 AIR SYSTEM SECTION 10 CONTENTS Page ci5650 Air Handling System Overview 10 2 Principle of Operation 10 2 Components 10 3 Parts List 10 4 ...

Страница 278: ...rocessed through the Printer to both the cabinet and the Printhead The positive pressure within the Printer cabinet and Printhead prevents harmful dust or vapors from entering the Printer An opening at the bottom of the hydraulic section of the cabinet allows the air to exhaust from the Printer The positive air pressure prevents contaminants entering the cabinet and the air flow prevents the possi...

Страница 279: ...ci5000 Series Printer Technical Service Manual Version 0 1 10 3 Components Regulator Filter Bowl System Internal Components ...

Страница 280: ...ci5000 Series Printer Technical Service Manual Version 0 1 10 4 Pressure Switch Connection Parts List 1 004 1088 001 Regulator Filter Bowl Assembly 2 004 1079 001 Blanking Plate ...

Страница 281: ...ries Printer Technical Service Manual Version 0 1 10 5 1 004 1090 001 1 8 Tube fitting 2 004 1089 001 1 4 Tube fitting 3 004 1084 001 Internal Air Filter 4 004 1085 001 Pressure Switch 5 004 1078 001 Air Adapter ...

Страница 282: ...inter Technical Service Manual Version 0 1 11 1 REFERENCE SECTION 11 CONTENTS Page Glossary Of Terms 11 2 Schematics 11 4 Display Touch Connections 11 4 Electrical Connections 11 5 Fluids Connections 11 6 Menu Map 11 7 ...

Страница 283: ...resses Drop Ink drop Also used as a unit of measurement in measuring character or font height Element Relating to Barcodes Is any individual bar or space Ethernet This is the LAN Local Area Network technology used to connect the printer to other devices MSDS Material Safety Data Sheet PPR Pulses Per Revolution Number of pulses for 1 complete revolution of a shaft encoder Print Trigger The internal...

Страница 284: ...ed by the printer the current value setting or adjustment in the printer Stroke The adjacent lines of ink drops making up the character drop matrix The distance between strokes is sometimes used as a unit of measurement in spacing or delays USB Universal Serial Bus This is defined as a plug and play device that can be fitted into the printer In the ci5000 series printers a USB socket is provided t...

Страница 285: ...ci5000 Series Printer Technical Service Manual Version 0 1 11 4 Schematics Display Touch Connections ...

Страница 286: ...ci5000 Series Printer Technical Service Manual Version 0 1 11 5 Electrical Connections ...

Страница 287: ...ci5000 Series Printer Technical Service Manual Version 0 1 11 6 Fluids Connections ...

Страница 288: ...ab 301 viscosity status 414 shift defaults jet start 3 home 303 speed 415 expiration defaults jet stop 11 messages 304 filters 412 counter defaults 300 status 307 System info set all messages 805 set all messages 200 service 101 properties 130 files 110 security USB 222 flush prime citronix 206 override system 211 test valves customer 207 run pump SD 201 HV trip citronix 221 advanced service syste...

Отзывы: