www.charltonandjenrick.co.uk
7
LT8019
SECTION TWO Operating the Appliance (Users Instructions)
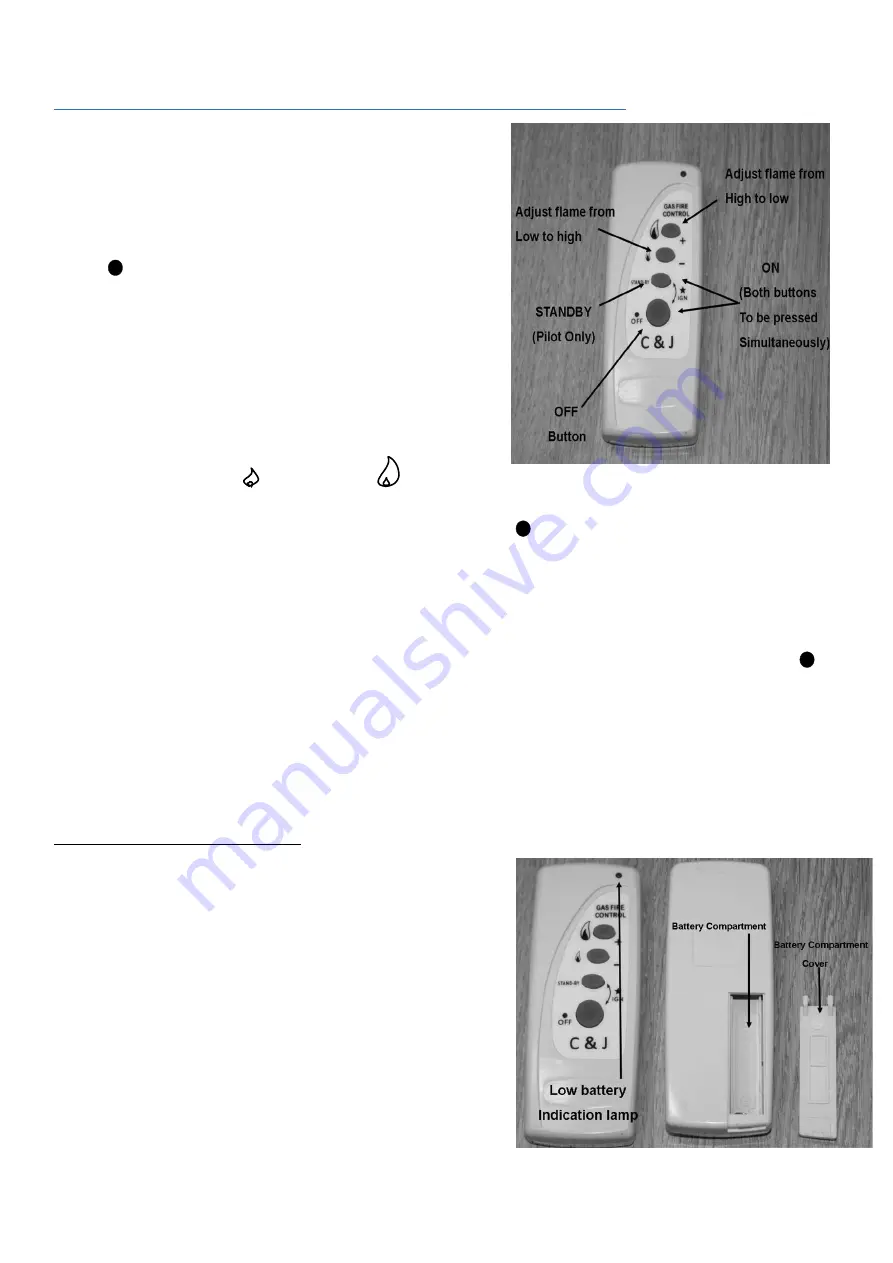
To light the appliance using the remote handset:
A.
Point the remote control handset in the direction of the
appliance and simultaneously press the buttons marked ‘
off’ and ‘standby’. Continue to hold in these two
buttons until a ‘bleep’ is heard (approximately 2
-3 sec.)
and then release these buttons. The appliance will
automatically go through the ignition sequence and the
pilot should ignite. Once the pilot is alight the appliance
will automatically go to the high setting (approximately
20-25sec). If the ignitor stops sparking and the pilot fails
to light, repeat this procedure.
B.
The appliance can be adjusted up or down by pressing the
appropriate button
'
'
(low setting) or
'
'
(high
setting).There are 5 heat settings and the fire will give a double bleep when the maximum or minimum heat
setting is reached. To switch off the appliance press the OFF
'
'
button or if the appliance is to be switch off
for a short period it is recomm
ended that the ‘standby’ button be used.
C.
The appliance can be switched off without using the handset by unplugging the transformer. When the
transformer is removed there will be a delay (up to 3minutes) after which double bleeps may be heard and
shortly after the appliance will extinguish. Ensure that the transformer is reconnected once the fire as been
extinguished. The appliance cannot be operated without the use of the handset. If the fire fails to light or
extinguishes for any reason, it will be necessary to re-set the fire. This can be done by pressing the off
button then following the normal lighting procedure.
NOTE: If the fire is extinguished for any reason wait 3 minutes before relighting.
Low Battery Indication (Handset)
If while pressing any of the buttons on the remote handset the low
battery indicator lamp either stops flashing or appreciably slows
then the battery should be changed.
To Replace Batteries in Handset (AAA 1.5 v lr3 x2)
Remove the cover from the rear of the handset and fit
replacement batteries, taking note of the orientation.
Содержание Edge 3s BF
Страница 11: ...www charltonandjenrick co uk 11 LT8019 Place logs 8 9 as shown above Place logs 10 11 as shown above ...
Страница 15: ...www charltonandjenrick co uk 15 LT8019 Appliance Dimensions EDGE BF EDGE 3s BF ...
Страница 21: ...www charltonandjenrick co uk 21 LT8019 ...
Страница 22: ...22 LT8019 ...
Страница 32: ...32 LT8019 SECTION FOURTEEN Wiring Diagram Maintenance Instructions ...
Страница 34: ...34 LT8019 Register your appliance online today to active your warranty ...
Страница 37: ...www charltonandjenrick co uk 37 LT8019 ...
Страница 38: ...38 LT8019 ...
Страница 39: ...www charltonandjenrick co uk 39 LT8019 ...


