www.charltonandjenrick.co.uk
23
LT8019
SECTION TEN Installing the Appliance (Installation Instructions)
INSTALLING THE APPLIANCE ONTO A CAVITY WALL.
(When installing in a timber framed dwelling reference must be
made to the specific installation requirements stated later in this
Section ‘Installing The Appliance In Timber Framed
Dwelling’
)
.
•
Ensure it is a suitable outside wall constructed of non-combustible materials and that the flue position meets the
requirements previously described in
Section 8
.
•
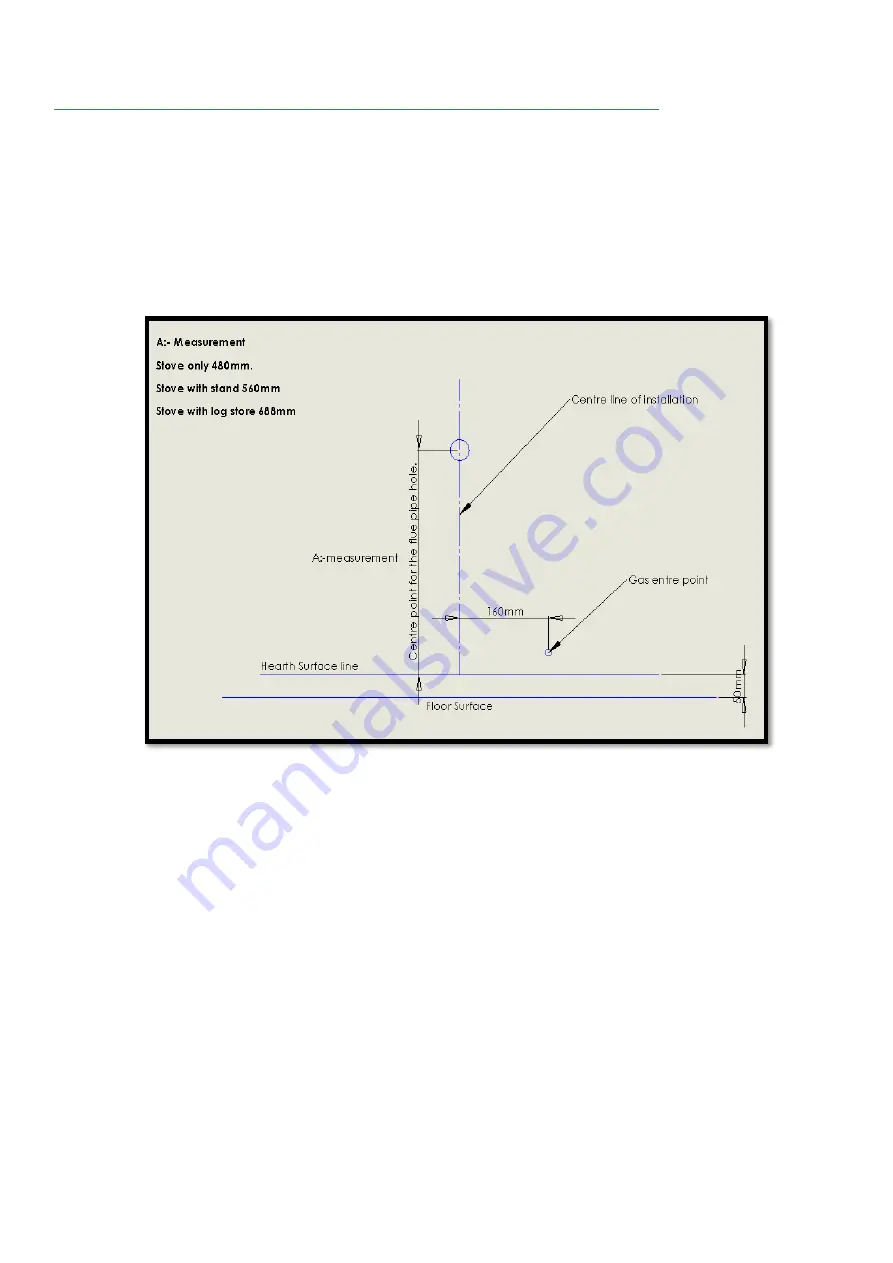
Mark a horizontal line on the wall at the intended hearth surface or appliance base height.
•
Mark a vertical line on the wall at the intended centre of the appliance up from the horizontal line for a height
of 595mm.
•
Mark a short horizontal line so it crosses the centre line at 483mm above hearth level line. This is the centre point
for the flue pipe hole.
•
Using a long masonry drill, make a pilot hole completely through the wall. Ensure the hole is drilled accurately at
the centre and square to the wall both horizontally and vertically at the cross point previously marked.
•
Using 150mm (6”) core drill cut a hole following the pilot hole. Drill
from the outside through to the cavity to give
a good finish on the outside.
•
Remove any cavity insulation from the cut-out opening and for a further 100mm into the cavity gap each side and
above.
•
Pack “
Rockwool
” around the sides and top of the
opening into the cavity for a depth of 100mm.
•
Position the gas supply (see connecting the gas supply later in this manual), taking account of the relative gas
regulations regarding a gas pipe in a cavity (sleeving and sealing etc). Note the gas feed must be fitted with the
restrictor elbow supplied.
•
Lay the hearth if required so that it is positioned correctly to the horizontal line.
Содержание Edge 3s BF
Страница 11: ...www charltonandjenrick co uk 11 LT8019 Place logs 8 9 as shown above Place logs 10 11 as shown above ...
Страница 15: ...www charltonandjenrick co uk 15 LT8019 Appliance Dimensions EDGE BF EDGE 3s BF ...
Страница 21: ...www charltonandjenrick co uk 21 LT8019 ...
Страница 22: ...22 LT8019 ...
Страница 32: ...32 LT8019 SECTION FOURTEEN Wiring Diagram Maintenance Instructions ...
Страница 34: ...34 LT8019 Register your appliance online today to active your warranty ...
Страница 37: ...www charltonandjenrick co uk 37 LT8019 ...
Страница 38: ...38 LT8019 ...
Страница 39: ...www charltonandjenrick co uk 39 LT8019 ...


