background image

Applicator APL 100 

Mechanical Adjustments


11/13 Operating 

Manual 

33


7 Mechanical 

Adjustments 


NOTICE! 

Perform the mechanical adjustments in two steps 


Roughly align the pad in all directions to avoid collisions 
of the pad with other parts when switching on the 
compressed air. 


Perform the fine adjustment with compressed air 
switched on to optimize the labelling process. 


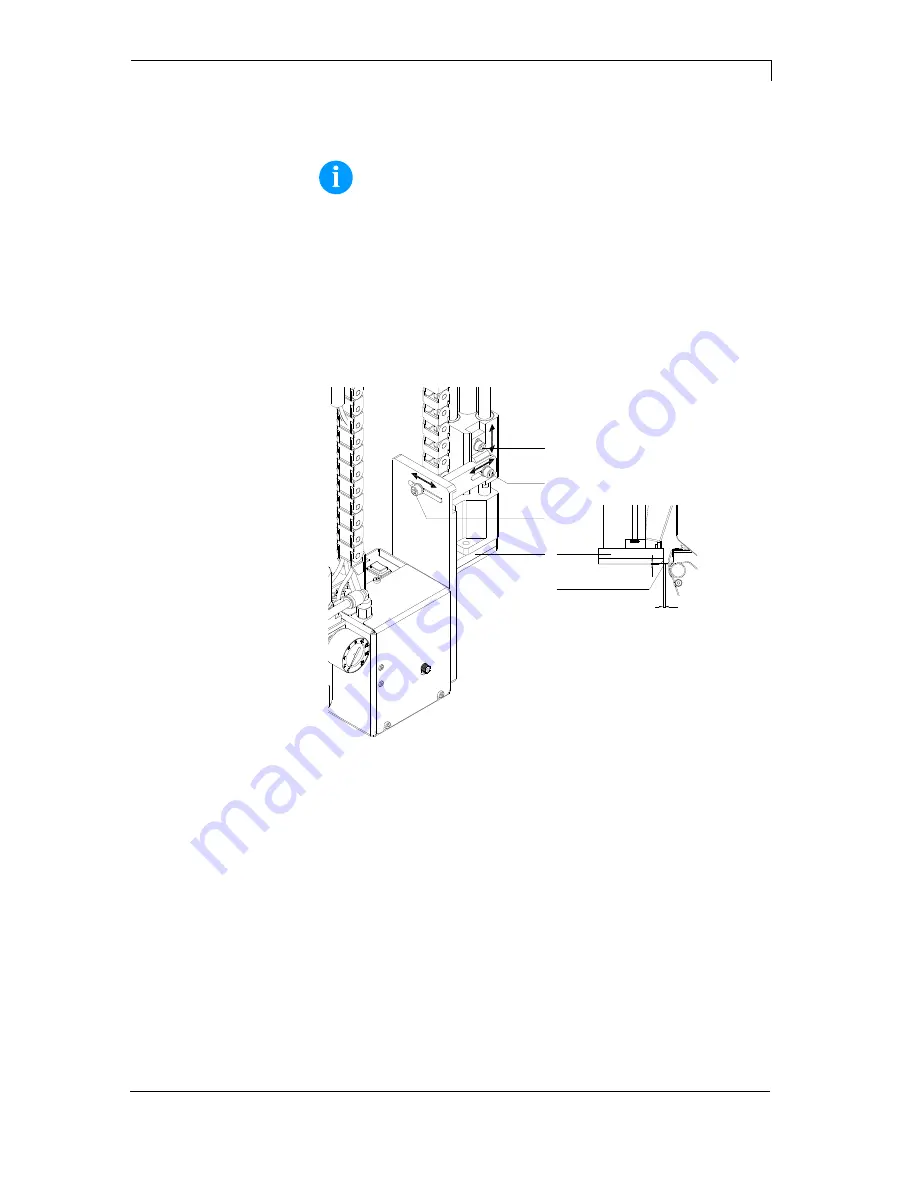
7.1  Aligning the pad 

2

1

3

2

1

4

5


Figure 17 


1. Loosen 

screw 

(3). 

2.  Shift the cylinder unit including the pad (4) inside the elongated 

hole in such a way, that the distance between the pad and the 
dispense edge (5) is about 2 mm. 

3.  Tighten screw (3). 


1. Loosen 

screw 

(1). 

2.  Shift the cylinder including the pad (4) inside the elongated hole in 

such a way that the lower rear edge of the pad (4) is located about 
1 mm below the dispense edge (5) of the printer. 

3.  Tighten screw (1). 


Adjustment in 
print direction 

Height adjustment 

Содержание APL 100

Страница 1: ...APL 100 Operating Manual ...

Страница 2: ...t update Trademarks Centronics is a registered trademark of Data Computer Corporation Microsoft is a registered trademark of Microsoft Corporation Windows 2000 2003 XP Vista 7 8 Windows ServerTM 2008 Windows ServerTM 2008 R2 Windows ServerTM 2012 are registered trademarks of Microsoft Corporation TrueTypeTM is a trademark of Apple Computer Inc Zebra and ZPL II are registered trademarks of ZIH Corp...

Страница 3: ...he Stopper 24 4 7 Connections 25 5 Configuration 27 5 1 Configuration Parameter 27 5 2 Settings in printer function menu Fehler Textmarke nicht definiert 6 Signal Diagrams 32 6 1 Print Apply 32 6 2 Apply Print 32 7 Mechanical Adjustments 33 7 1 Aligning the pad 33 7 2 Adjusting the Parallelism between Pad and Dispense Edge 34 7 3 Opening the Holes on the Blow Tube 35 7 4 Aligning the Blow Tube 36 ...

Страница 4: ... APL 100 4 Operating Manual 11 13 11 Error Messages 51 11 1 Error Messages of the Printer 51 11 2 Error Messages of the Applicator 51 12 Declaration 53 12 1 Extended Declaration 53 12 2 EC Declaration of Conformity 54 13 Index 55 ...

Страница 5: ...ice which complies with the recognized safety related rules and regulations Despite this a danger to life and limb of the user or third parties could arise and the device or other property could be damaged while operating the device The device may only be used while in proper working order and for the intended purpose Users must be safe aware of potential dangers and must comply with the operating...

Страница 6: ...d and disposed by the manufacturer Valentin products accordingly labelled can therefore in future be returned to Carl Valentin GmbH Thereupon old equipment is professionally disposed Thereby Carl Valentin GmbH observes all obligations in the context of old equipment disposal in time and makes therewith the smooth selling of products furthermore possible Please understand that we can only take back...

Страница 7: ... With the open printing unit due to construction the requirements of EN60950 1 regarding fire protection casing are not fulfilled These must be ensured by the installation into the end device Carry out only the actions described in these operating instructions Any work beyond this may only be performed by the manufacturer or upon agreement with the manufacturer Unauthorized interference with elect...

Страница 8: ...ment of the pad downwards and back up again Do not reach into the working area of the pad Keep hair loose clothing and items of jewellery out of this area When incorporating the unit into the overall system safety precautions must be taken so that no one is able to reach into the working area 1 Risk of crushing due to 1 the movement of the pad ...

Страница 9: ...ter careful study of our manuals Operation of printer is only allowed by especially trained persons NOTICE Perform trainings regularly These indications are also valid for someone else s equipment supplied by us Only use original spare and exchange parts CPU of printer is equipped with a lithium battery type CR 2032 for which the battery regulation is to apply This regulation plans that unloaded b...

Страница 10: ...6 to 10 of nominal value Allowable tolerance of power line frequency 2 to 2 of nominal value Allowable distortion factor of power line voltage 5 In case your net is infected e g by using thyristor controlled machines anti interference measures have to be taken You can use one of the following possibilities Provide separate power supply to our printers In case of problems please connect capacity de...

Страница 11: ...ides to the corner shell It is not allowed to guide lines parallel to power lines If a parallel guiding cannot be avoided a distance of at least 0 5 m has to be observed Temperature of lines between 15 to 80 C It is only allowed to connect devices which fulfil the request Safety Extra Low Voltage SELV These are generally devices which are checked corresponding to EN 60950 The data cables must be c...

Страница 12: ...unning and test printing Herewith you avoid faulty results reports and evaluation Only specially trained staff is allowed to operate the printers Control the correct handling of our products and repeat training We do not guarantee that all features described in this manual exist in all models Caused by our efforts to continue further development and improvement technical data might change without ...

Страница 13: ...ting air with an air current coming from a blow tube The correct transfer of the label is controlled by a vacuum sensor Next the pad is moved down into the labelling position Reaching the labelling position is confirmed by another sensor labelling position sensor In the labelling position the label is transferred onto the product While the pad is moving back into the starting position the vacuum s...

Страница 14: ... is reduced as much as possible To avoid contamination within the vacuum channels they are cleaned by air pressure impulse at the end of each application For integration into a superordinated process the printers are equipped with Dispenser I O 3 2 Technical Data Label transfer method Stamp on Blow on Roll on Labe width mm 25 176 25 176 25 176 Label height mm 25 200 25 100 80 200 Cylinder stroke m...

Страница 15: ...1 Upper cylinder throttle valve 02 Stopper for the operation mode Blow on 03 Cylinder unit 04 Pneumatic cylinder 05 Lower cylinder throttle valve 06 Pad holder 07 Pad application specific 08 Blow tube for supporting air 09 Knurled screw for attaching the applicator to the printer 10 Main pressure manometer Front view ...

Страница 16: ... Figure 3 11 Supporting air throttle valve 02 Vacuum throttle valve 03 Service unit 04 Shutoff valve 05 Compressed air connector 06 Pins 07 Interface to the printer 08 Knurled screw for attaching the applicator to the printer 09 Pre dispense key 10 Blow tube for supporting air Rear view ...

Страница 17: ...available in different standard sizes According to the size of the label the holes may be pierced by the customer For that purpose a piercing pin is included in the delivery contents On request tamp pads customized to the label sized are delivered Figure 6 Roll on pads are only produced on request customized to the label size Figure 7 Blow pads are only produced on request customized to the label ...

Страница 18: ......

Страница 19: ...e applicator must be returned 1 2 3 4 Figure 8 1 Applicator with cylinder 2 Pad according to command 3 Cylinder screw part of the pad 4 Piercing pin at universal tamp pads only CAUTION The label printer and the applicator can be damaged by moisture and water Set up the label printer with applicator only in dry locations protected from splash water ...

Страница 20: ...e compressed air only after mounting the applicator to the printer 1 2 3 4 Figure 9 1 Insert the pins 6 Figure 3 on the back of the applicator 2 into the holes 3 of the printer 2 Press the applicator against the printer That way the plug of the applicator will be connected to the peripheral port 4 of the printer 3 Fix the applicator 2 with the screw 1 CAUTION Malfunctions by inadequate operational...

Страница 21: ...a piercing pin is included in the contents of delivery 2mm 1 2 3 4 Figure 10 1 Place a label 1 to be operated on the bottom side of the pad 2 Note the position of the slanted edge 3 2 Align the label to the side edge in such a way that it reaches over the rear edge of the pad by 2 mm 3 Open all the holes which are certainly covered by the label Open the holes completely by turning the piercing pin...

Страница 22: ...it 6 can be mounted on the bracket 1 in two different positions When the applicator is delivered the cylinder unit is mounted on the bracket using the upper threaded hole 4 That position is suitable for the most pads 1 2 3 4 5 6 Figure 11 1 Loosen the screw 3 and washer 2 2 Dismount the cylinder unit 6 from the connecting bracket 3 Fix the cylinder unit 6 with the screw 3 at the connecting bracket...

Страница 23: ...screw 1 at the pad holder 7 and make a rough adjustment of the pad to the printer dispense plate 4 Insert the vacuum tube 2 an the blowing air tube into the appropriate push in fittings 3 4 of the pad 5 Insert the tube 6 into the appropriate push in fitting on the cylinder CAUTION Danger of collision of the pad with other parts of the labelling system Before connecting the applicator to the compre...

Страница 24: ...n for the operation mode Blow on can be adjusted 1 Slide the stopper 1 with the rubber buffer 2 down onto the rods 2 Adjust the stopper 1 see chapter 7 5 page 37 In the operating modes Stamp on and Roll on the stopper is not needed The stopper may not limit the pad movement 1 Loosen the screw 3 at the stopper 1 2 Slide the stopper 1 as far as possible upwards and tighten the screw 3 or 3 Remove th...

Страница 25: ...m 4 The air pressure for operating the applicator is pre adjusted to 0 5 MPa 5 bar Check the pressure at the manometer 5 of the service unit Correct the adjustment if necessary Pull knurled knob 4 up Turn knob to tune required operating pressure of 5 bar Push knob down 5 Open the shutoff valve 3 lever is turned in the air flow direction 6 Switch on the power supply of the printer CAUTION The pad w...

Страница 26: ......

Страница 27: ... on Roll on Mode Setting of application mode Default Print apply Print apply Apply print Support delay On Setting of switch on delay for supporting air Default 0 ms 0 2500 ms in steps of 10 ms Support delay Off Setting of switch off delay for supporting air Default 500 ms 0 2500 ms in steps of 10 ms Pressure control Setting of compressed air control Default On On Off Vacuum control Setting of vacu...

Страница 28: ...ycle see chapter 6 page 32 Print Apply The print of a label is released by an external start signal At the same time the vacuum on the pad as well as the supporting air from the blow tube are switched on If the label is printed and picked up completely from tamp the supporting air is switched off and the lift cylinder is controlled to move the pad down towards the labelling position A sensor signa...

Страница 29: ...sed air control with help from a compressed air sensor it is checked at each labelling cycle if the compressed air fits with the valve block If no compressed air is presented the labelling cycle is stopped and the error message compressed air is displayed If the parameter pressure control is set to Off the error treatment as described above will not be effected This can be especially helpful at in...

Страница 30: ...ycle So the next cycle begin with blowing up the label Press key to arrive the next parameter This parameter is only active if the operating mode blow on is selected The time period can be adjusted while the roll on pad is stopped in labelling position Value range 0 to 5000 ms Step size 10 ms Default 0 ms Press key to arrive the next parameter This parameter is only active if the operating mode bl...

Страница 31: ...pad in final position up 0 pad not in final position up I3 Final position down 1 pad in final position down 0 pad not in final position down I4 Compressed air 1 compressed air available 0 no compressed air available I5 Vacuum 1 vacuum at pad available 0 no vacuum at pad available Output signals 1 Move pad downwards 1 On 0 Off 2 Move pad upwards 1 On 0 Off 3 not assigned 4 not assigned 5 Blowing ai...

Страница 32: ... APL 100 32 Operating Manual 11 13 6 Signal Diagrams 6 1 Print Apply Input Print start Print process Supporting air Output Label print Vacuum Pad Delay On Delay Off Apply Blow on Cleaning time Figure 15 6 2 Apply Print Figure 16 ...

Страница 33: ...o optimize the labelling process 7 1 Aligning the pad 2 1 3 2 1 4 5 Figure 17 1 Loosen screw 3 2 Shift the cylinder unit including the pad 4 inside the elongated hole in such a way that the distance between the pad and the dispense edge 5 is about 2 mm 3 Tighten screw 3 1 Loosen screw 1 2 Shift the cylinder including the pad 4 inside the elongated hole in such a way that the lower rear edge of the...

Страница 34: ...bel is aligned centrally to the pad respectively to the open holes in an universal pad 3 Tighten screw 2 NOTICE Check the adjustment with compressed air switched on 7 2 Adjusting the Parallelism between Pad and Dispense Edge 1 2 3 Figure 18 1 Loosen screw 1 2 Adjust the parallelism between the rear edge of the pad 2 and the dispense edge 3 by turning the pad 3 Tighten screw 1 Side adjustment ...

Страница 35: ...1 has holes for the supporting air in regular distances of 15 mm 2 When the applicator is delivered only the two inner holes are open The other holes are closed by plastic rings 3 3 To adjust the supporting air to the label width the plastic rings 2 can be removed from the holes 4 Open all holes which affect certainly the area of the label ...

Страница 36: ...direction of the supporting air can be optimized 1 Loosen screw 1 2 Turn the blow tube 2 in that direction that the air current supports the sucking of the label by the pad 2 3 4 Figure 21 For small labels direct the air current to the dispense edge 3 of the printer setting 3 or 4 at the scale For larger labels direct the air current away from the dispense edge 3 setting 1 3 Tighten screw 1 ...

Страница 37: ...e service unit 1 Place a product sample 7 at the labelling point 2 Pull the tubes out of the push in fittings 1 5 3 Loosen the screw 3 in the stopper 2 4 Move the pad manually in the required labelling position The distance between the blow pad 6 in the labelling position and the product surface 7 must not exceed 10 mm 5 Move the stopper 2 against the guide block 4 and tighten the screw 3 6 Insert...

Страница 38: ......

Страница 39: ... printer is switched on the valve will controlled by electronics and the tamp will hold in the upper end position home position If the valve switched the tamp will move in the lower end position labelling position In normal labelling operation the movement back in the upper end position will start by a signal from labelling sensor NOTICE The switching by hand of this valve has only a result in cas...

Страница 40: ...e vacuum channels For all described functions both valves will be controlled parallel By pressing the keys 8 or 9 the blow air is only switched on by one of both internal valves Double 2 way valve 5 for vacuum supporting air The two internal valves serve the vacuum nozzle for connecting an in this way for creating the negative pressure at the tamp and independent of this for connecting the support...

Страница 41: ...e screw 4 at the lower valve 3 anticlockwise To increase the upward speed turn the screw 2 at the upper valve 1 anticlockwise NOTICE The application pressure of the pad is mainly dependent on the downward speed of the pad To reduce the application pressure turn screw 4 in clockwise direction CAUTION A too high decrease of the downward speed leads to an error message Error 101 Lower position The do...

Страница 42: ...e supporting air turn the screw at the valve 1 anticlockwise If necessary adjust the direction of the air current see chapter Aligning the Blow Tube page 36 Adjusting the vacuum NOTICE With the vacuum setting the final position of the label on the pad can be adjusted If the vacuum is too high the label feeding may early be stopped With the valve 2 the vacuum for sucking the label to the pad can be...

Страница 43: ...he liner is wound up internally 3 1 2 4 5 Figure 27 NOTICE For detailed information about inserting the material please read the operating manual of the label printer Insert the transfer ribbon 1 Insert the label material CAUTION Collision between the pad 5 and the locking system 4 during the labelling procedure Swivel the locking system 4 on the rewind assistant roller 3 ...

Страница 44: ...n into consideration I O static continuous For description of this operating mode see I O static Continuous means that it is printed as long as new data is transferred via interface The set dispenser offset is not taken into consideration I O dynamic The external signal is evaluated dynamically i e is the printer in waiting mode a single label is printed at each signal changing After the print the...

Страница 45: ...l is fed The vacuum at the pad as well as the supporting air blow tube are switched on After the label has been picked up by the pad the supporting air is switched off Press the pre dispense key 1 The pad is moved to the labelling position A sensor signals when the labelling position is reached The vacuum is switched off and the label is placed onto the product Then the pad is moved back into the ...

Страница 46: ...witched on After the label has been picked up by the pad the supporting air is switched off Press the pre dispense key 1 Figure 28 again Half cycle 2 The pad is moved to the labelling position A sensor signals when the labelling position is reached The vacuum is switched off and the label is placed onto the product Then the pad is moved back into the starting position If the label is manually remo...

Страница 47: ...diately be moved in the starting position Do not reach into the zone of the moving pad Keep long hair loose clothes and jewellery distant Do not reach or bend into the zone of the moving rods 5 Press the key at the printer A synchronization feed is released The processed labels have to be removed manually After a few seconds the printer carries out a short backfeed to position the front edge of th...

Страница 48: ......

Страница 49: ... 13 Operating Manual 49 10 Applicator Interface 10 1 Pin Assignment Figure 29 10 2 Internal Circuit of Outputs Figure 30 The outputs are realized by optocouplers With an active signal the collector emitter line of the optopoupler is conductive ...

Страница 50: ...e Collector emitter line conductive 1 Emitter signal Lower final position 10 Collector signal Lower final position Tamp pad is in the final position in which the transfer of label to the good can be done Collector emitter line conductive 2 Emitter signal Lower final position 11 Emitter signal Compressed air Control of the applicators compressed air supply Collector emitter line blocked 3 Emitter s...

Страница 51: ...ion labelling position was not reached Check final position switch for labelling position and compressed air supply Adjust stroke timeout Empty vacuum plate Sensor does not recognize a label at the vacuum plate Check if all holes of the pad plate are covered from the label Check compressed air supply Print position At print start the pad is not in printing position upper pad position Check the cor...

Страница 52: ......

Страница 53: ...Applicator APL 100 Declaration 11 13 Operating Manual 53 12 Declaration 12 1 Extended Declaration ...

Страница 54: ...Declaration Applicator APL 100 54 Operating Manual 11 13 12 2 EC Declaration of Conformity ...

Страница 55: ...E EC Declaration of conformity 54 Environmentally friendly disposal 6 Error messages Applicator 51 Printer 51 Extended declaration 53 F Function menu printer Application modes 28 Blow time 30 Cleaning time 30 Input Output 31 Operating modes 28 Pressure control 29 Pressure time 30 Roll on time 30 Stroke timeout 30 Support delay Off 29 Support delay On 29 Test functions 31 Vacuum control 29 Vacuum d...

Страница 56: ...djustment 34 Pads models Blow pad 17 Roll on pad 17 Tamp pad 17 Pin assignment 49 Pre dispense key 45 46 Product description 13 S Safety instructions 7 Safety marking 8 Scope of delivery 19 Signal assignment D Sub 15 pin 50 Signal diagrams Apply Print 32 Print Apply 32 Standard operation 47 Stopper Adjusting 37 Mounting 24 Supporting air adjusting 42 T Technical data 14 Test mode 45 46 U Universal...

Страница 57: ......

Страница 58: ...Carl Valentin GmbH Neckarstraße 78 86 u 94 78056 Villingen Schwenningen Phone 49 0 7720 9712 0 Fax 49 0 7720 9712 9901 info carl valentin de www carl valentin de ...

Отзывы: