Buffer Pass Unit
Overview
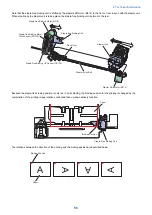
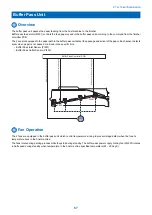
The buffer pass unit passes the paper feeding from the host machine to the finisher.
Buffer pass feed motor (M301) controls the feed paper speed in the buffer pass unit according to the command from the finisher
controller PCB.
The 2 sensors equipped to the paper path in the buffer pass unit detect the passage and arrival of the paper. Each sensor detects
a jam when paper is not passed or arrived in the specific time.
• Buffer Pass Inlet Sensor (PI201)
• Buffer Pass Outlet Sensor (PI202)
M301
PI201
PI202
Bu
ff
e
r
p
a
ss
o
u
tl
e
t
p
a
p
e
r
d
e
te
ct
io
n
si
g
n
a
l
Bu
ff
e
r
p
a
ss
in
le
t
p
a
p
e
r
d
e
te
ct
io
n
si
g
n
a
l
Bu
ff
e
r
p
a
ss
fe
e
d
mo
to
r
d
ri
ve
si
g
n
a
l
Buffer Pass Controller PCB
Fan Operation
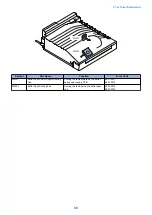
The 2 fans are equipped in the buffer pass unit which control temperature's rising to prevent image defect when the toner's
temperature rises in the host machine.
The fans rotate during printing process while they stop during standby. The buffer pass power supply cooling fan (FM201) rotates
in half speed during standby when temperature in the host machine specified temperature (24 - 29 deg C).
2. Technical Explanation
67
Содержание Staple Finisher-AA1
Страница 1: ...Revision 4 0 Staple Finisher AA1 Booklet Finisher AA1 Service Manual ...
Страница 12: ...Product Overview 1 Features 5 Specifications 6 Names of Parts 14 Optional Configuration 20 ...
Страница 83: ...Periodical Service 3 Periodic Servicing Tasks 76 ...
Страница 87: ...3 Remove the 2 Connectors 1 2x 1 4 Parts Replacement and Cleaning 79 ...
Страница 89: ...Main Units Parts 4 5 6 7 8 1 2 3 4 Parts Replacement and Cleaning 81 ...
Страница 128: ...4x 1 2 2 3 3 2x 4 Parts Replacement and Cleaning 120 ...
Страница 150: ...Adjustment 5 Overview 143 Basic Adjustment 148 Adjustments When Replacing Parts 173 Other 184 ...
Страница 178: ...A B Feed Direction Stapling Position Fixing Screw A B Stitcher Unit Fixing Screw Fixing Screw Mark 5 Adjustment 170 ...
Страница 184: ... Adjsting Phase Angle of the Paddle Unit 1 Put off the belt 1 1 2 Lower the swing roller till its end 5 Adjustment 176 ...
Страница 193: ...Troubleshooting 6 Making Initial Checks 186 Processing Tray Area 187 Saddle Stitcher Area 188 ...
Страница 204: ...4 5 6 7 8 9 7 Installation 196 ...
Страница 205: ...10 7 Installation 197 ...
Страница 210: ...11 NOTE Keep the parts as illustration above Installation of Buffer Pass Unit 1 7 Installation 202 ...
Страница 223: ...2 3 2x 7 Installation 215 ...
Страница 224: ...APPENDICES Service Tools 217 General Circuit Diagram 218 ...

