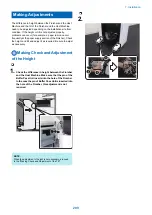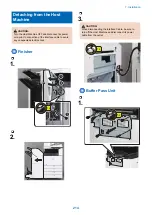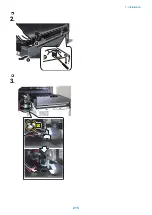
3.
Turn the adjustment dial of the caster in the direction
of the arrow by lifting the dial upward a little to adjust
the height.
(A full turn of the adjustment dial changes the height of
the Finisher by 2.0 mm.)
• To increase the height of the Finisher, turn the dial
in the direction of arrow [A].
• To decrease the height of the Finisher, turn the dial
in the direction of arrow [B].
NOTE:
Adjust the height at four casters.
[A]
[B]
>$@
>%@
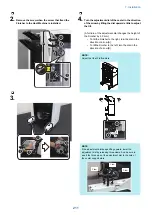
NOTE:
If the adjustment dial keeps lifting upward, lower the
adjustment dial by releasing three claws. And be sure to
insert the three pins of the adjustment dial to the hole of
the caster support plate.
Claw
Claw
Claw
Making Check and Adjustment
of the Tilt
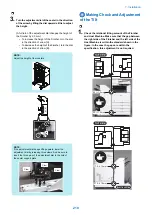
1.
Check the relational tilting amount of the Finisher
and Host Machine. Make sure that the gap between
the right side of the Finisher and the left side of the
Host Machine is within the standard shown in the
figure. In the case the gaps are within the
specification, this adjustment is not required.
5.0-/+1.5mm
5.0-/+1.5mm
21.5-/+1.5mm
17.5-/+1.5mm
7. Installation
210
Содержание Staple Finisher-AA1
Страница 1: ...Revision 4 0 Staple Finisher AA1 Booklet Finisher AA1 Service Manual ...
Страница 12: ...Product Overview 1 Features 5 Specifications 6 Names of Parts 14 Optional Configuration 20 ...
Страница 83: ...Periodical Service 3 Periodic Servicing Tasks 76 ...
Страница 87: ...3 Remove the 2 Connectors 1 2x 1 4 Parts Replacement and Cleaning 79 ...
Страница 89: ...Main Units Parts 4 5 6 7 8 1 2 3 4 Parts Replacement and Cleaning 81 ...
Страница 128: ...4x 1 2 2 3 3 2x 4 Parts Replacement and Cleaning 120 ...
Страница 150: ...Adjustment 5 Overview 143 Basic Adjustment 148 Adjustments When Replacing Parts 173 Other 184 ...
Страница 178: ...A B Feed Direction Stapling Position Fixing Screw A B Stitcher Unit Fixing Screw Fixing Screw Mark 5 Adjustment 170 ...
Страница 184: ... Adjsting Phase Angle of the Paddle Unit 1 Put off the belt 1 1 2 Lower the swing roller till its end 5 Adjustment 176 ...
Страница 193: ...Troubleshooting 6 Making Initial Checks 186 Processing Tray Area 187 Saddle Stitcher Area 188 ...
Страница 204: ...4 5 6 7 8 9 7 Installation 196 ...
Страница 205: ...10 7 Installation 197 ...
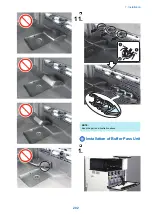
Страница 210: ...11 NOTE Keep the parts as illustration above Installation of Buffer Pass Unit 1 7 Installation 202 ...
Страница 223: ...2 3 2x 7 Installation 215 ...
Страница 224: ...APPENDICES Service Tools 217 General Circuit Diagram 218 ...

