


Chapter 16
16-30
16.5 FUNCTION (Operation/Inspection Mode)
16.5.1 COPIER
16.5.1.1 COPIER List
0009-5980
<INSTALL>
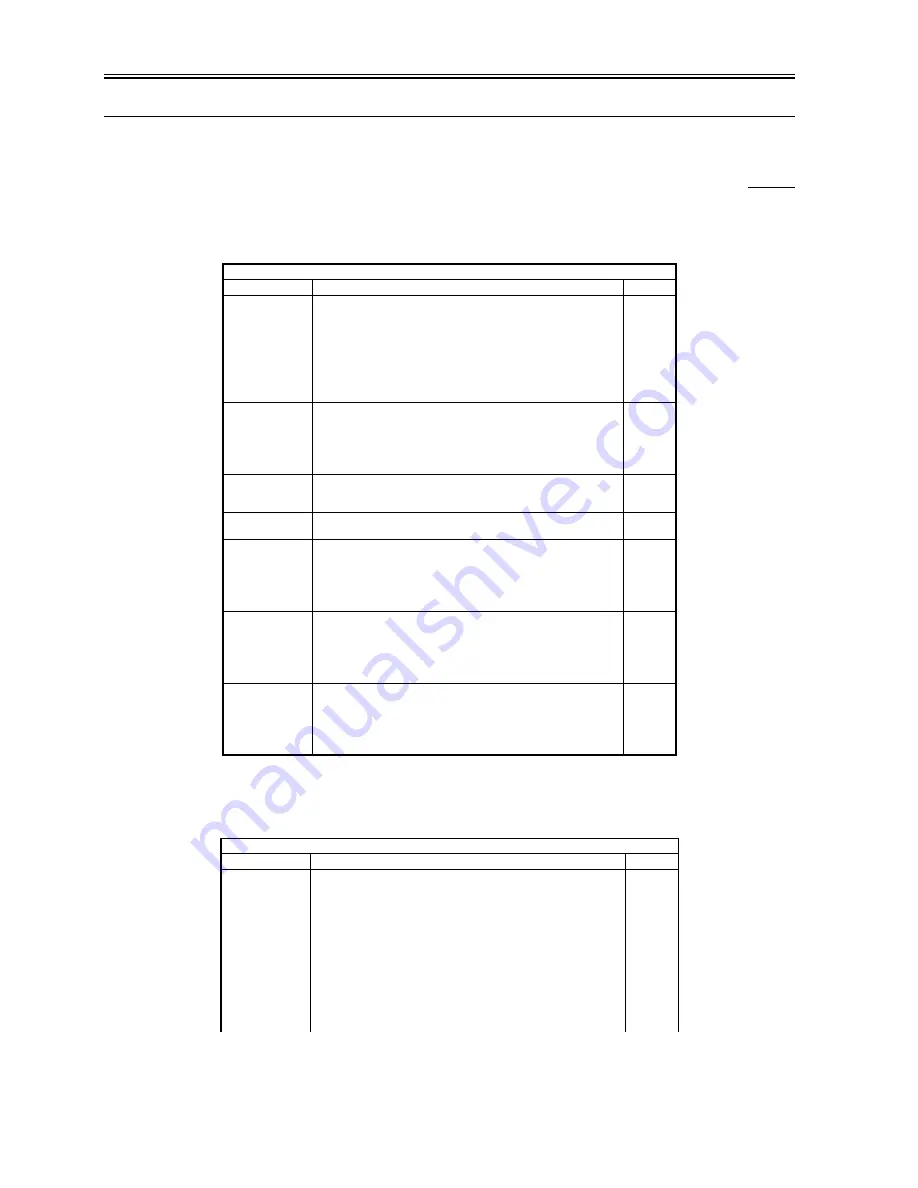
T-16-32
<CCD>
T-16-33
COPIER > FUNCTION > INSTALL
Sub-item
Description
Level
TONER-S
Use it to stir the toner inside the developing assembly at time of installation.
Procedure
1. Select the item to highlight.
2. See that the message "Check the developer" is indicated.
At this time, check to see that the developing assembly is correctly mounted.
3. Press the OK key to start the operation. The operation will automatically
stop after a specific period of time.
during operation, time remaining (sec): at the end, if successful, '0'; if error,
'0xFFFF'.
1
CARD
Use it to set up the card reader.
Procedure
Enter the number of a specific card (0 to 2001), and press the OK key. (As
many as 100 cards may be used, starting from the number you have entered.)
At this time, initialization will take place for card control information (group
ID and ID No.).
1
E-RDS
Use it to specify the use of E-RDS.
0: off (do not use; default)
1: use RDS (transmit all counter information)
1
RGW-PORT
Use it to set the Sales Company server port number used for embedded-RDS.
settings range: 1 to 6535
1
COM-TEST
Use it to check the connection to the server used for E-RDS.
Procedure
1) Select the item to highlight, and press the OK key.
2) See where a connection has been made. (The result will be indicated as 'OK'
or 'NG'.)
OK: connection possible; NG: connection not possible
1
COM-LOG
Use it to indicate the details of the result of the communication test executed
for the server used for E-RDS.
Procedure
1) Select the item to highlight, and press [show info].
log information particulars: year, date, time, error code, error detail (128
characters max.)
1
RGW-ADR
Use it to specify the URL of the server used for E-RDS.
Procedure
1) Select the item to highlight, and press [show information].
2) When the URL input screen appears, enter the appropriate URL and press
the OK key.
(default: https://a01.ugwdevice.net/ugw/agnetif010)
1
COPIER > FUNCTION > CCD
Sub-item
Description
Level
CCD-ADJ
Use it to execute CCD auto adjustment.
Procedure
1) Place about 10 sheets of paper (the whitest of all papers used by the user,
other than color print paper) on the platen glass.
2) Select <CCD-ADJ> to highlight, and press the OK key.
3) See that auto adjustment takes place (about 15 sec). During adjustment,
<ACTIVE> will be indicated.
4) See that the scanning lamp goes on twice during adjustment. At the end, the
screen will show <OK!>.
5) See that al items of service mode have been updated
(COPIER>ADJUST>CCD). Record the new settings on the service label.
If you have replaced the CCD unit, scanning lamp, inverter PCB, or platen
board glass (standard white plate), be sure to execute this mode item.
1
Содержание iR6570 series
Страница 1: ...Mar 29 2005 Service Manual iR6570 5570 Series...
Страница 2: ......
Страница 6: ......
Страница 26: ...Contents...
Страница 27: ...Chapter 1 Introduction...
Страница 28: ......
Страница 30: ......
Страница 55: ...Chapter 2 Installation...
Страница 56: ......
Страница 58: ...Contents 2 9 3 Mounting the Cassette Heater 2 34...
Страница 98: ......
Страница 99: ...Chapter 3 Basic Operation...
Страница 100: ......
Страница 102: ......
Страница 110: ......
Страница 111: ...Chapter 4 Main Controller...
Страница 112: ......
Страница 114: ......
Страница 135: ...Chapter 5 Original Exposure System...
Страница 136: ......
Страница 181: ...Chapter 6 Laser Exposure...
Страница 182: ......
Страница 184: ......
Страница 192: ......
Страница 193: ...Chapter 7 Image Formation...
Страница 194: ......
Страница 198: ......
Страница 259: ...Chapter 8 Pickup Feeding System...
Страница 260: ......
Страница 299: ...Chapter 8 8 35 F 8 51 PS36 M19 M14 Reversing flapper Outside delivery roller Point of reversal PS37...
Страница 349: ...Chapter 8 8 85 F 8 290 1 Feeding roller 2 Separation roller 3 Pressure lever 4 Pressure spring 1 2 A B 3 4...
Страница 350: ......
Страница 351: ...Chapter 9 Fixing System...
Страница 352: ......
Страница 401: ...Chapter 10 External and Controls...
Страница 402: ......
Страница 406: ......
Страница 448: ......
Страница 449: ...Chapter 11 MEAP...
Страница 450: ......
Страница 452: ......
Страница 455: ...Chapter 12 Maintenance and Inspection...
Страница 456: ......
Страница 458: ......
Страница 468: ......
Страница 469: ...Chapter 13 Standards and Adjustments...
Страница 470: ......
Страница 505: ...Chapter 14 Correcting Faulty Images...
Страница 506: ......
Страница 508: ......
Страница 537: ...Chapter 15 Self Diagnosis...
Страница 538: ......
Страница 540: ......
Страница 565: ...Chapter 16 Service Mode...
Страница 566: ......
Страница 568: ......
Страница 633: ...Chapter 17 Upgrading...
Страница 634: ......
Страница 636: ......
Страница 641: ...Chapter 17 17 5 F 17 4 HDD Boot ROM Flash ROM System Software...
Страница 646: ...Chapter 17 17 10 F 17 11 8 Click START F 17 12...
Страница 659: ...Chapter 17 17 23 F 17 32 2 Click Start F 17 33 3 When the downloading session has ended click OK...
Страница 661: ...Chapter 17 17 25 F 17 35 2 Click Start F 17 36 3 When the downloading session has ended click OK...
Страница 663: ...Chapter 17 17 27 F 17 38 2 Click Start F 17 39 3 When the downloading session has ended click OK...
Страница 668: ...Chapter 17 17 32 F 17 46 2 Click Start F 17 47 3 When the downloading session has ended click OK...
Страница 675: ...Chapter 17 17 39 F 17 59 2 Select the data to download F 17 60 3 Click Start...
Страница 677: ...Chapter 18 Service Tools...
Страница 678: ......
Страница 679: ...Contents Contents 18 1 Service Tools 18 1 18 1 1 List of Special Tools 18 1 18 1 2 List of Solvents Oils 18 2...
Страница 680: ......
Страница 683: ...Mar 29 2005...
Страница 684: ......