


Chapter 13
13-24
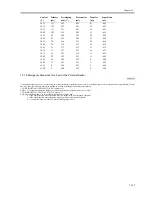
13.5 Image Formation System
13.5.1 Outline of the Charging Wire
0009-5695
The photosensitive drum is surrounded by three charging wires (for
primary charging, pre-transfer, and transfer/separation).
These charging wires are newly adopted brown wires (0.06 mm in
diameter). Do not use a gold-plated wire, which has been used in the
past; otherwise, image faults may occur.
Further, be sure to use a strengthened polishing pad (in a blue holder) as
the cleaning pad for the primary charging assembly and the transfer
charging assembly.
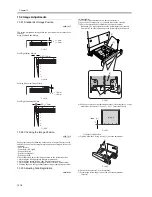
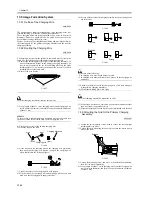
13.5.2 Routing the Charging Wire
0009-5696
All charging wires (except the grid wire) are routed more or less in the
same way; the following cites the primary charging assembly:
1) Remove the shielding plate (left, right) of the charging assembly. To
prevent deformation (slack) in the primary charging assembly, be
sure to work separately for the left shielding plate and the right
shielding plate (i.e., do not loosen the mounting screws [1] of both
shielding plates at the same time).
2) Remove the wire cleaner.
F-13-37
For other charging assemblies, remove the two lids.
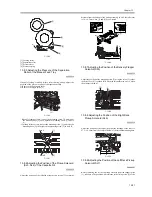
3) Free a length of about 5 cm of charging wire from the charging wire
reel (0.06 mm in diameter), and form a loop at its end with a diameter
of about 2 mm.
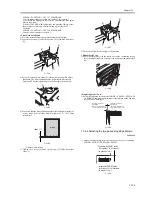
MEMO:
To form a loop, wind the charging wire around a hex key once, and turn
the hex key three to four times; then, twist the charg-ing wire.
4) Cut the end (excess) of the twisted charging wire.
5) Hook the loop on the stud.
F-13-38
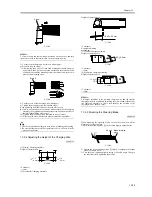
6) At the rear, hook the charging wire on the charging wire positioner;
then, hook the charging wire tension spring on the charging wire
where indicated to the following figure.
F-13-39
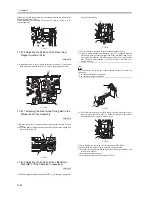
7) Cut off the excess of the charging wire with nippers.
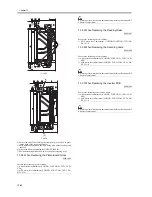
8) Pick the end of the charging wire tension spring with tweezers, and
hook it on the charging power supply electrode.
In the case of the pre-transfer charging assembly, hook the spring on the
pin at the front.
F-13-40
F-13-41
Make sure of the following:
- The charging wire must not be bent or twisted.
- The charging wire must be fitted in the V-groove of the charging wire
positioner.
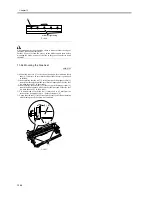
9) Attach a cushoin in front of the charg-ing wire. (This does not apply
to the primary charging assembly.)
10) Mount the shielding plate (left, right).
For other charging assemblies, mount the two lids.
11) Mount the wire cleaner. At this time, pay attention to make sure that
the wire cleaner is oriented correctly.
12)Wipe the charging wire with lint-free paper moistened with alcohol.
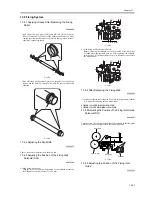
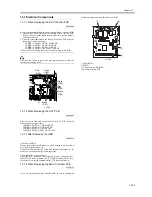
13.5.3 Routing the Grid for the Primary Charging
Assembly
0009-5697
1) Loosen the two mounting screws used to secure the left and right
shielding plates in place.
2) Loosen the three mounting screws used to secure the motor unit in
place at the front.
F-13-42
3) Loosen the mounting screw, and move it in the direction indicated;
then, fix it in place temporarily.
4) Free a length of about 5 cm of charging wire from the charging wire
reel (0.1 mm in diameter), and form a loop at its end with a diameter
of about 2 mm.
[1]
Charging electrode
(rear)
(front) Charging wire
Reel
Stud
Correct
Correct
Wrong
Wrong
Grid side
Screws
Содержание iR6570 series
Страница 1: ...Mar 29 2005 Service Manual iR6570 5570 Series...
Страница 2: ......
Страница 6: ......
Страница 26: ...Contents...
Страница 27: ...Chapter 1 Introduction...
Страница 28: ......
Страница 30: ......
Страница 55: ...Chapter 2 Installation...
Страница 56: ......
Страница 58: ...Contents 2 9 3 Mounting the Cassette Heater 2 34...
Страница 98: ......
Страница 99: ...Chapter 3 Basic Operation...
Страница 100: ......
Страница 102: ......
Страница 110: ......
Страница 111: ...Chapter 4 Main Controller...
Страница 112: ......
Страница 114: ......
Страница 135: ...Chapter 5 Original Exposure System...
Страница 136: ......
Страница 181: ...Chapter 6 Laser Exposure...
Страница 182: ......
Страница 184: ......
Страница 192: ......
Страница 193: ...Chapter 7 Image Formation...
Страница 194: ......
Страница 198: ......
Страница 259: ...Chapter 8 Pickup Feeding System...
Страница 260: ......
Страница 299: ...Chapter 8 8 35 F 8 51 PS36 M19 M14 Reversing flapper Outside delivery roller Point of reversal PS37...
Страница 349: ...Chapter 8 8 85 F 8 290 1 Feeding roller 2 Separation roller 3 Pressure lever 4 Pressure spring 1 2 A B 3 4...
Страница 350: ......
Страница 351: ...Chapter 9 Fixing System...
Страница 352: ......
Страница 401: ...Chapter 10 External and Controls...
Страница 402: ......
Страница 406: ......
Страница 448: ......
Страница 449: ...Chapter 11 MEAP...
Страница 450: ......
Страница 452: ......
Страница 455: ...Chapter 12 Maintenance and Inspection...
Страница 456: ......
Страница 458: ......
Страница 468: ......
Страница 469: ...Chapter 13 Standards and Adjustments...
Страница 470: ......
Страница 505: ...Chapter 14 Correcting Faulty Images...
Страница 506: ......
Страница 508: ......
Страница 537: ...Chapter 15 Self Diagnosis...
Страница 538: ......
Страница 540: ......
Страница 565: ...Chapter 16 Service Mode...
Страница 566: ......
Страница 568: ......
Страница 633: ...Chapter 17 Upgrading...
Страница 634: ......
Страница 636: ......
Страница 641: ...Chapter 17 17 5 F 17 4 HDD Boot ROM Flash ROM System Software...
Страница 646: ...Chapter 17 17 10 F 17 11 8 Click START F 17 12...
Страница 659: ...Chapter 17 17 23 F 17 32 2 Click Start F 17 33 3 When the downloading session has ended click OK...
Страница 661: ...Chapter 17 17 25 F 17 35 2 Click Start F 17 36 3 When the downloading session has ended click OK...
Страница 663: ...Chapter 17 17 27 F 17 38 2 Click Start F 17 39 3 When the downloading session has ended click OK...
Страница 668: ...Chapter 17 17 32 F 17 46 2 Click Start F 17 47 3 When the downloading session has ended click OK...
Страница 675: ...Chapter 17 17 39 F 17 59 2 Select the data to download F 17 60 3 Click Start...
Страница 677: ...Chapter 18 Service Tools...
Страница 678: ......
Страница 679: ...Contents Contents 18 1 Service Tools 18 1 18 1 1 List of Special Tools 18 1 18 1 2 List of Solvents Oils 18 2...
Страница 680: ......
Страница 683: ...Mar 29 2005...
Страница 684: ......