background image

Checking the Printing Status and Log

6C6U-058

You can check the current print statuses and the logs for printed documents.

When <Display Job Log> is set to <Off>, you cannot check the print logs.  <Display Job Log>(P. 590) 

Useful in the Following Cases

When your documents are not printed for a long time, you may want to see the waiting list of the
documents waiting to be printed.

When you cannot find your printouts that you thought had been printed, you may want to see whether an
error has occurred.

1

Select <Status Monitor>.

2

Select <Copy/Print Job>.

3

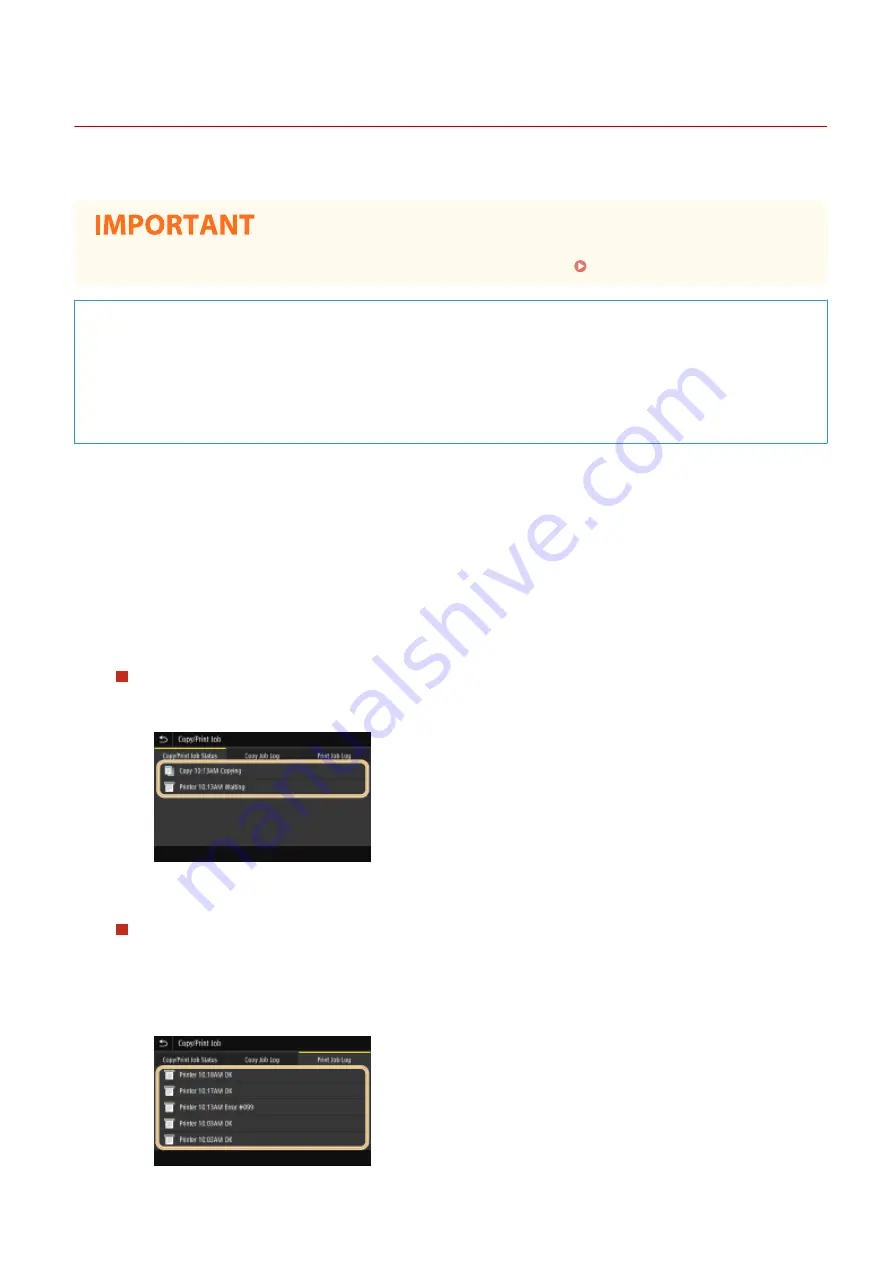
Check the print statuses and logs.

To check the print statuses

1

Select the document whose status you want to check in the <Copy/Print Job Status> tab.

Displays detailed information about the document.

To check the print logs

1

Select the document whose log you want to check in the <Print Job Log> tab.

<OK> is displayed when a document was printed successfully, and <Error> is displayed when a
document failed to be printed because it was canceled or there was some error.

Printing

272

Содержание imageRUNNER C3125i

Страница 1: ...imageRUNNER C3125i User s Guide USRMA 4602 00 2019 12 en Copyright CANON INC 2019...

Страница 2: ...rinting Protocols and WSD Functions 40 Configuring Printer Ports 43 Setting Up Print Server 47 Configuring the Machine for Your Network Environment 50 Configuring Ethernet Settings 51 Changing the Max...

Страница 3: ...fying Paper Size and Type 155 Specifying Paper Size and Type in the Paper Drawer 156 Specifying Paper Size and Type in the Multi Purpose Tray 159 Registering Favorite Paper Size and Type for the Multi...

Страница 4: ...als Together Different Size Originals 217 Finishing by Collating Grouping 218 Finishing with the Stapler 220 Making ID Card Copies 221 Faxing 223 Fax Basic Features Screen 226 Basic Operations for Sen...

Страница 5: ...rent Size Originals 318 Useful Scanning Functions 319 Enhancing the Security of Electronic Files 320 Adjusting Balance between File Size and Image Quality 323 Recalling Previously Used Settings for Se...

Страница 6: ...08 Configuring IEEE 802 1X Authentication Settings 415 Restricting the Machine s Functions 419 Restricting Access to Address Book and Sending Functions 421 Restricting Use of the Address Book 422 Limi...

Страница 7: ...r 602 Cleaning the Platen Glass 603 Cleaning the Feeder 605 Cleaning the Interior 610 Performing Special Cleaning 611 Cleaning the Dust Proof Glass 612 Replacing the Toner Cartridge 614 Replacing the...

Страница 8: ...Paper Jams in the Feeder 699 Paper Jams in the Main Unit 702 Paper Jams in a Paper Source 707 Paper Jams in a Finisher Optional 711 Paper Jams in the Inner Finisher 712 Clearing Staple Jams Optional...

Страница 9: ...justment kit A 768 Inner Finisher K 769 Inner 2way Tray J 780 Copy Tray J 781 Platen Cover Y 782 ADF Access Handle A 783 System Options 784 Copy Card Reader 785 Manuals and Their Contents 787 Using Us...

Страница 10: ...0 Setting IPv4 Address 31 Setting IPv6 Addresses 34 Viewing Network Settings 37 Configuring Settings for Communication with a Computer 39 Configuring Printing Protocols and WSD Functions 40 Configurin...

Страница 11: ...3 Preparing to Use the Machine as a Scanner 84 Procedure for Setting to Send E Mail Send and Receive I Fax 85 Configuring E Mail I Fax Communication Settings 86 Procedure for Setting a Shared Folder a...

Страница 12: ...quired to complete the setup and then perform the actual settings Preparations Required Before Use P 4 Configuring Initial Settings of the Machine Setup Guide You can easily configure the initial sett...

Страница 13: ...so check Preventing Unauthorized Access P 6 Step 1 Setting Up Using the Setup Guide P 8 Step 2 Setting Up the Network Environment P 13 Configure the network settings that are not included in the Setup...

Страница 14: ...sing Remote UI Starting Remote UI P 436 Importing data from another machine to save time As long as the model is the same you can save setting data registered on another Canon printer multifunction ma...

Страница 15: ...ach device participating in a computer network A global IP address is used for the communication connecting to the Internet and a private IP address is used for the communication within a local area n...

Страница 16: ...ecurity Settings P 385 and on the procedures to specify see Configuring the Key and Certificate for TLS P 397 Setting PIN to Manage Information Stored in the Multifunction Machine If a malicious third...

Страница 17: ...TC is the primary time standard by which the world regulates clocks and time The correct UTC time zone setting is required for Internet communications 2 Enter the date and time and select Apply Tap th...

Страница 18: ...pe of paper displayed on the screen is loaded in the machine and select OK 3 Confirm the procedure and select Start An adjustment image is printed 4 Open the feeder or the platen cover after the scree...

Страница 19: ...rs 2 Select OK 3 Select the setting method For more information about the wireless LAN settings see Connecting to a Wireless LAN P 17 Step 6 Viewing Application Library The one touch button referred t...

Страница 20: ...in the Home screen Home Screen P 117 2 Select Preferences Timer Energy Settings Date Time Settings Time Zone 3 Select the time zone What is UTC Coordinated Universal Time UTC is the primary time stand...

Страница 21: ...Daylight Saving Time If daylight saving time is enabled specify the dates from which and to which daylight saving time is in effect 1 Select Menu in the Home screen Home Screen P 117 2 Select Preferen...

Страница 22: ...vices or contact your manufacturer Before You Start Follow these steps to connect the machine to a network Check your computer settings Make sure that the computer is correctly connected to the networ...

Страница 23: ...to the setting you selected in step 2 Connecting to a Wired LAN P 16 Connecting to a Wireless LAN P 17 Set the IP address as necessary At the time of purchase the machine is set to automatically acqui...

Страница 24: ...installed on your computer and then reinstall them For more information see the manuals for the relevant drivers on the online manual website 1 Select Menu in the Home screen Home Screen P 117 2 Selec...

Страница 25: ...o the router 1 Connect a LAN cable Connect the machine to a router by using a LAN cable Push the connector in until it clicks into place 2 Wait for several minutes The IP address is set automatically...

Страница 26: ...ed to an unsecured network your personal information might be leaked to a third party because radio waves used in wireless communication can go anywhere nearby even beyond walls Wireless LAN security...

Страница 27: ...ation Regardless of the method make sure that you have the required setup information including the SSID and network key Checking the SSID and Network Key P 29 Selecting a Wireless Router Select this...

Страница 28: ...d PIN Logging in to the Machine P 128 3 Select Wireless LAN Settings If the Do you want to enable the wireless LAN message is displayed select Yes 4 Read the message that is displayed and select OK 5...

Страница 29: ...s P 30 While the machine is connected to the wireless LAN the Wi Fi icon is displayed in the Home screen or the Basic Features screen of each function Basic Screens P 116 Reducing power consumption Yo...

Страница 30: ...ee the instruction manuals for your networking device From the Operation Panel 2 Select Menu in the Home screen Home Screen P 117 3 Select Preferences Network If the login screen appears enter the cor...

Страница 31: ...SSI Received Signal Strength Indication You can set the IP address manually Setting IP Addresses P 30 While the machine is connected to the wireless LAN the Wi Fi icon is displayed in the Home screen...

Страница 32: ...or AES CCMP for WPA WPA2 encryption you need to set up the connection using Enter Manually Setting Up Connection by Specifying Detailed Settings P 26 1 Select Menu in the Home screen Home Screen P 117...

Страница 33: ...0 Wait until message Connected is displayed 11 Select Close Wait several minutes until the IP address and other items are set automatically Signal strength When more than one wireless router is availa...

Страница 34: ...In a DHCP environment the IP address of the machine may be changed automatically If this happens the connection is maintained as long as the machine and the computer belong to the same subnet LINKS Co...

Страница 35: ...een Home Screen P 117 2 Select Preferences Network If the login screen appears enter the correct ID and PIN Logging in to the Machine P 128 3 Select Wireless LAN Settings If the Do you want to enable...

Страница 36: ...WEP key you want to edit Select the WEP key 1 to 4 and select Edit Up to four WEP keys can be registered 4 Enter the network key that you have written down Enter the network key and select Apply 5 Se...

Страница 37: ...ngth Indication You can set the IP address manually Setting IP Addresses P 30 While the machine is connected to the wireless LAN the Wi Fi icon is displayed in the Home screen or the Basic Features sc...

Страница 38: ...de access point name and network name Network Key A keyword or password used for encrypting data or authenticating a network Some other terms used for network key include encryption key WEP key WPA WP...

Страница 39: ...network IP address Two versions of IP addresses are available IPv4 and IPv6 Configure these settings depending on the network environment To use IPv6 addresses you need to properly configure the IPv4...

Страница 40: ...Preferences Network If the login screen appears enter the correct ID and PIN Logging in to the Machine P 128 3 Select TCP IP Settings IPv4 Settings IP Address Settings 4 Configure IP address settings...

Страница 41: ...ttings are correct Make sure that the Remote UI screen can be displayed with your computer Starting Remote UI P 436 If a computer is not available you can check the connection by using the operation p...

Страница 42: ...her device on the network and select Apply If a proper connection has been established Received response from the host is displayed LINKS Setting IPv6 Addresses P 34 Viewing Network Settings P 37 Conf...

Страница 43: ...Manual address An address that is entered manually When using this address specify the prefix length and default router address Stateless address An address that is generated automatically using the M...

Страница 44: ...ulticast address cannot be entered Prefix Length Enter a number that indicates how many bits are available for the network address Default Router Address Specify the IPv6 address of the default router...

Страница 45: ...be accessed from Menu in the Home screen IPv6 Settings P 482 When you have changed the IP address after installing the printer driver You need to add a new port Configuring Printer Ports P 43 LINKS Se...

Страница 46: ...hine starts communicating Setting a Wait Time for Connecting to a Network P 54 You can print a list of the current network settings User Data List System Manager Data List P 648 Viewing IPv4 Settings...

Страница 47: ...ad the message that is displayed and select OK 5 Select Connection Information 6 Select the setting to view Viewing security information To view WEP and WPA WPA2 PSK information select Security Settin...

Страница 48: ...drivers on the online manual website Configuring Printing Protocols and WSD Functions P 40 Configuring Printer Ports P 43 Setting Up Print Server P 47 Protocols explained here are rules for delivering...

Страница 49: ...tings Registration on the Portal page Remote UI Screen P 437 3 Click Network Settings 4 Configure printing protocols Configuring LPD or RAW 1 Select LPD Settings or RAW Settings Edit 2 Configure the s...

Страница 50: ...se WSD Scanning check box is selected To perform scanning select Scan in the Home screen and specify a WSD connected computer as a scan destination Scanning and Saving to a Computer P 295 Use Multicas...

Страница 51: ...s for the relevant drivers on the online manual website To change the port number The same port number used for the machine and a computer must be used for printing protocol Configuring Printer Ports...

Страница 52: ...nd configure the required settings Adding a port If you have changed the IP address of the machine or you have selected an incorrect port while installing a driver from the Windows printer folder add...

Страница 53: ...Auto Detect and select the machine when it is detected and then click Next If the machine is not detected Click Refresh If the problem persists select IP address or MAC address enter the IP address o...

Страница 54: ...as been changed on the machine side Configuring Printing Protocols and WSD Functions P 40 or the port number has been changed Changing Port Numbers P 394 the corresponding settings on the computer mus...

Страница 55: ...he port you want to delete and click Delete Port You cannot delete a port currently configured as the printer port To delete this port select a different port and click Apply to configure it as the ne...

Страница 56: ...ent computers When implementing a print server in a domain environment consult your Network Administrator To carry out Department ID Management when using a print server Canon Driver Information Assis...

Страница 57: ...ovided DVD ROM CD ROM into the drive on the computer click Browse to specify the folder that contains the drivers and then click OK If the print server runs a 32 bit operating system select intdrv UFR...

Страница 58: ...3 Follow the on screen instructions to install the drivers LINKS Printing from a Computer P 268 Setting Up 49...

Страница 59: ...pped with a variety of technologies Consult your Network Administrator and set a configuration to suit your network environment Configuring Ethernet Settings P 51 Changing the Maximum Transmission Uni...

Страница 60: ...nter the correct ID and PIN Logging in to the Machine P 128 3 Select Ethernet Driver Settings 4 Select whether to configure Ethernet settings automatically or manually If auto detection is enabled the...

Страница 61: ...r most environments 3 Ethernet Type select the Ethernet type 4 Select Apply 5 Restart the machine Turn OFF the machine wait for at least 10 seconds and turn it back ON LINKS Changing the Maximum Trans...

Страница 62: ...of the machine as necessary For more information contact your Network Administrator 1 Select Menu in the Home screen Home Screen P 117 2 Select Preferences Network If the login screen appears enter t...

Страница 63: ...after you change the way that network devices are connected or if you add a new device If this type of problem occurs set a wait time for connecting to the network 1 Select Menu in the Home screen Hom...

Страница 64: ...IPv4 and IPv6 For more information about the basic operations to be performed when setting the machine from the Remote UI see Setting Up Menu Options from Remote UI P 445 1 Start the Remote UI and log...

Страница 65: ...k box to enable Option 69 to obtain an SMTP server address from the DHCP server Acquire POP Server Address Select the check box to enable Option 70 to obtain a POP3 server address from the DHCP server...

Страница 66: ...obtain a DNS server address from the DHCP server Acquire Domain Name Select the check box to enable Option 24 to obtain a domain name from the DHCP server DNS Settings Primary DNS Server Address Ente...

Страница 67: ...l text box mDNS Settings Use mDNS Adopted by Bonjour mDNS multicast DNS is a protocol for associating a host name with an IP address without using DNS Select the check box to enable mDNS Use Same mDNS...

Страница 68: ...use the computer name as the NetBIOS name Workgroup Name Workgroup name is a name for grouping multiple computers so that basic network functions such as file sharing become available in a Windows ne...

Страница 69: ...characters for the name of the workgroup that the machine belongs to NetBIOS names or workgroup names that start with an asterisk cannot be registered to a WINS server 6 Click OK 7 Restart the machin...

Страница 70: ...information about the basic operations to be performed when setting the machine from the Remote UI see Setting Up Menu Options from Remote UI P 445 1 Start the Remote UI and log in to System Manager M...

Страница 71: ...ntered in the WINS Server Address text box 6 Click OK 7 Restart the machine Turn OFF the machine wait for at least 10 seconds and turn it back ON Selecting settings from the operation panel WINS setti...

Страница 72: ...I and log in to System Manager Mode Starting Remote UI P 436 2 Click Settings Registration on the Portal page Remote UI Screen P 437 3 Click LDAP Server Settings 4 Click Register New Server for LDAP S...

Страница 73: ...e Security Authentication make sure that the DNS server supports reverse lookup Position to Start Search Specify the node in the directory information tree DIT that you want to start search from Leavi...

Страница 74: ...nd Password Use Same Authentication Information as When Send Operation Started Set whether the authentication information when the fax or scan function was used is also used when searching This check...

Страница 75: ...he DNS server supports reverse lookup Position to Start Search Specify the node in the directory information tree DIT that you want to start search from Leaving the text box blank sets the machine to...

Страница 76: ...this specifies whether authentication using the system manager ID is used To use the system manager ID select the check box and specify the user name and password for used for authentication If you de...

Страница 77: ...and use SNMPv3 SNMPv3 With SNMPv3 you can implement network device management that is protected by robust security features Note that TLS must be enabled for the Remote UI before configuring SNMPv3 Co...

Страница 78: ...y MIB Access Permission For each community select Read Write or Read Only for the access privileges to MIB objects Read Write Permits both viewing and changing the values of MIB objects Read Only Perm...

Страница 79: ...ption Off or Authentication On Encryption Off for the desired combination of authentication and encryption settings Authentication Algorithm Click the Authentication On Encryption On or Authentication...

Страница 80: ...s disabled some of the functions of the machine become unavailable such as obtaining machine information via the printer driver Using the operation panel You can enable or disable the SNMP settings fr...

Страница 81: ...uring SNTP Simple Network Time Protocol SNTP enables you to adjust the system clock by using the time server on the network If SNTP is used the time server is checked at the specified intervals theref...

Страница 82: ...tered server by clicking Settings Registration Network Settings Check NTP Server in SNTP Settings If a proper connection has been established the result is displayed as shown below Note that this oper...

Страница 83: ...more information about the basic operations to be performed when setting the machine from the Remote UI see Setting Up Menu Options from Remote UI P 445 Configuring SLP Communication with Device Manag...

Страница 84: ...essary communication during sleep mode and reduce the total power consumption Port Number Change the port number for this function according to the network environment Number of Routers to Traverse Sp...

Страница 85: ...Menu Preferences Network Device Settings Management On Setting Up 76...

Страница 86: ...tem requirements Depending on your machine or environmental conditions some functions may not be available Some of the drivers are not supported depending on the OS For more information about the supp...

Страница 87: ...instructions to configure the settings For more information about a particular step click on the link to go to the corresponding section The optional product is required for faxing to use the fax func...

Страница 88: ...fax and telephone Use answering machine Answering Machine Connect your answering machine Callers can record a message if they call while you are away from the telephone The machine automatically rece...

Страница 89: ...17 2 Select Function Settings Common Fax Setup Guide 3 Select Set Up Now 4 Select Next 5 Enter the fax number and select Apply 6 Select Next 7 Enter the unit name such as a user name or company name a...

Страница 90: ...receive mode other than those described below depending on your country or region Receiving Faxes P 236 To set the receive mode to Auto Select No To set the receive mode to Answering Machine Select Ye...

Страница 91: ...elephone to receive faxes manually 2 Select End after the telephone line has been connected 3 Select Yes If the machine does not automatically set the type of telephone line Follow the procedure below...

Страница 92: ...ose and network environment Saving to a Computer Preparing to Use the Machine as a Scanner P 84 Scanning to E mail or I Fax Procedure for Setting to Send E Mail Send and Receive I Fax P 85 Scanning to...

Страница 93: ...hen connecting this machine to a computer via a wireless or wired LAN you need to register this machine in MF Network Scanner Selector using the following procedure This procedure is not required if t...

Страница 94: ...The IP address of the machine Viewing Network Settings P 37 An e mail address to be registered as a destination Information about the e mail server including the SMTP server name port numbers whether...

Страница 95: ...ng Remote UI P 436 2 Click Settings Registration on the Portal page Remote UI Screen P 437 3 Select TX Settings Network Settings E Mail I Fax Settings 4 Click Edit 5 Specify the required settings SMTP...

Страница 96: ...uring Pop Authentication before Sending POP before SMTP authentication prevents unauthorized users from using e mail and I Faxes by performing user authentication on the POP3 server Use POP Authentica...

Страница 97: ...communication with an SMTP or POP3 server Use TLS for SMTP Select the check box to use TLS for encrypting communication with the SMTP server Select the check box for Verify Certificate or Add CN to Ve...

Страница 98: ...g Port Numbers P 394 For more information contact your Internet service provider or Network Administrator LINKS Procedure for Setting to Send E Mail Send and Receive I Fax P 85 Specifying E Mail Setti...

Страница 99: ...ure that you have the following information The IP address of the machine Viewing Network Settings P 37 The name of the computer where the shared folder is located Checking the Computer Name P 798 Pat...

Страница 100: ...Path to the FTP server and folder name User name password only if set If the path folder name user name password etc for the FTP server are unknown contact you Network Administrator To change the FTP...

Страница 101: ...Paper 136 Basic Paper Loading Method 138 Loading Envelopes 144 Loading Preprinted Paper 151 Specifying Paper Size and Type 155 Specifying Paper Size and Type in the Paper Drawer 156 Specifying Paper...

Страница 102: ...efault Settings for Functions 179 Setting Sounds 181 Entering Sleep Mode 183 Setting Auto Shutdown Time 185 Registering Destinations 186 Registering Destinations in the Address Book 188 Registering Mu...

Страница 103: ...operation panel and how to view the display Parts and Their Functions P 97 Turning ON the Machine This section describes how to turn the machine ON and OFF Turning ON the Machine P 111 Using the Oper...

Страница 104: ...oading Paper P 136 Customizing the Display This section describes how to rearrange buttons or create shortcut buttons in order to make it easier to use the screen shown in the display Customizing the...

Страница 105: ...nding is complete or when an error occurs Setting Sounds P 181 Entering Sleep Mode This section describes how to set the sleep mode Entering Sleep Mode P 183 Registering Destinations This section desc...

Страница 106: ...machine used for such basic operations as placing originals loading paper and replacing the toner cartridges this section also describes the keys on the operation panel and display Read this section...

Страница 107: ...tions and specify settings from the operation panel Operation Panel P 109 Basic Screens P 116 Feeder Platen cover Automatically feeds originals into the machine for scanning When two or more sheets ar...

Страница 108: ...into the multi purpose tray when you want to use a type of paper different from that which is loaded in the paper drawer Multi Purpose Tray P 106 Loading Paper in the Multi Purpose Tray P 141 Upper r...

Страница 109: ...cover of the machine For more information about the configuration of optional equipment installed on the machine see Options P 762 Connecting a USB Memory Device You can connect a USB memory device t...

Страница 110: ...chine to malfunction Be sure to check before using memory media Set Use Scan Function and Use Print Function to On Memory Media Settings P 584 Unsupported devices and usages Memory media with security...

Страница 111: ...the Telephone Line P 82 USB port Back side of the machine Use this port to connect devices such as a third party USB keyboard The USB port back side of the machine supports USB 2 0 USB connector Conne...

Страница 112: ...Fixing assembly The unit that fixes toner onto paper Check this when a paper jam has occurred inside the main unit Paper Jams in the Main Unit P 702 Duplexing unit This is a device to enable printing...

Страница 113: ...an original Original supply tray Originals placed here are automatically fed into the feeder When two or more sheets are loaded originals can be scanned continuously Placing Originals P 130 Document...

Страница 114: ...user that originals remain If a thick original such as a book or magazine is placed on the platen glass do not press down hard on the feeder Do not place any objects in the original output area Doing...

Страница 115: ...aper guides Adjust the paper guides to exactly the width of the loaded paper to ensure that paper is fed straight into the machine Paper tray Open the paper tray when loading paper Tray extension Pull...

Страница 116: ...e top part of the front guide and slide it Paper Drawer 2 Paper guide Left guide Press the top part of the left guide and slide it Paper guide Front guide Press the top part of the front guide and sli...

Страница 117: ...LINKS Loading Paper in the Paper Drawer P 138 Optional Equipment P 764 Basic Operations 108...

Страница 118: ...ey Press to put the machine into sleep mode The key lights up green when the machine is in sleep mode Press the key again to exit sleep mode Entering Sleep Mode P 183 Data indicator Blinks while opera...

Страница 119: ...Stop key Press to cancel printing and other operations LINKS Basic Operation P 123 Basic Operations 110...

Страница 120: ...ayed first after the machine is turned ON Default Screen After Startup Restoration P 469 The response of the touch panel display and keys on the control panel may not be optimal immediately after the...

Страница 121: ...moving the power plug It may take a while for the power to turn OFF completely Do not remove the power plug until the display and lamps turn OFF 1 Open the power switch cover and press the power switc...

Страница 122: ...to set up the machine from Remote UI see Setting Up Menu Options from Remote UI P 445 1 Start the Remote UI and log in to System Manager Mode Starting Remote UI P 436 2 Click Settings Registration on...

Страница 123: ...the Data indicator is lit up or blinking When the menu screen or Check Counter screen is displayed When settings data is being imported exported When the firmware is being updated If the power cannot...

Страница 124: ...ctions This section describes basic usage of the display and keys Basic Screens P 116 Basic Operation P 123 Entering Text P 126 If you want to invert the light and dark parts of the display Invert Scr...

Страница 125: ...The screen is also a touch panel so you can perform operations by touching the screen directly Home Screen P 117 Status Monitor Screen P 120 Message Display P 122 You can customize the Home screen by...

Страница 126: ...or to view the network settings such as the IP address of the machine You can also check the status of the machine such as the remaining amount of paper and the toner or whether any errors occurred St...

Страница 127: ...ption of Application Library Paper Settings This button is also used for specifying the size and type of paper loaded in the paper drawer and multi purpose tray Specifying Paper Size and Type P 155 Mo...

Страница 128: ...ary on the online manual website uniFLOW Online Setup You can check the usage status of the device and the user by linking to cloud service For more information see the Canon website Shortcut buttons...

Страница 129: ...ount remaining in the toner cartridges Paper Information Displays whether paper is loaded in each paper source Consumables Information You can check the status of the machine such as the amount of ton...

Страница 130: ...and status such as the condition of wireless LAN communications Viewing Network Settings P 37 Rmv Mem Media Used to safely remove a USB memory device This is only displayed when a USB memory device is...

Страница 131: ...ner cartridge lifetime is reached Countermeasures for Each Message P 671 When an Error Occurs In some cases when an error occurs instructions on how to respond to the error are displayed Follow the on...

Страница 132: ...s Operating the display while an object is placed on it Before using the touch panel display peel off the protective film from the display Tap Touch the screen lightly and quickly Use for selecting or...

Страница 133: ...een The scroll bar appears on the screen when there is still information that is undisplayed If the scroll bar is displayed flick the screen to scroll in the direction of the flick Note that the scrol...

Страница 134: ...play Settings P 469 To change the screen that is automatically displayed when the machine remains idle for a specified length of time Function After Auto Reset P 475 You can change various settings ab...

Страница 135: ...es When the keyboard consists of multiple pages tap or to change pages Deleting Text One character is deleted each time is tapped Holding down allows you to delete successive characters Moving the Cur...

Страница 136: ...ration panel Some keys on the USB keyboard such as the Backspace Home and End keys cannot be used When keys that cannot be used are pressed nothing is entered or changed To delete text press the Delet...

Страница 137: ...Management Login P 128 Logging in to Authorized Send P 129 Department ID Management Login When the login screen appears use the procedure below to enter the Department ID and PIN When Insert the card...

Страница 138: ...ssword are registered 4 Select Log In The login screen switches to the fax or scan function Home screen After you finish using the machine select Log Out to display the login screen If the Select Logo...

Страница 139: ...To avoid paper jams Do not place the following types of originals in the feeder as this may cause paper jams Wrinkled or creased paper Carbon paper Curled or rolled paper Coated paper Torn originals O...

Страница 140: ...ocument size the original image may be either reduced in size or divided into smaller parts before it is sent Placing Originals on the Platen Glass 1 Open the feeder or the platen cover If you place a...

Страница 141: ...glass If a thick original such as a book or magazine is placed on the platen glass do not press down hard on the feeder platen cover Placing Originals in the Feeder Do not place items in the original...

Страница 142: ...efore placing them into the feeder If the original is folded an error screen may be displayed because the size of originals cannot be detected correctly Thin originals may become creased if used in a...

Страница 143: ...d or remove originals When scanning is complete Remove the scanned originals from the original output tray to prevent paper jams To prevent originals from being left in the original output tray the or...

Страница 144: ...nd Color original scan range When a color original is scanned with a setting made for automatic color discrimination it may be identified as a black and white document if it contains color portions on...

Страница 145: ...ray P 141 Loading Envelopes P 144 Loading Preprinted Paper P 151 Configuring the Settings for the Loaded Paper Specifying Paper Size and Type P 155 Precautions for Paper Do not use the following types...

Страница 146: ...er Printed with the Machine When handling storing the paper printed with the machine take the following precautions How to Store the Printed Paper Store on a flat surface Do not store together with ar...

Страница 147: ...er in the Paper Drawer P 138 Loading Paper in the Multi Purpose Tray P 141 For the optional cassette feeding unit follow the procedure of paper drawer 2 to load paper Loading Paper in the Paper Drawer...

Страница 148: ...the inside of the machine dirty Paper size indicators The abbreviations on the paper size indicators in the paper drawer indicate paper sizes as follows LGL Legal LTR Letter EXEC Executive STMT Statem...

Страница 149: ...k pay attention to the orientation when loading it in the paper source Loading Preprinted Paper P 151 When placing envelopes pay attention to the orientation and the preparations before placing envelo...

Страница 150: ...Size and Type in the Paper Drawer P 156 When changing the paper size change the paper size label as necessary Note that the paper size label may include paper sizes which are unavailable on the machi...

Страница 151: ...with the print side face down The screen for specifying the paper size and type is displayed when the paper is fully inserted Do not exceed the load limit line when loading paper Make sure that the p...

Страница 152: ...e of printed paper Flatten any curls on the printed paper and insert it into the multi purpose tray with the side to print face down previously printed side face up Then select Manual Back Side Print...

Страница 153: ...ures that you need to complete before loading envelopes For a description of the general procedure for loading envelopes in the paper drawer or multi purpose tray see Basic Paper Loading Method P 138...

Страница 154: ...envelopes 3 Press down on the four sides Press down firmly on all four sides In particular carefully press down on the side facing the direction in which the envelopes will be fed Press down firmly s...

Страница 155: ...tachment A stored in paper drawer 2 Attach the Envelope Feeder Attachment A by aligning the protruding areas of the Envelope Feeder Attachment A with the holes on paper receptor located on the bottom...

Страница 156: ...r 2 3 Load the envelopes Loading to paper drawer 1 Load the envelopes as indicated below with the front side of the envelopes the side without the glued areas face up ISO C5 Close the flaps and load t...

Страница 157: ...lose the flaps and load the envelopes so that their flaps are on the far side Monarch COM10 No 10 DL Close the flaps and load the envelopes so that their flaps are on the near side Nagagata 3 Kakugata...

Страница 158: ...s so that their flaps are on the right side Monarch COM10 No 10 DL ISO C5 Close the flaps and load the envelopes so that their flaps are on the left side If the envelopes are not fed properly even if...

Страница 159: ...shown in the figure and change the settings and the orientation of the original Yougatanaga 3 Nagagata 3 To perform printing display the print settings screen of the printer driver and change the pap...

Страница 160: ...ay P 153 When performing a copy operation also pay attention to the orientation of the original document Place the original in the feeder with the side to copy face up or place the original on the pla...

Страница 161: ...sing preprinted paper load paper by interpreting that the indications in this section referring to the facing of the paper mean the opposite Loading Paper with Logos in the Paper Drawer The loading me...

Страница 162: ...aper is portrait or landscape Load the paper with the logo printed side the side to print face down as shown in the following illustrations When Loading A4 size Paper with Logos Portrait orientation p...

Страница 163: ...Landscape orientation paper The printing results Basic Operations 154...

Страница 164: ...159 Registering Favorite Paper Size and Type for the Multi Purpose Tray P 162 Fixing the Paper Size and Type To Use with the Multi Purpose Tray P 165 Registering a Custom Paper Size P 168 Limiting th...

Страница 165: ...If both paper size and paper type are correct the following operation is not necessary and are displayed only when the optional cassette feeding unit is installed If the displayed paper size is diffe...

Страница 166: ...on buttons S1 to S3 you can call them up with one touch Registering a Custom Paper Size P 168 3 Select Apply 4 Select the paper type When loading envelopes Envelopes can not be set in the paper drawer...

Страница 167: ...mately 5 mm to the left Approximately 5 mm Note that the paper size label may include paper sizes which are unavailable on the machine LINKS Loading Paper in the Paper Drawer P 138 Limiting the Paper...

Страница 168: ...in the multi purpose tray you can skip the paper setting operations by registering the paper size and type as the default setting When the default setting is registered however the screen shown above...

Страница 169: ...rinter driver 2 Specify the length of the X side and Y side Select X or Y and enter the length of each side using the numeric keys If you register the paper size you use frequently on buttons S1 to S3...

Страница 170: ...lly 3 Select Apply 2 Select Change Ppr Type 3 Select paper type 4 Select Apply LINKS Loading Paper in the Multi Purpose Tray P 141 Limiting the Paper Sizes Displayed for the Multi Purpose Tray P 169 A...

Страница 171: ...ich is displayed when you load the paper in the multi purpose tray so that you can save the time and labor to make size and type settings each time you use the specific paper 1 Select Paper Settings i...

Страница 172: ...it orientation select A4R or A5R When loading custom size paper 1 Select Custom Size 2 Specify the length of the X side and Y side Select X or Y and enter the length of each side using the numeric key...

Страница 173: ...vertical placement for Nagagata 3 select Next and specify the flap length When using Kakugata 2 place it horizontally 3 Select Apply 6 Select paper type 7 Select Apply LINKS Loading Paper in the Mult...

Страница 174: ...layed when paper is loaded and the same setting is always used If you load a different paper size or type without changing the paper settings the machine may not print properly To avoid this problem s...

Страница 175: ...ength of the X side and Y side Select X or Y and enter the length of each side using the numeric keys If you register the paper size you use frequently on buttons S1 to S3 you can call them up with on...

Страница 176: ...4 Select paper type LINKS Loading Paper in the Multi Purpose Tray P 141 Limiting the Paper Sizes Displayed for the Multi Purpose Tray P 169 Available Paper P 738 Basic Operations 167...

Страница 177: ...s 4 Specify the length of the X side and Y side Select X or Y and enter the length of each side using the numeric keys 5 Select Apply Setting to the registered custom size The paper sizes that are reg...

Страница 178: ...requently Used Paper Sizes 3 Select Multi Purpose Tray 4 Clear the check boxes for paper sizes you do not want displayed Ensure that only the check boxes for frequently used paper sizes are selected P...

Страница 179: ...s loaded with the same paper size 1 Select Menu in the Home screen Home Screen P 117 2 Select Function Settings Common Paper Feed Settings 3 Select Paper Source Auto Selection 4 Select the target func...

Страница 180: ...automatically for the multi purpose tray Be sure to register the paper size correctly If you do not register the paper size correctly paper jams may occur 1 Select Paper Settings in the Home screen H...

Страница 181: ...Set the Automatic Detection Size of the Paper Drawer P 171 and Auto is selected in Paper Size Specifying Paper Size and Type in the Paper Drawer P 156 1 Select Paper Settings in the Home screen Home S...

Страница 182: ...are displayed in the Home screen In addition you can customize the Home screen to make it easier to select functions by adding shortcut buttons Customizing the Home Screen P 174 Registering Favorite...

Страница 183: ...by assigning a sequence of settings e g Scan both sides of an original save it as a highly compressed PDF file and send it via e mail to a single button The settings to be added as a shortcut button m...

Страница 184: ...tons together with shortcut buttons for Favorite Settings You can also insert a blank space instead of a button to make it easier to view the Home screen 1 Select Home Screen Settings in the Home scre...

Страница 185: ...5 Select Apply LINKS Basic Operation P 123 Basic Operations 176...

Страница 186: ...s P 178 You can also register a fax or scan destination in the frequently used settings however it cannot be changed once it is registered To change a destination delete the settings and then register...

Страница 187: ...en when the machine is turned OFF If you want to delete a registered setting select Copy Other Settings Favorite Settings select the settings and select Delete Yes Recalling Registered Settings Simply...

Страница 188: ...nu Function Settings Send Fax Settings Change Default Settings Fax Select the setting Change the default value of the selected item Apply Memory Media Print For information about changeable setting it...

Страница 189: ...value of the selected item Apply Shared Folder FTP Server For information about changeable setting items see File Settings P 562 Menu Function Settings Send Scan and Send Settings File Settings Chang...

Страница 190: ...lume select Apply To mute the sound move the cursor all the way to the left Adjusting Other Volume Set 1 Press the key 2 Select Other Volume Set 3 Select a setting Setting Description Procedure Ring T...

Страница 191: ...cartridge is almost empty Warning Tone Sound produced when a paper jam or other error occurs Job Done Tone Sound produced when an operation such as copying or scanning is complete Energy Saver Alert...

Страница 192: ...et such that the fax incoming ring will not sound When the menu screen is displayed When a job is waiting to be scanned to a USB memory device or to a computer When an error message is displayed on th...

Страница 193: ...an also configure a setting so that the sleep mode is released at the specified time Menu Preferences Timer Energy Settings Auto Sleep Daily Timer or Sleep Mode Exit Time Settings Select On in Set Thi...

Страница 194: ...gy Settings Auto Shutdown Time Set the time period Apply IMPORTANT When the Auto Shutdown Time setting is enabled the machine may automatically shut down even if you are operating the machine from the...

Страница 195: ...k Group Dial You can select multiple destinations that have already been registered and register them together as a group You can send faxes or e mails to multiple destinations at the same time Groups...

Страница 196: ...can save the Address Book as a file on your computer although you cannot use the computer to edit the Address Book You can also import a saved Address Book from the computer to the machine Importing...

Страница 197: ...server If your office has an LDAP server installed you can make search to find user information on the server and register it in the Address Book To make registration from the LDAP server you need to...

Страница 198: ...Select a user you want to register in the Address Book 9 Select Apply The user name and the fax number or e mail address registered on the LDAP server of the selected user are registered in the Addres...

Страница 199: ...ttings Send Fax Settings However settings made from Address Book are enabled for the detailed settings of destinations registered in the Address Book 8 Select Register As 9 Select Favorites or Coded D...

Страница 200: ...e registered in a group as destinations 1 Select Address Book in the Home screen Home Screen P 117 2 Select Register Dest Group If a screen appears prompting you to enter a PIN enter the correct PIN u...

Страница 201: ...e target destination and select Details To remove a destination from the group Select the destination that you want to remove from the group and select Delete Yes 10 Select Register As 11 Select Favor...

Страница 202: ...s also deleted from the favorite settings Registering Frequently Used Settings P 177 1 Select Address Book in the Home screen Home Screen P 117 2 Select the index containing the destination you want t...

Страница 203: ...usting Sharpness for Copying Sharpness 210 Erasing Dark Borders When Copying Erase Frame 211 Adjusting the Color 213 Useful Copy Functions 214 Copying Multiple Documents onto One Sheet N on 1 215 Copy...

Страница 204: ...ns Copy Basic Features Screen P 197 Basic Copy Operations P 199 Canceling Copies P 205 Checking the Copying Status and Log P 206 Enhancing Quality Enhancing and Adjusting Copy Quality P 208 Selecting...

Страница 205: ...uments onto One Sheet N on 1 P 215 Copying a Facing Page Original as Two Separate Pages P 216 Copying Different Size Originals Together Different Size Originals P 217 Finishing by Collating Grouping P...

Страница 206: ...and prints the scanned data on one side of the paper Scans one side of an original and prints the scanned data on both sides of the paper Scans both sides of an original and prints the scanned data o...

Страница 207: ...Start Use this button to start copying Copying 198...

Страница 208: ...ng Selecting Copy Paper Selecting Color Copying or Black and White Copying Normally the machine automatically detects whether the original is color or black and white for copying but you can also spec...

Страница 209: ...P 200 Adjust the background density You can make a clear copy of originals with colored backgrounds or originals such as a newspaper that is printed on thin paper on which text or images on the other...

Страница 210: ...738 Other Settings 2 Sided Printing Select the type of 2 sided copying Apply Types of 2 sided copying The illustration below shows the types of 2 sided copying 1 Sided 2 Sided 2 Sided 2 Sided 2 Sided...

Страница 211: ...a copy ratio Numeric keys You can set any copy ratio from 25 to 400 in 1 increments Selecting Copy Paper Specify the paper source that contains the paper to use for printing out copies You must first...

Страница 212: ...r in step 1 The original is automatically scanned When placing originals on the platen glass in step 1 For 2 sided copying or N on 1 copying the screen prompting you to load the next original is displ...

Страница 213: ...the same settings Changing the Default Settings for Functions P 179 If you want to register a combination of settings to use when needed Registering Frequently Used Settings P 177 LINKS Checking the C...

Страница 214: ...Screen That is Displayed While Copying Press to Cancel If the Screen Displays a List of Documents When is Pressed Originals have been scanned and are waiting to be printed Select a copy document in th...

Страница 215: ...rinted When you cannot find your printouts that you thought had been copied you may want to see whether an error has occurred 1 Select Status Monitor 2 Select Copy Print Job 3 Check the copy statuses...

Страница 216: ...ion about the document When a three digit number is shown in the case of Error This number represents an error code Countermeasures for Each Error Code P 686 LINKS Basic Copy Operations P 199 Cancelin...

Страница 217: ...ecifying more detailed settings such as adjusting the brightness erasing unnecessary shadows etc Selecting the Type of Original for Copying P 209 Adjusting Sharpness for Copying Sharpness P 210 Erasin...

Страница 218: ...ngs Original Type Select the original type Text Photo Map Suitable when copying originals that contain both text and photos or originals that include detailed lines such as maps Printed Image Suitable...

Страница 219: ...t and lines or decrease the sharpness to improve the appearance of magazine photos Copy Other Settings Sharpness Adjust the sharpness Apply Example If you want to sharpen text and lines written in pen...

Страница 220: ...se Frame is not available when using N on 1 Erasing the frames in copies of documents Copy Other Settings Erase Frame Erase Original Frame Specify the width of the frame to erase Apply Select the orig...

Страница 221: ...LINKS Basic Copy Operations P 199 Copying 212...

Страница 222: ...el Apply Example If you want to make a copy with colors that more closely match the original Example If you want to make a copy with brighter colors than the original If you select Fine Adjust you can...

Страница 223: ...originals of different sizes together or to copy both sides of a card etc onto one page Copying Multiple Documents onto One Sheet N on 1 P 215 Copying a Facing Page Original as Two Separate Pages P 21...

Страница 224: ...he edges of the original might not be copied if you increase it N on 1 is not available when using Erase Frame When you copy multiple originals onto one page margins may be created in the copied image...

Страница 225: ...sided copies as well by copying the right page onto the front side and the left page onto the back side When scanning facing pages of a book or bound original place the original on the platen glass P...

Страница 226: ...on may cause damage to the originals or paper jams Do not place the originals together that are of different weights or paper types as this may cause damage to the originals or paper jams If the origi...

Страница 227: ...o complete sets in sequential page order For example if you are making three copies of a five page original the printouts will be arranged in the following page order 1 2 3 4 5 1 2 3 4 5 1 2 3 4 5 Gro...

Страница 228: ...or Group Same Pages Offset On Apply An optional device is required to use the offset function Optional Equipment P 764 Depending on the paper type you cannot use finishing functions Specifications P...

Страница 229: ...the staple position Eco Max 5 Sheets You can bind each paper by pressure joining without using staples An optional device is required to use the stapling function Optional Equipment P 764 Depending on...

Страница 230: ...k sides of a card onto the same side of a page This function is useful when copying a driver s license or ID card Copy Ratio is automatically set to 100 Place the card on the platen glass ID Card Copy...

Страница 231: ...ding a Fax after a Phone Call Manual Sending 243 Saving a Copy of a Sent Original 245 Various Receiving Methods 246 Saving Received Documents into the Machine Memory Reception 247 Forwarding the Recei...

Страница 232: ...ings for Fax Functions P 78 You need to register destinations in the Address Book before using this feature Registering Destinations P 186 Using Basic Operations Fax Basic Features Screen P 226 Basic...

Страница 233: ...P 246 Saving Received Documents into the Machine Memory Reception P 247 Forwarding All the Received Documents Forwarding the Received Documents Automatically P 249 Sending Faxes Directly from Your Co...

Страница 234: ...Sending and Receiving Faxes via the Internet Using Internet Fax I Fax P 257 Faxing 225...

Страница 235: ...ng Previously Used Settings for Sending Recall Settings P 240 TX RX Settings tab Select this tab to specify the scanning settings You can change the RX mode Deciding Which Fax Receive Mode to Use P 79...

Страница 236: ...Basic Features screen Fax Basic Features Screen P 226 If the destinations set by the previous user are still selected this can cause transmission errors Always reset the settings before sending 4 Spec...

Страница 237: ...ddress Book You can specify an address simply by entering its coded dial number To use coded dial numbers the destination must be registered in the Address Book beforehand Registering Destinations P 1...

Страница 238: ...onfirmation screen appears When Confirm Entered Fax Number is set to On the input screen reappears so that you can confirm the destination Confirming the Entered Fax Number P 426 Enter the destination...

Страница 239: ...ons Below Searches and displays the users that meet all the search criteria specified in steps 3 and 4 Using Some Conditions Below If users that meet even one of the criteria specified in steps 3 and...

Страница 240: ...stered in the group 3 Select Yes 5 Specify the scanning settings as necessary Adjusting Image Quality Scanning 2 Sided Originals Adjusting Image Quality You can select the resolution suitable for your...

Страница 241: ...ab Adjust the density Apply Adjusting Sharpness Select Sharpness in the TX RX Settings tab Adjust the sharpness Apply Example If you want to sharpen text and lines written in pencil Example If you wan...

Страница 242: ...ront and back sides face in opposite directions 6 Select Start If the Confirm Destination screen is displayed check whether the destination is correct and then select Start Scanning Scanning of the or...

Страница 243: ...179 If you want to register a combination of settings to use when needed Registering Frequently Used Settings P 177 If you want to sound an alarm when the handset is off the hook Off Hook Alarm P 564...

Страница 244: ...during fax transmission Press to cancel If the screen displays a list of documents when is pressed Originals have been scanned and are waiting to be processed Select the document to cancel and select...

Страница 245: ...Auto Switch When the call is a fax The machine receives the fax automatically When the call is a telephone call An incoming call rings Pick up the handset to answer the call You need to connect your t...

Страница 246: ...one connected to it the machine may not be able to send or receive faxes properly If you are connecting an external telephone with fax functions set the telephone to not receive faxes automatically If...

Страница 247: ...as reception date and time at the bottom of received documents Print RX Page Footer P 575 Using a Telephone to Receive Faxes Remote Reception When you pick up the telephone and get a fax signal you do...

Страница 248: ...to a previously specified destination how to send a fax after a phone call and how to save a copy of a fax document Recalling Previously Used Settings for Sending Recall Settings P 240 Sending a Fax a...

Страница 249: ...Sending a Fax after a Phone Call Manual Sending P 243 When you specify a destination using this feature any destinations that you have already specified are deleted 1 Place the original s Placing Ori...

Страница 250: ...ngs as necessary Basic Operations for Sending Faxes P 227 7 Select Start If the Confirm Destination screen is displayed check whether the destination is correct and then select Start Scanning Scanning...

Страница 251: ...3 Select Start Sending The faxes are sent LINKS Basic Operations for Sending Faxes P 227 Faxing 242...

Страница 252: ...ogin screen appears enter your user name and password and set up the authentication server Logging in to Authorized Send P 129 3 Select Reset in the Fax Basic Features screen Fax Basic Features Screen...

Страница 253: ...8 Hang up the handset LINKS Basic Operations for Sending Faxes P 227 Canceling Sending Faxes P 235 Checking Status and Log for Sent and Received Documents P 252 Faxing 244...

Страница 254: ...ons P 186 1 Select Menu in the Home screen Home Screen P 117 2 Select Function Settings Send Fax Settings 3 Select Archive TX Document If the login screen appears enter the correct ID and PIN Logging...

Страница 255: ...ed faxes in the machine s memory without printing them You can reduce fax paper waste by checking the detailed information of fax documents and only printing necessary documents Saving Received Docume...

Страница 256: ...s Receive Forward Common Settings Set Fax I Fax Inbox Fax Memory Lock Settings Select On in Use Memory Lock Specify each setting Apply Use Fax Preview Specify whether to preview received documents sto...

Страница 257: ...rding Deleting Documents in Memory You can check an outline of each document stored in memory including sender fax numbers and number of pages sent You can also select and forward a document stored in...

Страница 258: ...d are automatically forwarded 1 Select Menu in the Home screen Home Screen P 117 2 Select Function Settings Receive Forward Fax Settings 3 Select Forwarding Settings Forwarding Function If the login s...

Страница 259: ...warded in memory and print resend or delete them later Storing Documents that Failed to be Forwarded in Memory Menu Function Settings Receive Forward Fax Settings Forwarding Settings Store Images in M...

Страница 260: ...I to preview the documents that failed to be forwarded Checking Information of Documents That Failed To Be Forwarded P 441 LINKS Receiving Faxes P 236 Checking Status and Log for Sent and Received Doc...

Страница 261: ...nt whose status you want to check in the TX Job Status or RX Job Status tab Displays detailed information about the document If you specified multiple destinations the number of specified destinations...

Страница 262: ...umber represents an error code Countermeasures for Each Error Code P 686 LINKS Basic Operations for Sending Faxes P 227 Canceling Sending Faxes P 235 Receiving Faxes P 236 Sending I Faxes P 258 Receiv...

Страница 263: ...ion about how to install the fax driver see the manuals for the relevant drivers on the online manual website Sending PC Faxes P 255 Depending on the operating system and the version of the fax driver...

Страница 264: ...1 Open a document in an application and display the print dialog box How to display the print dialog box differs for each application For more information see the instruction manual for the applicati...

Страница 265: ...o specify destinations using the Address Book Selecting Store Sent Fax Information and Image enables you to store the logs for sending documents and check detailed information of a sent document along...

Страница 266: ...e mail Since a telephone connection is not used you can send faxes to distant locations and send documents with many pages without worrying about communications charges Some advance preparation is re...

Страница 267: ...d and set up the authentication server Logging in to Authorized Send P 129 3 Select I Fax on the Scan Basic Features screen Scan Basic Features Screen P 291 4 Specify the destination Specifying from A...

Страница 268: ...Numbers Three digit numbers coded dial numbers are assigned to addresses in the Address Book You can specify an address simply by entering its coded dial number To use coded dial numbers the destinat...

Страница 269: ...ecify Destination tab 2 Enter the I Fax address and select Apply On how to enter text see Entering Text P 126 Specifying Destinations in an LDAP Server If your office has an LDAP server installed you...

Страница 270: ...password registered in the LDAP server and select Apply Registering LDAP Servers P 63 8 Select the check box for the user that you want to specify as destination and select Apply If a screen on which...

Страница 271: ...y the scanning settings as necessary For more information about each setting see Sending Data by E Mail Saving Data to a Shared Folder or FTP Server P 301 or Scanning Clearly P 313 7 Specify the subje...

Страница 272: ...the procedures below 1 If there are additional pages of originals to be scanned place the next original on the platen glass and select Scan Next Repeat this step until you finish scanning all of the p...

Страница 273: ...click OK E mail is deleted from the mailbox If you always want to send with the same settings Changing the Default Settings for Functions P 179 If you want to register a combination of settings to use...

Страница 274: ...chine so that it does not receive I Faxes automatically use the method below to receive I Faxes manually If there is a document on the server printing begins Status Monitor RX Job Check I Fax RX Print...

Страница 275: ...68 Canceling Prints 270 Checking the Printing Status and Log 272 Various Printing Methods 274 Printing a Document Secured by a PIN Secure Print 275 Printing via Secure Print 276 Printing from a USB Me...

Страница 276: ...y using the printer driver Printing from a Computer P 268 Useful Functions When Printing You can assign a PIN to the print data to enhance security or directly print files stored in a USB memory devic...

Страница 277: ...lays the Help screen On this screen you can see the detailed descriptions that are not in the User s Guide To Use the Optional Items If the optional cassette feeding unit or inner finisher is attached...

Страница 278: ...n an application and display the print dialog box 2 Select the printer driver for this machine and click Preferences or Properties 3 Specify the print settings as necessary and click OK Switch the tab...

Страница 279: ...click the printer driver icon for this machine and click See what s printing or double click the icon of the printer driver for this machine 2 Select the document you want to cancel and click Documen...

Страница 280: ...ect the document you want to cancel and select Cancel Yes Check the Print Job Status Before Canceling Status Monitor Copy Print Job Select the document in the Copy Print Job Status tab Cancel Yes Seve...

Страница 281: ...hat you thought had been printed you may want to see whether an error has occurred 1 Select Status Monitor 2 Select Copy Print Job 3 Check the print statuses and logs To check the print statuses 1 Sel...

Страница 282: ...ame or user name may not reflect the actual document or user name When a three digit number is shown in the case of Error This number represents an error code Countermeasures for Each Error Code P 686...

Страница 283: ...how to print a document by adding a PIN and how to print a file stored on a USB memory device without using the printer driver Printing a Document Secured by a PIN Secure Print P 275 Printing from a...

Страница 284: ...ory of the machine and is not printed until the correct PIN is entered on the operation panel of the machine This function is called Secure Print and the document that is protected by a PIN is called...

Страница 285: ...e Valid Time Period for Secured Documents P 278 Sending a Secured Document from a Computer to the Machine 1 Open a document in an application and display the print dialog box 2 Select the printer driv...

Страница 286: ...the next step if the Remote Scanner screen shown below is displayed In this case select to close the screen and select Secure Print 2 Select the check box for the secured document to print and select...

Страница 287: ...Select Secure Print Deletion Time When Secure Print Deletion Time cannot be selected Set Use Secure Print to On Disabling Secure Print Set Use Secure Print to Off and then restart the machine 5 Speci...

Страница 288: ...Home screen Home Screen P 117 2 Select the check box for the file print You can select multiple files To clear a selection select the file you have selected again Selecting a folder displays its conte...

Страница 289: ...me Ascending or Date Time Ascending as the default setting for the file sort order File Sort Default Settings P 583 1 Select Sort Files 2 Select the criteria for file sorting When you select Date Time...

Страница 290: ...iles Uses the paper that is loaded in the optional cassette feeding unit Drawer 3 4 to make copies When specifying other print settings select Close Brightness You can adjust the brightness of the ent...

Страница 291: ...ing may not be available with some sizes or types of paper Available Paper P 738 N on 1 N on 1 is not available for printing TIFF files You can print images on multiple pages onto one page Select the...

Страница 292: ...print four pages on one side of a sheet of paper select 4 on 1 Original Type You can select the type of original depending on the image to print Photo Priority Gives priority to printing photo images...

Страница 293: ...et of paper select 4 on 1 Print Range Specify pages you want to print All Pages Prints all pages Specified Pages Specify the range of pages you want to print Enter the desired value in each of Start P...

Страница 294: ...gure See Black Overprint P 545 for the description of the setting RGB Source Profile Select the source profile for color matching to print RGB data according to the monitor you are using See RGB Sourc...

Страница 295: ...f the machine make a correction so that the toner volume does not exceed the limit value See Toner Volume Correction P 518 for the description of the setting Line Control Specify the processing method...

Страница 296: ...LINKS Store Access Files P 577 Printing 287...

Страница 297: ...lity 314 Adjusting Density 315 Adjusting Sharpness When Scanning Sharpness 316 Scanning Different Size Originals Together Different Size Originals 318 Useful Scanning Functions 319 Enhancing the Secur...

Страница 298: ...network you must register the machine to the installed software Preparing to Use the Machine as a Scanner P 84 Depending on the operating system and the version of the scanner driver or applications y...

Страница 299: ...scanned originals are saved to the computer You can scan using MF Scan Utility included with the machine or with other applications such as an image processing or word processing application Using Yo...

Страница 300: ...he scanned data to a USB memory device Basic Features Screen for USB Scanning P 292 E Mail Sends the scanned data by e mail Basic Features Screen for E Mail Sending I Fax Sending File Saving P 292 I F...

Страница 301: ...canning Basic Features Screen for E Mail Sending I Fax Sending File Saving E Mail Sending I Fax Sending File Saving Specify Destination tab Select this tab to search for a destination in the Address B...

Страница 302: ...ss of the specified destination as well as the number of destinations Reset You can collectively restore the default settings Start Use this button to start scanning Selecting B W starts black and whi...

Страница 303: ...for scanning originals Scanning Scanning and Saving to a Computer P 295 Saving Data to a USB Memory Device P 297 Sending Data by E Mail Saving Data to a Shared Folder or FTP Server P 301 Operating Jo...

Страница 304: ...nd password and set up the authentication server Logging in to Authorized Send P 129 3 Select Computer in the Scan Basic Features screen Scan Basic Features Screen P 291 If only a computer connected t...

Страница 305: ...l on the platen glass and select Scan Next Repeat this step until you finish scanning all of the pages When there is only one page to be scanned proceed to the next step 2 Select Finish The save desti...

Страница 306: ...Placing Originals P 130 2 Select Scan in the Home screen Home Screen P 117 When the login screen appears enter your user name and password and set up as well as the authentication server Logging in t...

Страница 307: ...Dividing a PDF file by Page P 298 or Dividing a TIFF File by Page P 298 PDF Compact and PDF Compact OCR compress photos and illustrations on the original more than PDF and PDF OCR and the file size w...

Страница 308: ...g Clearly P 313 or Adjusting Balance between File Size and Image Quality P 323 5 Select Start Scanning of the original starts If you want to cancel select Cancel Yes Canceling Sending Documents P 310...

Страница 309: ...d document is automatically assigned based on the following format the characters SCAN followed by a four digit number file extension name If you always want to scan with the same settings Changing th...

Страница 310: ...P 90 Procedure for Setting a FTP Server as a Save Location P 91 1 Place the original s Placing Originals P 130 2 Select Scan in the Home screen Home Screen P 117 When the login screen appears enter y...

Страница 311: ...or file saving can be displayed while the selected remains being destination specified Specifying from Coded Dial Numbers Three digit numbers coded dial numbers are assigned to addresses in the Addre...

Страница 312: ...ing Destinations Directly E mail Sending For a destination that is not registered in the Address Book specify it by entering an e mail address 1 Select Use Keyboard in the Specify Destination tab 2 En...

Страница 313: ...arch result Using All Conditions Below Searches and displays the users that meet all the search criteria specified in steps 3 and 4 Using Some Conditions Below If users that meet even one of the crite...

Страница 314: ...cify multiple destinations including Cc Bcc destinations as necessary Select the method used to specify destinations in the Specify Destination tab and then specify the destination If you selected LDA...

Страница 315: ...f the original is saved as a separate file If you select TIFF or PDF you can scan multiple page originals either from the platen glass or from the feeder In this case whether the original is to be sav...

Страница 316: ...achine can automatically scan the front and back sides of originals in the feeder The machine cannot automatically scan both sides of the original placed on the platen glass Select 2 Sided Original in...

Страница 317: ...tion screen or SMTP Authentication screen appears Enter the user name and password and then select Apply File name of the sent document The file name of a sent document is automatically assigned based...

Страница 318: ...ilbox If you always want to scan with the same settings Changing the Default Settings for Functions P 179 If you want to register a combination of settings to use when needed Registering Frequently Us...

Страница 319: ...cancel Press to cancel If the screen displays a list of documents when is pressed Originals have been scanned and are waiting to be processed Select the document to cancel and select Cancel Yes Check...

Страница 320: ...TX Job Status tab Displays detailed information about the document If you specified multiple destinations the number of specified destinations is displayed on the screen To check the details of speci...

Страница 321: ...number represents an error code Countermeasures for Each Error Code P 686 LINKS Basic Operations for Scanning Originals P 294 Canceling Sending Documents P 310 Printing Reports and Lists P 646 Scannin...

Страница 322: ...reports written in pencil you can adjust density and brightness to achieve clearer image quality Adjusting Image Quality P 314 Adjusting Density P 315 Adjusting Sharpness When Scanning Sharpness P 31...

Страница 323: ...or magazine photos Saving Data to a USB Memory Device Scan USB Memory Original Type Select the original type Sending Data by E Mail I Fax or Saving Data to the Server Scan Specify destinations in E Ma...

Страница 324: ...e Scan USB Memory Density Adjust the density Apply Sending Data by E Mail I Fax or Saving Data to the Server Scan Specify destinations in E Mail I Fax File Select Density in the Send Settings tab Adju...

Страница 325: ...ne photos Saving Data to a USB Memory Device Scan USB Memory Sharpness Adjust the sharpness Apply Sending Data by E Mail I Fax or Saving Data to the Server Scan Specify destinations in E Mail I Fax Fi...

Страница 326: ...LINKS Basic Operations for Scanning Originals P 294 Sending I Faxes P 258 Adjusting Density P 315 Scanning 317...

Страница 327: ...ether that are of different weights or paper types Doing so may cause damage to the originals or paper jams If the originals have the same height they can be copied scanned at once even if they have d...

Страница 328: ...event them from being tampered with and that can send data again to previously specified destinations Enhancing the Security of Electronic Files P 320 Adjusting Balance between File Size and Image Qua...

Страница 329: ...setting helps reduce the risk of the PDF file being viewed or edited by others 1 Select Scan on the Home screen Home Screen P 117 When the login screen appears enter your user name and password and s...

Страница 330: ...th a device signature The device signature serves the same purpose as sealing or signing a document it can be used to check where the file was created and whether the document has been tampered with o...

Страница 331: ...le Format Set PDF Details Sending e mail saving data to a shared folder or FTP server Select File Format Set PDF Details in the Send Settings tab 5 Select PDF format This setting can be changed for ea...

Страница 332: ...lower image quality On the other hand Large Image Quality Priority makes the compression ratio lower than normal larger files with higher image quality Saving data to a USB memory device Scan USB Memo...

Страница 333: ...ure Restricting New Destinations that Can Be Specified P 424 When you specify a destination using this feature any destinations that you have already specified are deleted 1 Place the original s Placi...

Страница 334: ...layed check whether the destination is correct and then select Start Scanning Scanning of the original starts If you want to cancel select Cancel Yes Canceling Sending Documents P 310 When placing ori...

Страница 335: ...ess starts If the File Authentication screen or SMTP Authentication screen appears Enter the user name and password and then select Apply LINKS Basic Operations for Scanning Originals P 294 Sending I...

Страница 336: ...4 Specify a destination and configure the scan settings as necessary Basic Operations for Scanning Originals P 294 5 Specify the subject message reply to address and priority for the e mail To specif...

Страница 337: ...complete the e mails are sent When placing originals on the platen glass in step 1 When scanning is complete follow the procedures below except if you selected JPEG as a file format 1 If there are add...

Страница 338: ...LINKS Checking Status and Log for Scanned Originals P 311 Scanning 329...

Страница 339: ...application included with the machine that enables you to scan documents or images to a computer You can forward the scanned data to a specified application or attach it to an e mail message For more...

Страница 340: ...nals may not be scanned or an error message may be displayed depending on the application In such a case place and scan one original at a time When Auto Online is set to Off you must select Scan Remot...

Страница 341: ...LINKS Using ScanGear MF P 333 Scanning 332...

Страница 342: ...ons on MF Scan Utility If you are a macOS user see the manuals for the relevant drivers or software on the online manual website Starting from an application To scan from applications such as image pr...

Страница 343: ...ction is called WSD Scan You need to complete some procedures before using WSD Scan Preparing for WSD Scan P 334 Preparing for WSD Scan From the control panel 1 Select Menu in the Home screen Home Scr...

Страница 344: ...machine and click Next Follow the on screen instructions to operate If this machine is not displayed a Firewall setting problem may exist For more information see the instruction manual of the compute...

Страница 345: ...ing WSD From the control panel 1 Place the original s Placing Originals P 130 2 Select Scan in the Home screen Home Screen P 117 3 Select Remote Scanner Now you are ready for scanning from your comput...

Страница 346: ...tings as necessary Selecting the type of original from the Profile drop down list enables you to make adjustments for the optimal image quality For originals mainly consisting of text select Document...

Страница 347: ...conveniently recall them when scanning Select Add profile from the Profile drop down list Specify the scan settings you want to register Enter a name in the Profile name text box Click Save Profile Se...

Страница 348: ...Directly Access Point Mode 344 Utilizing the Machine through Applications 348 Using AirPrint 350 Printing with AirPrint 355 Scanning with AirPrint 358 Faxing with AirPrint 360 If AirPrint Cannot Be Us...

Страница 349: ...onnecting with Mobile Devices P 341 Connecting Directly Access Point Mode P 344 Utilizing the Machine through Applications P 348 Using AirPrint P 350 Using Google Cloud Print P 363 Printing with Defau...

Страница 350: ...ile devices from Mobile Portal Home Screen P 117 Connecting via a Wireless LAN Router Just as connecting a computer to the machine connect a mobile device to the machine via a wireless LAN router Conn...

Страница 351: ...procedure if the Direct Connection screen is displayed after Mobile Portal is selected in the procedure below For information about the operating systems compatible with Canon PRINT Business the detai...

Страница 352: ...s the mobile device over the machine without launching Canon PRINT Business Canon PRINT Business starts automatically after passing it over 2 Enable the NFC settings of the mobile device 3 Move the mo...

Страница 353: ...nnecting Directly P 345 Optional products are required to use NFC System Options P 784 Preparing for Direct Connection Access Point Mode Establish a connection by using Access Point Mode in the follow...

Страница 354: ...Help or the Canon website https global canon gomp Connecting Directly It may take time until connection of the machine and the mobile device is established Connecting Manually 1 Select Mobile Portal...

Страница 355: ...rough Applications P 348 If you pass the mobile device over the machine without launching Canon PRINT Business Canon PRINT Business starts automatically after passing it over 2 Enable the NFC settings...

Страница 356: ...a wireless LAN you need to keep the machine connected to the wireless LAN when using direct connection When the machine is not connected to a wireless LAN or the connection process is not complete yet...

Страница 357: ...n easily print from the menu of applications that support the Android print subsystem For more information on supported operating systems and detailed settings and procedures see the Canon website htt...

Страница 358: ...e Cloud Print You can use applications and services which support Google Cloud Print to print from a computer or mobile device without using a printer driver Using Google Cloud Print P 363 Linking wit...

Страница 359: ...of the machine and installation location that is used for identifying the machine You can also disable the AirPrint function of the machine Use the Remote UI to change these settings For more informat...

Страница 360: ...registered name is displayed Latitude Enter the latitude of the location where the machine is installed Longitude Enter the longitude of the location where the machine is installed 6 Click OK If you...

Страница 361: ...ngs Set Use IPP Printing to Off or On Apply Changing the TLS Setting You can specify whether to encrypt communications using TLS when performing printing or sending faxes with AirPrint The factory def...

Страница 362: ...tings 1 Select System Preferences Printers Scanners then add the machine to the Mac you are using If the machine has already been added this operation is not required 2 Select this machine from the li...

Страница 363: ...ed for TLS Configuring the Key and Certificate for TLS P 397 Key and Certificate Settings Enables you to generate and install a key and certificate or request a certificate to be issued Configuring th...

Страница 364: ...an Apple device and the machine are connected to the same LAN An environment where an Apple device and the machine are connected directly An environment where a Mac is connected to the machine via US...

Страница 365: ...ice tap Print Printing from a Mac 1 Make sure that the machine is turned ON and connected to the Mac For how to make sure of this see Setting Up the Network Environment P 13 2 Add the machine to the M...

Страница 366: ...The available settings and paper sizes differ depending on the application you are using 6 Click Print Printing starts Linking with Mobile Devices 357...

Страница 367: ...able with AirPrint P 352 Before scanning it is required to put the machine into online state When the auto online function Auto Online P 507 is set to Off first put the machine into online state by se...

Страница 368: ...Click Scan 5 Click Open Scanner The Scanner screen is displayed 6 Configure the scan settings as necessary 7 Click Scan The original is scanned and the image is displayed Linking with Mobile Devices 3...

Страница 369: ...able with AirPrint P 352 Faxing from a Mac 1 Make sure that the machine is turned ON and connected to the Mac For how to make sure of this see Setting Up the Network Environment P 13 2 Add the machine...

Страница 370: ...5 Specify the destination 6 Click Fax Fax sending starts Linking with Mobile Devices 361...

Страница 371: ...l minutes before the machine is ready for communication Make sure that Bonjour on your Apple device is enabled Make sure that the machine is configured to enable execution of jobs from a computer even...

Страница 372: ...loud Print does not support printing from an IPv6 address A Google account is required to use Google Cloud Print If you do not have a Google account create one on the Google website Checking the Setti...

Страница 373: ...tion 8 Follow the instructions on the screen to register the machine Printing can now be performed from applications that support Google Cloud Print such as Google Chrome For information on the latest...

Страница 374: ...ria settings Log in to the Remote UI with Administrator privileges Starting Remote UI P 436 Settings Registration Network Settings Mopria Settings Edit select the Use Mopria check box OK In order to u...

Страница 375: ...Enter the IP address of the machine on the Web browser to start the Remote UI Prior to operation confirm the IP address set for the machine Viewing Network Settings P 37 If it is unknown ask your net...

Страница 376: ...CSR 403 Registering the Key and Certificate for Network Communication 406 Configuring IPSec Settings 408 Configuring IEEE 802 1X Authentication Settings 415 Restricting the Machine s Functions 419 Res...

Страница 377: ...Importing Exporting the Setting Data 458 Updating the Firmware 462 Initializing Settings 464 Managing the Machine 368...

Страница 378: ...best security measures by establishing an environment that multifunction printers on the company network cannot be accessed from the Internet along with the security functions of this machine Preventi...

Страница 379: ...Managing the System Configuration and Settings Updating the Firmware P 462 Initializing Settings P 464 Managing the Machine 370...

Страница 380: ...ivileges such as Network and Management Settings We recommend that you set and register the System Manager ID Otherwise anyone will be able to change the machine settings Only one System Manager ID ca...

Страница 381: ...agement Settings If the System Manager ID has already been set If the login screen appears enter the correct ID and PIN Logging in to the Machine P 128 3 Select User Management System Manager Informat...

Страница 382: ...e machine as well as to the settings that you can register by using the operation panel The registered information can be viewed on the Device Information page of the Remote UI Checking System Manager...

Страница 383: ...the computer side Registering Editing Department ID and PIN P 374 Enabling the Department ID Management P 376 Enabling the Department ID Management for Jobs from a Computer P 377 Blocking Jobs When De...

Страница 384: ...ed the Save to USB Memory Device Send E mail and Save to Shared Folder or FTP Server functions are all restricted You can also restrict other methods that scan documents by importing them to a compute...

Страница 385: ...rds that correspond to the deleted department IDs will become unavailable You cannot use Restrict Functions to restrict the allowable number of pages to print Enabling the Department ID Management Aft...

Страница 386: ...ement is enabled the login screen is displayed Logging in to the Machine P 128 Enabling the Department ID Management for Jobs from a Computer When you want to enable Department ID Management for jobs...

Страница 387: ...ox if the machine and the computer are connected via a USB or WSD port 7 Click OK Logging in to the machine When you try to send job from a computer when Department ID Management is enabled the follow...

Страница 388: ...entered clear the check box Allow Scan Jobs with Unknown IDs If the check box is selected you can select Computer or Remote Scanner on the main screen and scan documents into a computer anytime If th...

Страница 389: ...Machine P 128 3 Select License Other Remote UI Settings Restrict Access 4 Select On 5 Specify the System Remote UI Access PIN Enter the PIN and select Apply The Confirm screen is displayed Enter the...

Страница 390: ...the Remote UI see Setting Up Menu Options from Remote UI P 445 1 Start the Remote UI and log in to System Manager Mode Starting Remote UI P 436 2 Click Settings Registration on the Portal page Remote...

Страница 391: ...ation screen showing the same user name and password entered in the Authorized Send login screen Display the authentication screen without any authentication information Displays the authentication sc...

Страница 392: ...on screen without any authentication information Displays the authentication screen with the user name and password fields blank Use the authentication information from the address book and do not dis...

Страница 393: ...the shared folder or FTP server Folder Path Enter a path name for the save destination folder excluding the host name When the Add User Name check box is selected the user name for authentication on...

Страница 394: ...her devices is assigned port numbers that are predetermined according to the type of protocol The port number must be the same for all communication devices therefore changing it to an arbitrary numbe...

Страница 395: ...anaging user authentication information If a device tries to connect to the 802 1X network the device must go through user authentication in order to prove that the connection is made by an authorized...

Страница 396: ...tion devices that are connected to a network To prevent this unauthorized access specify the settings for packet filter a feature that restricts communication to devices with specified IP addresses or...

Страница 397: ...the Remote UI and log in to System Manager Mode Starting Remote UI P 436 2 Click Settings Registration on the Portal page Remote UI Screen P 437 3 Select Network Settings Firewall Settings 4 Click Edi...

Страница 398: ...range of IP addresses in the Address to Register text box and click Add Check for entry errors If IP addresses are incorrectly entered you may be unable to access the machine from the Remote UI in whi...

Страница 399: ...0 seconds and turn it back ON Using the operation panel You can also enable or disable IP address filtering from Menu in the Home screen IPv4 Address Filter P 489 IPv6 Address Filter P 490 LINKS Speci...

Страница 400: ...Remote UI P 445 1 Start the Remote UI and log in to System Manager Mode Starting Remote UI P 436 2 Click Settings Registration on the Portal page Remote UI Screen P 437 3 Select Network Settings Firew...

Страница 401: ...ion packets when they are sent to or received from devices whose MAC addresses are entered in Exception Addresses Communications with other devices are permitted 2 Specify address exceptions Enter the...

Страница 402: ...for at least 10 seconds and turn it back ON Using the operation panel You can also enable or disable MAC address filtering from Menu in the Home screen MAC Address Filter P 490 LINKS Specifying IP Add...

Страница 403: ...u in the Home screen Home Screen P 117 2 Select Preferences Network If the login screen appears enter the correct ID and PIN Logging in to the Machine P 128 3 Select TCP IP Settings Port Number Settin...

Страница 404: ...tting a proxy make sure that you have the necessary proxy information including the IP address port number and a user name and password for authentication For more information about the basic operatio...

Страница 405: ...e authentication by the proxy server select the check box and enter alphanumeric characters for the user name in the User Name text box Set Change Password To set or change the password for the proxy...

Страница 406: ...rtificate for TLS before enabling TLS Management Functions P 757 For more information about the basic operations to be performed when setting the machine from the Remote UI see Setting Up Menu Options...

Страница 407: ...Minimum Version of TLS Algorithm Settings Select the check box for the encryption algorithm to use for TLS 8 Click OK 9 Select License Other Remote UI Settings 10 Click Edit 11 Select the Use TLS che...

Страница 408: ...ng TLS to encrypt e mail I Fax communication If the SMTP server and the POP3 server support TLS you can enable TLS for communication with these servers Configuring E Mail I Fax Communication Settings...

Страница 409: ...e performed when setting the machine from the Remote UI see Setting Up Menu Options from Remote UI P 445 1 Start the Remote UI and log in to System Manager Mode Starting Remote UI P 436 2 Click Settin...

Страница 410: ...Start Date YYYY MM DD Enter the validity start date of the certificate in the order of year month day Validity End Date YYYY MM DD Enter the validity end date of the certificate in the order of year...

Страница 411: ...r the key and certificate is generated it is automatically registered to the machine LINKS Registering the Key and Certificate for Network Communication P 406 Configuring the Key and Certificate for T...

Страница 412: ...tting the machine from the Remote UI see Setting Up Menu Options from Remote UI P 445 Generating a Key and CSR 1 Start the Remote UI and log in to System Manager Mode Starting Remote UI P 436 2 Click...

Страница 413: ...be selected as the key length when RSA is selected in Key Algorithm Certificate Signing Request CSR Settings Country Region Click the Select Country Region radio button and select the country region f...

Страница 414: ...ister it using the procedure below 1 Start the Remote UI and log in to System Manager Mode Starting Remote UI P 436 2 Click Settings Registration on the Portal page Remote UI Screen P 437 3 Select Dev...

Страница 415: ...Device Management Key and Certificate Settings or CA Certificate Settings Click Key and Certificate Settings to install a key and certificate or CA Certificate Settings to install a CA certificate 4...

Страница 416: ...y and certificate file you want to register 2 Enter the name of the key and password Key Name Enter alphanumeric characters for the name of the key to be registered Password Enter alphanumeric charact...

Страница 417: ...rity policy consists of the groups of settings described below After registering policies specify the order in which they are applied Selector Selector defines conditions for IP packets to apply IPSec...

Страница 418: ...twork Settings IPSec Settings 4 Click Edit 5 Select the Use IPSec check box and click OK If you want the machine to only receive packets that match one of the security policies that you define in the...

Страница 419: ...All IPv6 Addresses Select to use IPSec for all IP packets that are sent to or from IPv6 addresses of the other devices IPv4 Manual Settings Select to specify a single IPv4 address or a range of IPv4 a...

Страница 420: ...e IPSec IPSec is not applied to the following packets Loopback multicast and broadcast packets IKE packets using UDP on port 500 ICMPv6 neighbor solicitation and neighbor advertisement packets 9 Speci...

Страница 421: ...of the certificate or verify the certificate by clicking the corresponding text link under Key Name or the certificate icon 3 Specify the Valid for and Authentication Encryption DH Group settings 10 S...

Страница 422: ...le the ESP encryption Connection Mode The connection mode of IPSec is displayed The machine supports transport mode in which the payloads of IP packets are encrypted Tunnel mode in which whole IP pack...

Страница 423: ...ration panel You can also enable or disable IPSec communication from Menu in the Home screen Use IPSec P 485 LINKS Configuring the Key and Certificate for TLS P 397 IPSec Policy List P 649 Managing th...

Страница 424: ...ation server authenticate each other by mutually verifying their certificates A key and certificate issued by a certification authority CA is required for the client authentication when authenticating...

Страница 425: ...ity that is used for identifying the user 6 Configure the required settings according to the specified authentication method Setting TLS 1 Select the Use TLS check box and click Key and Certificate Yo...

Страница 426: ...the check box if you want to use the login name as the user name 3 Set the user name password User Name Enter alphanumeric characters for the user name Change Password To set or change the password s...

Страница 427: ...e operation panel You can also enable or disable IEEE 802 1X authentication from Menu in the Home screen Use IEEE 802 1X P 489 LINKS Configuring the Key and Certificate for TLS P 397 Managing the Mach...

Страница 428: ...ess Book and Sending Functions P 421 Restricting Printing from a Computer You can limit printing from computer only to secure documents so that no print jobs can be executed unless the PIN is entered...

Страница 429: ...Disabling Remote Management When not using Remote UI you can disable functions to prevent an unauthorized remote operation via Remote UI Disabling Remote UI P 432 Managing the Machine 420...

Страница 430: ...LDAP servers or by setting a PIN for the Address Book so that unauthorized users cannot add or edit Address Book entries You can also avoid sending documents to unintended recipients if the machine i...

Страница 431: ...to the Machine P 128 3 Select Address Book PIN 4 Specify the PIN Enter the number and select Apply The Confirm screen is displayed Enter the PIN once again to confirm You cannot set a PIN that consis...

Страница 432: ...Registering Destinations from Remote UI P 448 Specifying E Mail Settings P 327 Managing the Machine 423...

Страница 433: ...ibits users from entering destinations using the numeric keys adding new entries to the Address Book and editing the existing Address Book entries Menu Function Settings Send Common Settings Restrict...

Страница 434: ...fax e mail or I Fax sending starts If Only for Sequential Broadcast is selected the confirmation screen is displayed only when multiple destinations are specified Menu Function Settings Send Common Se...

Страница 435: ...ling when entering a destination fax number using the numeric keys Menu Function Settings Send Fax Settings Confirm Entered Fax Number On Restricting Fax Sending from a Computer You can prohibit users...

Страница 436: ...xes from Your Computer PC Fax P 254 Enabling the Department ID Management for Jobs from a Computer P 377 Restricting Use of the Address Book P 422 Limiting Available Destinations P 424 Managing the Ma...

Страница 437: ...nformation leakage risks by limiting the documents printable from a computer to the Secure Print documents Printing a Document Secured by a PIN Secure Print P 275 Menu Function Settings Secure Print R...

Страница 438: ...the back side of the machine If this port is disabled the machine cannot communicate with a computer via USB This setting does not affect the front USB port which is for attaching USB memory devices M...

Страница 439: ...Basic Operations for Scanning Originals P 294 Printing from a USB Memory Device Memory Media Print P 279 Managing the Machine 430...

Страница 440: ...licious third party intrusions via the unused HTTP port Disabling HTTP disables some of the network capabilities such as the Remote UI WSD printing and printing with Google Cloud Print Menu Preference...

Страница 441: ...a computer via USB or if you do not need to use the Remote UI you might want to disable the Remote UI to reduce the risk of having your machine controlled remotely over the network by malicious third...

Страница 442: ...y and certificate mechanism in order to prove to the recipient that the document has been created on the machine The recipient can verify the device that created the document and whether the document...

Страница 443: ...t the basic operations to be performed when setting the machine from the Remote UI see Setting Up Menu Options from Remote UI P 445 1 Start the Remote UI and log in to System Manager Mode Starting Rem...

Страница 444: ...ut leaving your desk making system management easier For more information about the system requirements for the Remote UI see System Environment P 759 Functions of the Remote UI Checking the Status an...

Страница 445: ...the default value of the System Manager PIN must be changed Setting the System Manager ID and PIN P 372 1 Start the Web browser 2 Enter http the IP address of the machine in the address field and pre...

Страница 446: ...int documents based on information such as your computer name or computer login name Remote UI Access PIN Enter the Remote UI Access PIN in the following cases Setting a Remote UI PIN P 380 Logging in...

Страница 447: ...nformation Displays paper information and the amount remaining in the toner cartridges Support Link Displays the support link specified in Support Link under License Other Refresh Icon Refreshes the c...

Страница 448: ...isplays Settings Registration page When you have logged on in System Manager Mode you can change the settings items and save load the registered data Setting Up Menu Options from Remote UI P 445 Addre...

Страница 449: ...ame Checking Current Status of Print Documents The list of the documents currently printing or waiting to be printed is displayed Log in to the Remote UI Starting Remote UI P 436 Status Monitor Cancel...

Страница 450: ...t All to print all received documents Click Print to print a document waiting to be printed Click Job Number to display detailed information and preview of a document waiting to be printed Checking Hi...

Страница 451: ...layed by clicking the message displayed under Error Information on the Portal page main page Remote UI Screen P 437 Log in to the Remote UI Starting Remote UI P 436 Status Monitor Cancel Error Informa...

Страница 452: ...king System Manager Information Information about the machine and the system manager is displayed The device name and other system manager information displayed here correspond to the settings in User...

Страница 453: ...total number of pages that have been printed by the copy print and fax functions is displayed Log in to the Remote UI Starting Remote UI P 436 Status Monitor Cancel Check Counter LINKS Remote UI Scree...

Страница 454: ...f the machine using the Remote UI Some settings can only be changed when you have logged on in System Manager Mode Some settings may require operations that differ from the procedure described here 1...

Страница 455: ...5 Click Edit 6 Specify the required settings 7 Click OK Managing the Machine 446...

Страница 456: ...machine as necessary Turn OFF the machine wait for at least 10 seconds and turn it back ON For information about whether you need to restart the machine view the message on the edit screen Managing th...

Страница 457: ...IN Enter the PIN and click OK 3 Click Coded Dial You can also register destinations in Favorites In this case click Favorites instead of Coded Dial Favorites P 186 4 Click the text link under Number T...

Страница 458: ...Speed If it takes time for transmissions to start such as when there is a poor telephone connection you can adjust the transmission start speed downward Long Distance Specify International 1 to Intern...

Страница 459: ...shared folder as a destination FTP Select this when registering an FTP server as a destination Host Name For a shared folder Enter the computer name or IP address You can include a path to the shared...

Страница 460: ...erformed However if the specified path includes two or more non existent folder levels or if the user does not have a write privilege for the parent folder no folder is created and the process ends in...

Страница 461: ...rtal page Remote UI Screen P 437 3 Click Security Settings Confirm Security Policy Security Policy Items The following items are displayed by the Remote UI The items for functions unavailable on this...

Страница 462: ...x Communication Settings P 86 Registering the Machine with Google Cloud Print P 363 Registering LDAP Servers P 63 Prohibit Cleartext Authentication for Server Functions Dedicated Port Auth Method is s...

Страница 463: ...r s Software Port Port Number 5900 This function is not available on this machine giving no change to the security level Restrict SIP IP Fax Port Port Number 5004 5005 5060 5061 49152 This function is...

Страница 464: ...ore Identical Consecutive Characters This function is not available on this machine giving no change to the security level Force Use of at Least 1 Uppercase Character This function is not available on...

Страница 465: ...resses Restrict New Destinations is set to On It is only possible to send to destinations that are registered in the Address Book Restrict New Destinations P 557 Force Confirmation of Fax Number Confi...

Страница 466: ...matches that of the importing machine or if no password has been set for the importing machine If no password has been set for the importing machine the password configured for the exporting machine i...

Страница 467: ...the settings that cannot be imported exported see Setting Menu List P 467 You can also import export settings data via a USB memory device by using the operation panel of the machine Import Export P...

Страница 468: ...data Application Library Settings Information Select the check box to export the Application Library settings data Encryption Password Enter a password to encrypt the export data using alphanumeric c...

Страница 469: ...items Decryption Password Enter the password set when the settings were exported Address Book Select the check box to import Address Book data Importing Address Book data will overwrite the Address B...

Страница 470: ...7 Click OK If the Settings Registration check box is selected in step 4 the machine automatically restarts Managing the Machine 461...

Страница 471: ...Internet P 462 Updating from a Computer P 463 USB connection Updating from a Computer P 463 If you are in an IPv6 environment you cannot perform firmware update Use USB to re establish connection and...

Страница 472: ...port Tool Operation Guide included with the firmware To Put the Machine into a Firmware Update Waiting State Menu Management Settings License Other Update Firmware Via PC Yes Checking the Firmware Ver...

Страница 473: ...y for Network in Preferences Menu Preferences Network Initialize Network Settings Yes Restart the machine Initializing Key and Certificate You can restore the settings of the key and certificate and t...

Страница 474: ...ing leaked when replacing or disposing of the machine When the initialization process finishes the machine automatically restarts Before initializing make sure that there are no documents being proces...

Страница 475: ...493 Adjustment Maintenance 494 Adjust Image Quality 495 Adjust Action 498 Maintenance 499 Function Settings 500 Common 501 Copy 510 Printer 514 Send 557 Receive Forward 570 Store Access Files 577 Secu...

Страница 476: ...work settings Adjustment Maintenance P 494 This section describes how to adjust print image quality and the cleaning functions of the machine Function Settings P 500 This section describes the setting...

Страница 477: ...ngs Timer Energy Settings P 473 This section describes the timer settings and energy settings Network P 478 This section describes the network settings External Interface P 492 This section describes...

Страница 478: ...witch P 471 Default Screen After Startup Restoration By default the Home screen is displayed immediately after the machine is turned ON or when the Auto Reset function is performed Specify the setting...

Страница 479: ...ais Hrvatski Italiano Latvie u Lietuvi Magyar Nederlands Norsk Polski Portugu s Rom n Sloven ina Sloven ina Suomi Svenska T rk e Menu Preferences Display Settings Language Select a language Yes Remote...

Страница 480: ...to Clean Original Scanning Area Specify whether to display a message when stains are detected in the document feed scanning area Off On Menu Preferences Display Settings Notify to Clean Orig Scan Are...

Страница 481: ...U 08R Specify the layout of an USB keyboard if connected to the machine Default settings are marked with a dagger USA Layout UK Layout Menu Preferences English Keyboard Layout Select USA Layout or UK...

Страница 482: ...o Reset Time P 475 Function After Auto Reset P 475 Auto Shutdown Time P 476 Auto Sleep Time P 476 Auto Sleep Daily Timer P 477 Sleep Mode Exit Time Settings P 477 Current Date Time Settings 1 Set the...

Страница 483: ...ications Daylight Saving Time Settings 2 Enable or disable daylight saving time If daylight saving time is enabled specify the dates from which and to which daylight saving time is in effect Off On St...

Страница 484: ...r does not prevent the user from continuing to use a function Set This Function Off On Set Time 1 to 2 to 9 min Menu Preferences Timer Energy Settings Auto Reset Time Select On in Set This Function En...

Страница 485: ...occur particularly if the machine shuts down while data is being imported When you import data using the Remote UI set Auto Shutdown Time to Off in advance If any setting of the Timer Settings is cha...

Страница 486: ...set to the sleep mode Entering Sleep Mode P 183 Set This Function Off On 0 00 to 12 59 AM PM Sleep Mode Exit Time Settings Specify the time when the machine is recovered from the sleep mode Entering S...

Страница 487: ...eless LAN When switching the machine from Wireless LAN to Wired LAN you need to specify the setting Conversely when switching the machine from Wired LAN to Wireless LAN you do not need to specify this...

Страница 488: ...a WPS wireless router Setting Up Connection Using WPS PIN Code Mode P 21 Power Save Mode Select whether or not the machine enters Power Save Mode based on signals emitted from the wireless router Off...

Страница 489: ...re the SSID network key arbitrarily If you want to connect multiple mobile devices to the machine at the same time you need to configure both SSID and network key arbitrarily Use Custom SSID Off On SS...

Страница 490: ...t Mask 0 0 0 0 Gateway Address 0 0 0 0 Check Settings DHCP Option Settings If DHCP is enabled use these settings to select whether to use the DHCP optional functions to acquire the DNS server address...

Страница 491: ...Enable or disable stateless addresses Stateless Address Settings Off On Check Settings Select Address to Check Stateless Address Prefix Length DHCPv6 Settings Enable or disable the stateful address th...

Страница 492: ...istered in the DNS server as well as the name of the domain to which the machine belongs IPv4 Host Name Domain Name IPv6 Use IPv4 Host Domain Off Host Name Domain Name On DNS Dynamic Update Settings S...

Страница 493: ...le or disable LPD a printing protocol that can be used on any hardware platform or operating system You can also set the reception timeout period after which printing is canceled if print data recepti...

Страница 494: ...onnecting to an FTP server through a firewall you must select PASV mode Configuring FTP PASV Mode P 72 Off On Use HTTP Enable or disable HTTP which is required for communications with a computer such...

Страница 495: ...to 65535 SNMP 1 to 161 to 65535 MTU Size Select the maximum size of packets the machine sends or receives Changing the Maximum Transmission Unit P 53 1300 1400 1500 SNMP Settings Specify the settings...

Страница 496: ...patible software Off On Menu Preferences Network SNMP Settings Select Off or On in Acquire Printer Mngt Info from Host Apply Restart the machine Format Host Rsrcs MIB to RFC2790 Specify whether to con...

Страница 497: ...from the device management software or driver in some cases Waiting Time for Connection at Startup Specify a wait time for connecting to a network Select the setting depending on the network environme...

Страница 498: ...ecurity unauthorized third parties can access computers and other communication devices that are connected to a network To reduce the risk of this unauthorized access configure the settings for packet...

Страница 499: ...MAC Address Filter Enable or disable settings for filtering packets sent to or received from devices with specified MAC addresses Specifying MAC Addresses for Firewall Settings P 391 Outbound Filter O...

Страница 500: ...ings for Communication between the Machine and Plug ins P 75 Off On RMT SW Leave this switch set to Off When a service representative remotely performs device maintenance you may be asked to set the s...

Страница 501: ...ort or a USB memory device Use as USB Device Enable or disable the USB port that is used for connecting the machine to a computer Restricting the USB Connection with a Computer P 429 Off On Use USB St...

Страница 502: ...ard to view even after the brightness was adjusted in Brightness Off On Menu Preferences Accessibility Invert Screen Colors Select Off or On Brightness Adjust the brightness of the display to suit the...

Страница 503: ...to adjust image quality for printing Adjust Action P 498 Provides a description of the settings about the finishing of copying and printing Maintenance P 499 Provides a description of the cleaning fun...

Страница 504: ...st the gradation density and color in copies or printouts Adjusting Gradation P 632 Full Adjust Standard Plain Standard Heavy For Printer 1200 dpi Quick Adjust Correct Shading If the image areas of th...

Страница 505: ...g Values for Text Color Reproducibility in Color Documents P 641 Feeder Seven Levels Platen Glass Seven Levels Special Processing If the print results on special types of paper are not satisfactory th...

Страница 506: ...Apply Yes Adj Toner Vol for Color Print You can prevent excessive toner from being fixed onto paper to reduce print failure such as poor toner fixing or bleed through Troubleshooting P 654 Off Level 1...

Страница 507: ...etting may not be displayed depending on the model you are using options or other setting items Time Until Stapling Starts You can set the time until stapling is performed after inserting paper when u...

Страница 508: ...r P 610 Clean Feeder Clean the feeder rollers if originals become dirty after being fed through the feeder Cleaning the Feeder P 605 Initialize After Replacing Parts After replacing the ADF pickup rol...

Страница 509: ...cify printer settings Send P 557 This section describes how to specify settings for sending faxes or scanned originals Receive Forward P 570 This section describes how to specify settings for receivin...

Страница 510: ...509 Paper Feed Settings Configure paper feed settings Paper Source Auto Selection Enable or disable the automatic drawer selection feature for the paper sources If automatic drawer selection is set t...

Страница 511: ...On Drawer 4 1 Off On Receive Fax 1 Multi Purpose Tray Off On Drawer 1 Off On Drawer 2 Off On Drawer 3 1 Off On Drawer 4 1 Off On Other Multi Purpose Tray Off On Drawer 1 Off On Drawer 2 Off On Drawer...

Страница 512: ...n see Loading Preprinted Paper P 151 Multi Purpose Tray Speed Priority Print Side Priority Drawer 1 Speed Priority Print Side Priority Drawer 2 Speed Priority Print Side Priority Drawer 3 1 Speed Prio...

Страница 513: ...o the paper source instead In this case you need to load the paper in the same way as when Speed Priority is selected Loading Preprinted Paper P 151 1 sided printing speed may be slower when Print Sid...

Страница 514: ...ity 3 Tray A Tray B Tray C Do Not Set Check Settings Menu Function Settings Common Paper Output Settings Output Tray Settings Select the function Select the output tray Apply If a certain tray reaches...

Страница 515: ...ff On Menu Function Settings Common Paper Output Settings Use Optional Output Tray Select the output tray Select Off or On Apply Set this function properly depending on the optional equipment attached...

Страница 516: ...Manually When you set LTRR or STMT originals on the platen glass the screen for specifying the size of the original appears while reading Use LTRR Format When you set LTRR or STMT originals on the pla...

Страница 517: ...le Image Settings Specify settings for the gamma value for converting scanned originals into files YCbCr TX Gamma Value Select the gamma value used when converting scanned color originals into the spe...

Страница 518: ...Encrypt PDF When generating an encrypted PDF the PDF encryption level can be set to 128 bit or 256 bit If 256 bit is selected the version compatible with Acrobat can be changed Acrobat 9 0 or Equivale...

Страница 519: ...P 512 Change Default Settings Copy You can change the factory default settings about copy The selected settings are used as the default settings of the copy function Changing the Default Settings for...

Страница 520: ...f 1 Sided 2 Sided 2 Sided 2 Sided 2 Sided 1 Sided Orig Fin Type N on 1 Off 2 on 1 4 on 1 Layout Original Type Text Photo Map Printed Image Text Different Size Originals Off On Finishing Off Collate Pa...

Страница 521: ...n Settings Copy Auto Collate Select Off or On If the setting for Copy Other Settings Finishing is other than Off from the Home screen the setting for this item becomes disabled As the offset function...

Страница 522: ...lect Off or On If you are enlarging A4 or A5 originals onto A3 copy paper Auto Orientation is not performed even if it is set to On Only the images of standard size originals up to A4 size can be rota...

Страница 523: ...nd printing from UNIX or other operating system that does not support printer drivers Printer Settings P 514 PDL Selection Plug and Play P 555 Printer Settings Configure settings about printing and pr...

Страница 524: ...On Default Paper Use this item to specify the paper size and type Available Paper P 738 Menu Function Settings Printer Printer Settings Default Paper Select the paper size Select the paper type Paper...

Страница 525: ...nt Quality Density Adjust the density of each color Apply You can use Fine Adjust to adjust the toner density of each color to three density levels high density medium density and low density When Ton...

Страница 526: ...gs Print Quality Resolution Select 1200 dpi or 600 dpi Special Smoothing Mode Specify the mode to print data with a smooth finish If the quality of the printout is not acceptable in Mode 1 default try...

Страница 527: ...ext or lines exceeds the limit value of the machine make a correction so that the toner volume does not exceed the limit value Standard Gradation Priority Text Priority Menu Function Settings Printer...

Страница 528: ...ngs Printer Printer Settings Print Quality Width Adjustment On Select the target If you set to On the printing speed may be slower or image quality may be affected Even if you set to On bold printing...

Страница 529: ...s set to Level 1 or Level 2 Off On Menu Function Settings Printer Printer Settings Print Quality Advanced Smoothing Apply to Text Select Off or On The settings of Apply to Graphics and Apply to Text a...

Страница 530: ...Function Settings Printer Printer Settings Print Quality Gradation Smoothing Apply to Images Select Off or On Gradation Smoothing in the printer driver applies only to graphics data The setting confi...

Страница 531: ...use this item to specify whether to bind on the long or short edge Specify the setting of this item in combination with Gutter which specifies the binding margin to apply to the binding position Long...

Страница 532: ...dge of paper Top edge of paper A value with a sign Right edge of paper Bottom edge of paper Offset Short Edge Offset Long Edge Irrespective of the paper source you can shift the print position in unit...

Страница 533: ...ge Back Offset Long Edge Front Offset Long Edge Back Auto Skip Error Printing stops if a certain error occurs in the process However if you set this item to On the certain error will be skipped and pr...

Страница 534: ...is to be performed when the image quality has degraded due to insufficient memory during printing Output Display Error Menu Function Settings Printer Printer Settings Compressed Image Output Select O...

Страница 535: ...On Menu Function Settings Printer Printer Settings UFR II Halftones Error Diffusion Select Off or On This setting is only available when Resolution is set to 600 dpi Resolution Gradation 1 Select a me...

Страница 536: ...ethod used to correct the color General Perceptual Colorimetric Vivid Photo Menu Function Settings Printer Printer Settings UFR II Matching Method Select an item General Performs processing so that th...

Страница 537: ...or On Paper Save Specify whether to disable a blank page in print data from being output Off On Menu Function Settings Printer Printer Settings UFR II Paper Save Select Off or On PCL Specify the PCL...

Страница 538: ...ments You can specify this setting only when a proportionally spaced scalable font is selected in Font Number 4 00 to 12 00 to 999 75 point Menu Function Settings Printer Printer Settings PCL Point Si...

Страница 539: ...EW8 ISO4 ISO6 ISO11 ISO15 ISO17 ISO21 ISO60 ISO69 ISOCYR ISOGRK ISOHEB ISOL1 ISOL2 ISOL5 ISOL6 ISOL9 LEGAL MATH8 MCTEXT MSPUBL PC775 PC8 PC850 PC851 PC852 PC858 PC862 PC864 PC866 PC8DN PC8GRK PC8TK PC...

Страница 540: ...ings Printer Printer Settings PCL X dimension Specify the dimension Apply Y dimension Specify the vertical dimension long edge of the custom paper 99 to 320 mm Menu Function Settings Printer Printer S...

Страница 541: ...h Select Off or On Halftones You can select the printing method used to reproduce halftones the intermediate range between the lighter and darker areas of an image for optimal image quality Error Diff...

Страница 542: ...image type Select Resolution or Gradation Type of image Select the object for which to change the setting Text represents letters and characters Graphics represents lines and figures and Image represe...

Страница 543: ...an General Gray Compensation Configures a setting so that black or gray data of which color information is R G B is printed using only the K black toner If Off is selected data is printed using the to...

Страница 544: ...ing Kit it changes to Enable FreeScape Specify the AEC Alternate Escape Code to be used for bar code commands when the host computer does not support the standard Escape Code Off Menu Function Setting...

Страница 545: ...ck text of which color information is R G B 0 C M Y 100 or C M Y 0 K 100 is printed using only the K black toner When Off is selected text is printed based on the Output Profile setting Off On Menu Fu...

Страница 546: ...mma 2 4 None Menu Function Settings Printer Printer Settings PS RGB Source Profile Select a profile sRGB Sets the image quality to the industry standard for general Windows computer monitors If the mo...

Страница 547: ...tones closest to those of the U S printing standard Euro Standard v1 00 Canon Set a Euro Standard profile Data is printed in the color tones closest to those of the European printing standard None Pri...

Страница 548: ...e a setting for Text is targeted for Text a line or figure for Graphics and an image such as a photo for Image Profile Normal Prints data by adjusting it to the color tones closest to those displayed...

Страница 549: ...color tone that is suitable for printing artworks graphs and other images used for presentation materials Colorimetric Set this option when you want to reproduce the RGB color value in the color repro...

Страница 550: ...ation Menu Function Settings Printer Printer Settings PS Halftones Resolution Gradation Select an image type Select Resolution or Gradation Type of image Select the object for which to change the sett...

Страница 551: ...rinting color data in black and white Off On Menu Function Settings Printer Printer Settings PS Composite Overprint Select Off or On Overprinting using special colors is not permitted Grayscale Conver...

Страница 552: ...ange between the lighter and darker areas of an image for optimal image quality Gradation Error Diffusion Menu Function Settings Printer Printer Settings Imaging Settings Halftones Select Gradation or...

Страница 553: ...d depending on the original N on 1 Specify whether to shrink multiple pages and print them on one page in such arrangement that the first page is positioned at top left For example to print 4 pages on...

Страница 554: ...background or figure This option is not displayed when Pure Black Text is set to Off Off On Menu Function Settings Printer Printer Settings PDF Black Overprint Select Off or On Off Outlines black text...

Страница 555: ...r the gamma value is the darker the printed text or image becomes None Carries out color separation from RGB data to CMYK data without applying an RGB source profile CMYK Simulation Profile Select a s...

Страница 556: ...to convert gray data to CMYK data using the grayscale profile of the machine Off On Menu Function Settings Printer Printer Settings PDF Use Grayscale Profile Select Off or On Even if On is selected d...

Страница 557: ...and using only the K black toner to reproduce black and gray elements TR Photo Prints data by adjusting it to photo like color tones and using only the K black toner to reproduce black and gray elemen...

Страница 558: ...mediate range between the lighter and darker areas of an image for optimal image quality Error Diffusion This mode is suitable for printing data with text and thin lines and the curved lines of CAD da...

Страница 559: ...print with smooth gradation or smooth edges It is suitable for printing figures or graphs containing gradation areas Brightness 1 Adjust the brightness of the entire image in increments of 5 The lowe...

Страница 560: ...radation is achieved NTSC Prints in black and white so that the resulting image looks like a black and white television picture of the NTSC system Uniform RGB Prints in black and white so that R G and...

Страница 561: ...used to reproduce halftones the intermediate range between the lighter and darker areas of an image for optimal image quality Error Diffusion This mode is suitable for printing data with text and thin...

Страница 562: ...print with clear edges of text It is suitable for printing characters and fine lines Gradation Produces a print with smooth gradation or smooth edges It is suitable for printing figures or graphs con...

Страница 563: ...sion Select the type of image Select the type of grayscale conversion Type of image Select the object for which to change the setting Text represents letters and characters Graphics represents lines a...

Страница 564: ...that language when it is connected to a computer by using Plug and Play Network 2 Select a page description language so that the machine is detected as a printer that is compatible with that language...

Страница 565: ...connects the machine as a UFR II printer that is compatible with XML Paper Specification XPS PCL6 Detects and connects the machine as a PCL6 printer PCL6 V4 Detects and connects the machine as a PCL6...

Страница 566: ...ct whether to limit the fax numbers and e mail I Fax addresses that can be specified as destinations to those already registered in the Address Book Restricting New Destinations that Can Be Specified...

Страница 567: ...he sender name Apply E Mail Settings Change the default settings used for scanning originals to send as e mails Change Default Settings E Mail Specify settings used for scanning originals to send as e...

Страница 568: ...DF Compact OCR PDF OCR Set PDF Details PDF PDF Compact PDF Compact OCR PDF OCR Encryption None Acrobat 7 0 or Later 128 bit AES Acrobat 9 0 or Equivalent 256 bit AES 1 Acrobat 10 0 or Equivalent 256 b...

Страница 569: ...ecify the basic settings for using the machine as a I Fax device Change Default Settings I Fax You can change the default settings used for sending I Fax The selected settings are used as the default...

Страница 570: ...m F4A 215 9x342 9 mm Density Nine Levels Original Type Text Text Photo Photo Different Size Originals Off On 2 Sided Original 1 Off Book Type Calendar Type Sharpness Seven Levels Subject Message Subje...

Страница 571: ...ngs when scanning Changing the Default Settings for Functions P 179 Scan Size Auto A4 A4R A3 A5 A5R B4 B5 B5R 8K 16K 16KR LTR LTRR LGL STMT STMTR EXEC 11x17 FOOLSCAP FOLIO 215 9x330 2 mm OFICIO 215 9x...

Страница 572: ...On JPEG TIFF Set TIFF Details Divide into Pages Off On Density Nine Levels Original Type Text Text Photo Photo Different Size Originals Off On 2 Sided Original 1 Off Book Type Calendar Type Sharpness...

Страница 573: ...ine makes an alert sound when the handset of a telephone connected to the machine is not properly set on the cradle You can also adjust the volume of the alert sound 0 to 3 Menu Function Settings Send...

Страница 574: ...the number is still not recognized correctly change the duration of the pause For instructions on how to enter a pause see step 4 on Basic Operations for Sending Faxes P 227 1 to 4 to 15 sec Menu Fun...

Страница 575: ...Unit Name Register the name of a company or person Registering the Fax Number and Unit Name P 80 The registered name is sent as sender information to the destination TX Terminal ID P 568 Select Line T...

Страница 576: ...cess the outside line PSTN PBX Prefix Code Hooking 1 Menu Function Settings Send Fax Settings R Key Setting PBX Select Prefix or Hooking Enter the outside line access number if you select Prefix Apply...

Страница 577: ...a computer Restricting Fax Sending from a Computer P 426 Off On Restrict Sequential Broadcast Select whether to prohibit sequential broadcasting a feature that sends faxes to multiple destinations in...

Страница 578: ...achine Registering the Fax Number and Unit Name P 80 Select Tel to indicate that the notified number is a telephone number Auto Adjust VoIP Comm Speed When you want to perform a successful fax communi...

Страница 579: ...with 3 cannot be imported or exported Common Settings P 570 I Fax Settings P 571 Fax Settings P 571 Common Settings Configure settings for receiving faxes in memory Set Fax I Fax Inbox Fax Memory Loc...

Страница 580: ...d I Fax Settings Print on Both Sides On RX Print Size Specify the paper size to be used for printing A4 A3 B4 B5 305x457mm 8K 16K LTR LGL EXEC 11x17 Menu Function Settings Receive Forward I Fax Settin...

Страница 581: ...Settings Select Drawer Specify the setting item Apply ECM RX Enable or disable error correction mode ECM ECM checks for fax data errors and corrects them To reduce errors on sent faxes see ECM TX P 56...

Страница 582: ...e machine does not enter sleep mode Remote RX 1 Specify settings for receiving a fax by operating a telephone that is connected to the machine Remote Reception When a fax is sent to the machine you ca...

Страница 583: ...4800 bps 2400 bps Menu Function Settings Receive Forward Fax Settings RX Start Speed Select a communication start speed Use Reduce RX Size Specify settings for reducing the image size of a received d...

Страница 584: ...3 Select whether to forward all the received fax documents to a specified destination In addition to a fax number you can also specify an e mail address or a shared folder in a computer etc as the fo...

Страница 585: ...Only When Error Occurs Setting Menu List 576...

Страница 586: ...efault settings for file saving and memory media print Scan and Store Settings Configure settings for saving the scanned document to a USB memory device or file USB Memory Settings You can change and...

Страница 587: ...mm OFICIO Ecuador 220 0x320 0 mm OFICIO Argentina 220 0x340 0 mm F4A 215 9x342 9 mm File Format PDF PDF Compact PDF Compact OCR PDF OCR Set PDF Details PDF PDF Compact PDF Compact OCR PDF OCR Encrypt...

Страница 588: ...Print You can change the default settings associated with memory media print The settings configured here are used as the default settings of the memory media print function Changing the Default Sett...

Страница 589: ...d Pages Enlarge Reduce to Fit Paper Size Off On Enlarge Print Area Off On Print Comments Off Auto Other Settings Halftones Error Diffusion Off On Resolution Gradation Text Resolution Gradation Graphic...

Страница 590: ...ormal Photo TR Normal TR Photo Graphics Normal Photo TR Normal TR Photo Image Normal Photo TR Normal TR Photo Matching Method Perceptual Saturation Colorimetric Composite Overprint Off On Grayscale Co...

Страница 591: ...tandard Gradation Priority Text Priority Line Control Resolution Priority Gradation Priority Width Adjustment Off On Advanced Smoothing Advanced Smoothing Off Level 1 Level 2 Apply to Graphics Off On...

Страница 592: ...ry device in ascending or descending order of file name or date Name Ascending Name Descending Date Time Ascending Date Time Descending Menu Function Settings Store Access Files Common Settings Access...

Страница 593: ...include the characters in file extensions such as jpg Memory Media Settings Specify whether to enable or disable the functions of a USB memory device Use Scan Function Select whether to permit storing...

Страница 594: ...ther to enable or disable Secure Print Printing via Secure Print P 276 Default settings are marked with a dagger Use Secure Print Off On Restrict Printer Jobs Off On Secure Print Deletion Time 10 to 3...

Страница 595: ...related to the address book are listed with descriptions Address Book PIN Specify a PIN and require entering it to add new entries to or edit existing entries in the Address Book Restricting Use of th...

Страница 596: ...592 You can configure the settings related to the remote UI and the software available for the machine Data Management P 594 You can configure settings to utilize the machine settings or data or form...

Страница 597: ...gister the name of an Administrator Setting the System Manager ID and PIN P 372 System Manager ID and PIN Enter a number of up to seven digits for the System Manager ID and PIN System Manager ID Syste...

Страница 598: ...ttings P 589 Select Country Region P 589 Display Job Log P 590 Use NFC P 590 Scan w Canon PRINT Business P 590 Device Information Settings Enter alphanumeric characters for the name and the installati...

Страница 599: ...he display of the machine and in the Communication Management Report Off On Menu Management Settings Device Management Display Job Log Select Off or On Restart the machine Use NFC 3 Select whether to...

Страница 600: ...Menu Management Settings Device Management Scan w Canon PRINT Business Select Off or On Restart the machine Setting Menu List 591...

Страница 601: ...t Settings License Other Register License OK Enter Register License Code Apply Close Restart the machine Remote UI Settings Configure settings for using the Remote UI Using the Remote UI allows you to...

Страница 602: ...gits All users use a common PIN Setting a Remote UI PIN P 380 Off On Remote UI Access PIN Update Firmware Select how to install the firmware update according to the environment of the machine Updating...

Страница 603: ...and various settings of the machine Import Export Import Menu Management Settings Data Management Import Export Import Yes Enter the password Apply Export Menu Management Settings Data Management Imp...

Страница 604: ...restore the Address Book settings Initializing Address Book P 465 Initialize Menu Select to restore the settings listed below to the factory defaults You can restore all the settings listed below at o...

Страница 605: ...hine lockout When On is selected specify how many consecutive times failures are permitted before lockout is activated and also the time required before a user can log in again after lockout Enable Lo...

Страница 606: ...enu Management Settings Security Settings Encryption Settings Select On in Prohibit Use of Weak Encrypt Select Off or On in Prohibit Weak Encryp Key Cert Apply Restart the machine Setting Menu List 59...

Страница 607: ...les Optional 622 Replenishing the Staples for the Inner Finisher 623 Replacing the Drum Unit 625 Checking the Remaining Amount of Consumables 629 Adjusting Print Quality 631 Adjusting Gradation 632 Co...

Страница 608: ...g how to clean the machine and initialize settings Basic Cleaning Regular Cleaning P 601 Replacing Consumables Replacing the Toner Cartridge P 614 Replacing the Waste Toner Container P 618 Replenishin...

Страница 609: ...t Parts P 650 Checking the Remaining Amount of Consumables P 629 Others Maintenance and Adjustment Adjusting Print Quality P 631 Printing Reports and Lists P 646 Viewing the Counter Value P 645 Mainte...

Страница 610: ...you to use the machine comfortably and safely Clean the locations indicated by to in the following figures Exterior Cleaning the Exterior P 602 Platen glass Cleaning the Platen Glass P 603 Feeder Clea...

Страница 611: ...turn the power OFF even if the machine is executing an operation but this may cause the operation to be interrupted or data to become damaged 2 Wipe the surface of the machine Wet a soft cloth with w...

Страница 612: ...this may cause the operation to be interrupted or data to become damaged 2 Open the feeder or the platen cover 3 Wipe the reverse side of the feeder or the platen cover and the platen glass Wipe the p...

Страница 613: ...If you cannot remove the dirt Wet a soft cloth with mild detergent and wring it out well then wipe the machine with it Afterwards wipe the machine with a soft and dry cloth 4 Gently close the feeder...

Страница 614: ...g from the power outlet Turning OFF the Machine P 112 Check the operation status of the machine before turning the power OFF You can turn the power OFF even if the machine is executing an operation bu...

Страница 615: ...r of the feeder Wipe the transparent plastic Wet a soft cloth with water and wring it out well then wipe the plastic with it Afterwards wipe the plastic with a soft and dry cloth Wait until the moistu...

Страница 616: ...lt in personal injury 5 Clean the document feed scanning area thin glass strip and the white area rollers and plate Open the feeder Clean the white plate Wet a soft cloth with water and wring it out w...

Страница 617: ...s this may result in personal injury 7 Insert the power plug into the power outlet and turn the power ON Turning ON the Machine P 111 If streaks still appear on the originals or paper after the feeder...

Страница 618: ...elect Adjustment Maintenance Maintenance 3 Select Clean Feeder 4 Select Start Cleaning starts When a message appears notifying that cleaning is complete press to return to the Home screen Maintenance...

Страница 619: ...s missing execute Clean Device 1 Select Menu in the Home screen Home Screen P 117 2 Select Adjustment Maintenance Maintenance 3 Select Clean Device 4 Select Start Cleaning starts When a message appear...

Страница 620: ...perform Special Cleaning 1 Select Menu in the Home screen Home Screen P 117 2 Select Adjustment Maintenance Maintenance 3 Select Special Cleaning 4 Select Start Cleaning starts When a message appears...

Страница 621: ...operation status of the machine before turning the power OFF You can turn the power OFF even if the machine is executing an operation but this may cause the operation to be interrupted or data to bec...

Страница 622: ...les to clean them 5 When cleaning is complete return the cleaning stick to its original position Return the cleaning stick to the front cover of the main unit with its tip on the left side 6 Close the...

Страница 623: ...remaining inside the machine the message Toner low Rplct not yet needed is displayed You do not necessarily need to replace the toner cartridge soon but prepare a new toner cartridge so that you can...

Страница 624: ...played on the screen in addition to the following procedure When replacing multiple toner cartridges at the same time replace them in the following order black yellow magenta and cyan 1 Select Next 2...

Страница 625: ...new toner cartridge from its box 5 With the white part of the new toner cartridge facing up shake the toner cartridge up and down approximately 10 times Shaking the toner cartridge evens out the tone...

Страница 626: ...ocedure is complete when this message disappears If printing was interrupted because toner ran out it will automatically resume when you replace the toner cartridge Even if cyan magenta or yellow tone...

Страница 627: ...container see Replacement Parts P 650 You can check the current amount of space remaining in the waste toner container Checking the Space Remaining in the Waste Toner Container P 629 When a Message Is...

Страница 628: ...ll out the paper drawer 1 and open the waste toner container cover Pull the tab to open the waster toner container cover 2 Pull out the waste toner container After pulling out the waste toner containe...

Страница 629: ...er container Insert the waste toner container with the Canon logo on top of the container towards the back of the machine and push it in to load it Push the waste toner container in as far as it will...

Страница 630: ...The used waste toner container will be collected by your local authorized Canon dealer Maintenance 621...

Страница 631: ...ishing the Staples for the Inner Finisher P 623 Copies and prints may be output to optional equipment while you are replenishing the staple Take care when handling the optional equipment installed to...

Страница 632: ...Finisher Pull the green handle to disengage the lock and lift the case slightly upwards while pulling it straight out 3 Remove the empty staple case from the staple cartridge Hold the staple case aro...

Страница 633: ...d into the staple cartridge and lower the staple case to place it in the staple cartridge 6 Hold the green knob on the staple cartridge and push in the cartridge as far as it will go 7 Close the front...

Страница 634: ...llowing procedure For the model number of the drum unit see Replacement Parts P 650 The drum unit replacement message displayed on the screen differs depending on your contract Procedure for Replacing...

Страница 635: ...2 Open the cover of the drum unit 3 Pull out the drum unit Do not tilt the drum unit Doing so may cause the toner in the drum to spill 4 Remove the new drum unit from its box Maintenance 626...

Страница 636: ...h in the slider on the right side of the orange colored protective cover toward the back of the main unit until it cannot go any further and then pull out the protective cover 7 Close the cover of the...

Страница 637: ...After the replacement is complete put the used drum unit in the bag that contained the new drum unit and store it until the local authorized Canon dealer comes to collect it Maintenance 628...

Страница 638: ...o prepare new toner cartridges Status Monitor Device Information Consumables Information checking the amount remaining Press Checking the Space Remaining in the Waste Toner Container It is recommended...

Страница 639: ...e Information Consumables Information check the remaining amount of staples Press LINKS Replacing the Toner Cartridge P 614 Replacing the Waste Toner Container P 618 Replenishing the Staples Optional...

Страница 640: ...ity is even Correcting Uneven Density P 636 Correct Print Color Mismatch If the colors in printouts become blurry perform Correct Print Color Mismatch This problem may be caused by a color mismatch Co...

Страница 641: ...tains information to optimize color reproducibility The machine maintains this information until the next time you perform full adjustment To make a full adjustment repeat the operation print out the...

Страница 642: ...d Plain or Standard Heavy has been selected in step 4 or 2 times if For Printer 1200 dpi has been selected 7 Open the feeder or the platen cover after the screen displayed during printing disappears 8...

Страница 643: ...tment image with the print side facing down while checking that the black stripe is placed on the back side of the machine 15 Gently close the feeder or the platen cover 16 Select Start Scanning The a...

Страница 644: ...ust This adjustment may be automatically performed after you replace a toner cartridge Quick adjustment is not available while scanning or printing is performed 1 Select Menu in the Home screen Home S...

Страница 645: ...tput with a commercial densitometer and enter the measured density values to correct the density of halftone areas 1 Select Menu in the Home screen Home Screen P 117 2 Select Adjustment Maintenance Ad...

Страница 646: ...tometer or when correction is not effective 1 Select Menu in the Home screen Home Screen P 117 2 Select Adjustment Maintenance Adjust Image Quality 3 Select Correct Shading Visual Correction 4 Select...

Страница 647: ...Home screen Home Screen P 117 2 Select Adjustment Maintenance Adjust Image Quality 3 Select Correct Shading Scanner Correction 4 Confirm the procedure and select Next 5 Check that the size and type of...

Страница 648: ...side face down with the black stripe toward the back side of the machine Has a paper jam occurred Clearing Paper Jams P 696 Is the amount remaining in toner cartridge required for correction sufficien...

Страница 649: ...tch can cause printouts to appear blurry If print color mismatch occurs perform the following procedure This adjustment is sometimes performed automatically such as when toner cartridges are replaced...

Страница 650: ...Map or Text Selecting the Type of Original for Copying P 209 1 Select Menu in the Home screen Home Screen P 117 2 Select Adjustment Maintenance Adjust Image Quality 3 Select Black Text Processing for...

Страница 651: ...5 Select Apply Maintenance 642...

Страница 652: ...aring when copying originals from 2 sided printing This function is enabled when in the Copy or Print menu Full Color is selected under Select Color or Auto Color B W is selected that is when the curr...

Страница 653: ...s used 1 Select Menu in the Home screen Home Screen P 117 2 Select Adjustment Maintenance Adjust Image Quality Special Processing Fill Area Image Adj Mode 3 Select the adjust mode Mode 1 Adjust when u...

Страница 654: ...nting B4 or smaller sizes 122 Total Full Color Single Color Large Displays the total number of pages for color printing 123 Total Full Color Single Color Small Displays the total number of pages for c...

Страница 655: ...in the machine and select Start Setting Reports on the Communication Results You can print reports on the results of sending receiving by e mail fax and I Fax or saving to shared folders and FTP serve...

Страница 656: ...port can be printed either every time a transmission is completed or only when a sending error occurs Menu Output Report Report Settings Fax TX Result Report Select On or Only When Error Occurs Select...

Страница 657: ...nting Lists of Settings You can print information and settings registered in the machine as a list Address Book List You can check the list of destinations registered in the Address Book as Coded Dial...

Страница 658: ...eport Print List IPSec Policy List Check that the size and type of paper displayed on the screen is loaded in the machine and select Start Printing Reports on the Usage Condition of the Machine You ca...

Страница 659: ...n handling and storing the replacement parts follow the precautions indicated in the Getting Started included with the machine You can check the current amount of replaceable parts remaining Checking...

Страница 660: ...roduct Name Model Number imageRUNNER C3125i Canon C EXV 49 Drum Unit Staple Cases for Replacement Always use the dedicated replacement staple cases for this machine Finisher name Genuine Canon staple...

Страница 661: ...Fixing Assembly Refer to the packing box for the Fixing Assembly FX 202 ADF Maintenance Kit Follow the instructions provided to your local authorized Canon dealer DR 202 Maintenance 652...

Страница 662: ...Message Saying to Contact Your Local Authorized Canon Dealer Is Displayed 670 Countermeasures for Each Message 671 Countermeasures for Each Error Code 686 Clearing Paper Jams 696 Paper Jams in the Fe...

Страница 663: ...ode is Displayed This section describes how to take action when a message or error code three digits appears on the display A Message or a Number Starting with an Error Code Is Displayed P 669 Clearin...

Страница 664: ...ble connected correctly Check whether these cables are connected correctly Use care not to mistake the phone cord s port for the other cables ports Connecting the Telephone Line P 82 Parts and Their F...

Страница 665: ...is connected firmly and the IP address is set correctly and then start the Remote UI again Connecting to a Wired LAN P 16 Viewing Network Settings P 37 Are you using a proxy server If so add the machi...

Страница 666: ...twork When the Machine Cannot Connect to the Wireless LAN P 657 The machine dials up to an unintended connection destination if a dialup router is connected to a network If a dialup router does not ne...

Страница 667: ...Wireless Router P 23 Setting Up Connection by Specifying Detailed Settings P 26 When you need to manually set up the connection If the wireless router is set as described below manually enter all the...

Страница 668: ...the print server and computer connected correctly Is the print server running Do you have user rights to connect to the print server If you are not sure contact the server administrator Is Network di...

Страница 669: ...the same wireless LAN router SSID If they are different reset the wireless LAN connection settings of this machine Viewing Network Settings P 37 Checking the SSID to Which Your Computer is Connected P...

Страница 670: ...l communication enabled Enable bidirectional communication and restart the computer Checking Bidirectional Communication P 800 Disable security software and other resident software Connect to another...

Страница 671: ...gle Cloud Print P 363 It takes a long time before printing starts Did you print to narrow width paper After you print to narrow width paper the machine may cool itself to maintain the print quality As...

Страница 672: ...t from the color tones of the print data P 665 The printed image is displaced or skewed Are the paper guides misaligned Match the paper guides with the paper loaded in the paper source Images are unev...

Страница 673: ...g Faxes P 227 Adjusting Gradation P 632 Images are not printed on the intended side of the paper Is the orientation of the loaded paper correct Check the orientation and side of the paper that is faci...

Страница 674: ...l on the print settings screen of the application 2 On the Basic Settings screen of the driver set Orientation to the same orientation you set in step 1 3 While checking the print preview set Page Lay...

Страница 675: ...Is the paper damp Replace the paper with paper that is not damp Are the gradation and density set appropriately Perform gradation adjustment Adjusting Gradation P 632 Troubleshooting 666...

Страница 676: ...strict New Destinations to On If so the history before you set was deleted Did you set Restrict Resending from Log to Off If so the destinations in the history cannot be specified A fax cannot be sent...

Страница 677: ...is set to Fax Tel Auto Switch Auto Answering Machine or Net Switch Selecting the Receive Mode P 81 Free space in memory may be running low Print or delete data in memory Checking Forwarding Deleting...

Страница 678: ...the machine s display or a number error code prefixed with appears see the following sections to check the solution A Message Saying to Contact Your Local Authorized Canon Dealer Is Displayed P 670 Co...

Страница 679: ...s turn off and then turn the power ON again Turning ON the Machine P 111 Note that data waiting to be processed is erased when you turn the power OFF 2 If the message is still displayed prepare the fo...

Страница 680: ...this cartridge press I Agree Source of Error The color of one of the inserted toner cartridges may be incorrect Make sure to check the status of the inserted container which is displayed in the area...

Страница 681: ...nd PIN contact your Administrator Setting the Department ID Management P 374 Black White printing is restricted Only Color printing is available Black and white printing is disabled in the Department...

Страница 682: ...nect to the network Settings Problems P 656 If the problem persists check the security settings of the wireless router Cannot print RX data Received documents cannot be printed due to some specific si...

Страница 683: ...ions to send fax documents without selecting Hook Cannot use these settings Sending to the specified destination is restricted The machine is set up so that the user currently logged in cannot send to...

Страница 684: ...Department ID and PIN Setting the Department ID Management P 374 Color printing is restricted Only Black White printing is available Color printing is disabled in the Department ID Management To print...

Страница 685: ...ngs Problems P 656 If the problem persists even after checking the wireless LAN connection check the security settings of the wireless router Could not connect using WPS Wait a moment then configure t...

Страница 686: ...4 or Letter size paper into the paper drawer Full Adjust P 632 An adjustment image that is required for correction is not placed on the platen glass correctly Place the adjustment image on the platen...

Страница 687: ...method to Open System Setting Up Connection by Selecting a Wireless Router P 23 Setting Up Connection by Specifying Detailed Settings P 26 The authentication method of the machine is set to Shared Key...

Страница 688: ...e press I Agree Source of Error A toner cartridge with the wrong model number may be inserted or the toner cartridge may have been damaged Make sure to check the status of the inserted container which...

Страница 689: ...inted onto several sheets Load staples into the stapler unit The staple cartridge in the stapler unit optional has run out of staples Replace the staple cartridge Replenishing the Staples Optional P 6...

Страница 690: ...he paper size setting specified in Paper Settings and the size of the paper that is actually loaded To use the loaded paper Change the setting of Paper Settings to match the loaded paper size Specifyi...

Страница 691: ...artridge for the machine Replacing the Toner Cartridge P 614 Scanning is restricted Scanning is disabled in the Department ID Management Log in with a Department ID for which scanning is not disabled...

Страница 692: ...te registered in the printer that is compatible with the authentication server certificate Configuring IEEE 802 1X Authentication Settings P 415 The computer is restricted Scanning that is operated on...

Страница 693: ...Photo Map and then copy the original Selecting the Type of Original for Copying P 209 The number of entered characters is incorrect or invalid characters are used The network key the WPA WPA2 PSK or...

Страница 694: ...the WEP authentication method to Open System Setting Up Connection by Selecting a Wireless Router P 23 Setting Up Connection by Specifying Detailed Settings P 26 Change the WEP authentication method t...

Страница 695: ...original Paper Jams in the Feeder P 699 003 A fax could not be sent or received due to its large data size When sending a fax Reduce the resolution and scan the original Basic Operations for Sending...

Страница 696: ...d to be forwarded remain in memory you can forward it again Registering Destinations P 186 Printing Resending Deleting Documents that Failed to be Forwarded P 250 037 A fax could not be sent because t...

Страница 697: ...ected USB memory device is using an unsupported format Check that the USB memory device is using a format supported by this machine Connecting a USB Memory Device P 100 701 Authentication failed becau...

Страница 698: ...ngs P 327 Configuring E Mail I Fax Communication Settings P 86 E mail sending or I Fax sending receiving was impossible because an incorrect domain name was set Check the domain name and correct the s...

Страница 699: ...t error occurred from the server Check whether SMTP is running on the network correctly Check whether the machine is properly installed and correctly connected to the network Settings Problems P 656 W...

Страница 700: ...e mail I Fax an incorrect destination was specified Enter the correct e mail address and send the message again If the destination that was registered in the Address Book was used check whether the e...

Страница 701: ...gs and then resend the data 820 The received data is not supported incorrect BASE64 or uuencode information Contact the other party and ask them to check the settings and then resend the data 821 The...

Страница 702: ...rred during communication with the SMTP server Check that the CA certificate that signed the TLS server certificate on the SMTP server side is registered to the machine by using the Remote UI Check th...

Страница 703: ...rom a computer this error code is displayed but this is not abnormal Print again as necessary A secured document that was left unprinted was deleted If the secured document is not printed within a spe...

Страница 704: ...document data for any defects 862 Settings are included which are not supported cannot be combined or otherwise exceed the limits of the machine Check the job settings 863 An error occurred when prin...

Страница 705: ...remain Do not forcibly remove jammed originals and paper from the machine Forcibly removing them may cause damage to the parts of the machine etc If you cannot remove the paper contact your local auth...

Страница 706: ...e heavy paper or coated paper by loading it in the multi purpose tray paper jams may occur due to the grain direction In this case changing the paper orientation portrait landscape may prevent paper j...

Страница 707: ...check all the locations The screen indicating that there is a paper jam is repeatedly displayed until you clear the paper jam If you press Close on the screen indicating that there is a paper jam you...

Страница 708: ...any originals from the original supply tray 2 Check whether an original is jammed in the feeder cover Pull the lever to open the feeder cover If an original is jammed gently pull it out in the direct...

Страница 709: ...ion of the arrow 4 Check whether an original is jammed inside the inner cover of the feeder Open the inner cover of the feeder If an original is jammed gently pull it out in the direction of the arrow...

Страница 710: ...ed by If an original is jammed gently pull it out in the direction of the arrow 7 Return the feeder to its original position Continue following the instructions on the screen to proceed with the inter...

Страница 711: ...pen the right cover of the main unit 2 Check whether paper is jammed in the output tray of the main unit If paper is jammed gently pull it out in the direction of the arrow When the machine is equippe...

Страница 712: ...g unit If paper is jammed gently pull it out in the direction of the arrow 4 Check whether paper is jammed in the fixing assembly Open the upper cover of the fixing assembly If paper is jammed gently...

Страница 713: ...bly Return the upper cover of the fixing assembly back to position 5 Check whether paper is jammed in the output area on the side of the main unit s right cover If paper is jammed gently pull it out i...

Страница 714: ...arrow Return the duplex unit back into position If paper is jammed in the lower area of the duplexing unit gently pull it out in the direction of the arrow 7 Check whether paper is jammed around the p...

Страница 715: ...ntly close the right cover of the main unit until they click Continue following the instructions on the screen to proceed with the interrupted operation or continue clearing paper jams Troubleshooting...

Страница 716: ...ional equipment are closed Clearing Paper Jams in Paper Drawer 1 1 Check whether paper is jammed in the paper drawer 1 Open the paper drawer If paper is jammed gently pull it out in the direction of t...

Страница 717: ...jammed in the paper drawer Open the paper drawer If paper is jammed gently pull it out in the direction of the arrow Push the paper drawer in until it clicks When closing the paper drawer be careful n...

Страница 718: ...t cover of the paper drawer If paper is jammed gently pull it out in the direction of the arrow Gently close the upper right cover and lower right cover of the paper drawer until they click 2 Check wh...

Страница 719: ...wer be careful not to get your fingers caught as this may result in personal injury Continue following the instructions on the screen to proceed with the interrupted operation or continue clearing pap...

Страница 720: ...the screen and follow the procedure in the reference indicated below to remove the paper Paper Jams in the Inner Finisher P 712 Confirm before handling Remove any paper loaded in a tray Before startin...

Страница 721: ...n of the arrow When you are using the Staple mode do not remove the current stack of printouts from the output tray before it is stapled After the paper jam clearing operation is finished the followin...

Страница 722: ...jammed gently pull it out in the direction of the arrow Return the guide to its original position 5 Gently close the right cover of the main unit until they click Continue following the instructions...

Страница 723: ...le For information on cautions when clearing staple jams see Important Safety Instructions in Getting Started Staple Jams in the Inner Finisher P 715 Copies and prints may be output to optional equipm...

Страница 724: ...t remove the current stack of printouts from the output tray before it is stapled After the paper jam clearing operation is finished the following printouts will add to the current stack 2 Open the fr...

Страница 725: ...p the knob on the staple cartridge Remove all jammed staples and exposed staples Return the knob on the staple cartridge to its original position 5 Hold the green handle on the staple cartridge and pu...

Страница 726: ...6 Close the front cover of the finisher The finisher may automatically perform dry stapling to perform staple repositioning Troubleshooting 717...

Страница 727: ...r Finisher K 747 Inner 2way Tray J 749 Copy Tray J 750 Copy Card Reader 751 Super G3 FAX Board 752 Send Function 753 Printer Functions 755 Management Functions 757 System Environment 759 Network Envir...

Страница 728: ...Using User s Guide 788 Screen Layout of User s Guide 789 Viewing User s Guide 792 Basic Windows Operations 794 Notice 802 Appendix 719...

Страница 729: ...following section s when you want to check what options are available to use this machine more conveniently and more effectively Options P 762 Referencing the Manual of This Machine See the first of t...

Страница 730: ...Third Party Software P 722 Feature Highlights P 723 Basic Windows Operations P 794 Notice P 802 Appendix 721...

Страница 731: ...Third Party Software 6C6U 0CF For information related to third party software click the following icon s Appendix 722...

Страница 732: ...leveraging the features of the machine by category You can make use of the features according to your intended purposes and operating environment Going Green and Saving Money P 724 Improving Efficienc...

Страница 733: ...on one sheet of paper You can print up to 32 pages on a single sheet which is both economical and environmentally friendly Basic Copy Operations P 199 Printing from a Computer P 268 Receive Forward P...

Страница 734: ...to action Entering Sleep Mode P 183 Assume you need paper to fax Those old paper printouts you always make are a thing of the past Send documents by fax just as they are created on your computer It s...

Страница 735: ...a on your computer and feel secure knowing that your important contact information is backed up Registering Destinations P 186 Registering Destinations from Remote UI P 448 Basic Operations for Sendin...

Страница 736: ...having to go over to the machine Configure settings and keep an eye on the machine s status with an intuitive easy to understand Web browser interface that you ll master immediately Save your time and...

Страница 737: ...send a fax than mess around with a computer this feature is for you Basic Operations for Scanning Originals P 294 Say you ve got a paper copy of a report for a company wide meeting Scan it convert it...

Страница 738: ...wise reproduced you should consult in advance with your legal advisor for guidance Searching of text in a PDF can be done with a searchable PDF By scanning an original with both text and images text p...

Страница 739: ...st use of Application Library for time reduction and operational accuracy enhancement For more information see the manual on Application Library on the online manual website At times such as when you...

Страница 740: ...Printing a Document Secured by a PIN Secure Print P 275 Go Wireless Get Faxes Wherever You Go No cables easy installation simple maintenance If you ve got a WPS wireless LAN router bypass the settings...

Страница 741: ...fications of Optional Equipment Cassette Feeding Unit AP P 745 Media Adjustment kit A P 746 Inner Finisher K P 747 Inner 2way Tray J P 749 Copy Tray J P 750 Copy Card Reader P 751 Functional Specifica...

Страница 742: ...iginal Sheet book and three dimensional objects Automatically Detectable Sizes of Original A3 A4 A4R A5 A5R B4 B5 B5R B6 Copy Size Copy Paper Paper Sizes Available Paper P 738 Margin Top 4 0 mm Left 2...

Страница 743: ...tions or use conditions Dimensions W x D x H 565 mm x 664 mm x 880 mm 565 mm x 635 mm x 777 mm when the Platen Cover Y is attached Weight Toner bottle is not included Approximately 67 3 kg Approximate...

Страница 744: ...printing is measured during continuous copying The speed vary depending on the output resolution and the paper type and size The speed on smaller paper sizes may be slower Plus the machine may experie...

Страница 745: ...R The combinations of document sizes that you can copy scan 4 Documents with the same width A3 and A4 A4R and A5 Original Tray Capacity 100 sheets 80 g m 75 g m 64 g m 10 mm or less in height 10 sheet...

Страница 746: ...supported when scanning a single original 3 Originals longer than 431 8 mm are supported when scanning a single original 4 Copying scanning with a combination other than described above may cause dama...

Страница 747: ...h options attached see the specifications of respective options Supported Paper Sizes Paper Sizes Paper Source Standard Paper Source Optional Paper Drawer 1 Paper Drawer 2 Multi Purpose Tray Cassette...

Страница 748: ...he Inner Finisher K and not with the 3 Way Unit D it does not support paper types Heavy 7 1 Sided Coated 5 and 2 Sided Coated 5 and the job will be canceled 2 You cannot use paper types Heavy 7 1 Side...

Страница 749: ...Appendix 740...

Страница 750: ...ine is referred to as the vertical side while the side parallel to the front of the machine is referred to as the horizontal side In the User s Guide loading paper with the longer side perpendicular t...

Страница 751: ...ource Optional Paper Drawer 1 Paper Drawer 2 Multi Purpose Tray Cassette Feeding Unit AP Thin 2 52 to 59 g m2 Thin 1 60 to 63 g m2 Plain 1 64 to 75 g m2 Plain 2 76 to 90 g m2 Plain 3 91 to 105 g m2 He...

Страница 752: ...256 g m2 1 Sided Coated 5 1 6 257 to 300 g m2 2 7 2 Sided Coated 1 6 106 to 128 g m2 2 Sided Coated 2 6 129 to 163 g m2 2 Sided Coated 3 6 164 to 220 g m2 2 Sided Coated 4 6 221 to 256 g m2 2 Sided Co...

Страница 753: ...A5R 11 x 17 LGL LTR LTRR STMTR EXEC 8K 16KR 16K and Custom Size 139 7 mm x 182 mm to 304 8 mm x 457 2 mm Paper type Thin 1 to Thin 2 Plain 1 to Plain 3 Heavy 1 to Heavy 5 Color Recycled 1 to Recycled...

Страница 754: ...ailable Paper P 738 Paper Weight Available Paper P 738 Paper Drawers Capacity 550 sheets 80 g m 75 g m 640 sheets 64 g m x 2 Dimensions W x D x H 565 mm x 615 mm x 248 mm Weight Approximately 16 0 kg...

Страница 755: ...0E0 Paper Sizes Max 320 0 mm x 457 2 mm Min 210 0 mm x 139 7 mm Paper Weight 60 g m to 300 g m Paper Type Thin 1 Plain Heavy Recycled 1 Sided Coated 2 Sided Coated Color Pre punched Labels and Bond Ca...

Страница 756: ...A4 B5 A5 A5R LTR STMT STMTR EXEC and 16K 500 sheets or 52 mm in height 320 mm x 450 mm SRA3 305 mm x 457 mm A3 B4 A4R B5R 8K 11 x 17 LGL LTRR and 16KR 250 sheets or 26 mm in height No Collating Collat...

Страница 757: ...g the Main Unit W x D 1 026 mm x 1 117 mm When the auxiliary tray is extended and the paper drawers and the multi purpose tray are opened 1 Excluding Thin 2 two sided printed Heavy 7 with width of 216...

Страница 758: ...n Unit Supported Paper Sizes P 738 Paper Weight 52 g m to 300 g m Paper Type Paper available for the Main Unit Supported Paper Types P 742 Capacity 100 sheets 80 g m 75 g m 64 g m Dimensions W x D x H...

Страница 759: ...eavy 1 to 5 and Bond Capacity LTR STMTR A4 B5 B5R A5R and 16K 100 sheets 80 g m 64 g m 11 x 17 LGL LTRR EXEC A3 B4 A4R 8K and 16KR 75 sheets 80 g m 64 g m Dimensions W x D x H 269 mm x 373 mm x 97 mm...

Страница 760: ...d Readout Method Magnetic readout Magnetic Card Reading Direction Face up Store Replay Replay Dimensions W x D x H 88 mm x 96 mm x 40 mm excluding the attachment kit and cable Weight Approximately 200...

Страница 761: ...B5 3 B5R 4 A5 4 A5R 4 11 x 17 LGL LTR LTRR and STMTR Receiving Paper Sizes A3 B4 A4 A4R B5 B5R A5R 11 x 17 LGL LTR LTRR STMTR 8K and 16K No of Memory RX Jobs Up to 90 jobs Transmission Times JBIG App...

Страница 762: ...SMTP Output Format TIFF JPEG 1 PDF Compact Searchable PDF Encrypted Digital Signature 1 Single Page only Pull Scan Max Original Scanning Size Depends on copy specifications Color Mode Color Black and...

Страница 763: ...Server 2013 Microsoft Exchange Server 2016 Microsoft Exchange Server 2019 Lotus Domino R7 0 Sendmail 8 14 4 Receiving Microsoft Exchange Server 2010 Microsoft Exchange Server 2013 Microsoft Exchange S...

Страница 764: ...er 2016 Server 2019 Mac OS X 10 10 and later Resident Fonts None Interface USB2 0 High Speed Wired LAN Wireless LAN PCL Printer Function Type Internal Print Size Depends on copy specifications Print S...

Страница 765: ...ing Resolution 1 200 dpi x 1 200 dpi 600 dpi x 600 dpi Page Description Language PDL Adobe PostScript 3 Protocol Supported TCP IP LPD Port9100 WSD Compatible OS Driver Windows 7 8 1 10 Server 2008 Ser...

Страница 766: ...SHA 256 SHA 384 1 SHA 512 1 MD2 3 MD5 3 RSA public key algorithm key length RSA 512 bits 3 1024 bits 2048 bits 4096 bits 3 DSA signature algorithm SHA 1 DSA public key algorithm key length DSA 1024 b...

Страница 767: ...h is used for signing a root certificate can be used Log Management The following types of logs can be managed on the machine Collected logs can be exported in the CSV file format Log Type Number Indi...

Страница 768: ...Server 2010 Microsoft Exchange Server 2013 Microsoft Exchange Server 2016 Microsoft Exchange Server 2019 Lotus Domino R7 0 Qpopper 4 0 19 File servers available as destinations for file transmission...

Страница 769: ...Server 2016 with Active Directory Windows Server 2019 with Active Directory System requirements for the User s Guide Windows Internet Explorer 9 and later Microsoft Edge Firefox Firefox ESR Chrome 2...

Страница 770: ...802 11n Transmission Scheme IEEE 802 11b Modulation system DS SS IEEE 802 11g Modulation system OFDM method IEEE 802 11n Modulation system OFDM method Frequency Range 2 412 to 2 472 GHz Maximum Radio...

Страница 771: ...add paper drawers Cassette Feeding Unit AP P 767 To use functions such as offset and stapling Inner Finisher K P 769 To add an output tray Inner 2way Tray J P 780 Copy Tray J P 781 To install a cover...

Страница 772: ...not place your fingers or hands on the finisher when the finisher is in use Doing so may result in personal injury or damage to the finisher Do not place anything other than output paper in the trays...

Страница 773: ...fset and stapling Corner Double with this option In addition you can manually bind with the stapler or bind without the stapler Inner Finisher K P 769 Cassette Feeding Unit AP Load the type of paper t...

Страница 774: ...u can implement Department ID Management using the card reader Copy Card Reader P 785 Copy Tray J This option enables paper to be output to two locations Copy Tray J P 781 Utility Tray B This option p...

Страница 775: ...For information on the combination of options that can be installed on the machine contact your local authorized Canon dealer Appendix 766...

Страница 776: ...or switching paper Paper drawer Load Paper Loading Paper in the Paper Drawer P 138 Lower right cover Open this cover when clearing a paper jam inside the machine Paper Jams in a Paper Source P 707 Whe...

Страница 777: ...Media Adjustment kit A 6C6U 0EH This kit enables you to load heavy coated paper 300 g m2 in the multi purpose tray For information on available paper sizes see Available Paper P 738 Appendix 768...

Страница 778: ...ts are crimped and bound without using a staple You can easily split the paper by pressing the crimped part with your fingers This function is useful for saving staples and also binding printouts brie...

Страница 779: ...mmed paper clear a staple jam in the stapler unit or replace the staple cartridge Selecting the Staple Position To finish with the stapler you need to select the staple position paying attention to th...

Страница 780: ...it orientation When Placing A4 A5 size Originals Feeder Platen glass select Top Left When Placing A3 size Originals Feeder Platen glass select Bottom Left Stapling at the top right of paper in portrai...

Страница 781: ...g A3 size Originals Feeder Platen glass select Top Right Stapling at the top left of paper in landscape orientation When Placing A4 A5 size Originals Feeder Platen glass select Top Right When Placing...

Страница 782: ...g figures to select the staple position Stapling in the top margin area of paper in portrait orientation When Placing A3 size Originals Feeder Platen glass select Left Stapling in the left margin area...

Страница 783: ...ing A4 A5 size Originals Feeder Platen glass select Right Stapling at the left margin area of paper in landscape orientation When Placing A3 size Originals Feeder Platen glass select Left Stapling in...

Страница 784: ...position when crimping the paper without using staples Stapling at the top right of paper in portrait orientation When Placing A4 A5 size Originals Feeder Platen glass select Top Right When Placing A...

Страница 785: ...t Top Left When Placing A3 size Originals Feeder Platen glass select Bottom Left Stapling at the top right of paper in landscape orientation When Placing A4 A5 size Originals Feeder Platen glass selec...

Страница 786: ...ize Originals Feeder Platen glass select Top Left Manual Stapling 1 Place the desired bundle of paper into the slit in the inner finisher Insert the corner of the paper bundle where you want it staple...

Страница 787: ...output paper to the upper tray with Inner Finisher K installed requires 3 Way Unit D For information on the paper sizes that can be used for Staple see Inner Finisher K P 747 To replace the staple ca...

Страница 788: ...job has been completed If the Load staples into the stapler unit message appears almost all of the staples have been used To proceed replace the staple cartridge Output temporarily stops when the tra...

Страница 789: ...you wan to use separate output trays for different functions such as copying printing and faxing Inner Tray Paper is output to the output tray To install Inner 2way Tray J requires 3 Way Unit D TIPS I...

Страница 790: ...r different functions such as Copy Print and Fax Output Tray The prints are output to this tray Auxiliary tray Pull out the auxiliary tray if you are printing on large size paper To install Copy Tray...

Страница 791: ...eder install the Platen Cover Y The cover enables originals placed on the platen glass to be held in place For more information contact your local authorized Canon dealer Platen cover Place the origin...

Страница 792: ...ADF Access Handle A 6C6U 0ES This option helps you to close the feeder ADF access handle Hook the edge of the handle to the tip of the feeder to gently close it Appendix 783...

Страница 793: ...uper G3 FAX Board enables you to send and receive faxes You can also send documents that are created in applications directly from your computer via the network The fax driver that enables faxing via...

Страница 794: ...opying or faxing Setting the Department ID Management P 374 Card slot Insert a control card Control card Control cards used with the Copy Card Reader You can manage up to 1 000 Department IDs Insertin...

Страница 795: ...onfirm that the screen to set a control card is displayed If the Home screen does not appear when the control card is inserted check if the control card is inserted in the correct direction and that t...

Страница 796: ...anual first This manual describes basic operations in an easy to understand manner User s Guide This Manual This manual describes all the functions of the machine in a manual that is viewed using a We...

Страница 797: ...the User s Guide Viewing User s Guide P 792 Specifying How the Appearance of the User s Guide Looks You can change the character size used in the User s Guide and switch the screen layout to fit to t...

Страница 798: ...table of contents is displayed each click on switches between hiding and showing the display When the search display is shown each click on switches between hiding and showing the display Click to se...

Страница 799: ...chapter topic you are currently viewing Click to jump to the corresponding page To return to the previous page click Back on your Web browser When you click the icon the current page may go dark and...

Страница 800: ...click to display the search results You can search for pages containing all the keywords by separating the keywords by a space blank Also you can only search for pages containing an exact phrase by e...

Страница 801: ...the machine or property Indicates a clarification of an operation or contains additional explanations for a procedure Indicates useful functions or tips for using the machine Keys and Buttons Used in...

Страница 802: ...Appendix 793...

Страница 803: ...s and printers Windows 8 1 Server 2012 R2 Right click Start select Control Panel View devices and printers Windows 10 select Windows System Control Panel Hardware and Sound Devices and Printers Window...

Страница 804: ...lect Control Panel View network status and tasks Change advanced sharing settings select Turn on network discovery under Network discovery Displaying Shared Printers in the Print Server 1 Open Windows...

Страница 805: ...n Windows 1 Load A4 size paper in the multi purpose tray Loading Paper in the Multi Purpose Tray P 141 2 Open the printer folder Displaying the Printer Folder P 794 3 Right click the printer driver ic...

Страница 806: ...een select Control Panel Windows 8 1 Server 2012 R2 Right click Start select Control Panel Windows 10 Server 2016 Proceed to step 2 2 Display System Windows Vista 7 8 Server 2008 R2 Server 2012 Click...

Страница 807: ...ontrol Panel Windows 8 1 Server 2012 R2 Right click Start select Control Panel Windows 10 select Windows System Control Panel Server 2016 Right click select Control Panel 2 Display System Windows Vist...

Страница 808: ...pen the printer folder Displaying the Printer Folder P 794 2 Right click the printer driver icon for this machine and click Printer properties or Properties 3 In the Ports tab check that the port is s...

Страница 809: ...ined You do not need to add a new port If it is Standard TCP IP Port you need to add a new port Configuring Printer Ports P 43 Checking Bidirectional Communication 1 Open the printer folder Displaying...

Страница 810: ...2 R2 Display the charms on the right side of the screen Tap or click Devices Print The driver that you use Print Windows 10 Tap or click Print on the application The driver that you use Print If you p...

Страница 811: ...tive 2006 66 EC and or national legislation implementing those Directives If a chemical symbol is printed beneath the symbol shown above in accordance with the Battery Directive this indicates that a...

Страница 812: ...n and Canon strongly recommends that you do not disable this function You should continue to use the duplex function to reduce the environmental impact of your work with this product at all times Disc...

Страница 813: ...a PostScript printing device PostScript display device or similar item refers to a printing device display device or item respectively that contains PostScript technology created or licensed by Adobe...

Страница 814: ...ice or item respectively that contains PostScript technology created or licensed by Adobe Systems Incorporated and not to devices or items that purport to be merely compatible with the PostScript lang...

Страница 815: ...to remain under this license does not apply to any document created using the fonts or their derivatives DEFINITIONS Font Software refers to the set of files released by the Copyright Holder s under t...

Страница 816: ...sion except to acknowledge the contribution s of the Copyright Holder s and the Author s or with their explicit written permission 5 The Font Software modified or unmodified in part or in whole must b...

Отзывы: